Ingredients
For the Dark Chocolate Oreo Crust:
- Chocolate Sandwich Cookies (Oreos): 28 cookies (about 300g or one standard package)
- Unsalted Butter: 6 tablespoons (85g), melted
For the Creamy No-Bake Cheesecake Filling:
- Full-Fat Block Cream Cheese: 16 ounces (452g), softened to room temperature
- Powdered Sugar (Icing Sugar): 1 cup (120g), sifted
- Heavy Whipping Cream: 1 cup (240ml), chilled
- Pure Vanilla Extract: 2 teaspoons
- Fresh Lemon Juice: 1 tablespoon (for a subtle tang to cut the richness)
- Pinch of Salt: 1/8 teaspoon
For the Intricate Chocolate Spider Web:
- Semi-Sweet or Dark Chocolate Chips/Bar: 3 ounces (85g), finely chopped
- Coconut Oil or Unsalted Butter: 1 teaspoon (this helps the chocolate flow smoothly)
Instructions
Part 1: Crafting the Perfect Oreo Crust
The foundation of our tart is a crisp, no-bake crust that provides the perfect dark canvas for our spooky creation.
- Prepare the Pan: Select a 9-inch or 10-inch round tart pan with a removable bottom. This type of pan is essential for a clean, professional presentation. Lightly grease the bottom and sides to ensure the tart releases easily later.
- Create the Crumbs: Place the 28 Oreo cookies (no need to remove the filling) into the bowl of a food processor. Pulse them until they are broken down into fine, consistent crumbs, resembling dark, damp sand. If you don’t have a food processor, place the cookies in a large, sealed zip-top bag and crush them with a rolling pin. This method requires a bit more effort but is just as effective.
- Combine with Butter: Transfer the fine cookie crumbs to a medium-sized mixing bowl. Pour the 6 tablespoons of melted unsalted butter over the crumbs. Using a fork or a spatula, mix thoroughly until all the crumbs are evenly moistened. The mixture should clump together when you press it between your fingers.
- Press and Form the Crust: Tip the buttery crumb mixture into your prepared tart pan. Start by evenly distributing the crumbs over the bottom of the pan. Then, using the flat bottom of a measuring cup or your fingers, firmly press the crumbs into a compact layer across the base. Next, work the crumbs up the fluted sides of the pan, pressing firmly to create a sturdy wall. Ensure the thickness is as even as possible on both the bottom and the sides.
- Chill the Crust: Place the tart pan in the freezer for at least 30 minutes or in the refrigerator for 1 hour. This step is crucial. Chilling solidifies the butter, creating a firm, stable crust that won’t crumble when you add the filling. Do not skip this step.
Part 2: Mixing the Velvety Cheesecake Filling
The heart of this tart is its light, airy, and tangy cheesecake filling. The secret to its texture is using room temperature cream cheese and properly whipped cream.
- Beat the Cream Cheese: In the bowl of a stand mixer fitted with the paddle attachment, or in a large bowl using a hand mixer, place the 16 ounces of softened cream cheese. Beat on medium speed for 2-3 minutes until it is completely smooth, creamy, and free of any lumps. Scrape down the sides and bottom of the bowl frequently to ensure everything is incorporated. Starting with properly softened cream cheese is the most important step for a lump-free filling.
- Add Sugar and Flavorings: With the mixer on low speed, gradually add the 1 cup of sifted powdered sugar. Once it’s mostly incorporated, increase the speed to medium and beat for another 2 minutes until the mixture is light and smooth. Add the 2 teaspoons of vanilla extract, 1 tablespoon of lemon juice, and the pinch of salt. Mix until just combined. The lemon juice won’t make the filling taste lemony; it simply brightens the flavors and balances the sweetness.
- Whip the Heavy Cream: In a separate, chilled mixing bowl, pour in the 1 cup of cold heavy whipping cream. Using a hand mixer or a stand mixer with the whisk attachment, whip the cream on medium-high speed. It will go from liquid to frothy, then to soft peaks. Continue whipping until stiff peaks form. Stiff peaks mean that when you lift the beaters out of the cream, the peak that forms holds its shape and doesn’t flop over. Be careful not to over-whip, or you’ll begin to make butter.
- Fold and Combine: Gently add about one-third of the whipped cream to the cream cheese mixture. Using a rubber spatula, fold it in to lighten the base. Then, add the remaining whipped cream and continue to fold gently until no white streaks remain. The folding motion (scraping down the side of the bowl and bringing the spatula up through the middle) incorporates the cream without deflating the air you just whipped into it. This is what gives the filling its light, mousse-like texture.
Part 3: Assembly and Creating the Spider Web
This is the final, artistic step where your spooky masterpiece comes to life. Work with confidence!
- Fill the Crust: Retrieve your chilled Oreo crust from the freezer or refrigerator. Scrape the prepared cheesecake filling into the crust, spreading it into an even, smooth layer with an offset spatula or the back of a spoon. Work from the center outwards to ensure the filling reaches all the edges of the fluted crust.
- Melt the Chocolate: Place the 3 ounces of chopped chocolate and 1 teaspoon of coconut oil or butter into a small, microwave-safe bowl. Microwave in 15-second intervals, stirring well after each one, until the chocolate is about 90% melted. Remove from the microwave and continue stirring until the residual heat melts the remaining pieces, resulting in a smooth, glossy, and pourable chocolate ganache. This gentle melting process prevents the chocolate from seizing or burning.
- Prepare for Piping: Transfer the melted chocolate into a small piping bag with a tiny round tip, or into a small zip-top bag. If using a zip-top bag, simply snip a very small corner off to create a makeshift piping bag.
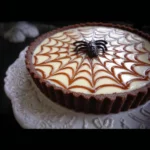
- Pipe the Web’s “Spokes”: Starting from the center of the tart, pipe a spiral of chocolate outwards, leaving about a half-inch of space between each circle, until you reach the edge of the tart. You should have a target-like pattern. Don’t worry if the circles aren’t perfectly round; the next step will hide any imperfections.
- Create the Web Effect: Take a toothpick, skewer, or the tip of a sharp knife. Starting from the very center of the tart, gently drag the toothpick in a straight line out to the edge of the crust. This will pull the chocolate with it, creating the first line of the web. Wipe the toothpick clean. Turn the tart about an inch and drag another line from the center outwards. Repeat this process 8-10 times, wiping the toothpick clean each time, creating lines all around the tart like spokes on a wheel.
- Finalize the Web: For a more intricate design, you can now drag the toothpick in the opposite direction. Between each of your existing lines, drag the toothpick from the outer edge of the tart inward toward the center. This creates a more realistic, draped web effect.
- The Final Chill: Carefully place the finished tart in the refrigerator. Let it chill, uncovered, for a minimum of 6 hours, but preferably overnight. This extended chilling time is absolutely essential. It allows the no-bake filling to set and firm up completely, ensuring clean slices and the best possible flavor and texture.
Nutrition
- Serving Size: One Normal Portion
- Calories: 380-420