


Of all the treats that grace my table during the spooky season, this Spider Web Cheesecake Tart holds a special, almost hallowed place. I first made it for a Halloween party a few years back, expecting it to be just another dessert on a crowded table. I was wrong. The moment I set it down, a hush fell over the room. My kids, usually bouncing off the walls with sugary excitement, simply stared. My friends, who are used to my baking experiments, looked genuinely impressed. It wasn’t just a dessert; it was a centerpiece, a conversation starter. The real magic, however, happened with the first bite. The crisp, dark chocolate of the Oreo crust gives way to a tangy, impossibly creamy cheesecake filling that’s rich without being heavy. The delicate chocolate web on top isn’t just for show; it adds a perfect snap of bittersweet chocolate to every mouthful. Since that first party, it has become a non-negotiable tradition. My family now asks for the “fancy spiderweb cake” starting in early October. It’s the one recipe that manages to be both elegantly spooky and universally delicious, delighting the adventurous palates of the adults and the sweet-toothed demands of the children. It looks like it took hours of painstaking work in a professional patisserie, but the secret is that it’s surprisingly straightforward, relying on simple techniques and the magic of chilling time to create something truly spectacular. This is more than just a recipe; it’s an opportunity to create a memory, a delicious tradition that will have your own family and friends asking for it year after year.
A Hauntingly Delicious Spider Web Cheesecake Tart
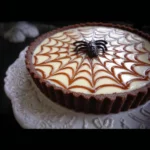
This recipe guides you through creating a stunning, no-bake cheesecake tart with a rich Oreo crust and a dramatic chocolate spider web topping. It’s the perfect showstopper for any Halloween gathering or spooky-themed event. The velvety smooth filling contrasts beautifully with the crunchy, buttery crust, making every bite a delight.
Ingredients You’ll Need
To ensure your tart is a resounding success, we’ve broken down the ingredients into three key components: the crust, the filling, and the iconic web decoration. Using high-quality ingredients, especially full-fat cream cheese and real vanilla, will make a significant difference in the final taste and texture.
For the Dark Chocolate Oreo Crust:
- Chocolate Sandwich Cookies (Oreos): 28 cookies (about 300g or one standard package)
- Unsalted Butter: 6 tablespoons (85g), melted
For the Creamy No-Bake Cheesecake Filling:
- Full-Fat Block Cream Cheese: 16 ounces (452g), softened to room temperature
- Powdered Sugar (Icing Sugar): 1 cup (120g), sifted
- Heavy Whipping Cream: 1 cup (240ml), chilled
- Pure Vanilla Extract: 2 teaspoons
- Fresh Lemon Juice: 1 tablespoon (for a subtle tang to cut the richness)
- Pinch of Salt: 1/8 teaspoon
For the Intricate Chocolate Spider Web:
- Semi-Sweet or Dark Chocolate Chips/Bar: 3 ounces (85g), finely chopped
- Coconut Oil or Unsalted Butter: 1 teaspoon (this helps the chocolate flow smoothly)
Step-by-Step Instructions for a Flawless Tart
Follow these detailed instructions carefully. The key to this recipe isn’t complex technique but rather patience, particularly with allowing the components to chill and set properly.
Part 1: Crafting the Perfect Oreo Crust
The foundation of our tart is a crisp, no-bake crust that provides the perfect dark canvas for our spooky creation.
- Prepare the Pan: Select a 9-inch or 10-inch round tart pan with a removable bottom. This type of pan is essential for a clean, professional presentation. Lightly grease the bottom and sides to ensure the tart releases easily later.
- Create the Crumbs: Place the 28 Oreo cookies (no need to remove the filling) into the bowl of a food processor. Pulse them until they are broken down into fine, consistent crumbs, resembling dark, damp sand. If you don’t have a food processor, place the cookies in a large, sealed zip-top bag and crush them with a rolling pin. This method requires a bit more effort but is just as effective.
- Combine with Butter: Transfer the fine cookie crumbs to a medium-sized mixing bowl. Pour the 6 tablespoons of melted unsalted butter over the crumbs. Using a fork or a spatula, mix thoroughly until all the crumbs are evenly moistened. The mixture should clump together when you press it between your fingers.
- Press and Form the Crust: Tip the buttery crumb mixture into your prepared tart pan. Start by evenly distributing the crumbs over the bottom of the pan. Then, using the flat bottom of a measuring cup or your fingers, firmly press the crumbs into a compact layer across the base. Next, work the crumbs up the fluted sides of the pan, pressing firmly to create a sturdy wall. Ensure the thickness is as even as possible on both the bottom and the sides.
- Chill the Crust: Place the tart pan in the freezer for at least 30 minutes or in the refrigerator for 1 hour. This step is crucial. Chilling solidifies the butter, creating a firm, stable crust that won’t crumble when you add the filling. Do not skip this step.
Part 2: Mixing the Velvety Cheesecake Filling
The heart of this tart is its light, airy, and tangy cheesecake filling. The secret to its texture is using room temperature cream cheese and properly whipped cream.
- Beat the Cream Cheese: In the bowl of a stand mixer fitted with the paddle attachment, or in a large bowl using a hand mixer, place the 16 ounces of softened cream cheese. Beat on medium speed for 2-3 minutes until it is completely smooth, creamy, and free of any lumps. Scrape down the sides and bottom of the bowl frequently to ensure everything is incorporated. Starting with properly softened cream cheese is the most important step for a lump-free filling.
- Add Sugar and Flavorings: With the mixer on low speed, gradually add the 1 cup of sifted powdered sugar. Once it’s mostly incorporated, increase the speed to medium and beat for another 2 minutes until the mixture is light and smooth. Add the 2 teaspoons of vanilla extract, 1 tablespoon of lemon juice, and the pinch of salt. Mix until just combined. The lemon juice won’t make the filling taste lemony; it simply brightens the flavors and balances the sweetness.
- Whip the Heavy Cream: In a separate, chilled mixing bowl, pour in the 1 cup of cold heavy whipping cream. Using a hand mixer or a stand mixer with the whisk attachment, whip the cream on medium-high speed. It will go from liquid to frothy, then to soft peaks. Continue whipping until stiff peaks form. Stiff peaks mean that when you lift the beaters out of the cream, the peak that forms holds its shape and doesn’t flop over. Be careful not to over-whip, or you’ll begin to make butter.
- Fold and Combine: Gently add about one-third of the whipped cream to the cream cheese mixture. Using a rubber spatula, fold it in to lighten the base. Then, add the remaining whipped cream and continue to fold gently until no white streaks remain. The folding motion (scraping down the side of the bowl and bringing the spatula up through the middle) incorporates the cream without deflating the air you just whipped into it. This is what gives the filling its light, mousse-like texture.
Part 3: Assembly and Creating the Spider Web
This is the final, artistic step where your spooky masterpiece comes to life. Work with confidence!
- Fill the Crust: Retrieve your chilled Oreo crust from the freezer or refrigerator. Scrape the prepared cheesecake filling into the crust, spreading it into an even, smooth layer with an offset spatula or the back of a spoon. Work from the center outwards to ensure the filling reaches all the edges of the fluted crust.
- Melt the Chocolate: Place the 3 ounces of chopped chocolate and 1 teaspoon of coconut oil or butter into a small, microwave-safe bowl. Microwave in 15-second intervals, stirring well after each one, until the chocolate is about 90% melted. Remove from the microwave and continue stirring until the residual heat melts the remaining pieces, resulting in a smooth, glossy, and pourable chocolate ganache. This gentle melting process prevents the chocolate from seizing or burning.
- Prepare for Piping: Transfer the melted chocolate into a small piping bag with a tiny round tip, or into a small zip-top bag. If using a zip-top bag, simply snip a very small corner off to create a makeshift piping bag.
- Pipe the Web’s “Spokes”: Starting from the center of the tart, pipe a spiral of chocolate outwards, leaving about a half-inch of space between each circle, until you reach the edge of the tart. You should have a target-like pattern. Don’t worry if the circles aren’t perfectly round; the next step will hide any imperfections.
- Create the Web Effect: Take a toothpick, skewer, or the tip of a sharp knife. Starting from the very center of the tart, gently drag the toothpick in a straight line out to the edge of the crust. This will pull the chocolate with it, creating the first line of the web. Wipe the toothpick clean. Turn the tart about an inch and drag another line from the center outwards. Repeat this process 8-10 times, wiping the toothpick clean each time, creating lines all around the tart like spokes on a wheel.
- Finalize the Web: For a more intricate design, you can now drag the toothpick in the opposite direction. Between each of your existing lines, drag the toothpick from the outer edge of the tart inward toward the center. This creates a more realistic, draped web effect.
- The Final Chill: Carefully place the finished tart in the refrigerator. Let it chill, uncovered, for a minimum of 6 hours, but preferably overnight. This extended chilling time is absolutely essential. It allows the no-bake filling to set and firm up completely, ensuring clean slices and the best possible flavor and texture.
Nutrition Facts
- Servings: 12 slices
- Calories Per Serving: Approximately 380-420 kcal (This is an estimate and can vary based on specific brands of ingredients used, such as the fat content in the cream cheese and cookies.)
Preparation Time
Understanding the time commitment helps in planning, especially for an event. The beauty of this recipe is that most of the time is hands-off.
- Active Preparation Time: 35-40 minutes (Making the crust, mixing the filling, and creating the web)
- Chilling Time: 6.5 hours minimum (30 minutes for the crust, 6+ hours for the final tart)
- Total Time: Approximately 7 hours 15 minutes
How to Serve Your Spider Web Cheesecake Tart
Presentation elevates this dessert from a simple treat to a showstopping centerpiece. Here are some ideas to make your serving as impressive as the tart itself.
- The Perfect Slice:
- For the cleanest possible slices, use a large, sharp knife.
- Fill a tall glass with hot water. Dip the knife into the hot water, wipe it dry with a paper towel, and then make a cut.
- Repeat the dip-and-wipe process for every single cut. This melts the chocolate and filling just enough to prevent dragging and ensures perfectly defined slices that showcase the layers.
- Plating and Garnishes:
- Spooky Ambiance: Serve the slices on dark or black dessert plates to make the white filling and web pop.
- A Fun Surprise: Place a single, clean plastic spider toy on top of the tart or next to each slice for a fun, spooky touch.
- “Blood” Splatter: For a gorier effect, create a simple raspberry or strawberry coulis by simmering fresh or frozen berries with a little sugar and water. Drizzle or “splatter” it around the plate before placing the slice on top.
- Dusting of Darkness: A light dusting of unsweetened cocoa powder around the edge of the plate can add a professional, moody touch.
- Perfect Drink Pairings:
- For Adults: A rich, dark coffee or a smooth espresso beautifully cuts through the sweetness of the tart. For an after-dinner treat, a glass of dessert wine like a Ruby Port or a coffee liqueur on the rocks is a sublime pairing.
- For Kids: A tall glass of cold milk is the classic and unbeatable companion to this creamy, chocolatey dessert.
Additional Tips for Success
These five tips address common baking pitfalls and will help you achieve a perfect result every time.
- Room Temperature is Non-Negotiable: The single most important tip for a smooth, creamy, lump-free cheesecake filling is to use truly softened cream cheese. It should not feel cool to the touch. Take it out of the refrigerator at least 2-3 hours before you plan to start mixing. If you’re short on time, you can unwrap the foil blocks and place them on a plate on the counter for about an hour. Cold cream cheese will result in a lumpy filling no matter how much you beat it.
- Don’t Deflate the Filling: The lightness of this cheesecake comes from the air incorporated into the whipped cream. When you combine the whipped cream with the cream cheese base, you must use a gentle folding motion with a spatula. Do not use the electric mixer for this step, as it will beat all the air out, resulting in a dense, heavy, and potentially runny filling.
- Customize Your Crust: While Oreos are classic for their dark color and chocolate flavor, don’t be afraid to experiment. For a different flavor profile, you could use:
- Graham Crackers: For a classic cheesecake crust.
- Biscoff Cookies: For a spiced, caramel-like flavor.
- Gingersnaps: For a warm, spicy kick perfect for autumn.
The ratio of crumbs to butter (approximately 2 cups of crumbs to 6 tablespoons of melted butter) remains a good guideline.
- Chocolate Web Troubleshooting: If your chocolate is too thick to pipe, it may have cooled too much or seized. Add another ½ teaspoon of oil and gently warm it again. If it’s too thin and runny, it’s likely too hot. Let it sit at room temperature for 5-10 minutes to cool and thicken slightly before piping. The ideal consistency is like warm honey.
- Embrace the Make-Ahead Nature: This is the ultimate make-ahead party dessert. In fact, it’s better when made the day before. The flavors have time to meld and the filling gets perfectly firm. You can prepare the entire tart, including the web, up to 24 hours in advance. Just keep it covered in the refrigerator until you’re ready to stun your guests.
Frequently Asked Questions (FAQ)
1. My cheesecake filling seems a bit soft and didn’t set properly. What went wrong?
This is the most common issue with no-bake cheesecakes and usually comes down to two things. First, the tart may not have been chilled for long enough. A minimum of 6 hours is required, but overnight is truly best. Second, the heavy cream may not have been whipped to stiff peaks. If the cream is only at the soft peak stage, it doesn’t have enough structure to hold the filling firmly. Ensure your cream is cold and your bowl is chilled before whipping to help achieve maximum volume and stiffness.
2. Can I use a regular pie dish instead of a tart pan with a removable bottom?
You can, but it will be much more difficult to serve. The signature look of a tart is its clean, fluted sides, which you can only get by removing the outer ring of the pan. If you use a standard pie dish, you will have to scoop the slices out, which can be messy and won’t look as neat. If it’s your only option, be sure to chill the tart for even longer (8+ hours) to make it as firm as possible before slicing and scooping.
3. Can I make this a baked cheesecake tart instead of no-bake?
This specific recipe is not designed for baking as it contains no eggs or starch to act as a binder during heating. To convert it to a baked version, you would need a completely different filling recipe, typically one that includes eggs, and it would need to be baked in a water bath to prevent cracking. It’s best to find a recipe specifically developed for a baked cheesecake tart.
4. How should I store leftovers, and how long will they last?
Store any leftover tart in the refrigerator. The best way is to place it in an airtight container or leave it on the tart pan base and cover it tightly with plastic wrap. It will stay fresh and delicious for up to 4 days. The Oreo crust may soften slightly over time, but it will still be wonderful.
5. Can I use low-fat or fat-free cream cheese for this recipe?
It is strongly recommended to use full-fat, block-style cream cheese for this recipe. Low-fat or fat-free versions have a higher water content and contain stabilizers that can prevent the filling from setting up properly, leading to a runny texture. The same applies to cream cheese sold in tubs, which is softer and not suitable for this tart. The fat content is crucial for the rich flavor and firm structure of a no-bake cheesecake.
Spider Web Cheesecake Tart Recipe
Ingredients
For the Dark Chocolate Oreo Crust:
- Chocolate Sandwich Cookies (Oreos): 28 cookies (about 300g or one standard package)
- Unsalted Butter: 6 tablespoons (85g), melted
For the Creamy No-Bake Cheesecake Filling:
- Full-Fat Block Cream Cheese: 16 ounces (452g), softened to room temperature
- Powdered Sugar (Icing Sugar): 1 cup (120g), sifted
- Heavy Whipping Cream: 1 cup (240ml), chilled
- Pure Vanilla Extract: 2 teaspoons
- Fresh Lemon Juice: 1 tablespoon (for a subtle tang to cut the richness)
- Pinch of Salt: 1/8 teaspoon
For the Intricate Chocolate Spider Web:
- Semi-Sweet or Dark Chocolate Chips/Bar: 3 ounces (85g), finely chopped
- Coconut Oil or Unsalted Butter: 1 teaspoon (this helps the chocolate flow smoothly)
Instructions
Part 1: Crafting the Perfect Oreo Crust
The foundation of our tart is a crisp, no-bake crust that provides the perfect dark canvas for our spooky creation.
- Prepare the Pan: Select a 9-inch or 10-inch round tart pan with a removable bottom. This type of pan is essential for a clean, professional presentation. Lightly grease the bottom and sides to ensure the tart releases easily later.
- Create the Crumbs: Place the 28 Oreo cookies (no need to remove the filling) into the bowl of a food processor. Pulse them until they are broken down into fine, consistent crumbs, resembling dark, damp sand. If you don’t have a food processor, place the cookies in a large, sealed zip-top bag and crush them with a rolling pin. This method requires a bit more effort but is just as effective.
- Combine with Butter: Transfer the fine cookie crumbs to a medium-sized mixing bowl. Pour the 6 tablespoons of melted unsalted butter over the crumbs. Using a fork or a spatula, mix thoroughly until all the crumbs are evenly moistened. The mixture should clump together when you press it between your fingers.
- Press and Form the Crust: Tip the buttery crumb mixture into your prepared tart pan. Start by evenly distributing the crumbs over the bottom of the pan. Then, using the flat bottom of a measuring cup or your fingers, firmly press the crumbs into a compact layer across the base. Next, work the crumbs up the fluted sides of the pan, pressing firmly to create a sturdy wall. Ensure the thickness is as even as possible on both the bottom and the sides.
- Chill the Crust: Place the tart pan in the freezer for at least 30 minutes or in the refrigerator for 1 hour. This step is crucial. Chilling solidifies the butter, creating a firm, stable crust that won’t crumble when you add the filling. Do not skip this step.
Part 2: Mixing the Velvety Cheesecake Filling
The heart of this tart is its light, airy, and tangy cheesecake filling. The secret to its texture is using room temperature cream cheese and properly whipped cream.
- Beat the Cream Cheese: In the bowl of a stand mixer fitted with the paddle attachment, or in a large bowl using a hand mixer, place the 16 ounces of softened cream cheese. Beat on medium speed for 2-3 minutes until it is completely smooth, creamy, and free of any lumps. Scrape down the sides and bottom of the bowl frequently to ensure everything is incorporated. Starting with properly softened cream cheese is the most important step for a lump-free filling.
- Add Sugar and Flavorings: With the mixer on low speed, gradually add the 1 cup of sifted powdered sugar. Once it’s mostly incorporated, increase the speed to medium and beat for another 2 minutes until the mixture is light and smooth. Add the 2 teaspoons of vanilla extract, 1 tablespoon of lemon juice, and the pinch of salt. Mix until just combined. The lemon juice won’t make the filling taste lemony; it simply brightens the flavors and balances the sweetness.
- Whip the Heavy Cream: In a separate, chilled mixing bowl, pour in the 1 cup of cold heavy whipping cream. Using a hand mixer or a stand mixer with the whisk attachment, whip the cream on medium-high speed. It will go from liquid to frothy, then to soft peaks. Continue whipping until stiff peaks form. Stiff peaks mean that when you lift the beaters out of the cream, the peak that forms holds its shape and doesn’t flop over. Be careful not to over-whip, or you’ll begin to make butter.
- Fold and Combine: Gently add about one-third of the whipped cream to the cream cheese mixture. Using a rubber spatula, fold it in to lighten the base. Then, add the remaining whipped cream and continue to fold gently until no white streaks remain. The folding motion (scraping down the side of the bowl and bringing the spatula up through the middle) incorporates the cream without deflating the air you just whipped into it. This is what gives the filling its light, mousse-like texture.
Part 3: Assembly and Creating the Spider Web
This is the final, artistic step where your spooky masterpiece comes to life. Work with confidence!
- Fill the Crust: Retrieve your chilled Oreo crust from the freezer or refrigerator. Scrape the prepared cheesecake filling into the crust, spreading it into an even, smooth layer with an offset spatula or the back of a spoon. Work from the center outwards to ensure the filling reaches all the edges of the fluted crust.
- Melt the Chocolate: Place the 3 ounces of chopped chocolate and 1 teaspoon of coconut oil or butter into a small, microwave-safe bowl. Microwave in 15-second intervals, stirring well after each one, until the chocolate is about 90% melted. Remove from the microwave and continue stirring until the residual heat melts the remaining pieces, resulting in a smooth, glossy, and pourable chocolate ganache. This gentle melting process prevents the chocolate from seizing or burning.
- Prepare for Piping: Transfer the melted chocolate into a small piping bag with a tiny round tip, or into a small zip-top bag. If using a zip-top bag, simply snip a very small corner off to create a makeshift piping bag.
- Pipe the Web’s “Spokes”: Starting from the center of the tart, pipe a spiral of chocolate outwards, leaving about a half-inch of space between each circle, until you reach the edge of the tart. You should have a target-like pattern. Don’t worry if the circles aren’t perfectly round; the next step will hide any imperfections.
- Create the Web Effect: Take a toothpick, skewer, or the tip of a sharp knife. Starting from the very center of the tart, gently drag the toothpick in a straight line out to the edge of the crust. This will pull the chocolate with it, creating the first line of the web. Wipe the toothpick clean. Turn the tart about an inch and drag another line from the center outwards. Repeat this process 8-10 times, wiping the toothpick clean each time, creating lines all around the tart like spokes on a wheel.
- Finalize the Web: For a more intricate design, you can now drag the toothpick in the opposite direction. Between each of your existing lines, drag the toothpick from the outer edge of the tart inward toward the center. This creates a more realistic, draped web effect.
- The Final Chill: Carefully place the finished tart in the refrigerator. Let it chill, uncovered, for a minimum of 6 hours, but preferably overnight. This extended chilling time is absolutely essential. It allows the no-bake filling to set and firm up completely, ensuring clean slices and the best possible flavor and texture.
Nutrition
- Serving Size: One Normal Portion
- Calories: 380-420


