Ingredients
Scale
- 8 plain, unsalted (or lightly salted) rice cakes (brown or white)
- 1 cup natural creamy peanut butter (or crunchy, if preferred)
- 1 ½ cups semi-sweet chocolate chips (or dark/milk chocolate, see notes above)
- 2 tablespoons coconut oil
- Optional Toppings:
- Flaky sea salt
- Chopped roasted peanuts
- Sprinkles
- Mini chocolate chips
Instructions
Phase 1: Preparation is Key
- Clear Your Workspace: Make sure you have a clean, flat surface to work on.
- Line a Baking Sheet: Take a baking sheet or a large tray that will fit in your refrigerator or freezer. Line it with parchment paper or wax paper. This is crucial to prevent the rice cakes from sticking as the chocolate sets and makes for super easy cleanup.
- Arrange Rice Cakes: Place the 8 rice cakes in a single layer on the prepared baking sheet, leaving a little space between each one.
Phase 2: The Peanut Butter Layer
- Stir Peanut Butter (if natural): If you’re using natural peanut butter where the oil separates, give it a thorough stir until it’s smooth and well combined.
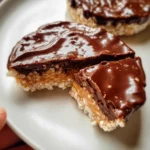
- Spread the Peanut Butter: Using a knife or a small offset spatula, spread approximately 2 tablespoons of peanut butter evenly over the top surface of each rice cake. Aim for a generous, even layer, covering the rice cake from edge to edge. Don’t worry if it’s not perfectly smooth; rustic charm is part of their appeal!
Phase 3: The Chocolate Coating Magic
- Melt the Chocolate:
- Microwave Method (Recommended for ease): Place the chocolate chips and coconut oil in a microwave-safe bowl. Microwave on medium power (or 50%) for 30-second intervals, stirring well after each interval. Continue until the chocolate is almost completely melted. Remove from the microwave and stir until smooth and glossy. Be careful not to overheat or scorch the chocolate, as this will cause it to seize and become unusable.
- Double Boiler Method: If you prefer, or don’t have a microwave, you can use a double boiler. Fill the bottom pot with an inch or two of water and bring it to a gentle simmer. Place the chocolate chips and coconut oil in the top pot (or a heatproof bowl set over the simmering water, ensuring the bottom of the bowl doesn’t touch the water). Stir frequently until the chocolate is completely melted and smooth.
- Coat with Chocolate: Once the chocolate is perfectly melted and glossy, carefully spoon or pour it over the peanut butter layer on each rice cake. Use the back of your spoon or a small spatula to gently spread the chocolate, allowing it to cover the peanut butter completely and even drip down the sides a little if you like that rustic, fully enrobed look. Work relatively quickly as the chocolate will start to set.
- Add Toppings (Optional but Recommended!): If you’re using any toppings like flaky sea salt, chopped peanuts, or sprinkles, sprinkle them over the wet chocolate immediately. This way, they will adhere as the chocolate sets.
Phase 4: Chill and Set
- Refrigerate to Set: Carefully transfer the baking sheet with the prepared rice cakes to the refrigerator. Let them chill for at least 30-60 minutes, or until the chocolate is completely firm and set.
- Freezer (Quicker Option): If you’re in a hurry, you can place them in the freezer for 15-20 minutes. Just keep an eye on them; you want the chocolate set, not the rice cakes frozen solid (unless that’s your preference!).
Phase 5: Serve and Enjoy!
- Ready to Devour: Once the chocolate is firm, your Peanut Butter Cup Rice Cakes are ready to be enjoyed! Gently lift them off the parchment paper.
Nutrition
- Serving Size: One Normal Portion
- Calories: 280-380