


I still remember the first time I whipped up a batch of these Peanut Butter Cup Rice Cakes. It was one of those hectic weekday afternoons, the kids were “starving” (their words, about 30 minutes after lunch), and I was desperate for a snack that was quick, relatively wholesome, and wouldn’t involve turning on the oven in the summer heat. I’d seen variations floating around online, but I wanted something truly decadent yet simple. The combination of crispy rice cakes, creamy peanut butter, and a rich chocolate shell sounded like pure genius. Let me tell you, they were an instant hit! My eldest, usually a picky eater, devoured two before I could even properly plate them. My partner, who claims to “not have a sweet tooth,” was caught sneaking one from the fridge late that night. Since then, these have become a staple in our household – our go-to for a satisfying snack, a quick dessert, or even a fun treat to bring to casual get-togethers. They strike that perfect balance between indulgence and simplicity, and the best part? They look far more impressive than the minimal effort they require.
Why This Peanut Butter Cup Rice Cake Recipe Will Become Your New Obsession
Before we even get to the “how-to,” let’s talk about why these Peanut Butter Cup Rice Cakes are about to rock your snacking world. It’s not just about a tasty treat; it’s about a smarter, more satisfying way to indulge your cravings.
- The Perfect Texture Trio: You get the satisfying crunch from the rice cake, the smooth, luscious creaminess from the peanut butter, and the delightful snap of the hardened chocolate shell. It’s a symphony of textures in every single bite that keeps you coming back for more.
- Effortlessly Easy & Quick: Seriously, if you can melt chocolate and spread peanut butter, you can make these. There’s no baking involved, minimal cleanup, and the active prep time is laughably short. This makes them perfect for busy individuals, parents needing a quick kid-friendly snack, or anyone who wants maximum deliciousness for minimum effort.
- Customizable to Your Heart’s Content: While the classic peanut butter and chocolate combination is a winner, these rice cakes are a blank canvas. We’ll explore variations later, but think different nut butters, various types of chocolate, added spices, or fun toppings. You can truly make them your own.
- Surprisingly Satisfying: Thanks to the protein and healthy fats in peanut butter and the fiber from the rice cakes (especially if you choose whole grain), these aren’t just empty calories. They provide a decent amount of satiety, making them a great option to tide you over between meals or to curb those afternoon sugar cravings in a more balanced way.
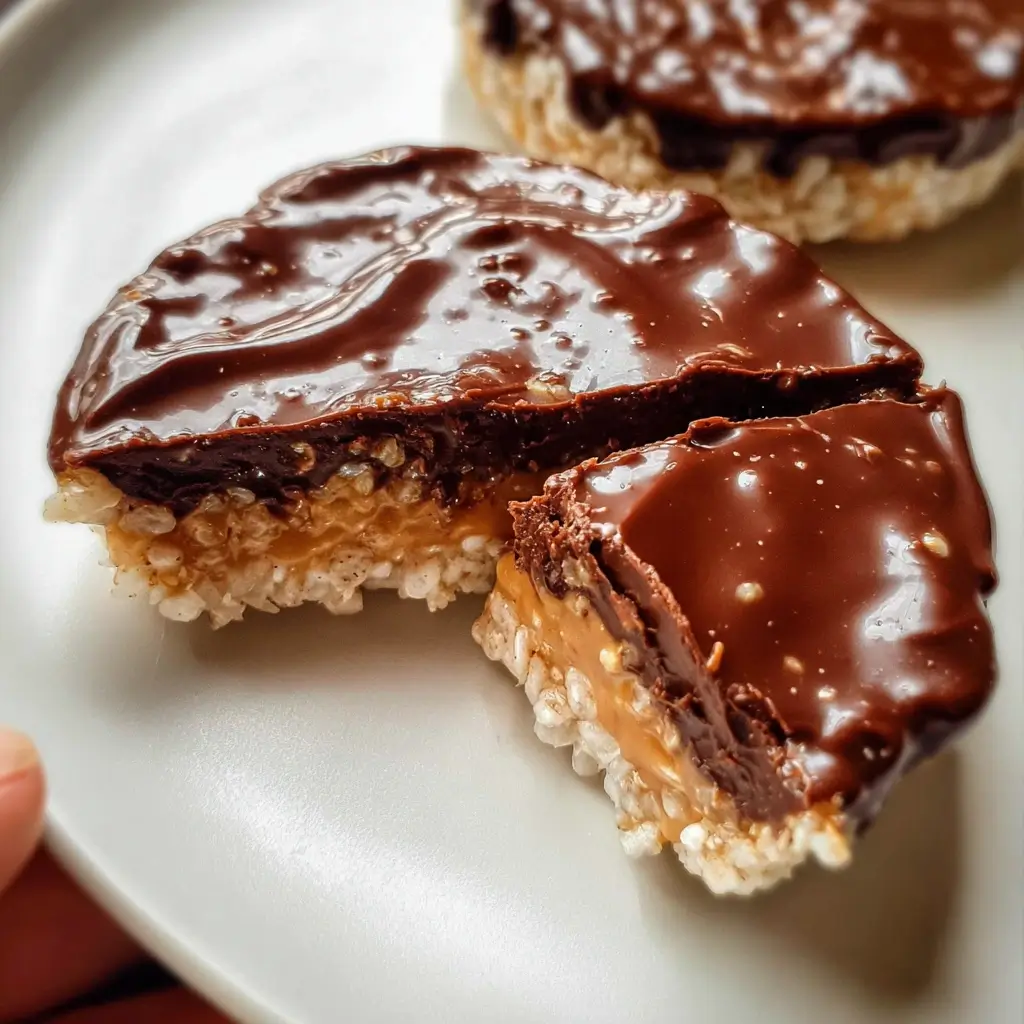
- Visually Appealing: Let’s be honest, they look fantastic! The contrast of the dark chocolate against the rice cake and the potential for decorative toppings make them look like gourmet treats. They’re impressive enough to serve to guests, yet simple enough for an everyday indulgence.
- No-Bake Wonder: Especially during warmer months, the last thing anyone wants is to turn on the oven. These are a completely no-bake dessert, keeping your kitchen cool and your energy bills down.
- Scalable for Any Occasion: Need a single satisfying snack? Make one or two. Hosting a party? Whip up a big batch. The recipe easily scales up or down to suit your needs.
- Relatively Wholesome Indulgence: Compared to many store-bought candy bars or processed snacks, these homemade peanut butter cup rice cakes offer a more controlled ingredient list. You know exactly what’s going into them, and you can opt for natural peanut butter, dark chocolate, and unsalted rice cakes to keep things on the healthier side of delicious.
In essence, these Peanut Butter Cup Rice Cakes deliver on taste, convenience, and satisfaction. They are the culinary equivalent of a warm hug – comforting, delightful, and always welcome.
The Stars of the Show: Deconstructing the Key Ingredients
The beauty of this recipe lies in its simplicity, but the quality of your ingredients will significantly impact the final taste and texture. Let’s break down what you’ll need and why each component plays a crucial role.
The Foundation: Rice Cakes
- What to look for: Plain, unsalted, or lightly salted rice cakes are your best bet. You want a neutral base that allows the peanut butter and chocolate to shine. Thickness matters too; a moderately thick rice cake provides a sturdy base and a satisfying crunch. Brown rice cakes offer a bit more fiber and a nuttier flavor, while white rice cakes are lighter and crispier.
- Why they work: Rice cakes provide that essential airy, crispy texture that contrasts beautifully with the creamy peanut butter and smooth chocolate. They are relatively low in calories and act as the perfect vehicle for the more indulgent toppings.
- Quantity: 8 standard-sized rice cakes
The Creamy Heart: Peanut Butter
- What to look for: This is where personal preference reigns, but I highly recommend a good quality natural peanut butter – the kind where the oil separates and you need to stir it. These typically contain just peanuts and maybe a touch of salt, without added sugars, hydrogenated oils, or emulsifiers. This results in a purer, more intense peanut flavor.
- Creamy vs. Crunchy: Both work wonderfully! Creamy peanut butter will give you a smoother, more classic “cup” experience. Crunchy peanut butter adds an extra textural element with little peanut pieces, which many people love. For the most authentic peanut butter cup vibe, creamy is often preferred.
- Why it works: Peanut butter is the star flavor here. Its rich, nutty, slightly salty profile is the perfect partner for sweet chocolate. It also provides protein and healthy fats, contributing to the snack’s satiety.
- Quantity: 1 cup (approximately 2 tablespoons per rice cake)
The Luscious Coating: Chocolate
- What to look for:
- Type: Semi-sweet chocolate chips or melting wafers are a fantastic all-around choice. They offer a good balance of sweetness and chocolate intensity. Dark chocolate (60-70% cacao) provides a richer, less sweet, and more sophisticated flavor, often with beneficial antioxidants. Milk chocolate will result in a sweeter, creamier coating, reminiscent of classic milk chocolate peanut butter cups. White chocolate can also be used for a different flavor profile and visual appeal.
- Quality: Using good quality chocolate makes a noticeable difference. It will melt more smoothly and have a better flavor.
- Why it works: The chocolate provides the sweet, decadent shell that encases the peanut butter. When it chills and hardens, it gives that satisfying “snap” characteristic of a peanut butter cup.
- Quantity: 1 ½ cups chocolate chips (or chopped chocolate)
The Melting Magic: Coconut Oil (or alternative)
- What to look for: Refined coconut oil will have a neutral flavor, while unrefined (virgin) coconut oil will impart a subtle coconut aroma and taste, which can be quite pleasant with chocolate and peanut butter. If you don’t have or like coconut oil, a teaspoon of vegetable oil or butter can also help the chocolate melt smoothly and create a slightly glossier finish, though coconut oil is preferred for its setting properties.
- Why it works: A small amount of coconut oil helps the chocolate melt more smoothly and evenly. It also helps the chocolate set with a slight sheen and a slightly softer bite when chilled, preventing it from becoming too brittle.
- Quantity: 2 tablespoons
The Optional Flourish: Toppings
- Flaky Sea Salt: A tiny sprinkle of flaky sea salt (like Maldon) on top of the melted chocolate before it sets can elevate these treats immensely. The salt enhances the sweetness of the chocolate and the nuttiness of the peanut butter, creating a more complex and addictive flavor profile.
- Chopped Peanuts: For extra crunch and peanut flavor, a sprinkle of finely chopped roasted peanuts is a fantastic addition.
- Sprinkles: If making these for kids or a festive occasion, a few colorful sprinkles can add a fun touch.
- Mini Chocolate Chips or Peanut Butter Chips: For an extra decadent touch.
- Quantity: To taste (e.g., 1-2 teaspoons flaky sea salt, ¼ cup chopped peanuts)
Complete Recipe: Peanut Butter Cup Rice Cakes
Here’s the full list of what you’ll need to create these irresistible treats.
Yields: 8 rice cakes
Prep time: 15-20 minutes
Chill time: 30-60 minutes
Ingredients:
- 8 plain, unsalted (or lightly salted) rice cakes (brown or white)
- 1 cup natural creamy peanut butter (or crunchy, if preferred)
- 1 ½ cups semi-sweet chocolate chips (or dark/milk chocolate, see notes above)
- 2 tablespoons coconut oil
- Optional Toppings:
- Flaky sea salt
- Chopped roasted peanuts
- Sprinkles
- Mini chocolate chips
Step-by-Step Instructions: Crafting Your Peanut Butter Cup Rice Cakes
Follow these simple steps to peanut butter chocolate perfection!
Phase 1: Preparation is Key
- Clear Your Workspace: Make sure you have a clean, flat surface to work on.
- Line a Baking Sheet: Take a baking sheet or a large tray that will fit in your refrigerator or freezer. Line it with parchment paper or wax paper. This is crucial to prevent the rice cakes from sticking as the chocolate sets and makes for super easy cleanup.
- Arrange Rice Cakes: Place the 8 rice cakes in a single layer on the prepared baking sheet, leaving a little space between each one.
Phase 2: The Peanut Butter Layer
- Stir Peanut Butter (if natural): If you’re using natural peanut butter where the oil separates, give it a thorough stir until it’s smooth and well combined.
- Spread the Peanut Butter: Using a knife or a small offset spatula, spread approximately 2 tablespoons of peanut butter evenly over the top surface of each rice cake. Aim for a generous, even layer, covering the rice cake from edge to edge. Don’t worry if it’s not perfectly smooth; rustic charm is part of their appeal!
Phase 3: The Chocolate Coating Magic
- Melt the Chocolate:
- Microwave Method (Recommended for ease): Place the chocolate chips and coconut oil in a microwave-safe bowl. Microwave on medium power (or 50%) for 30-second intervals, stirring well after each interval. Continue until the chocolate is almost completely melted. Remove from the microwave and stir until smooth and glossy. Be careful not to overheat or scorch the chocolate, as this will cause it to seize and become unusable.
- Double Boiler Method: If you prefer, or don’t have a microwave, you can use a double boiler. Fill the bottom pot with an inch or two of water and bring it to a gentle simmer. Place the chocolate chips and coconut oil in the top pot (or a heatproof bowl set over the simmering water, ensuring the bottom of the bowl doesn’t touch the water). Stir frequently until the chocolate is completely melted and smooth.
- Coat with Chocolate: Once the chocolate is perfectly melted and glossy, carefully spoon or pour it over the peanut butter layer on each rice cake. Use the back of your spoon or a small spatula to gently spread the chocolate, allowing it to cover the peanut butter completely and even drip down the sides a little if you like that rustic, fully enrobed look. Work relatively quickly as the chocolate will start to set.
- Add Toppings (Optional but Recommended!): If you’re using any toppings like flaky sea salt, chopped peanuts, or sprinkles, sprinkle them over the wet chocolate immediately. This way, they will adhere as the chocolate sets.
Phase 4: Chill and Set
- Refrigerate to Set: Carefully transfer the baking sheet with the prepared rice cakes to the refrigerator. Let them chill for at least 30-60 minutes, or until the chocolate is completely firm and set.
- Freezer (Quicker Option): If you’re in a hurry, you can place them in the freezer for 15-20 minutes. Just keep an eye on them; you want the chocolate set, not the rice cakes frozen solid (unless that’s your preference!).
Phase 5: Serve and Enjoy!
- Ready to Devour: Once the chocolate is firm, your Peanut Butter Cup Rice Cakes are ready to be enjoyed! Gently lift them off the parchment paper.
Nutrition Facts (Approximate)
It’s important to remember that nutritional information can vary widely based on the specific brands and types of ingredients used (e.g., type of rice cake, natural vs. conventional peanut butter, percentage of cacao in chocolate). The following is an estimation:
- Servings: 8 (1 rice cake per serving)
- Calories per serving: Approximately 280-380 calories.
Breakdown considerations:
- Rice Cake: 35-60 calories
- Peanut Butter (2 tbsp): 180-200 calories
- Chocolate (approx. 3 tbsp melted per cake): 60-100 calories
- Coconut Oil (per cake): ~30 calories
This treat provides a good balance of carbohydrates for energy, protein and healthy fats from the peanut butter for satiety, and deliciousness from the chocolate! For a more precise calculation, you would need to use the nutritional information from the specific products you use and divide by the number of servings.
Preparation Time Breakdown
Understanding the time commitment helps you plan when to whip up these delightful snacks.
- Active Preparation Time: 15-20 minutes
- This includes gathering ingredients, lining the baking sheet, spreading peanut butter, melting chocolate, and coating the rice cakes.
- Chilling Time: 30-60 minutes (in the refrigerator) OR 15-20 minutes (in the freezer)
- This is hands-off time while the chocolate sets.
- Total Time (from start to ready-to-eat): Approximately 45 minutes to 1 hour 20 minutes.
The great news is that the majority of this time is passive chilling time, making the actual hands-on work incredibly minimal for such a rewarding treat.
How to Serve Your Peanut Butter Cup Rice Cakes
These versatile treats can be enjoyed in numerous ways and for various occasions. Here are some ideas:
- As an Everyday Snack:
- Perfect for an afternoon pick-me-up when energy levels dip.
- A satisfying treat to curb sweet cravings without derailing healthy eating goals entirely.
- Pack one in a lunchbox (ensure it stays cool if it’s a warm day).
- For a Quick Dessert:
- Serve after dinner for a simple yet indulgent sweet ending to a meal.
- Enjoy with a cup of coffee, tea, or a glass of cold milk.
- At Casual Gatherings & Parties:
- Arrange them artfully on a platter for a potluck, BBQ, or casual get-together. They are always a crowd-pleaser.
- A fantastic addition to a dessert table or snack bar.
- Kid-Friendly Fun:
- Let kids help with spreading the peanut butter (with supervision) or adding sprinkles.
- A great alternative to overly sugary store-bought treats for playdates or after-school snacks.
- Post-Workout Refuel:
- The combination of carbs from the rice cake and protein from the peanut butter can make this a decent option for a quick energy boost after a light workout (though dedicated protein snacks might be better for intense sessions).
- Creative Pairings:
- With Fruit: Serve alongside some fresh berries (raspberries, strawberries) or banana slices for a more balanced and visually appealing snack plate. The tartness of berries complements the richness beautifully.
- With Yogurt: Crumble a piece over a bowl of Greek yogurt for added texture and flavor.
- As part of a “Snack Board”: Include them on a larger board with fruits, nuts, cheeses, and other small bites.
No matter how you choose to serve them, they are best enjoyed chilled or at room temperature shortly after removing from the fridge, so the chocolate maintains its delightful snap.
Additional Tips for Peanut Butter Perfection (5 Pro Tips)
Elevate your Peanut Butter Cup Rice Cake game with these handy tips:
- Don’t Skimp on Peanut Butter Quality: The peanut butter is a star player. Using a high-quality, natural peanut butter (the kind you have to stir) with minimal ingredients (just peanuts, maybe salt) will give you the purest, most intense peanut flavor. Avoid those with added sugars or hydrogenated oils, as they can alter the taste and texture.
- Master the Chocolate Melt: The key to a smooth, glossy chocolate coating is gentle melting. Whether using the microwave or a double boiler, go low and slow. Stir frequently and remove from heat when there are still a few small lumps of chocolate – the residual heat will melt them as you stir. This prevents the chocolate from seizing or burning, which makes it grainy and unusable. The addition of coconut oil is your secret weapon here!
- Chill Thoroughly for the Perfect Snap: Be patient during the chilling process! Allowing the chocolate to fully set in the refrigerator or freezer is crucial for achieving that satisfying “snap” when you bite into it. If the chocolate isn’t fully hardened, it will be soft and messy.
- Embrace the Flaky Salt Finish: If you do one extra thing, let it be a tiny sprinkle of flaky sea salt on top of the wet chocolate. This small addition dramatically enhances the flavors, cutting through the sweetness and highlighting the nuttiness of the peanut butter. It transforms a simple treat into something a bit more gourmet.
- Experiment with Rice Cake Thickness & Type: While standard rice cakes work great, try different varieties. Thicker rice cakes offer a more substantial base and crunch. Thinner ones will give you a higher chocolate-to-rice-cake ratio. Brown rice cakes add a slightly nuttier, more wholesome flavor, while white rice cakes are lighter and crispier. See what you prefer!
Frequently Asked Questions (FAQ) – Your Peanut Butter Cup Rice Cake Queries Answered
Here are answers to some common questions you might have about making these delicious treats:
- Q: Can I make these gluten-free?
- A: Absolutely! Rice cakes are naturally gluten-free. Just ensure the brand of rice cakes you purchase is certified gluten-free if you have celiac disease or a severe gluten sensitivity, as some may be processed in facilities that also handle wheat. Also, double-check your chocolate and peanut butter, though most are inherently gluten-free.
- Q: Can I use a different nut butter or a seed butter?
- A: Yes, definitely! This recipe is very adaptable. Almond butter, cashew butter, or sunflower seed butter (for a nut-free option) would all be delicious alternatives to peanut butter. Keep in mind that the consistency of other nut/seed butters might vary, so you may need to adjust the amount slightly. The flavor profile will change, of course, but that’s part of the fun of experimenting!
- Q: How should I store these Peanut Butter Cup Rice Cakes, and how long will they last?
- A: Store them in an airtight container in the refrigerator. This will keep the chocolate firm and the rice cakes from becoming stale too quickly. They are best enjoyed within 3-4 days for optimal freshness and texture. If left at room temperature for too long, the chocolate may soften.
- Q: Can I make these ahead of time?
- A: Yes, they are perfect for making ahead! You can prepare a batch a day or two in advance of when you plan to serve them. Just keep them stored properly in the refrigerator as mentioned above. They are great for meal prepping snacks for the week.
- Q: My chocolate seized while melting! What did I do wrong, and can I fix it?
- A: Chocolate seizes (becomes thick, grainy, and unworkable) primarily due to two reasons: overheating or contact with even a tiny amount of water.
- Prevention: Melt chocolate gently over low heat (or in short intervals in the microwave on lower power), stirring frequently. Ensure all your bowls and utensils are perfectly dry.
- Fixing (sometimes possible): If it’s only slightly seized, sometimes vigorously stirring in a tiny bit more fat (like another teaspoon of melted coconut oil or vegetable shortening, not butter or water) can sometimes smooth it out. However, if it’s badly seized, it’s often difficult to recover for coating purposes. You might be able to repurpose it in recipes where texture is less critical, like some baked goods.
- A: Chocolate seizes (becomes thick, grainy, and unworkable) primarily due to two reasons: overheating or contact with even a tiny amount of water.
Enjoy crafting and, more importantly, devouring these simple yet incredibly satisfying Peanut Butter Cup Rice Cakes. They are a testament to the fact that sometimes the best treats are the easiest to make!
Print
Peanut Butter Cup Rice Cakes Recipe
Ingredients
- 8 plain, unsalted (or lightly salted) rice cakes (brown or white)
- 1 cup natural creamy peanut butter (or crunchy, if preferred)
- 1 ½ cups semi-sweet chocolate chips (or dark/milk chocolate, see notes above)
- 2 tablespoons coconut oil
- Optional Toppings:
- Flaky sea salt
- Chopped roasted peanuts
- Sprinkles
- Mini chocolate chips
Instructions
Phase 1: Preparation is Key
- Clear Your Workspace: Make sure you have a clean, flat surface to work on.
- Line a Baking Sheet: Take a baking sheet or a large tray that will fit in your refrigerator or freezer. Line it with parchment paper or wax paper. This is crucial to prevent the rice cakes from sticking as the chocolate sets and makes for super easy cleanup.
- Arrange Rice Cakes: Place the 8 rice cakes in a single layer on the prepared baking sheet, leaving a little space between each one.
Phase 2: The Peanut Butter Layer
- Stir Peanut Butter (if natural): If you’re using natural peanut butter where the oil separates, give it a thorough stir until it’s smooth and well combined.
- Spread the Peanut Butter: Using a knife or a small offset spatula, spread approximately 2 tablespoons of peanut butter evenly over the top surface of each rice cake. Aim for a generous, even layer, covering the rice cake from edge to edge. Don’t worry if it’s not perfectly smooth; rustic charm is part of their appeal!
Phase 3: The Chocolate Coating Magic
- Melt the Chocolate:
- Microwave Method (Recommended for ease): Place the chocolate chips and coconut oil in a microwave-safe bowl. Microwave on medium power (or 50%) for 30-second intervals, stirring well after each interval. Continue until the chocolate is almost completely melted. Remove from the microwave and stir until smooth and glossy. Be careful not to overheat or scorch the chocolate, as this will cause it to seize and become unusable.
- Double Boiler Method: If you prefer, or don’t have a microwave, you can use a double boiler. Fill the bottom pot with an inch or two of water and bring it to a gentle simmer. Place the chocolate chips and coconut oil in the top pot (or a heatproof bowl set over the simmering water, ensuring the bottom of the bowl doesn’t touch the water). Stir frequently until the chocolate is completely melted and smooth.
- Coat with Chocolate: Once the chocolate is perfectly melted and glossy, carefully spoon or pour it over the peanut butter layer on each rice cake. Use the back of your spoon or a small spatula to gently spread the chocolate, allowing it to cover the peanut butter completely and even drip down the sides a little if you like that rustic, fully enrobed look. Work relatively quickly as the chocolate will start to set.
- Add Toppings (Optional but Recommended!): If you’re using any toppings like flaky sea salt, chopped peanuts, or sprinkles, sprinkle them over the wet chocolate immediately. This way, they will adhere as the chocolate sets.
Phase 4: Chill and Set
- Refrigerate to Set: Carefully transfer the baking sheet with the prepared rice cakes to the refrigerator. Let them chill for at least 30-60 minutes, or until the chocolate is completely firm and set.
- Freezer (Quicker Option): If you’re in a hurry, you can place them in the freezer for 15-20 minutes. Just keep an eye on them; you want the chocolate set, not the rice cakes frozen solid (unless that’s your preference!).
Phase 5: Serve and Enjoy!
- Ready to Devour: Once the chocolate is firm, your Peanut Butter Cup Rice Cakes are ready to be enjoyed! Gently lift them off the parchment paper.
Nutrition
- Serving Size: One Normal Portion
- Calories: 280-380


