


There are certain smells and tastes that instantly transport you back to a specific time and place. For me, the aroma of cinnamon, butter, and sugar baking together is inextricably linked to cozy Sunday mornings and the anticipation of sinking my fork into a thick slice of New York Crumb Cake. This isn’t just any coffee cake; it’s the crumb cake – the one with the ridiculously generous, buttery, crunchy topping that’s practically half the height of the cake itself. My first attempt at recreating this iconic treat was a revelation. Watching my family’s eyes light up, hearing the contented sighs as they savored each bite, and seeing the plate practically licked clean confirmed it: this recipe was a keeper. It’s more than just a cake; it’s a square of pure comfort, a guaranteed crowd-pleaser, and surprisingly straightforward to make. Forget those pale imitations with flimsy streusel; this is the real deal, a dense yet moist sour cream cake base crowned with the glorious, golden crumb topping that defines the New York style. Get ready to bake a legend.
What Makes New York Crumb Cake a Legend?
Before we dive into the nuts and bolts (or rather, the flour and butter), let’s talk about what sets a New York Crumb Cake apart from its coffee cake cousins. It boils down to a few key characteristics that create its unique and addictive personality:
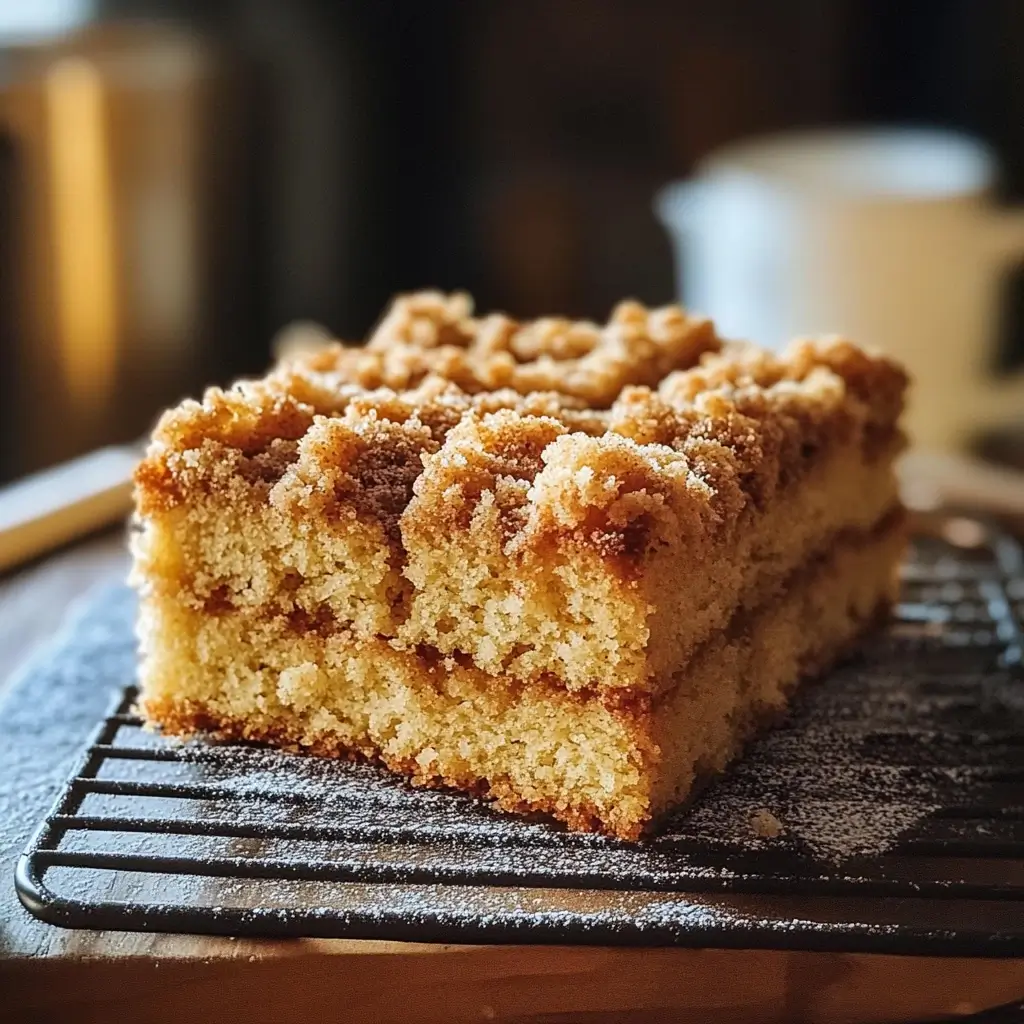
- The Crumb-to-Cake Ratio: This is the defining feature. A true New York Crumb Cake boasts a topping that is equal to, or even slightly thicker than, the cake layer beneath it. It’s not a sprinkle; it’s a substantial, deeply satisfying layer of buttery, sweet, cinnamon-spiced goodness. This generous topping is what people crave and remember.
- The Crumb Texture: The crumbs themselves are distinct. They aren’t fine and sandy like some streusels. Instead, they are larger, chunkier, and often slightly clumped together. This texture comes from using cold butter cut into the dry ingredients, creating pockets that result in a delightful crunch and chew after baking.
- The Cake Base: Beneath that mountain of crumbs lies a tender, moist, and slightly dense cake. Often utilizing sour cream or buttermilk, the cake provides the perfect soft counterpoint to the crunchy topping. It’s sturdy enough to support the weight of the crumbs but melts in your mouth. Its flavor is typically simple – vanilla-kissed – allowing the buttery, cinnamon-spiced topping to be the star.
- Simplicity and Focus: Unlike coffee cakes that might incorporate fruits, nuts, or glazes within the cake or topping, the classic New York Crumb Cake keeps it focused. The magic lies in the perfect execution of two components: the cake and the crumb.
It’s this unapologetic celebration of butter, sugar, and cinnamon, delivered in generous proportions, that has cemented the New York Crumb Cake as an icon of American baking, perfect alongside a cup of coffee, as a brunch centerpiece, or a simple, comforting dessert.
Gathering Your Arsenal: Ingredients for the Ultimate New York Crumb Cake
Precision is key in baking, and using the right ingredients in the correct amounts is crucial for achieving that perfect balance of moist cake and crunchy crumb. Here’s what you’ll need:
For the Legendary Crumb Topping:
- All-Purpose Flour: 3 cups (360g) – Provides the structure for the crumbs.
- Light Brown Sugar: 1 ½ cups (330g), packed – Adds moisture, chewiness, and a deep molasses flavor.
- Granulated Sugar: ½ cup (100g) – Contributes to crispness and sweetness.
- Ground Cinnamon: 1 ½ tablespoons – The essential warm spice. Feel free to adjust slightly based on your preference.
- Salt: ¾ teaspoon – Balances the sweetness and enhances all the flavors.
- Unsalted Butter: 1 cup (2 sticks or 226g), cold and cut into small ½-inch cubes – Cold butter is crucial for creating those distinct, larger crumbs rather than a sandy mixture.
For the Moist Sour Cream Cake Base:
- All-Purpose Flour: 2 cups (240g) – The foundation of the cake structure.
- Baking Powder: 1 teaspoon – Provides lift and tenderness.
- Baking Soda: ½ teaspoon – Reacts with the sour cream for additional leavening.
- Salt: ½ teaspoon – Enhances the cake’s flavor and balances sweetness.
- Unsalted Butter: ½ cup (1 stick or 113g), softened to room temperature – Crucial for a tender cake crumb. “Room temperature” means it should give slightly when pressed but not be greasy or melted.
- Granulated Sugar: 1 cup (200g) – Sweetens the cake and helps with creaming for a light texture.
- Large Eggs: 2, at room temperature – Bind the ingredients and add richness. Room temperature eggs incorporate better into the batter.
- Full-Fat Sour Cream: 1 cup (240g), at room temperature – The secret weapon for a moist, tender, slightly tangy cake. Room temperature ensures it mixes smoothly.
- Pure Vanilla Extract: 2 teaspoons – Adds essential background flavor.
Ingredient Notes & Why They Matter:
- Flour: Spoon your flour into the measuring cup and level it off with a straight edge. Scooping directly from the bag can compact the flour, leading to a dry cake or crumb.
- Butter: Use unsalted butter so you can control the salt level precisely. For the crumb, ensure it’s cold. For the cake, ensure it’s properly softened. The temperature difference is critical for the distinct textures.
- Sugars: The combination of brown and granulated sugar in the crumb topping creates a balance of moisture, chew, crispness, and flavor depth. Don’t skimp on packing the brown sugar.
- Sour Cream: Full-fat sour cream provides the best moisture and richness. Low-fat versions can work but might result in a slightly less tender cake. Ensure it’s at room temperature along with the butter and eggs for a smooth, well-emulsified batter.
- Room Temperature Ingredients (Cake): This is non-negotiable for the cake batter (butter, eggs, sour cream). Cold ingredients don’t emulsify properly, which can lead to a dense, heavy, or unevenly baked cake. Plan ahead and take them out of the fridge about 1-2 hours before you start mixing.
Crafting the Masterpiece: Step-by-Step Instructions
Let’s break down the process into manageable steps. We’ll make the crumb topping first and set it aside, then tackle the cake batter.
Part 1: Preparing the Star – The Crumb Topping
- Combine Dry Ingredients: In a large bowl, whisk together the 3 cups of all-purpose flour, 1 ½ cups of packed light brown sugar, ½ cup of granulated sugar, 1 ½ tablespoons of ground cinnamon, and ¾ teaspoon of salt. Ensure there are no large clumps of brown sugar.
- Cut in the Cold Butter: Add the cold, cubed butter to the dry ingredients. Using a pastry blender, two knives, or your fingertips, cut the butter into the flour mixture. Work relatively quickly to keep the butter cold.
- Achieve Crumb Perfection: Continue mixing until the mixture resembles coarse crumbs with some larger, pea-sized (or slightly larger) pieces of butter still visible. You want a clumpy, uneven texture, not a fine powder. Avoid overmixing, which can warm the butter too much and make the crumbs greasy.
- Chill (Optional but Recommended): For the best texture and distinct crumbs, cover the bowl and place the crumb mixture in the refrigerator while you prepare the cake batter. This helps keep the butter firm.
Part 2: Building the Foundation – The Cake Batter
- Preheat and Prep: Preheat your oven to 350°F (175°C). Grease and flour a 9×13 inch baking pan thoroughly. Alternatively, line the pan with parchment paper, leaving an overhang on two sides for easy lifting later. This is highly recommended for clean removal.
- Combine Dry Ingredients: In a medium bowl, whisk together the 2 cups of all-purpose flour, 1 teaspoon of baking powder, ½ teaspoon of baking soda, and ½ teaspoon of salt. Set aside.
- Cream Butter and Sugar: In the bowl of a stand mixer fitted with the paddle attachment, or in a large bowl using a handheld electric mixer, beat the ½ cup of softened unsalted butter on medium speed until creamy, about 1 minute. Add the 1 cup of granulated sugar and continue beating on medium-high speed until the mixture is light, fluffy, and pale yellow, about 3-4 minutes. Scrape down the sides and bottom of the bowl occasionally. This step incorporates air, which is crucial for a lighter cake texture.
- Add Eggs: Add the room temperature eggs one at a time, beating well after each addition until fully incorporated. Scrape down the bowl again.
- Mix in Vanilla: Beat in the 2 teaspoons of pure vanilla extract.
- Alternate Wet and Dry: Reduce the mixer speed to low. Add the dry ingredient mixture in three additions, alternating with the room temperature sour cream in two additions, beginning and ending with the dry ingredients. (Dry -> Sour Cream -> Dry -> Sour Cream -> Dry). Mix only until each addition is just combined. Be careful not to overmix at this stage; overmixing develops gluten and can lead to a tough cake. Stop mixing as soon as the last streaks of flour disappear. The batter will be thick.
- Spread Batter: Scrape the batter into the prepared 9×13 inch baking pan. Using an offset spatula or the back of a spoon, spread the batter evenly across the bottom of the pan. It might seem like a thin layer, but it will rise.
Part 3: Assembling and Baking
- Apply the Crumb Topping: Retrieve the chilled crumb topping from the refrigerator. Sprinkle it generously and evenly over the cake batter, covering the entire surface. Gently pat the crumbs down very lightly just so they adhere slightly – do not press them firmly into the batter. You want them to sit proudly on top. Ensure even distribution, especially around the edges.
- Bake: Place the pan in the preheated oven. Bake for 45-55 minutes, or until a wooden skewer or toothpick inserted into the cake layer (not just the crumbs) near the center comes out clean or with a few moist crumbs attached. The topping should be golden brown and set. Baking times can vary depending on your oven, so start checking around the 45-minute mark.
- Cool Completely: Once baked, remove the cake from the oven and place the pan on a wire rack. Let the crumb cake cool completely in the pan before slicing and serving. This is crucial! Cooling allows the cake structure to set and prevents the crumbs from falling apart when cut. This can take 2-3 hours at room temperature. Rushing this step will lead to a messy presentation.
The Baker’s Timeline: Preparation and Baking Time
Understanding the time commitment helps plan your baking session:
- Active Preparation Time: Approximately 25-35 minutes (Making crumbs: 10-15 mins; Making cake batter: 15-20 mins)
- Baking Time: 45-55 minutes
- Cooling Time: 2-3 hours (Essential!)
- Total Time (Start to Finish, Ready to Serve): Approximately 3 hours 10 minutes to 4 hours 30 minutes
Understanding the Indulgence: Nutrition Facts
While undeniably delicious, New York Crumb Cake is a treat. Here’s an approximate nutritional estimate:
- Servings: This recipe typically yields 12 generous servings or 16 smaller servings when cut from a 9×13 inch pan.
- Calories per Serving (Approximate): Depending on the serving size (1/12th or 1/16th of the cake), calories can range from 450 to 600 calories per serving.
Disclaimer: Nutritional information is an estimate only, calculated using standard ingredient databases. Actual values may vary based on specific ingredients used, measuring accuracy, and final serving size.
Presenting Perfection: How to Serve Your New York Crumb Cake
This cake is fantastic on its own, but here are some ways to serve it for maximum enjoyment:
- Classic Coffee Companion: The most traditional way! Serve a warm or room temperature square alongside a hot cup of black coffee or a latte. The bitterness of the coffee beautifully cuts through the richness of the cake.
- Brunch Star: Make it the centerpiece of a brunch spread. Its comforting flavors are perfect for a weekend gathering.
- With a Cold Glass of Milk: A nostalgic pairing that appeals to all ages.
- Dusting of Powdered Sugar: For an extra touch of elegance (and sweetness!), lightly dust the cooled cake with confectioners’ sugar just before serving.
- A La Mode: For an indulgent dessert, serve a slightly warmed slice with a scoop of high-quality vanilla bean ice cream. The contrast of warm cake and cold ice cream is divine.
- Fruit on the Side: Offer a side of fresh berries (strawberries, raspberries, blueberries) or sliced peaches to add a touch of freshness and tartness that complements the sweet crumbs.
- Potluck Hero: Easily transportable (once fully cooled in its pan) and always a crowd-pleaser at potlucks, picnics, or bake sales. Cut into squares just before serving.
- Tea Time Treat: Pairs wonderfully with black tea or Earl Grey tea for an afternoon pick-me-up.
Elevate Your Bake: Additional Tips for Crumb Cake Success
Achieve crumb cake nirvana with these extra pointers:
- Embrace Room Temperature (for the Cake): We mentioned it before, but it bears repeating. Using room temperature butter, eggs, and sour cream for the cake batter is critical. It allows the ingredients to emulsify properly, creating a homogenous batter that traps air, resulting in a tender, evenly risen cake. Cold ingredients can lead to a greasy, dense, or curdled batter.
- Don’t Overmix the Cake Batter: Mix the wet and dry ingredients only until just combined. A few small streaks of flour remaining are okay. Overmixing develops the gluten in the flour, which will make your cake tough and dense instead of tender and moist. Use a low speed on your mixer or even finish mixing by hand with a spatula.
- Keep Crumb Butter Cold: The key to distinct, large, buttery crumbs is cold butter. Cut it into small cubes and work quickly when incorporating it into the dry ingredients. If your kitchen is warm, or if you work slowly, definitely chill the finished crumb mixture in the fridge while you make the cake batter. This prevents the butter from melting and creating a greasy, sandy topping.
- Measure Flour Correctly: How you measure flour significantly impacts the outcome. Avoid scooping the measuring cup directly into the flour bag, as this compacts the flour, giving you more than the recipe calls for. Instead, use the “spoon and level” method: fluff the flour in its container, gently spoon it into the measuring cup until it overflows, then sweep the excess off with the straight edge of a knife or offset spatula. This ensures the correct flour quantity for both the tender cake and the perfectly textured crumb.
- Cool Completely Before Cutting: Patience is a virtue, especially with crumb cake! Resist the temptation to slice into it while it’s still warm. The cake needs time to fully set its structure as it cools. Cutting it prematurely will cause the cake to crumble, and the glorious topping will likely fall apart. Letting it cool completely in the pan ensures clean slices with the topping intact.
Crumb Cake Conundrums: Frequently Asked Questions (FAQ)
Here are answers to some common questions about making New York Crumb Cake:
- Q: How should I store leftover New York Crumb Cake?
- A: Leftover crumb cake can be stored in an airtight container at room temperature for up to 3-4 days. Avoid refrigerating it if possible, as the cold temperature can dry out the cake base more quickly. Ensure the container is truly airtight to maintain freshness and prevent the crumbs from becoming soft.
- Q: Can I freeze New York Crumb Cake?
- A: Yes, crumb cake freezes quite well! For best results, cool the cake completely. You can freeze the entire cake (well-wrapped in plastic wrap, then foil or in an airtight container) or individual slices. Wrap slices individually in plastic wrap, then place them in a freezer bag or container. Thaw overnight at room temperature. The crumb topping might be slightly softer after thawing but should still be delicious. It can be frozen for up to 2-3 months.
- Q: Can I substitute something else for the sour cream?
- A: Yes, you can substitute full-fat plain Greek yogurt or buttermilk for the sour cream in a 1:1 ratio. Plain regular yogurt can also work, but Greek yogurt’s thickness is closer to sour cream. Using buttermilk might result in a slightly lighter, tangier cake. Ensure whatever substitute you use is also at room temperature.
- Q: My crumb topping sank into the cake / became soggy. What went wrong?
- A: This usually happens for a few reasons:
- Batter too thin: Ensure you measured ingredients correctly; the batter should be quite thick.
- Crumb butter too warm: If the butter in the crumbs melted too much before baking, it can make the topping heavy and greasy, causing it to sink or become soggy. Keep that butter cold!
- Overmixing crumbs: Overworking the crumb mixture can make it too fine and dense. Aim for coarse, uneven crumbs.
- Pressing crumbs too hard: Only pat the crumbs down very gently onto the batter. Pressing firmly compacts them and encourages sinking.
- Underbaking: If the cake wasn’t fully baked, the excess moisture could make the bottom of the crumb layer soggy.
- A: This usually happens for a few reasons:
- Q: Can I make the crumb topping ahead of time?
- A: Absolutely! You can prepare the crumb topping mixture a day or two in advance. Store it in an airtight container or zip-top bag in the refrigerator. This can be a great time-saver. Just give it a quick toss before sprinkling it over the cake batter.
New York Crumb Cake Recipe
Ingredients
For the Legendary Crumb Topping:
- All-Purpose Flour: 3 cups (360g) – Provides the structure for the crumbs.
- Light Brown Sugar: 1 ½ cups (330g), packed – Adds moisture, chewiness, and a deep molasses flavor.
- Granulated Sugar: ½ cup (100g) – Contributes to crispness and sweetness.
- Ground Cinnamon: 1 ½ tablespoons – The essential warm spice. Feel free to adjust slightly based on your preference.
- Salt: ¾ teaspoon – Balances the sweetness and enhances all the flavors.
- Unsalted Butter: 1 cup (2 sticks or 226g), cold and cut into small ½-inch cubes – Cold butter is crucial for creating those distinct, larger crumbs rather than a sandy mixture.
For the Moist Sour Cream Cake Base:
- All-Purpose Flour: 2 cups (240g) – The foundation of the cake structure.
- Baking Powder: 1 teaspoon – Provides lift and tenderness.
- Baking Soda: ½ teaspoon – Reacts with the sour cream for additional leavening.
- Salt: ½ teaspoon – Enhances the cake’s flavor and balances sweetness.
- Unsalted Butter: ½ cup (1 stick or 113g), softened to room temperature – Crucial for a tender cake crumb. “Room temperature” means it should give slightly when pressed but not be greasy or melted.
- Granulated Sugar: 1 cup (200g) – Sweetens the cake and helps with creaming for a light texture.
- Large Eggs: 2, at room temperature – Bind the ingredients and add richness. Room temperature eggs incorporate better into the batter.
- Full-Fat Sour Cream: 1 cup (240g), at room temperature – The secret weapon for a moist, tender, slightly tangy cake. Room temperature ensures it mixes smoothly.
- Pure Vanilla Extract: 2 teaspoons – Adds essential background flavor.
Instructions
Part 1: Preparing the Star – The Crumb Topping
- Combine Dry Ingredients: In a large bowl, whisk together the 3 cups of all-purpose flour, 1 ½ cups of packed light brown sugar, ½ cup of granulated sugar, 1 ½ tablespoons of ground cinnamon, and ¾ teaspoon of salt. Ensure there are no large clumps of brown sugar.
- Cut in the Cold Butter: Add the cold, cubed butter to the dry ingredients. Using a pastry blender, two knives, or your fingertips, cut the butter into the flour mixture. Work relatively quickly to keep the butter cold.
- Achieve Crumb Perfection: Continue mixing until the mixture resembles coarse crumbs with some larger, pea-sized (or slightly larger) pieces of butter still visible. You want a clumpy, uneven texture, not a fine powder. Avoid overmixing, which can warm the butter too much and make the crumbs greasy.
- Chill (Optional but Recommended): For the best texture and distinct crumbs, cover the bowl and place the crumb mixture in the refrigerator while you prepare the cake batter. This helps keep the butter firm.
Part 2: Building the Foundation – The Cake Batter
- Preheat and Prep: Preheat your oven to 350°F (175°C). Grease and flour a 9×13 inch baking pan thoroughly. Alternatively, line the pan with parchment paper, leaving an overhang on two sides for easy lifting later. This is highly recommended for clean removal.
- Combine Dry Ingredients: In a medium bowl, whisk together the 2 cups of all-purpose flour, 1 teaspoon of baking powder, ½ teaspoon of baking soda, and ½ teaspoon of salt. Set aside.
- Cream Butter and Sugar: In the bowl of a stand mixer fitted with the paddle attachment, or in a large bowl using a handheld electric mixer, beat the ½ cup of softened unsalted butter on medium speed until creamy, about 1 minute. Add the 1 cup of granulated sugar and continue beating on medium-high speed until the mixture is light, fluffy, and pale yellow, about 3-4 minutes. Scrape down the sides and bottom of the bowl occasionally. This step incorporates air, which is crucial for a lighter cake texture.
- Add Eggs: Add the room temperature eggs one at a time, beating well after each addition until fully incorporated. Scrape down the bowl again.
- Mix in Vanilla: Beat in the 2 teaspoons of pure vanilla extract.
- Alternate Wet and Dry: Reduce the mixer speed to low. Add the dry ingredient mixture in three additions, alternating with the room temperature sour cream in two additions, beginning and ending with the dry ingredients. (Dry -> Sour Cream -> Dry -> Sour Cream -> Dry). Mix only until each addition is just combined. Be careful not to overmix at this stage; overmixing develops gluten and can lead to a tough cake. Stop mixing as soon as the last streaks of flour disappear. The batter will be thick.
- Spread Batter: Scrape the batter into the prepared 9×13 inch baking pan. Using an offset spatula or the back of a spoon, spread the batter evenly across the bottom of the pan. It might seem like a thin layer, but it will rise.
Part 3: Assembling and Baking
- Apply the Crumb Topping: Retrieve the chilled crumb topping from the refrigerator. Sprinkle it generously and evenly over the cake batter, covering the entire surface. Gently pat the crumbs down very lightly just so they adhere slightly – do not press them firmly into the batter. You want them to sit proudly on top. Ensure even distribution, especially around the edges.
- Bake: Place the pan in the preheated oven. Bake for 45-55 minutes, or until a wooden skewer or toothpick inserted into the cake layer (not just the crumbs) near the center comes out clean or with a few moist crumbs attached. The topping should be golden brown and set. Baking times can vary depending on your oven, so start checking around the 45-minute mark.
- Cool Completely: Once baked, remove the cake from the oven and place the pan on a wire rack. Let the crumb cake cool completely in the pan before slicing and serving. This is crucial! Cooling allows the cake structure to set and prevents the crumbs from falling apart when cut. This can take 2-3 hours at room temperature. Rushing this step will lead to a messy presentation.
Nutrition
- Serving Size: One Normal Portion
- Calories: 450 to 600


