Ingredients
- 1 cup (226g or 2 sticks) Unsalted Butter, softened to room temperature
- ¾ cup (150g) Packed Light Brown Sugar
- ¼ cup (50g) Granulated White Sugar
- 1 (3.4 oz or 96g) package Instant Vanilla Pudding Mix (just the dry mix)
- 2 large Eggs, at room temperature
- 1 tablespoon Pure Vanilla Extract
- 2 ¼ cups (270g) All-Purpose Flour
- 1 teaspoon Baking Soda
- ½ teaspoon Salt
- 1 cup (170g) Semi-Sweet Chocolate Chips
- ½ cup (85g) Halloween Sprinkles (Jimmies style work best for mixing in)
- Optional for decorating:
- Additional Halloween sprinkles for topping
- Candy eyeballs of various sizes
- Orange, black, purple, or green food coloring
Instructions
Step 1: Preheat Oven and Prepare Baking Sheets
First, position your oven racks in the upper and lower thirds of the oven. Preheat your oven to 375°F (190°C). Line two large baking sheets with parchment paper or silicone baking mats. This prevents the cookies from sticking and ensures even browning on the bottom.
Step 2: Combine Dry Ingredients
In a medium-sized bowl, whisk together the all-purpose flour, baking soda, and salt. Whisking aerates the flour and ensures the leavening agent (baking soda) and salt are evenly distributed throughout. This simple step prevents pockets of saltiness or uneven rising. Set this bowl aside for later.
Step 3: Cream Butter, Sugars, and Pudding Mix
In a large mixing bowl or the bowl of a stand mixer fitted with the paddle attachment, add the softened unsalted butter, packed light brown sugar, and granulated sugar. Cream them together on medium speed for 2-3 minutes. The mixture should become light, fluffy, and pale in color. This process incorporates air into the dough, which is essential for a light texture. Next, pour in the dry instant vanilla pudding mix and continue to beat on medium speed for another minute until it is fully incorporated. The pudding mix will make the mixture slightly thicker.
Step 4: Add Eggs and Vanilla
Add the room temperature eggs one at a time, beating well after each addition. Scrape down the sides and bottom of the bowl with a rubber spatula as needed to ensure everything is evenly mixed. Once the eggs are incorporated, beat in the pure vanilla extract. At this stage, the mixture should be smooth and creamy.
(Optional Step for Colored Dough): If you wish to make different colored cookies, now is the time to divide the wet batter into separate bowls. Add a few drops of your desired food coloring (orange, green, purple) to each bowl and mix until the color is uniform.
Step 5: Gradually Add Dry Ingredients
With the mixer on its lowest speed, gradually add the dry flour mixture to the wet ingredients in three additions. Mix only until the flour is just combined. It’s crucial not to overmix at this stage. Overmixing develops the gluten in the flour, which can result in tough, dense cookies instead of soft, tender ones. Stop mixing as soon as the last streaks of flour disappear.
Step 6: Fold in Mix-ins
Remove the bowl from the mixer. Using a rubber spatula or wooden spoon, gently fold in the semi-sweet chocolate chips and the Halloween sprinkles. Fold until they are just evenly distributed throughout the dough.
Step 7: Chill the Dough (Crucial Step!)
Cover the bowl with plastic wrap and refrigerate the cookie dough for at least 60 minutes, and up to 24 hours. Do not skip this step! Chilling the dough solidifies the fat (butter), which prevents the cookies from spreading too much in the oven. It also allows the flavors to meld and deepen, resulting in a much more flavorful cookie.
Step 8: Scoop and Bake
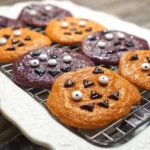
Once chilled, scoop the dough into 1.5-tablespoon-sized balls (a medium cookie scoop works perfectly for this). Arrange the dough balls about 2-3 inches apart on the prepared baking sheets to allow for spreading. If you like, you can gently press a few extra chocolate chips or candy eyeballs onto the tops of the dough balls before baking. For a bakery-style look, roll the balls in additional Halloween sprinkles.
Step 9: Bake to Perfection
Bake in the preheated oven at 375°F (190°C) for 10-12 minutes. The edges should be lightly golden brown, and the centers should still look slightly soft and underdone. The cookies will continue to cook from the residual heat of the baking sheet after you remove them from the oven. This is the secret to a soft center. If you are baking two sheets at once, rotate them halfway through the baking time (top to bottom, front to back) for even results.
Step 10: Cool and Decorate
Let the cookies cool on the baking sheet for 5-7 minutes. This allows them to set up properly so they don’t fall apart when you move them. If you are adding candy eyeballs, gently press them into the warm cookies as soon as they come out of the oven so they stick. After 5-7 minutes, transfer the cookies to a wire rack to cool completely.
Nutrition
- Serving Size: One Normal Portion
- Calories: 155 kcal