


Of all the traditions our family cherishes, our annual Halloween baking day is my absolute favorite. The air grows crisp, the decorative gourds appear on the porch, and the kitchen transforms into a delightful laboratory of sugar and spice. For years, we searched for the perfect Halloween cookie—one that was not only spooky and fun to look at but also addictively delicious. We tried crumbly sugar cookies that were hard to decorate and finicky cutout recipes that spread into unrecognizable blobs. Then, we discovered the secret ingredient that changed everything: instant pudding mix. The first time I pulled a batch of these Halloween Pudding Cookies from the oven, I knew we had found “the one.” The aroma of vanilla and warm butter filled the house, and the cookies themselves were a revelation. They were unbelievably soft, with a dense, chewy, almost melt-in-your-mouth texture that no other cookie recipe had ever achieved. My kids’ eyes went wide, not just from the silly candy eyeballs staring back at them, but from the sheer deliciousness. These cookies have become legendary in our house, the official treat of October, and the star of every school party and neighborhood get-together. They are incredibly forgiving to make, a blast to decorate, and they stay soft for days, making them the most reliable and spooktacularly tasty treat for the season.
The Ultimate Halloween Pudding Cookies Recipe
This recipe is your ticket to the softest, chewiest, and most festive cookies you’ll ever make for Halloween. The instant vanilla pudding mix is the non-negotiable secret ingredient that guarantees a perfectly tender crumb and a rich flavor that complements all the spooky add-ins. Get ready for these to become your new annual tradition.
Ingredients
- 1 cup (226g or 2 sticks) Unsalted Butter, softened to room temperature
- ¾ cup (150g) Packed Light Brown Sugar
- ¼ cup (50g) Granulated White Sugar
- 1 (3.4 oz or 96g) package Instant Vanilla Pudding Mix (just the dry mix)
- 2 large Eggs, at room temperature
- 1 tablespoon Pure Vanilla Extract
- 2 ¼ cups (270g) All-Purpose Flour
- 1 teaspoon Baking Soda
- ½ teaspoon Salt
- 1 cup (170g) Semi-Sweet Chocolate Chips
- ½ cup (85g) Halloween Sprinkles (Jimmies style work best for mixing in)
- Optional for decorating:
- Additional Halloween sprinkles for topping
- Candy eyeballs of various sizes
- Orange, black, purple, or green food coloring
Ingredient Notes and Substitutions
Before you begin, understanding your ingredients can elevate your cookies from good to phenomenal.
- Unsalted Butter: Using unsalted butter allows you to control the salt content precisely. If you only have salted butter, reduce the added salt in the recipe to ¼ teaspoon. Ensure it’s properly softened to room temperature—not melted!—for the best creaming results.
- Sugars: The combination of light brown sugar and granulated sugar is key. Brown sugar, with its molasses content, adds moisture and chewiness, while white sugar contributes to crispier edges and spreading.
- Instant Pudding Mix: This is the star. The cornstarch and emulsifiers in the mix create an incredibly soft, moist cookie that stays fresh for days. While vanilla is a classic and versatile choice, feel free to experiment! Butterscotch, cheesecake, or even chocolate pudding mix can create exciting flavor variations. Do not use cook-and-serve pudding mix, as it has a different formulation and will not work in this recipe.
- Eggs: Room temperature eggs incorporate more easily into the batter, creating a smoother, more uniform emulsion. To quickly bring eggs to room temperature, place them in a bowl of warm (not hot) water for 5-10 minutes.
- All-Purpose Flour: Be sure to measure your flour correctly. The best method is to fluff the flour with a fork, spoon it into your measuring cup, and level it off with a straight edge. Packing the flour into the cup will result in too much flour and a dry, cakey cookie.
- Mix-ins: This is where you can get creative! We love semi-sweet chocolate chips, but you can use milk chocolate, dark chocolate, white chocolate chips, or even butterscotch or peanut butter chips. The Halloween sprinkles add festive color right into the dough.
Step-by-Step Instructions
Follow these detailed instructions carefully for perfect pudding cookies every time. Baking is a science, and these steps are designed to build the perfect cookie structure.
Step 1: Preheat Oven and Prepare Baking Sheets
First, position your oven racks in the upper and lower thirds of the oven. Preheat your oven to 375°F (190°C). Line two large baking sheets with parchment paper or silicone baking mats. This prevents the cookies from sticking and ensures even browning on the bottom.
Step 2: Combine Dry Ingredients
In a medium-sized bowl, whisk together the all-purpose flour, baking soda, and salt. Whisking aerates the flour and ensures the leavening agent (baking soda) and salt are evenly distributed throughout. This simple step prevents pockets of saltiness or uneven rising. Set this bowl aside for later.
Step 3: Cream Butter, Sugars, and Pudding Mix
In a large mixing bowl or the bowl of a stand mixer fitted with the paddle attachment, add the softened unsalted butter, packed light brown sugar, and granulated sugar. Cream them together on medium speed for 2-3 minutes. The mixture should become light, fluffy, and pale in color. This process incorporates air into the dough, which is essential for a light texture. Next, pour in the dry instant vanilla pudding mix and continue to beat on medium speed for another minute until it is fully incorporated. The pudding mix will make the mixture slightly thicker.
Step 4: Add Eggs and Vanilla
Add the room temperature eggs one at a time, beating well after each addition. Scrape down the sides and bottom of the bowl with a rubber spatula as needed to ensure everything is evenly mixed. Once the eggs are incorporated, beat in the pure vanilla extract. At this stage, the mixture should be smooth and creamy.
(Optional Step for Colored Dough): If you wish to make different colored cookies, now is the time to divide the wet batter into separate bowls. Add a few drops of your desired food coloring (orange, green, purple) to each bowl and mix until the color is uniform.
Step 5: Gradually Add Dry Ingredients
With the mixer on its lowest speed, gradually add the dry flour mixture to the wet ingredients in three additions. Mix only until the flour is just combined. It’s crucial not to overmix at this stage. Overmixing develops the gluten in the flour, which can result in tough, dense cookies instead of soft, tender ones. Stop mixing as soon as the last streaks of flour disappear.
Step 6: Fold in Mix-ins
Remove the bowl from the mixer. Using a rubber spatula or wooden spoon, gently fold in the semi-sweet chocolate chips and the Halloween sprinkles. Fold until they are just evenly distributed throughout the dough.
Step 7: Chill the Dough (Crucial Step!)
Cover the bowl with plastic wrap and refrigerate the cookie dough for at least 60 minutes, and up to 24 hours. Do not skip this step! Chilling the dough solidifies the fat (butter), which prevents the cookies from spreading too much in the oven. It also allows the flavors to meld and deepen, resulting in a much more flavorful cookie.
Step 8: Scoop and Bake
Once chilled, scoop the dough into 1.5-tablespoon-sized balls (a medium cookie scoop works perfectly for this). Arrange the dough balls about 2-3 inches apart on the prepared baking sheets to allow for spreading. If you like, you can gently press a few extra chocolate chips or candy eyeballs onto the tops of the dough balls before baking. For a bakery-style look, roll the balls in additional Halloween sprinkles.
Step 9: Bake to Perfection
Bake in the preheated oven at 375°F (190°C) for 10-12 minutes. The edges should be lightly golden brown, and the centers should still look slightly soft and underdone. The cookies will continue to cook from the residual heat of the baking sheet after you remove them from the oven. This is the secret to a soft center. If you are baking two sheets at once, rotate them halfway through the baking time (top to bottom, front to back) for even results.
Step 10: Cool and Decorate
Let the cookies cool on the baking sheet for 5-7 minutes. This allows them to set up properly so they don’t fall apart when you move them. If you are adding candy eyeballs, gently press them into the warm cookies as soon as they come out of the oven so they stick. After 5-7 minutes, transfer the cookies to a wire rack to cool completely.
The Science Behind the Softness: The Magic of Pudding Mix
Ever wonder what makes these cookies so uniquely soft and chewy? The answer lies in the science of instant pudding mix. Unlike traditional cookie recipes, the addition of this one key ingredient fundamentally changes the dough’s chemistry and structure.
Instant pudding mix primarily consists of sugar, modified cornstarch, and various emulsifiers and flavorings. It’s the cornstarch that works the real magic. Cornstarch is a powerful thickening agent that absorbs liquid and gelatinizes when heated. In cookie dough, it ties up moisture, preventing the cookies from drying out in the oven. This results in a much moister, more tender crumb.
Furthermore, the fine, powdery texture of the pudding mix contributes to a softer mouthfeel than flour alone can achieve. The emulsifiers in the mix help to bind the fat and water in the dough more effectively, leading to a more stable and uniform cookie that resists becoming greasy. The extra sugar and vanilla flavoring in the mix also deepen the overall taste profile, creating a rich, complex flavor that is simply irresistible. In short, adding pudding mix is a scientific shortcut to a professional bakery-quality soft cookie.
Nutrition Facts
- Servings: This recipe yields approximately 36 cookies.
- Calories per serving (1 cookie): Approximately 155 kcal.
Disclaimer: The nutritional information provided is an estimate and will vary depending on the specific ingredients and brands used, as well as the final size of your cookies.
Preparation Time
- Prep Time: 20 minutes
- Chill Time: 60 minutes
- Bake Time: 10-12 minutes per batch
- Total Time: Approximately 1 hour 32 minutes
How to Serve Your Spooktacular Cookies
These Halloween Pudding Cookies are fantastic on their own, but presenting them in a fun and creative way can make your Halloween celebration even more memorable. Here are some serving ideas:
- The Ultimate Halloween Party Platter:
- Arrange the cookies on a large black or orange platter.
- Intersperse them with other Halloween treats like candy corn, gummy worms, and chocolate skulls.
- Create a “cookie graveyard” by crumbling some extra cookies to look like dirt and sticking cookie “tombstones” (like Milano cookies with “RIP” written in icing) among your pudding cookies.
- DIY Cookie Decorating Station:
- Bake the cookies plain, without adding candy eyeballs before baking.
- Set up a decorating station with small bowls of frosting (in black, orange, and white), various Halloween sprinkles, and plenty of candy eyeballs.
- Let kids and guests decorate their own monster cookies. It’s a fun activity and a delicious dessert all in one.
- Spooky Cookie Ice Cream Sandwiches:
- Find two cookies of a similar size.
- Place a scoop of your favorite ice cream (vanilla, chocolate, or even pumpkin spice!) on the flat side of one cookie.
- Gently press the second cookie on top, flat side down.
- Roll the exposed ice cream edges in more Halloween sprinkles for a festive touch. Serve immediately.
- “You’ve Been Boo’d!” Baskets:
- Package a half-dozen cookies in a clear cellophane bag tied with a festive black and orange ribbon.
- Place the bag in a small basket or decorative box along with some other Halloween goodies.
- Secretly deliver it to a neighbor’s doorstep with a “You’ve Been Boo’d!” sign to spread the holiday cheer.
- Festive Lunchbox Surprise:
- Tuck one or two of these colorful cookies into your child’s lunchbox for a special treat that will make their day during the Halloween season.
5 Additional Tips for Cookie Perfection
- Don’t Skimp on the Chilling Time: We can’t stress this enough. Chilling the dough is the number one secret to preventing your cookies from spreading into thin, crispy wafers. The cold butter takes longer to melt in the oven, meaning the cookie’s structure has time to set before the fat melts completely. For extra thick cookies, scoop the dough first and then chill the dough balls for 30 minutes.
- Room Temperature is Key: Using room temperature butter and eggs is crucial for the creaming process. Cold ingredients don’t emulsify properly, which can lead to a dense, greasy cookie. Softened butter should give slightly when pressed but not be oily or melted.
- The “Slightly Underbaked” Secret: The perfect time to pull your cookies from the oven is when the edges are set and golden, but the centers still look a little soft and puffy. They might not look fully done, but they will continue to bake on the hot pan from residual heat. This “carryover cooking” is the key to a permanently soft and chewy center.
- Achieve Perfectly Round Cookies: For that perfectly circular, bakery-style look, use a simple trick. As soon as the cookies come out of the oven, take a round cookie cutter, glass, or bowl that is slightly larger than the cookie. Place it over the hot cookie and gently “scoot” it in a circular motion. This will tuck in any uneven edges, creating a perfect circle.
- Press, Don’t Mix, Toppings: For the most visually appealing cookies, reserve some of your prettiest toppings—like the candy eyeballs and larger, more interesting sprinkles—to press onto the tops of the dough balls right before baking. If you mix everything into the dough, the colors can sometimes bleed, and the fun shapes can get lost.
Frequently Asked Questions (FAQ)
Q1: Why do I have to use instant pudding mix? Can I use cook-and-serve pudding instead?
A: You must use instant pudding mix. Cook-and-serve pudding contains a different type of starch that requires boiling to activate and will not work as a dry mix-in for this cookie recipe. Instant pudding mix is designed to dissolve and thicken with cold liquid (or in this case, the moisture from the butter and eggs), and its specific formulation is what creates the signature soft texture of these cookies.
Q2: My cookies came out dry and cakey. What did I do wrong?
A: A dry or cakey cookie is almost always the result of too much flour. This can happen if you scoop your measuring cup directly into the flour bag, which compacts it. The best practice is the “spoon and level” method described in the ingredient notes. Another culprit could be overmixing the dough after adding the flour, which develops too much gluten and leads to a tougher cookie. Mix only until the flour is just incorporated.
Q3: How should I store these Halloween pudding cookies to keep them soft?
A: These cookies have excellent staying power! To keep them soft, store them in an airtight container at room temperature. They will stay fresh and soft for up to 5-7 days. For an extra trick to maintain moisture, you can place a slice of bread in the container with the cookies. The cookies will absorb moisture from the bread, keeping them incredibly soft.
Q4: Can I freeze these cookies?
A: Absolutely! This recipe is very freezer-friendly. You can freeze them in two ways:
- Freezing the Dough: Scoop the dough into balls and place them on a baking sheet. Flash freeze for about an hour until solid, then transfer the frozen dough balls to a zip-top freezer bag. They can be stored for up to 3 months. You can bake them directly from frozen; just add 2-3 minutes to the baking time.
- Freezing Baked Cookies: Allow the cookies to cool completely. Stack them in a freezer-safe airtight container, placing a sheet of parchment paper between each layer to prevent sticking. They will stay fresh in the freezer for up to 3 months. Thaw at room temperature before serving.
Q5: My cookies spread too much and are flat. What happened?
A: The most common reason for excessive spreading is that the dough was not chilled long enough (or at all). Chilling solidifies the butter. If your butter was too soft or melted when you started, that can also cause spreading. Lastly, double-check that your baking soda isn’t expired, as old leavening agents can affect the structure and rise of the cookie. Using a silicone baking mat instead of greasing a pan can also help control spread.
Print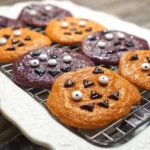
Halloween Pudding Cookies Recipe
Ingredients
- 1 cup (226g or 2 sticks) Unsalted Butter, softened to room temperature
- ¾ cup (150g) Packed Light Brown Sugar
- ¼ cup (50g) Granulated White Sugar
- 1 (3.4 oz or 96g) package Instant Vanilla Pudding Mix (just the dry mix)
- 2 large Eggs, at room temperature
- 1 tablespoon Pure Vanilla Extract
- 2 ¼ cups (270g) All-Purpose Flour
- 1 teaspoon Baking Soda
- ½ teaspoon Salt
- 1 cup (170g) Semi-Sweet Chocolate Chips
- ½ cup (85g) Halloween Sprinkles (Jimmies style work best for mixing in)
- Optional for decorating:
- Additional Halloween sprinkles for topping
- Candy eyeballs of various sizes
- Orange, black, purple, or green food coloring
Instructions
Step 1: Preheat Oven and Prepare Baking Sheets
First, position your oven racks in the upper and lower thirds of the oven. Preheat your oven to 375°F (190°C). Line two large baking sheets with parchment paper or silicone baking mats. This prevents the cookies from sticking and ensures even browning on the bottom.
Step 2: Combine Dry Ingredients
In a medium-sized bowl, whisk together the all-purpose flour, baking soda, and salt. Whisking aerates the flour and ensures the leavening agent (baking soda) and salt are evenly distributed throughout. This simple step prevents pockets of saltiness or uneven rising. Set this bowl aside for later.
Step 3: Cream Butter, Sugars, and Pudding Mix
In a large mixing bowl or the bowl of a stand mixer fitted with the paddle attachment, add the softened unsalted butter, packed light brown sugar, and granulated sugar. Cream them together on medium speed for 2-3 minutes. The mixture should become light, fluffy, and pale in color. This process incorporates air into the dough, which is essential for a light texture. Next, pour in the dry instant vanilla pudding mix and continue to beat on medium speed for another minute until it is fully incorporated. The pudding mix will make the mixture slightly thicker.
Step 4: Add Eggs and Vanilla
Add the room temperature eggs one at a time, beating well after each addition. Scrape down the sides and bottom of the bowl with a rubber spatula as needed to ensure everything is evenly mixed. Once the eggs are incorporated, beat in the pure vanilla extract. At this stage, the mixture should be smooth and creamy.
(Optional Step for Colored Dough): If you wish to make different colored cookies, now is the time to divide the wet batter into separate bowls. Add a few drops of your desired food coloring (orange, green, purple) to each bowl and mix until the color is uniform.
Step 5: Gradually Add Dry Ingredients
With the mixer on its lowest speed, gradually add the dry flour mixture to the wet ingredients in three additions. Mix only until the flour is just combined. It’s crucial not to overmix at this stage. Overmixing develops the gluten in the flour, which can result in tough, dense cookies instead of soft, tender ones. Stop mixing as soon as the last streaks of flour disappear.
Step 6: Fold in Mix-ins
Remove the bowl from the mixer. Using a rubber spatula or wooden spoon, gently fold in the semi-sweet chocolate chips and the Halloween sprinkles. Fold until they are just evenly distributed throughout the dough.
Step 7: Chill the Dough (Crucial Step!)
Cover the bowl with plastic wrap and refrigerate the cookie dough for at least 60 minutes, and up to 24 hours. Do not skip this step! Chilling the dough solidifies the fat (butter), which prevents the cookies from spreading too much in the oven. It also allows the flavors to meld and deepen, resulting in a much more flavorful cookie.
Step 8: Scoop and Bake
Once chilled, scoop the dough into 1.5-tablespoon-sized balls (a medium cookie scoop works perfectly for this). Arrange the dough balls about 2-3 inches apart on the prepared baking sheets to allow for spreading. If you like, you can gently press a few extra chocolate chips or candy eyeballs onto the tops of the dough balls before baking. For a bakery-style look, roll the balls in additional Halloween sprinkles.
Step 9: Bake to Perfection
Bake in the preheated oven at 375°F (190°C) for 10-12 minutes. The edges should be lightly golden brown, and the centers should still look slightly soft and underdone. The cookies will continue to cook from the residual heat of the baking sheet after you remove them from the oven. This is the secret to a soft center. If you are baking two sheets at once, rotate them halfway through the baking time (top to bottom, front to back) for even results.
Step 10: Cool and Decorate
Let the cookies cool on the baking sheet for 5-7 minutes. This allows them to set up properly so they don’t fall apart when you move them. If you are adding candy eyeballs, gently press them into the warm cookies as soon as they come out of the oven so they stick. After 5-7 minutes, transfer the cookies to a wire rack to cool completely.
Nutrition
- Serving Size: One Normal Portion
- Calories: 155 kcal


