


Baking has always been a cherished tradition in our home, filling the kitchen with warm, inviting aromas and culminating in treats that bring smiles to everyone’s faces. However, with the growing awareness of gluten sensitivities and dietary needs, I’ve been on a mission to adapt our favorite recipes to be inclusive and equally delightful for everyone. That’s how I stumbled upon this gluten-free scone recipe, and let me tell you, it’s been a game-changer! From the first batch, these scones were a hit. My family, who are not necessarily gluten-free, devoured them, praising their light, tender crumb and buttery flavor. The golden-brown tops and slightly crumbly edges were just as visually appealing as any traditional scone. What impressed me most was how remarkably easy they were to make. No complicated techniques or hard-to-find ingredients are required. Whether you’re gluten-free yourself, baking for someone who is, or simply curious to explore gluten-free baking, this recipe is a must-try. Get ready to experience the joy of warm, freshly baked scones, completely guilt-free and absolutely delicious!
Ingredients
Creating perfect gluten-free scones hinges on selecting the right ingredients and understanding their roles. While traditional scones rely heavily on gluten for their structure, we’ll be using a carefully chosen blend of gluten-free alternatives to achieve a similar, if not even better, texture and flavor. Let’s delve into each ingredient and explore why they are essential for this recipe:
- 2 cups Gluten-Free All-Purpose Flour Blend: This is the cornerstone of our gluten-free scones. It’s crucial to use a blend specifically formulated for gluten-free baking, as single-flour alternatives like almond or coconut flour alone won’t provide the necessary structure for scones. Look for blends that contain a mix of rice flour, tapioca starch, potato starch, and perhaps a touch of xanthan gum. These blends are designed to mimic the properties of wheat flour, offering a balance of lightness and binding. Using a high-quality gluten-free all-purpose blend will significantly impact the final texture of your scones, ensuring they are tender and not overly dense or gritty. Different brands of gluten-free flour blends can vary, so if you’re unsure, choose a reputable brand known for baking applications. Experimenting with different blends over time can help you discover your personal favorite for various gluten-free baked goods. You can also consider making your own blend if you are an experienced baker, ensuring you have control over each component and tailoring it to your specific taste preferences.
- 1/4 cup Granulated Sugar: Sugar not only adds sweetness but also contributes to the tender texture and golden-brown crust of the scones. Granulated sugar is ideal for this recipe as it dissolves readily and provides a clean sweetness. You can adjust the amount of sugar slightly to your preference. If you prefer a less sweet scone, you can reduce it to 3 tablespoons. For a slightly richer flavor, consider using caster sugar, which has finer crystals and dissolves even more easily. Alternatively, for a touch of warmth and complexity, you could substitute a tablespoon or two of brown sugar, though this might slightly alter the texture and color.
- 1 tablespoon Baking Powder: Baking powder is the leavening agent that gives scones their rise and light, airy texture. It’s crucial to use fresh baking powder, as its effectiveness diminishes over time. Always check the expiration date. Double-acting baking powder is recommended as it reacts twice – once when mixed with wet ingredients and again when exposed to heat in the oven, ensuring a good rise. If you are baking in a high-altitude environment, you may need to slightly reduce the amount of baking powder to prevent the scones from rising too quickly and then collapsing.
- 1/2 teaspoon Salt: Salt is a flavor enhancer in baking. It balances the sweetness, brings out the other flavors in the recipe, and also plays a role in gluten development (though less relevant in gluten-free baking, it still affects the protein structure of the gluten-free flours). Use fine sea salt or table salt. If using kosher salt, which has larger crystals, you may need to use slightly more to achieve the same level of saltiness. Don’t skip the salt, as it significantly contributes to the overall taste profile of the scones, preventing them from tasting flat or bland.
- 1/2 cup (1 stick) Cold Unsalted Butter, cut into cubes: Cold butter is absolutely essential for achieving flaky, tender scones. When cold butter is incorporated into the flour mixture, it remains in small solid pieces. As the scones bake, the water in the butter turns to steam, creating pockets of air and resulting in a light, flaky texture. Using unsalted butter gives you control over the total amount of salt in the recipe. Make sure the butter is very cold. You can even chill it in the freezer for 10-15 minutes before cutting it into cubes. Cutting the butter into small, even cubes ensures it distributes evenly throughout the flour mixture. For vegan scones, you can use a good quality vegan butter alternative that is solid and cold, ensuring it behaves similarly to dairy butter in the baking process.
- 3/4 cup Buttermilk: Buttermilk adds a tangy flavor and contributes to the tender crumb of scones. The acidity in buttermilk helps to tenderize the gluten-free flour blend and activate the baking powder. It also provides moisture and richness. If you don’t have buttermilk, you can easily make a substitute by adding 1 tablespoon of lemon juice or white vinegar to 3/4 cup of milk (dairy or non-dairy). Let it sit for 5-10 minutes to curdle slightly before using. Full-fat buttermilk will result in richer, more flavorful scones, but low-fat buttermilk will also work. For a dairy-free option, you can use a plant-based milk like almond milk or soy milk with the lemon juice/vinegar trick. Coconut milk (not the canned creamy kind, but the beverage kind) can also be used for a slightly different flavor profile.
- 1 Large Egg, lightly beaten: The egg acts as a binder, adding richness and structure to the scones. It also contributes to the golden-brown color of the crust. Lightly beating the egg ensures it mixes evenly into the wet ingredients. Use a large egg at room temperature for best results. For vegan scones, you can try using a flax egg (1 tablespoon flaxseed meal mixed with 3 tablespoons water, let sit for 5 minutes to thicken) or an applesauce substitute, though these substitutions may slightly alter the texture.
- Optional Add-ins (1/2 cup): This is where you can get creative and customize your scones! Consider adding:
- Dried fruit: Raisins, cranberries, chopped apricots, or currants are classic additions to scones.
- Chocolate chips or chunks: Dark, milk, or white chocolate chips add sweetness and decadence.
- Berries: Fresh or frozen blueberries, raspberries, or chopped strawberries (if using frozen berries, don’t thaw them).
- Nuts: Chopped walnuts, pecans, almonds, or hazelnuts add texture and flavor.
- Spices: Cinnamon, nutmeg, cardamom, or ginger can add warmth and aroma.
- Citrus zest: Lemon, orange, or lime zest adds brightness and freshness.
- Cheese: For savory scones, try adding shredded cheddar, parmesan, or Gruyere cheese.
- Herbs: Fresh chopped herbs like rosemary, thyme, or chives can create savory and aromatic scones.
When choosing add-ins, make sure to chop them into small pieces so they distribute evenly throughout the scone dough. Don’t overload the dough with add-ins, as this can make the scones dense and prevent them from baking properly. About 1/2 cup of total add-ins is usually a good amount for this recipe.
Instructions
Making gluten-free scones is surprisingly straightforward, but following these detailed instructions will ensure you achieve bakery-quality results every time. Pay close attention to each step, especially the techniques for handling gluten-free dough, to create light, tender, and perfectly risen scones.
- Preheat Oven and Prepare Baking Sheet: Preheat your oven to 400°F (200°C). This high temperature is essential for creating steam quickly and helping the scones rise properly. Line a baking sheet with parchment paper. Parchment paper prevents the scones from sticking and makes cleanup easier. Alternatively, you can lightly grease the baking sheet with gluten-free cooking spray or butter. Having the oven preheated and the baking sheet ready before you start mixing the dough will ensure a smooth and efficient baking process.
- Combine Dry Ingredients: In a large mixing bowl, whisk together the gluten-free all-purpose flour blend, granulated sugar, baking powder, and salt. Whisking is crucial to evenly distribute the baking powder and salt throughout the flour, ensuring consistent leavening and flavor in the scones. This step also helps to aerate the flour, making it lighter and easier to incorporate the wet ingredients. Make sure there are no clumps in the dry ingredients, especially in the baking powder.
- Cut in Cold Butter: Add the cold, cubed butter to the dry ingredients. Using a pastry blender, your fingertips, or two knives, cut the butter into the flour mixture until it resembles coarse crumbs. The goal is to keep the butter in small pieces. This is the key step for creating flaky scones. If using your fingertips, work quickly to prevent the butter from melting from the heat of your hands. If using knives, use a criss-cross motion to cut the butter into the flour. The mixture should look like coarse breadcrumbs with some pea-sized pieces of butter remaining. Don’t overmix at this stage.
- Incorporate Wet Ingredients: In a separate small bowl, whisk together the buttermilk and lightly beaten egg. Make sure the egg is fully incorporated into the buttermilk. Pour the wet ingredients into the bowl with the dry ingredients and butter mixture.
- Gently Mix Dough: Using a rubber spatula or a wooden spoon, gently stir the wet and dry ingredients together until just combined. Do not overmix the dough. Overmixing gluten-free dough can develop a gummy texture. Mix only until the dry ingredients are mostly moistened and the dough just comes together. It will be slightly sticky and shaggy, which is perfectly normal for gluten-free scone dough. If you are adding optional add-ins, gently fold them in at this stage.
- Turn Dough onto Floured Surface and Shape: Lightly flour a clean work surface with gluten-free flour blend. Turn the dough out onto the floured surface. Gently pat the dough into a disc about 3/4 to 1 inch thick. Avoid kneading or working the dough too much. The less you handle gluten-free dough, the more tender your scones will be.
- Cut Scones: Use a sharp knife or a scone cutter to cut the dough into wedges or rounds. For wedges, cut the disc in half, then in half again, and then each quarter into triangles. For round scones, use a round cookie cutter, pressing straight down without twisting. Twisting can seal the edges and prevent proper rising. You can also simply cut square scones for an even easier approach.
- Place Scones on Baking Sheet: Carefully transfer the cut scones to the prepared baking sheet, spacing them about 1-2 inches apart. This allows for even baking and air circulation.
- Bake: Bake in the preheated oven for 15-20 minutes, or until the scones are golden brown on top and lightly browned on the bottom. Baking time may vary slightly depending on your oven and the size of the scones. Keep an eye on them and check for doneness around the 15-minute mark. A toothpick inserted into the center of a scone should come out with moist crumbs attached, not wet batter.
- Cool Slightly and Serve: Remove the baking sheet from the oven and let the scones cool on the baking sheet for a few minutes before transferring them to a wire rack to cool slightly further. Scones are best served warm, while they are still slightly crumbly and tender. Enjoy them as they are, or with your favorite toppings.
Nutrition Facts
(Note: Nutritional information is an estimate and can vary based on specific ingredients used and serving size.)
Servings: Approximately 8 scones
Calories per serving (estimated): 250-350 calories (depending on size and add-ins)
Approximate Nutritional Breakdown per Scone (estimated, without add-ins):
- Calories: 280
- Fat: 15-20g
- Saturated Fat: 9-12g
- Cholesterol: 60-80mg
- Sodium: 300-400mg
- Carbohydrates: 30-35g
- Fiber: 1-2g
- Sugar: 8-10g
- Protein: 3-4g
Important Considerations:
- These are estimates and can vary based on the specific gluten-free flour blend, butter, buttermilk, and any optional add-ins used.
- Gluten-free baked goods may sometimes be higher in refined carbohydrates and lower in fiber compared to their wheat-based counterparts.
- If you are following a specific dietary plan, it’s always best to calculate the nutritional information based on the exact brands and ingredients you use.
- Enjoy these scones in moderation as part of a balanced diet.
Preparation Time
- Prep Time: 15-20 minutes (includes measuring ingredients, mixing dough, and shaping scones)
- Cook Time: 15-20 minutes
- Total Time: 30-40 minutes
This recipe is relatively quick and easy to make, making it perfect for a weekend brunch, a last-minute treat, or a delightful addition to afternoon tea. The hands-on time is minimal, and the baking time is short, allowing you to enjoy freshly baked gluten-free scones in under an hour.
How to Serve
Gluten-free scones are incredibly versatile and can be enjoyed in numerous ways, making them perfect for various occasions from a casual breakfast to an elegant afternoon tea. Here are some delightful serving suggestions:
- Classic Cream Tea:
- Clotted Cream and Jam: The quintessential scone accompaniment! Serve warm scones with a generous dollop of clotted cream (or whipped cream for a lighter option) and your favorite jam or fruit preserves. Strawberry, raspberry, and blackcurrant jam are classic choices.
- Lemon Curd: The tangy sweetness of lemon curd pairs beautifully with the buttery scones.
- Fresh Berries: Add a scattering of fresh berries like strawberries, raspberries, or blueberries alongside the cream and jam for a refreshing touch.
- Breakfast or Brunch:
- Butter and Honey: Simple and satisfying. Spread warm scones with butter and drizzle with honey or maple syrup.
- Fruit and Yogurt: Top scones with Greek yogurt or regular yogurt and fresh fruit for a lighter and healthier breakfast option.
- Savory Breakfast Scones: For savory scones (consider adding cheese and herbs to the dough), serve them alongside scrambled eggs, bacon, or sausage for a hearty breakfast or brunch.
- Afternoon Tea or Dessert:
- Lemon Glaze: Drizzle a simple lemon glaze over cooled scones for added sweetness and a zesty flavor. Make the glaze by whisking together powdered sugar and lemon juice until smooth.
- Chocolate Drizzle: Melt dark or milk chocolate and drizzle it over the scones for a decadent treat.
- Icing Sugar Dusting: A simple dusting of powdered sugar adds a touch of elegance.
- Alongside Coffee or Tea: Scones are the perfect accompaniment to a hot cup of coffee, tea, or herbal infusion.
- Savory Serving Ideas:
- Soup or Salad Side: Savory scones (like cheese and chive scones) can be served as a delicious side to soup or salad, replacing bread or rolls.
- Cheese Board: Include savory scones as part of a cheese board for a sophisticated appetizer or snack.
- With Smoked Salmon and Cream Cheese: For a more substantial savory option, split a savory scone and fill it with cream cheese and smoked salmon.
Serving Temperature:
- Scones are best enjoyed warm, ideally within a few hours of baking. You can gently reheat them in a low oven (300°F/150°C) for a few minutes to refresh them.
- If serving later, allow them to cool completely and store them in an airtight container at room temperature for up to 2 days, or freeze for longer storage.
Additional Tips for Perfect Gluten-Free Scones
Achieving perfect gluten-free scones is within everyone’s reach with these helpful tips. Mastering these techniques will ensure your scones are consistently delicious, tender, and beautifully risen.
- Use Cold Ingredients: Cold butter and buttermilk are crucial for flaky gluten-free scones. Cold butter prevents gluten development (not applicable in gluten-free, but still helps with texture) and creates steam pockets as it melts in the oven, resulting in a light and airy texture. Cold buttermilk also helps to keep the butter cold and contributes to the tenderness of the dough. Ensure your butter is thoroughly chilled and your buttermilk is cold straight from the refrigerator.
- Don’t Overmix the Dough: Overmixing gluten-free dough can lead to tough, dense scones. Mix the wet and dry ingredients just until combined. The dough should be slightly shaggy and sticky, and it’s okay if there are still some streaks of flour. Resist the urge to keep mixing until it’s perfectly smooth. Gentle handling is key for tender gluten-free scones.
- Handle Dough Gently: Gluten-free dough is more delicate than traditional wheat-based dough. When patting out the dough and cutting the scones, handle it gently to avoid overworking it. Use a light touch and avoid kneading or pressing too firmly. The less you manipulate the dough, the better the texture of your scones will be.
- Bake at a High Temperature: Baking scones at a high temperature (400°F/200°C) helps them rise quickly and develop a golden-brown crust. The initial burst of heat creates steam, which is essential for achieving a light and airy interior. Ensure your oven is fully preheated before placing the scones in to bake.
- Don’t Overbake: Overbaked scones will be dry and crumbly. Bake them until they are golden brown on top and lightly browned on the bottom. The centers should be just set but still slightly moist. Start checking for doneness around 15 minutes and adjust baking time as needed based on your oven. Remove them from the oven as soon as they are done to prevent them from drying out.
FAQ Section
Here are some frequently asked questions about making gluten-free scones, to help you troubleshoot and bake with confidence.
Q1: Can I use a different gluten-free flour blend?
A: Yes, you can use different gluten-free all-purpose flour blends. However, be aware that different blends can have varying starch and gum ratios, which can affect the texture. For best results, use a blend specifically designed for baking and that contains a mix of starches and gums (like xanthan gum or guar gum). If you are using a new blend, you might need to adjust the liquid slightly. If the dough seems too dry, add a tablespoon of buttermilk at a time until it reaches the desired consistency.
Q2: Can I make these scones dairy-free or vegan?
A: Yes, you can easily adapt this recipe for dairy-free or vegan diets. For dairy-free scones, substitute the unsalted butter with a good quality vegan butter alternative that is solid and cold, and use a plant-based milk (like almond milk, soy milk, or coconut milk beverage) mixed with 1 tablespoon of lemon juice or vinegar as a buttermilk substitute. For vegan scones, in addition to the dairy-free substitutions, replace the egg with a flax egg (1 tablespoon flaxseed meal mixed with 3 tablespoons water, let sit for 5 minutes to thicken) or 1/4 cup of unsweetened applesauce. Keep in mind that vegan substitutions may slightly alter the texture and flavor.
Q3: Can I freeze gluten-free scones?
A: Yes, gluten-free scones freeze well. Let the baked scones cool completely. Wrap them individually in plastic wrap and then place them in a freezer-safe bag or container. Freeze for up to 2-3 months. To reheat, bake frozen scones directly from the freezer in a preheated oven at 350°F (175°C) for 10-15 minutes, or until warmed through. You can also thaw them overnight in the refrigerator and then reheat them briefly in the oven or microwave.
Q4: Why are my scones dense and not light and fluffy?
A: Dense scones are often a result of overmixing the dough or using too much flour. Remember to mix the dough gently just until combined, and don’t overwork it when shaping. Also, ensure you are using fresh baking powder. Expired baking powder will not provide sufficient leavening. Measuring flour correctly is also important; spoon the flour into your measuring cup and level it off, rather than scooping it directly from the bag, which can pack it down and result in too much flour.
Q5: Can I make these scones ahead of time?
A: While scones are best enjoyed fresh, you can prepare the dough ahead of time. After mixing the dough, pat it into a disc, wrap it tightly in plastic wrap, and refrigerate it for up to 24 hours. When ready to bake, remove the dough from the refrigerator, cut the scones, and bake as directed. You can also shape and cut the scones and freeze them unbaked on a baking sheet. Once frozen solid, transfer them to a freezer-safe bag. Bake frozen unbaked scones directly from the freezer, adding a few extra minutes to the baking time.
Print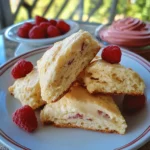
Gluten-Free Scones Recipe
Ingredients
- 2 cups Gluten-Free All-Purpose Flour Blend: This is the cornerstone of our gluten-free scones. It’s crucial to use a blend specifically formulated for gluten-free baking, as single-flour alternatives like almond or coconut flour alone won’t provide the necessary structure for scones. Look for blends that contain a mix of rice flour, tapioca starch, potato starch, and perhaps a touch of xanthan gum. These blends are designed to mimic the properties of wheat flour, offering a balance of lightness and binding. Using a high-quality gluten-free all-purpose blend will significantly impact the final texture of your scones, ensuring they are tender and not overly dense or gritty. Different brands of gluten-free flour blends can vary, so if you’re unsure, choose a reputable brand known for baking applications. Experimenting with different blends over time can help you discover your personal favorite for various gluten-free baked goods. You can also consider making your own blend if you are an experienced baker, ensuring you have control over each component and tailoring it to your specific taste preferences.
- 1/4 cup Granulated Sugar: Sugar not only adds sweetness but also contributes to the tender texture and golden-brown crust of the scones. Granulated sugar is ideal for this recipe as it dissolves readily and provides a clean sweetness. You can adjust the amount of sugar slightly to your preference. If you prefer a less sweet scone, you can reduce it to 3 tablespoons. For a slightly richer flavor, consider using caster sugar, which has finer crystals and dissolves even more easily. Alternatively, for a touch of warmth and complexity, you could substitute a tablespoon or two of brown sugar, though this might slightly alter the texture and color.
- 1 tablespoon Baking Powder: Baking powder is the leavening agent that gives scones their rise and light, airy texture. It’s crucial to use fresh baking powder, as its effectiveness diminishes over time. Always check the expiration date. Double-acting baking powder is recommended as it reacts twice – once when mixed with wet ingredients and again when exposed to heat in the oven, ensuring a good rise. If you are baking in a high-altitude environment, you may need to slightly reduce the amount of baking powder to prevent the scones from rising too quickly and then collapsing.
- 1/2 teaspoon Salt: Salt is a flavor enhancer in baking. It balances the sweetness, brings out the other flavors in the recipe, and also plays a role in gluten development (though less relevant in gluten-free baking, it still affects the protein structure of the gluten-free flours). Use fine sea salt or table salt. If using kosher salt, which has larger crystals, you may need to use slightly more to achieve the same level of saltiness. Don’t skip the salt, as it significantly contributes to the overall taste profile of the scones, preventing them from tasting flat or bland.
- 1/2 cup (1 stick) Cold Unsalted Butter, cut into cubes: Cold butter is absolutely essential for achieving flaky, tender scones. When cold butter is incorporated into the flour mixture, it remains in small solid pieces. As the scones bake, the water in the butter turns to steam, creating pockets of air and resulting in a light, flaky texture. Using unsalted butter gives you control over the total amount of salt in the recipe. Make sure the butter is very cold. You can even chill it in the freezer for 10-15 minutes before cutting it into cubes. Cutting the butter into small, even cubes ensures it distributes evenly throughout the flour mixture. For vegan scones, you can use a good quality vegan butter alternative that is solid and cold, ensuring it behaves similarly to dairy butter in the baking process.
- 3/4 cup Buttermilk: Buttermilk adds a tangy flavor and contributes to the tender crumb of scones. The acidity in buttermilk helps to tenderize the gluten-free flour blend and activate the baking powder. It also provides moisture and richness. If you don’t have buttermilk, you can easily make a substitute by adding 1 tablespoon of lemon juice or white vinegar to 3/4 cup of milk (dairy or non-dairy). Let it sit for 5–10 minutes to curdle slightly before using. Full-fat buttermilk will result in richer, more flavorful scones, but low-fat buttermilk will also work. For a dairy-free option, you can use a plant-based milk like almond milk or soy milk with the lemon juice/vinegar trick. Coconut milk (not the canned creamy kind, but the beverage kind) can also be used for a slightly different flavor profile.
- 1 Large Egg, lightly beaten: The egg acts as a binder, adding richness and structure to the scones. It also contributes to the golden-brown color of the crust. Lightly beating the egg ensures it mixes evenly into the wet ingredients. Use a large egg at room temperature for best results. For vegan scones, you can try using a flax egg (1 tablespoon flaxseed meal mixed with 3 tablespoons water, let sit for 5 minutes to thicken) or an applesauce substitute, though these substitutions may slightly alter the texture.
- Optional Add-ins (1/2 cup): This is where you can get creative and customize your scones! Consider adding:
- Dried fruit: Raisins, cranberries, chopped apricots, or currants are classic additions to scones.
- Chocolate chips or chunks: Dark, milk, or white chocolate chips add sweetness and decadence.
- Berries: Fresh or frozen blueberries, raspberries, or chopped strawberries (if using frozen berries, don’t thaw them).
- Nuts: Chopped walnuts, pecans, almonds, or hazelnuts add texture and flavor.
- Spices: Cinnamon, nutmeg, cardamom, or ginger can add warmth and aroma.
- Citrus zest: Lemon, orange, or lime zest adds brightness and freshness.
- Cheese: For savory scones, try adding shredded cheddar, parmesan, or Gruyere cheese.
- Herbs: Fresh chopped herbs like rosemary, thyme, or chives can create savory and aromatic scones.
Instructions
- Preheat Oven and Prepare Baking Sheet: Preheat your oven to 400°F (200°C). This high temperature is essential for creating steam quickly and helping the scones rise properly. Line a baking sheet with parchment paper. Parchment paper prevents the scones from sticking and makes cleanup easier. Alternatively, you can lightly grease the baking sheet with gluten-free cooking spray or butter. Having the oven preheated and the baking sheet ready before you start mixing the dough will ensure a smooth and efficient baking process.
- Combine Dry Ingredients: In a large mixing bowl, whisk together the gluten-free all-purpose flour blend, granulated sugar, baking powder, and salt. Whisking is crucial to evenly distribute the baking powder and salt throughout the flour, ensuring consistent leavening and flavor in the scones. This step also helps to aerate the flour, making it lighter and easier to incorporate the wet ingredients. Make sure there are no clumps in the dry ingredients, especially in the baking powder.
- Cut in Cold Butter: Add the cold, cubed butter to the dry ingredients. Using a pastry blender, your fingertips, or two knives, cut the butter into the flour mixture until it resembles coarse crumbs. The goal is to keep the butter in small pieces. This is the key step for creating flaky scones. If using your fingertips, work quickly to prevent the butter from melting from the heat of your hands. If using knives, use a criss-cross motion to cut the butter into the flour. The mixture should look like coarse breadcrumbs with some pea-sized pieces of butter remaining. Don’t overmix at this stage.
- Incorporate Wet Ingredients: In a separate small bowl, whisk together the buttermilk and lightly beaten egg. Make sure the egg is fully incorporated into the buttermilk. Pour the wet ingredients into the bowl with the dry ingredients and butter mixture.
- Gently Mix Dough: Using a rubber spatula or a wooden spoon, gently stir the wet and dry ingredients together until just combined. Do not overmix the dough. Overmixing gluten-free dough can develop a gummy texture. Mix only until the dry ingredients are mostly moistened and the dough just comes together. It will be slightly sticky and shaggy, which is perfectly normal for gluten-free scone dough. If you are adding optional add-ins, gently fold them in at this stage.
- Turn Dough onto Floured Surface and Shape: Lightly flour a clean work surface with gluten-free flour blend. Turn the dough out onto the floured surface. Gently pat the dough into a disc about 3/4 to 1 inch thick. Avoid kneading or working the dough too much. The less you handle gluten-free dough, the more tender your scones will be.
- Cut Scones: Use a sharp knife or a scone cutter to cut the dough into wedges or rounds. For wedges, cut the disc in half, then in half again, and then each quarter into triangles. For round scones, use a round cookie cutter, pressing straight down without twisting. Twisting can seal the edges and prevent proper rising. You can also simply cut square scones for an even easier approach.
- Place Scones on Baking Sheet: Carefully transfer the cut scones to the prepared baking sheet, spacing them about 1-2 inches apart. This allows for even baking and air circulation.
- Bake: Bake in the preheated oven for 15-20 minutes, or until the scones are golden brown on top and lightly browned on the bottom. Baking time may vary slightly depending on your oven and the size of the scones. Keep an eye on them and check for doneness around the 15-minute mark. A toothpick inserted into the center of a scone should come out with moist crumbs attached, not wet batter.
- Cool Slightly and Serve: Remove the baking sheet from the oven and let the scones cool on the baking sheet for a few minutes before transferring them to a wire rack to cool slightly further. Scones are best served warm, while they are still slightly crumbly and tender. Enjoy them as they are, or with your favorite toppings.
Nutrition
- Serving Size: one normal portion
- Calories: 280
- Sugar: 8-10g
- Sodium: 300-400mg
- Fat: 15-20g
- Saturated Fat: 9-12g
- Carbohydrates: 30-35g
- Fiber: 1-2g
- Protein: 3-4g
- Cholesterol: 60-80mg


