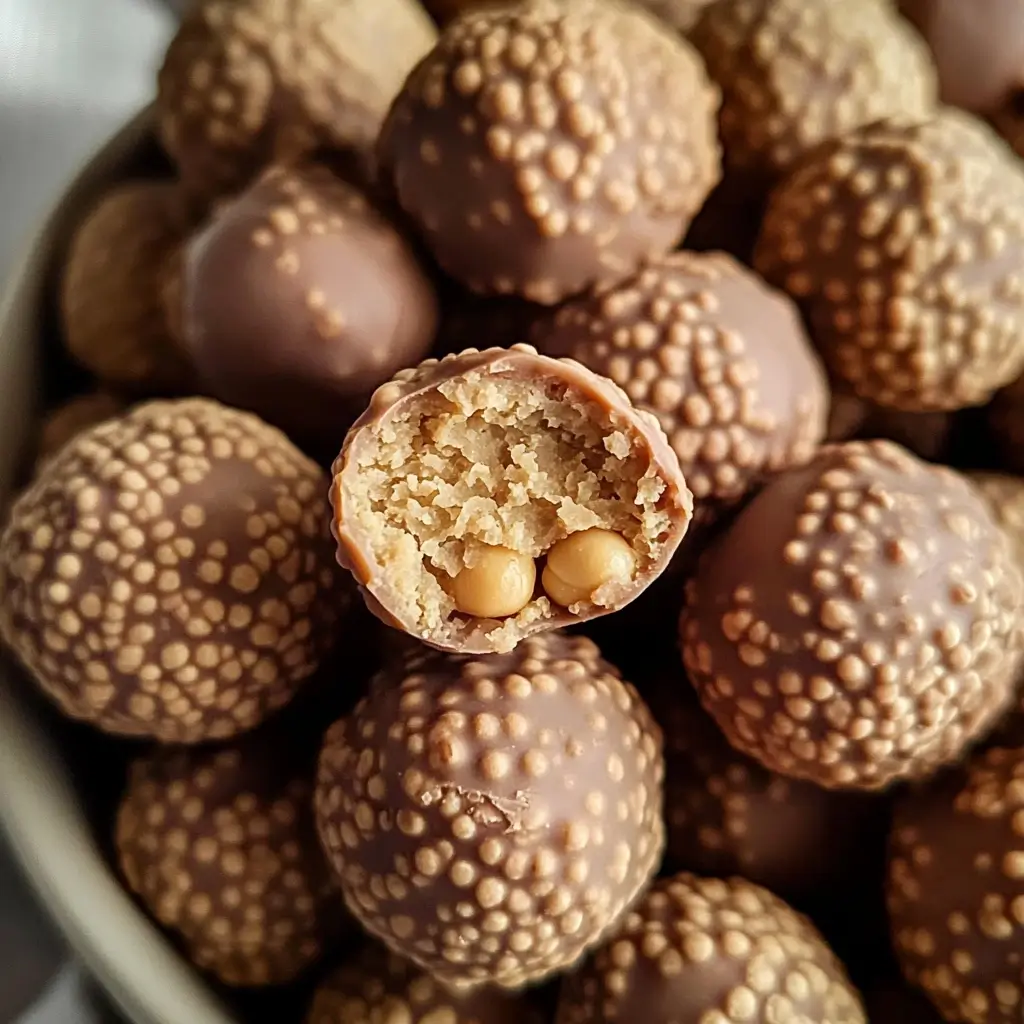
It started with a skeptical glance across the kitchen table. Chickpea truffles? The name itself sounded like a healthy compromise gone slightly awry. But then, the first bite. Rich, decadent, undeniably chocolatey, and with a melt-in-your-mouth smoothness that rivaled any classic truffle. My family, a tough crowd when it comes to healthy swaps, was instantly converted. These weren’t just good for you truffles; they were simply good truffles, period. The secret? The humble chickpea, transformed into a creamy base that carries the intense chocolate flavor beautifully, all while packing in a surprising dose of fiber and plant-based protein. Since that initial experiment, these chickpea truffles have become a staple in our household, a go-to for guilt-free indulgence, impressive desserts, and even healthy snacks. They are incredibly easy to make, require minimal ingredients, and are endlessly customizable. Prepare to be amazed – these chickpea truffles will redefine your definition of healthy dessert.
Ingredients: The Magic Behind Chickpea Truffles
The beauty of chickpea truffles lies in their simplicity. You don’t need a long list of exotic ingredients or complicated techniques to create these decadent treats. In fact, you likely already have most, if not all, of these items in your pantry. Let’s break down the key components that make these truffles so exceptional:
- Cooked Chickpeas (1 can, 15 ounces, drained and rinsed): The star of the show! Opt for canned chickpeas for convenience, ensuring they are thoroughly drained and rinsed to remove any excess sodium and the canning liquid (aquafaba – save this for vegan baking projects!). The chickpeas provide the creamy base and structure for the truffles. Their mild flavor disappears completely, leaving behind a smooth, almost buttery texture.
- High-Quality Dark Chocolate (8 ounces, roughly chopped): This is where the indulgence comes in. Choose a dark chocolate that you genuinely enjoy eating on its own. The quality of the chocolate significantly impacts the final flavor of the truffles. Aim for at least 70% cacao for a rich, intense chocolate experience. You can experiment with different percentages based on your preference – a higher percentage will result in a more bitter, sophisticated truffle, while a slightly lower percentage will be sweeter and more approachable. Using chocolate chips is convenient, but for the best melting and flavor, opt for a chocolate bar and chop it yourself.
- Nut Butter (1/4 cup, creamy, your choice): Nut butter adds richness, creaminess, and healthy fats to the truffles. Peanut butter is a classic choice, offering a delightful nutty flavor that complements chocolate beautifully. However, feel free to experiment with other nut butters like almond butter, cashew butter, or even sunflower seed butter for a nut-free option. Choose a natural, unsweetened nut butter for the best flavor and to control the overall sweetness of the truffles. The nut butter also helps to bind the ingredients together and creates a smoother, more luxurious texture.
- Sweetener (2-4 tablespoons, maple syrup or agave nectar): The amount of sweetener you need will depend on your preference and the sweetness of your chocolate. Maple syrup and agave nectar are excellent vegan-friendly options that add a touch of natural sweetness. Start with 2 tablespoons and taste the mixture before adding more. You can also use other liquid sweeteners like date syrup or brown rice syrup. For a less refined option, consider using mashed ripe banana or date paste (soaked and blended dates) to add sweetness and moisture.
- Vanilla Extract (1 teaspoon): A touch of vanilla extract enhances the chocolate flavor and adds depth to the truffles. Use pure vanilla extract for the best results. You can also experiment with other extracts like almond extract or peppermint extract for different flavor profiles. A pinch of sea salt can also be added to enhance the sweetness and balance the flavors.
- Optional Coatings (for rolling): This is where you can get creative and customize your truffles to your liking. Here are some popular and delicious coating options:
- Cocoa Powder: Classic and simple, cocoa powder provides a slightly bitter and elegant coating. Use unsweetened cocoa powder for the best flavor.
- Chopped Nuts: Finely chopped almonds, pecans, walnuts, or hazelnuts add texture and nutty flavor. Toast the nuts lightly before chopping for enhanced flavor.
- Shredded Coconut: Desiccated or shredded coconut offers a tropical twist and adds a delicate sweetness. Toasted coconut adds a richer flavor and crispier texture.
- Sprinkles: For a festive and fun touch, use colorful sprinkles. Choose natural sprinkles for a healthier option.
- Powdered Sugar (Confectioners’ Sugar): Provides a sweet and snowy coating. Use sparingly as it can be quite sweet.
- Melted Chocolate (different types): Drizzle with melted white chocolate, milk chocolate, or even a contrasting dark chocolate for a decorative and flavorful finish.
- Sesame Seeds: Toasted sesame seeds add a nutty and slightly savory element.
- Freeze-Dried Fruit Powder: Strawberry, raspberry, or other fruit powders add color and a burst of fruity flavor.
Instructions: Crafting Your Chickpea Truffle Masterpieces
Making chickpea truffles is surprisingly straightforward and requires minimal equipment. The process is essentially a matter of blending, chilling, and rolling. Follow these step-by-step instructions to create your own batch of delectable chickpea truffles:
- Prepare the Chickpeas: Begin by draining and rinsing the canned chickpeas thoroughly. Place the chickpeas in a fine-mesh sieve and rinse them under cold running water for at least a minute. This step is crucial for removing any residual canning liquid and ensuring a neutral flavor. After rinsing, pat the chickpeas dry with paper towels to remove excess moisture. This will help create a smoother truffle base.
- Melt the Chocolate: There are two main methods for melting chocolate: the microwave and the double boiler.
- Microwave Method (Faster but requires careful monitoring): Place the chopped chocolate in a microwave-safe bowl. Microwave in 30-second intervals, stirring well after each interval, until the chocolate is almost completely melted. Be very careful not to overheat the chocolate, as it can burn easily. Once almost melted, continue stirring until the residual heat melts the remaining chocolate and it becomes smooth and glossy.
- Double Boiler Method (Gentler and less prone to burning): Fill a saucepan with about an inch of water and bring it to a simmer over medium heat. Place a heatproof bowl (glass or stainless steel) on top of the saucepan, ensuring the bottom of the bowl does not touch the water. Add the chopped chocolate to the bowl and stir gently as it melts from the steam. Continue stirring until the chocolate is completely melted and smooth.
- Blend the Truffle Base: In a food processor, combine the drained and rinsed chickpeas, melted chocolate, nut butter, sweetener (maple syrup or agave nectar), and vanilla extract. Process the mixture until it is completely smooth and creamy. This may take a few minutes, and you may need to stop and scrape down the sides of the food processor bowl a few times to ensure everything is evenly incorporated. The mixture should be thick and resemble a fudgy paste. Taste the mixture at this stage and adjust the sweetness if needed by adding more sweetener, a tablespoon at a time, and blending again.
- Chill the Truffle Mixture: Transfer the truffle mixture to a bowl, cover it tightly with plastic wrap (pressing the wrap directly onto the surface of the mixture to prevent a skin from forming), and refrigerate for at least 2-3 hours, or preferably overnight. Chilling is essential for firming up the mixture, making it easier to roll into truffles. The longer the mixture chills, the firmer it will become.
- Roll the Truffles: Once the truffle mixture is chilled and firm, remove it from the refrigerator. Use a spoon or a small cookie scoop to scoop out portions of the mixture. Roll each portion between your palms to form smooth, round truffles. If the mixture is too sticky to handle easily, you can lightly dampen your hands with water or dust them with cocoa powder. Aim for consistent truffle sizes for a professional look.
- Coat the Truffles (Optional but recommended): Prepare your desired coatings in shallow bowls. Roll each truffle in your chosen coating until it is evenly coated. Gently shake off any excess coating. You can use a single coating or experiment with combining different coatings. For example, you could roll the truffles in cocoa powder and then drizzle them with melted white chocolate.
- Chill Again (Optional but enhances texture): For a firmer truffle and to help the coatings set, you can chill the coated truffles in the refrigerator for another 30 minutes to an hour before serving. This step is especially recommended if you are using coatings like melted chocolate or sprinkles.
- Enjoy! Your homemade chickpea truffles are now ready to be enjoyed. Store them in an airtight container in the refrigerator for up to a week. They are best served slightly chilled, but they are also delicious at room temperature.
Nutrition Facts: Guilt-Free Indulgence
Chickpea truffles offer a healthier alternative to traditional chocolate truffles, thanks to the inclusion of chickpeas. While still a treat, they provide a boost of fiber, plant-based protein, and essential nutrients. Here’s an approximate nutritional breakdown per serving:
- Servings: This recipe typically yields approximately 20-24 truffles, depending on the size you make them. A serving size is generally considered to be 2-3 truffles.
- Calories per Serving (2 truffles): Approximately 150-200 calories (This is an estimate and can vary depending on the type of chocolate, nut butter, sweetener, and coatings used. Darker chocolate and natural nut butters will generally be lower in sugar and calories compared to milk chocolate and processed nut butters. Coatings will also add to the calorie count.)
Approximate Macronutrient Breakdown per Serving (2 truffles):
- Protein: 3-4 grams
- Fat: 8-12 grams (primarily healthy fats from nut butter and dark chocolate)
- Carbohydrates: 15-20 grams (including fiber and natural sugars)
- Fiber: 3-4 grams
Key Nutritional Benefits:
- Source of Fiber: Chickpeas are an excellent source of dietary fiber, which aids in digestion, promotes satiety, and helps regulate blood sugar levels.
- Plant-Based Protein: Chickpeas contribute plant-based protein, essential for muscle building, repair, and overall health.
- Healthy Fats: Nut butter and dark chocolate provide healthy fats, including monounsaturated and polyunsaturated fats, which are beneficial for heart health.
- Antioxidants: Dark chocolate is rich in antioxidants, which help protect the body against cell damage.
- Lower in Refined Sugar: Compared to many traditional desserts, chickpea truffles can be made with less refined sugar by using natural sweeteners like maple syrup or agave nectar and choosing dark chocolate with a higher cacao percentage.
Important Note: While chickpea truffles are a healthier dessert option, they are still calorie-dense and should be enjoyed in moderation as part of a balanced diet. Be mindful of portion sizes and choose high-quality ingredients to maximize the nutritional benefits.
Preparation Time: Quick and Easy Treat
One of the best things about chickpea truffles is their relatively short preparation time. From start to finish, you can have these delicious treats ready in just a few hours, including chilling time.
- Active Preparation Time: Approximately 20-30 minutes (This includes draining and rinsing chickpeas, melting chocolate, blending ingredients, and rolling truffles.)
- Chilling Time: Minimum 2-3 hours, ideally overnight (This is passive time where the mixture firms up in the refrigerator.)
- Total Time (including chilling): Approximately 2 hours 20 minutes to overnight.
This makes chickpea truffles a perfect dessert for when you need something impressive but don’t have hours to spend in the kitchen. The majority of the time is hands-off chilling time, allowing you to prepare them ahead of time and have them ready for any occasion. They are also a great recipe to make with kids, as the rolling and coating steps are fun and engaging.
How to Serve: Elevate Your Chickpea Truffle Experience
Chickpea truffles are incredibly versatile and can be served in a variety of ways, making them perfect for any occasion, from casual gatherings to elegant dinner parties. Here are some ideas on how to serve and present your chickpea truffles:
- Dessert Platters: Create a stunning dessert platter by arranging chickpea truffles alongside other sweet treats like fresh fruit, berries, biscotti, or mini pastries. This is a visually appealing and delicious way to offer a variety of options to your guests.
- Party Favors: Package individual truffles or small boxes of truffles as thoughtful and homemade party favors for birthdays, holidays, or other celebrations. Tie them with ribbons and personalized tags for an extra special touch.
- Edible Gifts: Chickpea truffles make wonderful edible gifts for friends, family, and neighbors. Present them in decorative boxes or tins, and they are sure to be appreciated.
- Coffee or Tea Pairing: Serve chickpea truffles with a warm cup of coffee, tea, or hot chocolate for a delightful afternoon treat or after-dinner indulgence. The rich chocolate flavor pairs perfectly with the warmth and bitterness of these beverages.
- Dessert Buffet: Include chickpea truffles as part of a dessert buffet at parties or events. Offer a variety of coatings and toppings for guests to customize their truffles.
- Elegant Dessert Course: For a more formal setting, serve chickpea truffles as a sophisticated dessert course. Present them on individual dessert plates, garnished with a dusting of cocoa powder, a sprig of mint, or a drizzle of melted chocolate.
- Snack Attack Solution: Keep a batch of chickpea truffles in the refrigerator for a healthy and satisfying snack whenever you crave something sweet. They are a much better option than processed sugary snacks.
- Holiday Treats: Customize your chickpea truffles for different holidays by using festive coatings and sprinkles. For example, use red and green sprinkles for Christmas, pastel sprinkles for Easter, or orange and black sprinkles for Halloween.
- With Ice Cream or Yogurt: Crumble chickpea truffles and sprinkle them over ice cream, frozen yogurt, or Greek yogurt for added flavor and texture.
- Alongside Fresh Fruit: Serve chickpea truffles alongside a bowl of fresh berries or sliced fruit for a balanced and refreshing dessert. The sweetness of the truffles complements the tartness of the fruit beautifully.
Additional Tips for Truffle Perfection
While chickpea truffles are incredibly easy to make, here are five additional tips to ensure your truffles are absolutely perfect every time:
- Use High-Quality Chocolate: As mentioned earlier, the quality of your chocolate directly impacts the taste of your truffles. Invest in good-quality dark chocolate that you enjoy eating. The richer and more flavorful the chocolate, the more decadent your truffles will be.
- Don’t Skip the Chilling Time: Chilling the truffle mixture is crucial for firming it up and making it easy to roll. Resist the temptation to rush this step. If you don’t chill the mixture long enough, it will be too sticky and difficult to handle. Overnight chilling is ideal for the best results.
- Adjust Sweetness to Your Preference: The amount of sweetener in the recipe is a guideline. Taste the truffle mixture after blending and adjust the sweetness to your liking. Remember that the coatings will also add sweetness, so you might want to err on the side of slightly less sweet in the base mixture.
- Experiment with Flavor Variations: Chickpea truffles are a blank canvas for flavor experimentation. Get creative and try adding different extracts (almond, peppermint, orange), spices (cinnamon, cardamom, nutmeg), zest (orange, lemon, lime), or even a pinch of chili powder for a spicy kick. You can also incorporate coffee powder or espresso powder for a mocha flavor.
- Proper Storage is Key: Store your chickpea truffles in an airtight container in the refrigerator to maintain their freshness and texture. They will keep well for up to a week. For longer storage, you can freeze them in an airtight container for up to 2-3 months. Thaw them in the refrigerator before serving.
Frequently Asked Questions (FAQ) About Chickpea Truffles
Here are five frequently asked questions about chickpea truffles to address any potential queries you might have:
Q1: Do chickpea truffles actually taste like chickpeas?
A: Surprisingly, no! When made correctly, chickpea truffles do not taste like chickpeas at all. The chickpeas are thoroughly blended and their mild flavor is completely masked by the rich chocolate and other ingredients. All you taste is decadent, chocolatey goodness. Many people are skeptical until they try them, and are then amazed at how undetectable the chickpeas are.
Q2: Can I use a different type of bean instead of chickpeas?
A: While chickpeas are the most commonly used bean for this recipe due to their mild flavor and creamy texture, you could potentially experiment with other white beans like cannellini beans or great northern beans. However, chickpeas tend to yield the best results in terms of flavor and texture. Other beans might have a slightly stronger flavor that could be noticeable in the truffles.
Q3: Are chickpea truffles vegan and gluten-free?
A: Yes, chickpea truffles are naturally vegan and gluten-free, making them a great option for those with dietary restrictions. Ensure that you use vegan chocolate and nut butter, and choose gluten-free coatings if necessary. Always double-check ingredient labels to confirm.
Q4: Can I make chickpea truffles ahead of time?
A: Absolutely! Chickpea truffles are perfect for making ahead of time. In fact, chilling them overnight is recommended for the best texture. You can prepare the truffle mixture, roll and coat the truffles, and store them in the refrigerator for several days before serving. This makes them ideal for party planning and meal prepping.
Q5: What if my truffle mixture is too soft to roll?
A: If your truffle mixture is too soft to roll, it likely needs to be chilled for a longer period. Return the mixture to the refrigerator and chill for another hour or two, or even overnight. You can also try adding a tablespoon or two of cocoa powder or finely ground almond flour to the mixture to help firm it up. If your kitchen is particularly warm, working quickly and keeping the mixture as cool as possible will also help. Lightly dampening your hands with water or dusting them with cocoa powder can also make rolling easier.
Print
Chickpea Truffles Recipe
Ingredients
- Cooked Chickpeas (1 can, 15 ounces, drained and rinsed): The star of the show! Opt for canned chickpeas for convenience, ensuring they are thoroughly drained and rinsed to remove any excess sodium and the canning liquid (aquafaba – save this for vegan baking projects!). The chickpeas provide the creamy base and structure for the truffles. Their mild flavor disappears completely, leaving behind a smooth, almost buttery texture.
- High-Quality Dark Chocolate (8 ounces, roughly chopped): This is where the indulgence comes in. Choose a dark chocolate that you genuinely enjoy eating on its own. The quality of the chocolate significantly impacts the final flavor of the truffles. Aim for at least 70% cacao for a rich, intense chocolate experience. You can experiment with different percentages based on your preference – a higher percentage will result in a more bitter, sophisticated truffle, while a slightly lower percentage will be sweeter and more approachable. Using chocolate chips is convenient, but for the best melting and flavor, opt for a chocolate bar and chop it yourself.
- Nut Butter (1/4 cup, creamy, your choice): Nut butter adds richness, creaminess, and healthy fats to the truffles. Peanut butter is a classic choice, offering a delightful nutty flavor that complements chocolate beautifully. However, feel free to experiment with other nut butters like almond butter, cashew butter, or even sunflower seed butter for a nut-free option. Choose a natural, unsweetened nut butter for the best flavor and to control the overall sweetness of the truffles. The nut butter also helps to bind the ingredients together and creates a smoother, more luxurious texture.
- Sweetener (2-4 tablespoons, maple syrup or agave nectar): The amount of sweetener you need will depend on your preference and the sweetness of your chocolate. Maple syrup and agave nectar are excellent vegan-friendly options that add a touch of natural sweetness. Start with 2 tablespoons and taste the mixture before adding more. You can also use other liquid sweeteners like date syrup or brown rice syrup. For a less refined option, consider using mashed ripe banana or date paste (soaked and blended dates) to add sweetness and moisture.
- Vanilla Extract (1 teaspoon): A touch of vanilla extract enhances the chocolate flavor and adds depth to the truffles. Use pure vanilla extract for the best results. You can also experiment with other extracts like almond extract or peppermint extract for different flavor profiles. A pinch of sea salt can also be added to enhance the sweetness and balance the flavors.
- Optional Coatings (for rolling): This is where you can get creative and customize your truffles to your liking. Here are some popular and delicious coating options:
- Cocoa Powder: Classic and simple, cocoa powder provides a slightly bitter and elegant coating. Use unsweetened cocoa powder for the best flavor.
- Chopped Nuts: Finely chopped almonds, pecans, walnuts, or hazelnuts add texture and nutty flavor. Toast the nuts lightly before chopping for enhanced flavor.
- Shredded Coconut: Desiccated or shredded coconut offers a tropical twist and adds a delicate sweetness. Toasted coconut adds a richer flavor and crispier texture.
- Sprinkles: For a festive and fun touch, use colorful sprinkles. Choose natural sprinkles for a healthier option.
- Powdered Sugar (Confectioners’ Sugar): Provides a sweet and snowy coating. Use sparingly as it can be quite sweet.
- Melted Chocolate (different types): Drizzle with melted white chocolate, milk chocolate, or even a contrasting dark chocolate for a decorative and flavorful finish.
- Sesame Seeds: Toasted sesame seeds add a nutty and slightly savory element.
- Freeze-Dried Fruit Powder: Strawberry, raspberry, or other fruit powders add color and a burst of fruity flavor.
Instructions
- Prepare the Chickpeas: Begin by draining and rinsing the canned chickpeas thoroughly. Place the chickpeas in a fine-mesh sieve and rinse them under cold running water for at least a minute. This step is crucial for removing any residual canning liquid and ensuring a neutral flavor. After rinsing, pat the chickpeas dry with paper towels to remove excess moisture. This will help create a smoother truffle base.
- Melt the Chocolate: There are two main methods for melting chocolate: the microwave and the double boiler.
- Microwave Method (Faster but requires careful monitoring): Place the chopped chocolate in a microwave-safe bowl. Microwave in 30-second intervals, stirring well after each interval, until the chocolate is almost completely melted. Be very careful not to overheat the chocolate, as it can burn easily. Once almost melted, continue stirring until the residual heat melts the remaining chocolate and it becomes smooth and glossy.
- Double Boiler Method (Gentler and less prone to burning): Fill a saucepan with about an inch of water and bring it to a simmer over medium heat. Place a heatproof bowl (glass or stainless steel) on top of the saucepan, ensuring the bottom of the bowl does not touch the water. Add the chopped chocolate to the bowl and stir gently as it melts from the steam. Continue stirring until the chocolate is completely melted and smooth.
- Blend the Truffle Base: In a food processor, combine the drained and rinsed chickpeas, melted chocolate, nut butter, sweetener (maple syrup or agave nectar), and vanilla extract. Process the mixture until it is completely smooth and creamy. This may take a few minutes, and you may need to stop and scrape down the sides of the food processor bowl a few times to ensure everything is evenly incorporated. The mixture should be thick and resemble a fudgy paste. Taste the mixture at this stage and adjust the sweetness if needed by adding more sweetener, a tablespoon at a time, and blending again.
- Chill the Truffle Mixture: Transfer the truffle mixture to a bowl, cover it tightly with plastic wrap (pressing the wrap directly onto the surface of the mixture to prevent a skin from forming), and refrigerate for at least 2-3 hours, or preferably overnight. Chilling is essential for firming up the mixture, making it easier to roll into truffles. The longer the mixture chills, the firmer it will become.
- Roll the Truffles: Once the truffle mixture is chilled and firm, remove it from the refrigerator. Use a spoon or a small cookie scoop to scoop out portions of the mixture. Roll each portion between your palms to form smooth, round truffles. If the mixture is too sticky to handle easily, you can lightly dampen your hands with water or dust them with cocoa powder. Aim for consistent truffle sizes for a professional look.
- Coat the Truffles (Optional but recommended): Prepare your desired coatings in shallow bowls. Roll each truffle in your chosen coating until it is evenly coated. Gently shake off any excess coating. You can use a single coating or experiment with combining different coatings. For example, you could roll the truffles in cocoa powder and then drizzle them with melted white chocolate.
- Chill Again (Optional but enhances texture): For a firmer truffle and to help the coatings set, you can chill the coated truffles in the refrigerator for another 30 minutes to an hour before serving. This step is especially recommended if you are using coatings like melted chocolate or sprinkles.
- Enjoy! Your homemade chickpea truffles are now ready to be enjoyed. Store them in an airtight container in the refrigerator for up to a week. They are best served slightly chilled, but they are also delicious at room temperature.
Nutrition
- Serving Size: One Normal Portion
- Calories: 150-200
- Fat: 8-12 grams
- Carbohydrates: 15-20 grams
- Fiber: 3-4 grams
- Protein: 3-4 grams


