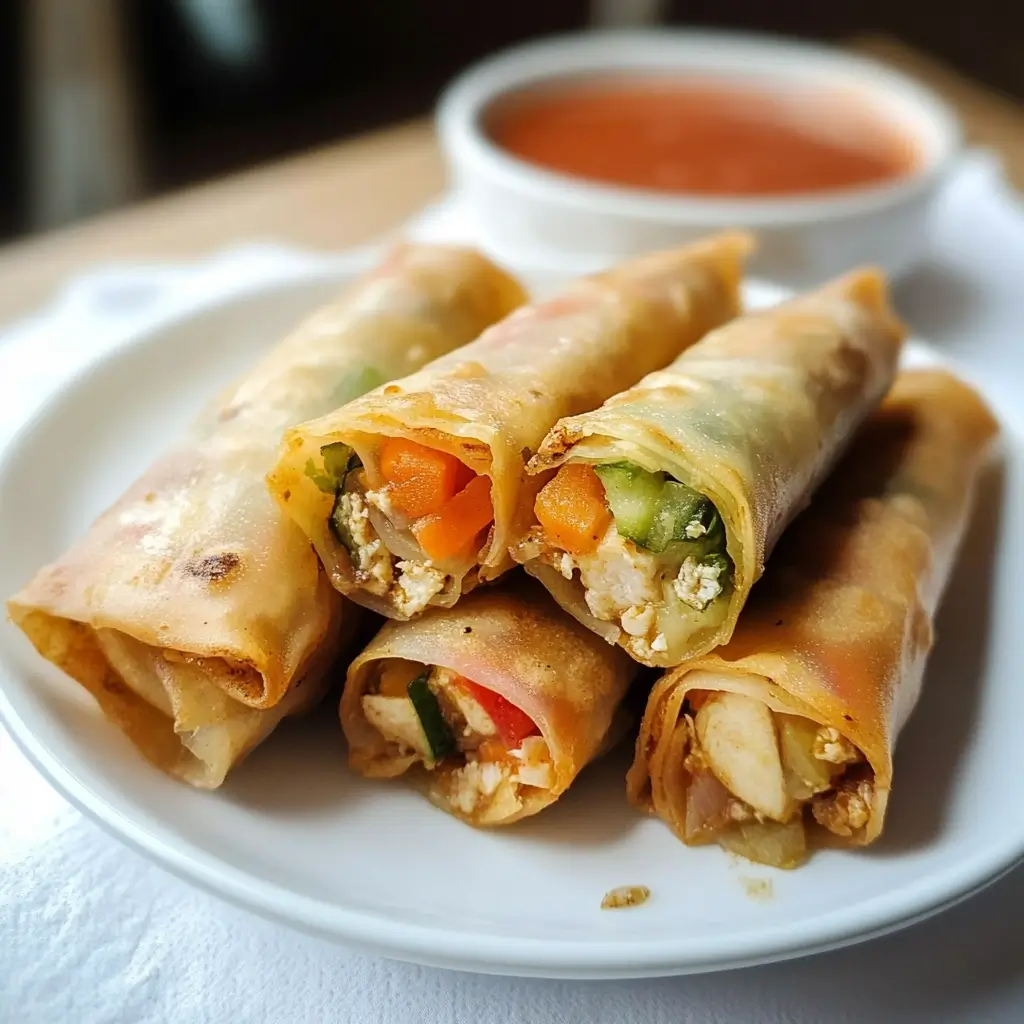
There are few culinary experiences as universally delightful as biting into a perfectly crispy, golden-brown spring roll, the delicate wrapper giving way to a steaming, savory filling. For years, spring rolls were a “treat-yourself” takeout item in our household. The thought of making them from scratch seemed daunting, reserved for culinary experts. But one weekend, armed with a craving and a bit of determination, I decided to tackle homemade Chicken and Vegetable Spring Rolls. The result? An absolute triumph! Not only were they leagues fresher and more flavorful than any store-bought or restaurant version we’d had, but the process was surprisingly therapeutic. My kids, usually picky eaters, devoured them, even asking for seconds (and thirds!). The aroma of ginger, garlic, and sesame oil wafting through the kitchen as the filling sizzled was intoxicating, and the satisfaction of successfully rolling and frying (and later, air-frying) these little parcels of joy was immense. They’ve since become a family favorite, perfect for weekend snacks, party appetizers, or even a light meal. This recipe is the culmination of several tries, perfected for maximum flavor, a satisfying crunch, and relative ease of assembly. Prepare to impress yourself and your loved ones!
Ingredients for The Ultimate Chicken and Vegetable Spring Rolls
This recipe aims for a balance of savory chicken, crisp vegetables, and aromatic seasonings, all encased in a delightfully crunchy wrapper. We’ll also cover a simple yet delicious dipping sauce.
For the Spring Roll Filling:
- Chicken: 1 lb (about 450g) boneless, skinless chicken thighs or breasts, finely minced or ground. (Thighs offer more flavor and moisture).
- Green Cabbage: 3 cups, very thinly shredded (a mandoline or food processor shredding disc works wonders).
- Carrots: 1.5 cups, julienned or finely grated.
- Shiitake Mushrooms (optional but recommended): 1 cup fresh, thinly sliced, or ½ cup dried, rehydrated and sliced.
- Bean Sprouts: 1 cup, fresh (optional, add towards the end of cooking to maintain crunch).
- Yellow Onion: 1 medium, finely chopped.
- Garlic: 4-5 cloves, minced.
- Fresh Ginger: 2-inch piece, peeled and finely grated or minced.
- Scallions (Green Onions): ½ cup, thinly sliced (mostly green parts).
- Soy Sauce (low sodium preferred): 3-4 tablespoons, or to taste.
- Oyster Sauce (optional, for umami): 1-2 tablespoons.
- Toasted Sesame Oil: 1 tablespoon.
- Rice Vinegar: 1 teaspoon.
- White Pepper: ½ teaspoon (or black pepper to taste).
- Sugar: 1 teaspoon (helps balance flavors).
- Cornstarch: 1 tablespoon (to thicken filling slightly and help bind).
- Cooking Oil: 2-3 tablespoons (e.g., vegetable, canola, or peanut oil for stir-frying).
For Assembling the Spring Rolls:
- Spring Roll Wrappers: 1 package (approx. 20-25 sheets, typically 8×8 inch squares). Ensure they are the thin, wheat-based type, not rice paper wrappers for fresh summer rolls.
- Sealing Agent: 1 egg, beaten with 1 tablespoon of water (egg wash), OR 2 tablespoons of cornstarch mixed with 3 tablespoons of water to make a slurry.
For Frying/Cooking:
- Neutral Frying Oil: Approximately 4-6 cups (e.g., peanut, canola, vegetable, or corn oil) if deep-frying.
- Cooking Spray or a little oil: If baking or air-frying.
For a Simple Soy-Ginger Dipping Sauce:
- Soy Sauce: ¼ cup.
- Rice Vinegar: 2 tablespoons.
- Toasted Sesame Oil: 1 teaspoon.
- Fresh Ginger: 1 teaspoon, grated.
- Garlic: 1 small clove, minced (optional).
- Sugar or Honey: 1 teaspoon (optional, to taste).
- Chili Garlic Sauce or Sriracha: ½ teaspoon, or to taste (optional).
- Water: 1-2 tablespoons (to dilute if desired).
Step-by-Step Instructions for Perfect Spring Rolls
Follow these instructions carefully for spring rolls that are crispy on the outside and packed with flavor on the inside.
Part 1: Preparing the Flavorful Filling
- Prepare the Chicken: If using whole chicken pieces, trim any excess fat and mince them very finely with a sharp knife, or pulse briefly in a food processor until ground but not pasty. If using pre-ground chicken, it’s ready to go.
- Prep the Vegetables: Ensure all your vegetables are chopped, shredded, or julienned as specified. Uniformity in size helps with even cooking and a pleasant texture. If using dried shiitake mushrooms, rehydrate them in hot water for 20-30 minutes, then squeeze out excess water and slice thinly.
- Sauté Aromatics: Heat 1-2 tablespoons of cooking oil in a large wok or heavy-bottomed skillet over medium-high heat. Add the chopped onion and cook for 2-3 minutes until softened. Then, add the minced garlic and grated ginger, sautéing for another minute until fragrant. Be careful not to burn them.
- Cook the Chicken: Add the minced or ground chicken to the wok. Break it apart with your spatula and cook, stirring frequently, until it’s no longer pink and is cooked through (about 5-7 minutes).
- Add Hardy Vegetables: Introduce the shredded carrots and sliced shiitake mushrooms (if using) to the wok. Stir-fry for 3-4 minutes until they begin to soften slightly.
- Add Softer Vegetables: Add the shredded cabbage to the wok. Continue to stir-fry for another 3-5 minutes. The cabbage should wilt down considerably but still retain a slight crunch. If using bean sprouts, add them in the last minute of cooking.
- Season the Filling: In a small bowl, whisk together the soy sauce, oyster sauce (if using), sesame oil, rice vinegar, white pepper, and sugar. Pour this sauce mixture over the chicken and vegetables in the wok. Stir well to combine everything.
- Thicken (Optional but Recommended): If your filling seems a bit watery, sprinkle the tablespoon of cornstarch evenly over the mixture. Stir continuously for about 1-2 minutes until the sauce thickens slightly and coats the ingredients. This helps prevent a soggy wrapper.
- Finish and Cool: Remove the wok from the heat. Stir in the sliced scallions. Taste the filling and adjust seasonings if necessary (more soy sauce for saltiness, a pinch more sugar for balance). Crucially, transfer the filling to a large baking sheet or several plates in a thin layer to cool down completely. This can take 30-60 minutes at room temperature, or you can speed it up in the refrigerator. A hot or warm filling will make the spring roll wrappers soggy and prone to tearing.
Part 2: Assembling the Spring Rolls
- Set Up Your Wrapping Station:
- Have your cooled spring roll filling ready.
- Carefully separate the spring roll wrappers. Keep them covered with a slightly damp (not wet!) paper towel or clean kitchen towel to prevent them from drying out, as they can become brittle quickly.
- Have your sealing agent (egg wash or cornstarch slurry) and a small brush nearby.
- Prepare a clean, dry work surface.
- Position the Wrapper: Place one spring roll wrapper on your work surface in a diamond shape, with one corner pointing towards you.
- Add the Filling: Spoon about 2-3 tablespoons of the cooled filling horizontally onto the lower third of the wrapper, leaving about 1-1.5 inches of space from the bottom corner and the side corners. Shape the filling into a compact log. Don’t overfill, or the wrapper might tear during rolling or frying.
- First Fold: Take the bottom corner (the one closest to you) and fold it up and over the filling, tucking it snugly against the filling.
- Fold the Sides: Fold in the left and right corners towards the center, over the filling, like you’re folding an envelope. Try to make these folds straight and tight to encase the filling.
- Roll Tightly: Begin rolling the spring roll upwards from the bottom, keeping the roll tight and compact. A tight roll prevents oil from seeping in during frying and helps the spring roll hold its shape.
- Seal the Edge: When you have about 1-2 inches of the top corner remaining, lightly brush the edges of that corner with your egg wash or cornstarch slurry. Continue rolling to seal the spring roll completely.
- Store Rolled Spring Rolls: Place the finished spring roll seam-side down on a baking sheet lined with parchment paper. Cover the completed rolls with plastic wrap or a damp towel to prevent them from drying out while you assemble the rest. Ensure they aren’t touching too much, or they might stick.
Part 3: Cooking the Spring Rolls
You have several options for cooking your spring rolls:
- Option 1: Deep Frying (Classic & Crispiest)
- Heat Oil: Pour about 2-3 inches of frying oil into a deep, heavy-bottomed pot, Dutch oven, or deep fryer. Heat the oil over medium-high heat until it reaches 350-375°F (175-190°C). Use a thermometer for accuracy. If you don’t have one, a small piece of wrapper dropped into the oil should sizzle vigorously and turn golden in about 30-45 seconds.
- Fry in Batches: Carefully place 3-4 spring rolls into the hot oil, ensuring not to overcrowd the pot (this lowers the oil temperature).
- Cook Until Golden: Fry for about 3-5 minutes per side, turning occasionally, until they are beautifully golden brown and crispy all over.
- Drain Excess Oil: Remove the cooked spring rolls using a spider or slotted spoon and transfer them to a wire rack set over a baking sheet to drain. This allows air to circulate, keeping them crispy. Avoid placing them directly on paper towels initially, as this can make the bottoms soggy. You can lightly pat them with paper towels after a minute on the rack.
- Maintain Oil Temperature: Allow the oil to come back up to temperature between batches.
- Option 2: Air Frying (Healthier Crunch)
- Preheat Air Fryer: Preheat your air fryer to 380-400°F (190-200°C).
- Prepare Rolls: Lightly spray or brush the spring rolls with oil on all sides. This helps them crisp up and achieve a golden color.
- Cook in Batches: Place the spring rolls in a single layer in the air fryer basket, ensuring they are not overcrowded.
- Air Fry: Cook for 8-12 minutes, flipping them halfway through, until golden brown and crispy. Cooking time may vary depending on your air fryer model.
- Option 3: Baking (Easiest Cleanup)
- Preheat Oven: Preheat your oven to 400-425°F (200-220°C). Line a baking sheet with parchment paper.
- Prepare Rolls: Lightly brush or spray the spring rolls with oil on all sides.
- Bake: Arrange the spring rolls in a single layer on the prepared baking sheet. Bake for 15-25 minutes, flipping them halfway through, until they are golden brown and crispy. They might not be as uniformly browned or quite as crispy as fried versions but are still delicious.
Part 4: Preparing the Dipping Sauce
- Combine Ingredients: In a small bowl, whisk together the soy sauce, rice vinegar, toasted sesame oil, grated ginger, minced garlic (if using), sugar/honey (if using), and chili garlic sauce/Sriracha (if using).
- Adjust to Taste: Taste the sauce and adjust the ingredients as needed. Add a little water if you prefer a thinner consistency.
- Serve: Pour into a small dipping bowl.
Nutrition Facts (Approximate)
- Servings: This recipe yields approximately 20-25 spring rolls.
- Serving Size (suggested): 2-3 spring rolls.
- Calories per Spring Roll (Approximate):
- Deep-Fried: 120-150 calories per roll (varies greatly with oil absorption).
- Air-Fried: 80-100 calories per roll.
- Baked: 70-90 calories per roll.
Please note that these are estimates. Actual nutritional values will vary based on specific ingredients used, portion sizes, oil absorption during frying, and the exact size of your spring rolls.
Preparation Time
- Active Preparation (Chopping, Sautéing Filling): 45-60 minutes.
- Cooling Filling: 30-60 minutes (can be done passively).
- Rolling Spring Rolls: 30-45 minutes (depending on your speed).
- Cooking Time (per batch):
- Deep Frying: 5-8 minutes per batch.
- Air Frying: 8-12 minutes per batch.
- Baking: 15-25 minutes.
- Total Estimated Time (excluding passive cooling): Approximately 1 hour 45 minutes to 2 hours 30 minutes. This can be significantly reduced if you prep ingredients in advance or have helpers for rolling.
How to Serve Your Delicious Homemade Spring Rolls
Serving spring rolls is all about enhancing their crispy texture and savory flavor with complementary elements. Here are some ideas:
- With Dipping Sauces (Essential!):
- Soy-Ginger Dip: The recipe provided above is a classic and light choice.
- Sweet Chili Sauce: A very popular option, offering a sweet, tangy, and slightly spicy kick. Readily available in most grocery stores.
- Peanut Sauce: Creamy, nutty, and rich – a fantastic contrast. You can buy it premade or make your own with peanut butter, soy sauce, lime juice, honey, ginger, and a touch of chili.
- Hoisin Sauce: A sweet and savory fermented soybean paste, often thinned with a little water or rice vinegar.
- Nuoc Cham (Vietnamese Dipping Sauce): A fish sauce-based dip that’s tangy, sweet, savory, and often spicy.
- Offer a small platter with 2-3 different dipping sauces to cater to various tastes.
- As an Appetizer:
- Arrange them artfully on a platter.
- Garnish with fresh herbs like cilantro sprigs, mint leaves, or thinly sliced scallions.
- Serve warm for the best texture.
- As Part of a Main Meal:
- Pair with a side of steamed jasmine rice or fried rice.
- Serve alongside a light Asian-inspired salad (e.g., a cucumber salad or a slaw with sesame-ginger dressing).
- Include them in a larger spread of Asian dishes, like noodles (Pad Thai, Lo Mein), stir-fried vegetables, or dumplings.
- For Parties and Gatherings:
- They are excellent finger food.
- Make them slightly smaller for easier one-or-two-bite enjoyment.
- Keep them warm in a low oven (around 200°F or 90°C) on a wire rack if serving over an extended period, but they are best enjoyed soon after cooking.
- Presentation Tips:
- Slice a few spring rolls diagonally to showcase the beautiful filling.
- Use small, individual dipping bowls for each guest or a central bowl with serving spoons.
- Consider a bed of lettuce leaves on the serving platter for a fresh look and to absorb any minimal grease.
Additional Tips for Spring Roll Perfection
- Don’t Overstuff the Wrappers: It’s tempting to load up each spring roll, but overstuffing is a primary cause of tearing, either during rolling or frying. Aim for about 2-3 tablespoons of filling per standard 8×8 inch wrapper. The filling should form a neat, compact log that allows the wrapper to encase it snugly without strain.
- Ensure the Filling is COMPLETELY Cool: This cannot be stressed enough. Hot or even warm filling will create steam inside the wrapper, making it damp, difficult to roll, and prone to tearing. It also leads to soggy spring rolls after cooking. Spread the cooked filling thinly on a baking sheet and let it cool to room temperature, or even chill it slightly in the fridge.
- Keep Unused Wrappers Covered: Spring roll wrappers dry out incredibly fast when exposed to air, becoming brittle and impossible to work with. As soon as you open the package, cover the stack of wrappers with a clean, slightly damp (not wet!) kitchen towel or plastic wrap. Only take out one wrapper at a time as you’re ready to roll.
- Roll Tightly and Seal Securely: A loosely rolled spring roll can unravel during cooking or allow oil to seep into the filling, making it greasy. When rolling, apply gentle but firm pressure to create a compact cylinder. Ensure the final edge is well-sealed with your egg wash or cornstarch slurry to prevent it from opening up.
- Master Batch Cooking & Freezing for Later:
- To Freeze Uncooked: Prepare the spring rolls completely up to the point before cooking. Place them in a single layer on a parchment-lined baking sheet (not touching) and freeze until solid (about 1-2 hours). Then, transfer the frozen spring rolls to a freezer-safe bag or container. They can be stored for up to 2-3 months. Cook directly from frozen, adding a few extra minutes to the cooking time, whether frying, air-frying, or baking.
- To Freeze Cooked (Not Ideal for Crispness): While possible, freezing cooked spring rolls means they won’t be as crispy when reheated. If you must, cool them completely, then freeze as above. Reheat in a hot oven or air fryer (not the microwave) until heated through and re-crisped as much as possible.
FAQ: Your Spring Roll Questions Answered
Q1: Can I make these spring rolls vegetarian or vegan?
A: Absolutely! To make them vegetarian, simply omit the chicken and increase the quantity of vegetables, especially mushrooms (shiitake, cremini, or oyster mushrooms work well for a “meaty” texture) or add firm tofu (crumbled and pan-fried) or edamame. For a vegan version, ensure your spring roll wrappers are vegan (most wheat-based ones are, but check ingredients for egg), use a cornstarch slurry instead of egg wash for sealing, and if using oyster sauce, replace it with a vegan oyster sauce (mushroom-based) or simply add a bit more soy sauce and a pinch of sugar for umami.
Q2: What’s the best way to store leftover cooked spring rolls and how do I reheat them?
A: Store leftover cooked spring rolls in an airtight container in the refrigerator for up to 2-3 days. To reheat and bring back some crispiness, the best methods are:
* Oven/Toaster Oven: Preheat to 350°F (175°C). Place spring rolls on a baking sheet or oven-safe rack and heat for 10-15 minutes, or until hot and re-crisped.
* Air Fryer: Preheat to 350-375°F (175-190°C). Reheat for 3-5 minutes, shaking the basket halfway, until hot and crispy.
Avoid reheating in the microwave, as this will make them soft and chewy.
Q3: My spring roll wrappers keep tearing when I try to roll them. What am I doing wrong?
A: This is a common issue with a few potential causes:
* Wrappers are too dry: Ensure you’re keeping the stack of unused wrappers covered with a damp cloth.
* Overfilling: Using too much filling stretches the wrapper too thin.
* Filling is too wet: Excess moisture in the filling can weaken the wrapper. Ensure your filling is well-drained and thickened with cornstarch if needed.
* Filling is too hot/warm: This creates steam and weakens the wrapper. Make sure it’s completely cool.
* Rough handling: Be gentle when separating wrappers and when folding and rolling. If a small tear occurs, you can sometimes patch it with a small piece of another wrapper using your sealing agent.
* Wrapper quality: Some brands are more delicate than others. Try a different brand if problems persist.
Q4: Can I prepare the filling or even the rolled spring rolls in advance?
A: Yes, definitely!
* Filling: You can make the filling a day or two in advance. Store it in an airtight container in the refrigerator. This actually helps the flavors meld.
* Rolled, Uncooked Spring Rolls: You can roll the spring rolls, place them on a parchment-lined baking sheet (not touching), cover tightly with plastic wrap, and refrigerate for up to 4-6 hours before cooking. For longer storage, it’s best to freeze them as described in the “Additional Tips” section.
Q5: What type of oil is best for frying spring rolls, and what’s the ideal temperature?
A: The best oils for frying spring rolls are neutral-flavored oils with a high smoke point. Good choices include:
* Peanut oil (classic choice, great flavor)
* Canola oil
* Vegetable oil
* Corn oil
* Sunflower or Safflower oil
Avoid oils with low smoke points like extra virgin olive oil.
The ideal oil temperature for frying spring rolls is between 350°F and 375°F (175°C and 190°C). Too low, and the spring rolls will absorb too much oil and become greasy. Too high, and the wrapper will brown too quickly before the filling is heated through, or even burn. Use a kitchen thermometer for accuracy.

Chicken and Vegetable Spring Rolls Recipe
Ingredients
For the Spring Roll Filling:
- Chicken: 1 lb (about 450g) boneless, skinless chicken thighs or breasts, finely minced or ground. (Thighs offer more flavor and moisture).
- Green Cabbage: 3 cups, very thinly shredded (a mandoline or food processor shredding disc works wonders).
- Carrots: 1.5 cups, julienned or finely grated.
- Shiitake Mushrooms (optional but recommended): 1 cup fresh, thinly sliced, or ½ cup dried, rehydrated and sliced.
- Bean Sprouts: 1 cup, fresh (optional, add towards the end of cooking to maintain crunch).
- Yellow Onion: 1 medium, finely chopped.
- Garlic: 4-5 cloves, minced.
- Fresh Ginger: 2-inch piece, peeled and finely grated or minced.
- Scallions (Green Onions): ½ cup, thinly sliced (mostly green parts).
- Soy Sauce (low sodium preferred): 3-4 tablespoons, or to taste.
- Oyster Sauce (optional, for umami): 1-2 tablespoons.
- Toasted Sesame Oil: 1 tablespoon.
- Rice Vinegar: 1 teaspoon.
- White Pepper: ½ teaspoon (or black pepper to taste).
- Sugar: 1 teaspoon (helps balance flavors).
- Cornstarch: 1 tablespoon (to thicken filling slightly and help bind).
- Cooking Oil: 2-3 tablespoons (e.g., vegetable, canola, or peanut oil for stir-frying).
For Assembling the Spring Rolls:
- Spring Roll Wrappers: 1 package (approx. 20-25 sheets, typically 8×8 inch squares). Ensure they are the thin, wheat-based type, not rice paper wrappers for fresh summer rolls.
- Sealing Agent: 1 egg, beaten with 1 tablespoon of water (egg wash), OR 2 tablespoons of cornstarch mixed with 3 tablespoons of water to make a slurry.
For Frying/Cooking:
- Neutral Frying Oil: Approximately 4-6 cups (e.g., peanut, canola, vegetable, or corn oil) if deep-frying.
- Cooking Spray or a little oil: If baking or air-frying.
For a Simple Soy-Ginger Dipping Sauce:
- Soy Sauce: ¼ cup.
- Rice Vinegar: 2 tablespoons.
- Toasted Sesame Oil: 1 teaspoon.
- Fresh Ginger: 1 teaspoon, grated.
- Garlic: 1 small clove, minced (optional).
- Sugar or Honey: 1 teaspoon (optional, to taste).
- Chili Garlic Sauce or Sriracha: ½ teaspoon, or to taste (optional).
- Water: 1-2 tablespoons (to dilute if desired).
Instructions
Part 1: Preparing the Flavorful Filling
- Prepare the Chicken: If using whole chicken pieces, trim any excess fat and mince them very finely with a sharp knife, or pulse briefly in a food processor until ground but not pasty. If using pre-ground chicken, it’s ready to go.
- Prep the Vegetables: Ensure all your vegetables are chopped, shredded, or julienned as specified. Uniformity in size helps with even cooking and a pleasant texture. If using dried shiitake mushrooms, rehydrate them in hot water for 20-30 minutes, then squeeze out excess water and slice thinly.
- Sauté Aromatics: Heat 1-2 tablespoons of cooking oil in a large wok or heavy-bottomed skillet over medium-high heat. Add the chopped onion and cook for 2-3 minutes until softened. Then, add the minced garlic and grated ginger, sautéing for another minute until fragrant. Be careful not to burn them.
- Cook the Chicken: Add the minced or ground chicken to the wok. Break it apart with your spatula and cook, stirring frequently, until it’s no longer pink and is cooked through (about 5-7 minutes).
- Add Hardy Vegetables: Introduce the shredded carrots and sliced shiitake mushrooms (if using) to the wok. Stir-fry for 3-4 minutes until they begin to soften slightly.
- Add Softer Vegetables: Add the shredded cabbage to the wok. Continue to stir-fry for another 3-5 minutes. The cabbage should wilt down considerably but still retain a slight crunch. If using bean sprouts, add them in the last minute of cooking.
- Season the Filling: In a small bowl, whisk together the soy sauce, oyster sauce (if using), sesame oil, rice vinegar, white pepper, and sugar. Pour this sauce mixture over the chicken and vegetables in the wok. Stir well to combine everything.
- Thicken (Optional but Recommended): If your filling seems a bit watery, sprinkle the tablespoon of cornstarch evenly over the mixture. Stir continuously for about 1-2 minutes until the sauce thickens slightly and coats the ingredients. This helps prevent a soggy wrapper.
- Finish and Cool: Remove the wok from the heat. Stir in the sliced scallions. Taste the filling and adjust seasonings if necessary (more soy sauce for saltiness, a pinch more sugar for balance). Crucially, transfer the filling to a large baking sheet or several plates in a thin layer to cool down completely. This can take 30-60 minutes at room temperature, or you can speed it up in the refrigerator. A hot or warm filling will make the spring roll wrappers soggy and prone to tearing.
Part 2: Assembling the Spring Rolls
- Set Up Your Wrapping Station:
- Have your cooled spring roll filling ready.
- Carefully separate the spring roll wrappers. Keep them covered with a slightly damp (not wet!) paper towel or clean kitchen towel to prevent them from drying out, as they can become brittle quickly.
- Have your sealing agent (egg wash or cornstarch slurry) and a small brush nearby.
- Prepare a clean, dry work surface.
- Position the Wrapper: Place one spring roll wrapper on your work surface in a diamond shape, with one corner pointing towards you.
- Add the Filling: Spoon about 2-3 tablespoons of the cooled filling horizontally onto the lower third of the wrapper, leaving about 1-1.5 inches of space from the bottom corner and the side corners. Shape the filling into a compact log. Don’t overfill, or the wrapper might tear during rolling or frying.
- First Fold: Take the bottom corner (the one closest to you) and fold it up and over the filling, tucking it snugly against the filling.
- Fold the Sides: Fold in the left and right corners towards the center, over the filling, like you’re folding an envelope. Try to make these folds straight and tight to encase the filling.
- Roll Tightly: Begin rolling the spring roll upwards from the bottom, keeping the roll tight and compact. A tight roll prevents oil from seeping in during frying and helps the spring roll hold its shape.
- Seal the Edge: When you have about 1-2 inches of the top corner remaining, lightly brush the edges of that corner with your egg wash or cornstarch slurry. Continue rolling to seal the spring roll completely.
- Store Rolled Spring Rolls: Place the finished spring roll seam-side down on a baking sheet lined with parchment paper. Cover the completed rolls with plastic wrap or a damp towel to prevent them from drying out while you assemble the rest. Ensure they aren’t touching too much, or they might stick.
Part 3: Cooking the Spring Rolls
You have several options for cooking your spring rolls:
- Option 1: Deep Frying (Classic & Crispiest)
- Heat Oil: Pour about 2-3 inches of frying oil into a deep, heavy-bottomed pot, Dutch oven, or deep fryer. Heat the oil over medium-high heat until it reaches 350-375°F (175-190°C). Use a thermometer for accuracy. If you don’t have one, a small piece of wrapper dropped into the oil should sizzle vigorously and turn golden in about 30-45 seconds.
- Fry in Batches: Carefully place 3-4 spring rolls into the hot oil, ensuring not to overcrowd the pot (this lowers the oil temperature).
- Cook Until Golden: Fry for about 3-5 minutes per side, turning occasionally, until they are beautifully golden brown and crispy all over.
- Drain Excess Oil: Remove the cooked spring rolls using a spider or slotted spoon and transfer them to a wire rack set over a baking sheet to drain. This allows air to circulate, keeping them crispy. Avoid placing them directly on paper towels initially, as this can make the bottoms soggy. You can lightly pat them with paper towels after a minute on the rack.
- Maintain Oil Temperature: Allow the oil to come back up to temperature between batches.
- Option 2: Air Frying (Healthier Crunch)
- Preheat Air Fryer: Preheat your air fryer to 380-400°F (190-200°C).
- Prepare Rolls: Lightly spray or brush the spring rolls with oil on all sides. This helps them crisp up and achieve a golden color.
- Cook in Batches: Place the spring rolls in a single layer in the air fryer basket, ensuring they are not overcrowded.
- Air Fry: Cook for 8-12 minutes, flipping them halfway through, until golden brown and crispy. Cooking time may vary depending on your air fryer model.
- Option 3: Baking (Easiest Cleanup)
- Preheat Oven: Preheat your oven to 400-425°F (200-220°C). Line a baking sheet with parchment paper.
- Prepare Rolls: Lightly brush or spray the spring rolls with oil on all sides.
- Bake: Arrange the spring rolls in a single layer on the prepared baking sheet. Bake for 15-25 minutes, flipping them halfway through, until they are golden brown and crispy. They might not be as uniformly browned or quite as crispy as fried versions but are still delicious.
Part 4: Preparing the Dipping Sauce
- Combine Ingredients: In a small bowl, whisk together the soy sauce, rice vinegar, toasted sesame oil, grated ginger, minced garlic (if using), sugar/honey (if using), and chili garlic sauce/Sriracha (if using).
- Adjust to Taste: Taste the sauce and adjust the ingredients as needed. Add a little water if you prefer a thinner consistency.
- Serve: Pour into a small dipping bowl.
Nutrition
- Serving Size: One Normal Portion
- Calories: 120-150