Ingredients
For the Spring Roll Filling:
- Chicken: 1 lb (about 450g) boneless, skinless chicken thighs or breasts, finely minced or ground. (Thighs offer more flavor and moisture).
- Green Cabbage: 3 cups, very thinly shredded (a mandoline or food processor shredding disc works wonders).
- Carrots: 1.5 cups, julienned or finely grated.
- Shiitake Mushrooms (optional but recommended): 1 cup fresh, thinly sliced, or ½ cup dried, rehydrated and sliced.
- Bean Sprouts: 1 cup, fresh (optional, add towards the end of cooking to maintain crunch).
- Yellow Onion: 1 medium, finely chopped.
- Garlic: 4-5 cloves, minced.
- Fresh Ginger: 2-inch piece, peeled and finely grated or minced.
- Scallions (Green Onions): ½ cup, thinly sliced (mostly green parts).
- Soy Sauce (low sodium preferred): 3-4 tablespoons, or to taste.
- Oyster Sauce (optional, for umami): 1-2 tablespoons.
- Toasted Sesame Oil: 1 tablespoon.
- Rice Vinegar: 1 teaspoon.
- White Pepper: ½ teaspoon (or black pepper to taste).
- Sugar: 1 teaspoon (helps balance flavors).
- Cornstarch: 1 tablespoon (to thicken filling slightly and help bind).
- Cooking Oil: 2-3 tablespoons (e.g., vegetable, canola, or peanut oil for stir-frying).
For Assembling the Spring Rolls:
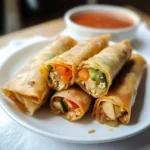
- Spring Roll Wrappers: 1 package (approx. 20-25 sheets, typically 8×8 inch squares). Ensure they are the thin, wheat-based type, not rice paper wrappers for fresh summer rolls.
- Sealing Agent: 1 egg, beaten with 1 tablespoon of water (egg wash), OR 2 tablespoons of cornstarch mixed with 3 tablespoons of water to make a slurry.
For Frying/Cooking:
- Neutral Frying Oil: Approximately 4-6 cups (e.g., peanut, canola, vegetable, or corn oil) if deep-frying.
- Cooking Spray or a little oil: If baking or air-frying.
For a Simple Soy-Ginger Dipping Sauce:
- Soy Sauce: ¼ cup.
- Rice Vinegar: 2 tablespoons.
- Toasted Sesame Oil: 1 teaspoon.
- Fresh Ginger: 1 teaspoon, grated.
- Garlic: 1 small clove, minced (optional).
- Sugar or Honey: 1 teaspoon (optional, to taste).
- Chili Garlic Sauce or Sriracha: ½ teaspoon, or to taste (optional).
- Water: 1-2 tablespoons (to dilute if desired).
Instructions
Part 1: Preparing the Flavorful Filling
- Prepare the Chicken: If using whole chicken pieces, trim any excess fat and mince them very finely with a sharp knife, or pulse briefly in a food processor until ground but not pasty. If using pre-ground chicken, it’s ready to go.
- Prep the Vegetables: Ensure all your vegetables are chopped, shredded, or julienned as specified. Uniformity in size helps with even cooking and a pleasant texture. If using dried shiitake mushrooms, rehydrate them in hot water for 20-30 minutes, then squeeze out excess water and slice thinly.
- Sauté Aromatics: Heat 1-2 tablespoons of cooking oil in a large wok or heavy-bottomed skillet over medium-high heat. Add the chopped onion and cook for 2-3 minutes until softened. Then, add the minced garlic and grated ginger, sautéing for another minute until fragrant. Be careful not to burn them.
- Cook the Chicken: Add the minced or ground chicken to the wok. Break it apart with your spatula and cook, stirring frequently, until it’s no longer pink and is cooked through (about 5-7 minutes).
- Add Hardy Vegetables: Introduce the shredded carrots and sliced shiitake mushrooms (if using) to the wok. Stir-fry for 3-4 minutes until they begin to soften slightly.
- Add Softer Vegetables: Add the shredded cabbage to the wok. Continue to stir-fry for another 3-5 minutes. The cabbage should wilt down considerably but still retain a slight crunch. If using bean sprouts, add them in the last minute of cooking.
- Season the Filling: In a small bowl, whisk together the soy sauce, oyster sauce (if using), sesame oil, rice vinegar, white pepper, and sugar. Pour this sauce mixture over the chicken and vegetables in the wok. Stir well to combine everything.
- Thicken (Optional but Recommended): If your filling seems a bit watery, sprinkle the tablespoon of cornstarch evenly over the mixture. Stir continuously for about 1-2 minutes until the sauce thickens slightly and coats the ingredients. This helps prevent a soggy wrapper.
- Finish and Cool: Remove the wok from the heat. Stir in the sliced scallions. Taste the filling and adjust seasonings if necessary (more soy sauce for saltiness, a pinch more sugar for balance). Crucially, transfer the filling to a large baking sheet or several plates in a thin layer to cool down completely. This can take 30-60 minutes at room temperature, or you can speed it up in the refrigerator. A hot or warm filling will make the spring roll wrappers soggy and prone to tearing.
Part 2: Assembling the Spring Rolls
- Set Up Your Wrapping Station:
- Have your cooled spring roll filling ready.
- Carefully separate the spring roll wrappers. Keep them covered with a slightly damp (not wet!) paper towel or clean kitchen towel to prevent them from drying out, as they can become brittle quickly.
- Have your sealing agent (egg wash or cornstarch slurry) and a small brush nearby.
- Prepare a clean, dry work surface.
- Position the Wrapper: Place one spring roll wrapper on your work surface in a diamond shape, with one corner pointing towards you.
- Add the Filling: Spoon about 2-3 tablespoons of the cooled filling horizontally onto the lower third of the wrapper, leaving about 1-1.5 inches of space from the bottom corner and the side corners. Shape the filling into a compact log. Don’t overfill, or the wrapper might tear during rolling or frying.
- First Fold: Take the bottom corner (the one closest to you) and fold it up and over the filling, tucking it snugly against the filling.
- Fold the Sides: Fold in the left and right corners towards the center, over the filling, like you’re folding an envelope. Try to make these folds straight and tight to encase the filling.
- Roll Tightly: Begin rolling the spring roll upwards from the bottom, keeping the roll tight and compact. A tight roll prevents oil from seeping in during frying and helps the spring roll hold its shape.
- Seal the Edge: When you have about 1-2 inches of the top corner remaining, lightly brush the edges of that corner with your egg wash or cornstarch slurry. Continue rolling to seal the spring roll completely.
- Store Rolled Spring Rolls: Place the finished spring roll seam-side down on a baking sheet lined with parchment paper. Cover the completed rolls with plastic wrap or a damp towel to prevent them from drying out while you assemble the rest. Ensure they aren’t touching too much, or they might stick.
Part 3: Cooking the Spring Rolls
You have several options for cooking your spring rolls:
- Option 1: Deep Frying (Classic & Crispiest)
- Heat Oil: Pour about 2-3 inches of frying oil into a deep, heavy-bottomed pot, Dutch oven, or deep fryer. Heat the oil over medium-high heat until it reaches 350-375°F (175-190°C). Use a thermometer for accuracy. If you don’t have one, a small piece of wrapper dropped into the oil should sizzle vigorously and turn golden in about 30-45 seconds.
- Fry in Batches: Carefully place 3-4 spring rolls into the hot oil, ensuring not to overcrowd the pot (this lowers the oil temperature).
- Cook Until Golden: Fry for about 3-5 minutes per side, turning occasionally, until they are beautifully golden brown and crispy all over.
- Drain Excess Oil: Remove the cooked spring rolls using a spider or slotted spoon and transfer them to a wire rack set over a baking sheet to drain. This allows air to circulate, keeping them crispy. Avoid placing them directly on paper towels initially, as this can make the bottoms soggy. You can lightly pat them with paper towels after a minute on the rack.
- Maintain Oil Temperature: Allow the oil to come back up to temperature between batches.
- Option 2: Air Frying (Healthier Crunch)
- Preheat Air Fryer: Preheat your air fryer to 380-400°F (190-200°C).
- Prepare Rolls: Lightly spray or brush the spring rolls with oil on all sides. This helps them crisp up and achieve a golden color.
- Cook in Batches: Place the spring rolls in a single layer in the air fryer basket, ensuring they are not overcrowded.
- Air Fry: Cook for 8-12 minutes, flipping them halfway through, until golden brown and crispy. Cooking time may vary depending on your air fryer model.
- Option 3: Baking (Easiest Cleanup)
- Preheat Oven: Preheat your oven to 400-425°F (200-220°C). Line a baking sheet with parchment paper.
- Prepare Rolls: Lightly brush or spray the spring rolls with oil on all sides.
- Bake: Arrange the spring rolls in a single layer on the prepared baking sheet. Bake for 15-25 minutes, flipping them halfway through, until they are golden brown and crispy. They might not be as uniformly browned or quite as crispy as fried versions but are still delicious.
Part 4: Preparing the Dipping Sauce
- Combine Ingredients: In a small bowl, whisk together the soy sauce, rice vinegar, toasted sesame oil, grated ginger, minced garlic (if using), sugar/honey (if using), and chili garlic sauce/Sriracha (if using).
- Adjust to Taste: Taste the sauce and adjust the ingredients as needed. Add a little water if you prefer a thinner consistency.
- Serve: Pour into a small dipping bowl.
Nutrition
- Serving Size: One Normal Portion
- Calories: 120-150