


It started as a late-night craving, a desperate search for something sweet yet healthy, and incredibly easy to make. Staring into my fridge, the options seemed limited until my eyes landed on a lone sweet potato and a carton of eggs. Could these two humble ingredients possibly transform into something resembling a pancake? Skepticism warred with curiosity, and thankfully, curiosity won. What unfolded was nothing short of kitchen magic. The aroma of subtly sweet pancakes filled my kitchen, and the first bite was a revelation. Lightly sweet, surprisingly fluffy, and with a delightful hint of sweet potato, these two-ingredient wonders defied all expectations. My family, initially dubious about the concept of “sweet potato pancakes,” devoured them in minutes, requesting them again the very next morning. Since then, these 2-Ingredient Sweet Potato Pancakes have become a staple in our home – a testament to the fact that sometimes, the simplest recipes are truly the best.
Ingredients
The beauty of this recipe lies in its utter simplicity. You’ll only need two primary ingredients, making it a pantry staple dream and a lifesaver for those impromptu breakfast or brunch moments.
- 1 Medium Sweet Potato: The star of the show! Choose a medium-sized sweet potato, roughly around 6-8 ounces. The type of sweet potato doesn’t drastically alter the recipe, but varieties like Jewel or Garnet, known for their moistness and sweetness, work particularly well. Ensure your sweet potato is cooked until soft. Baking, microwaving, steaming, or boiling are all viable methods, each imparting a slightly different nuance to the final pancake texture. For baking, roasting the sweet potato brings out a deeper sweetness and slightly drier texture, which can be beneficial for thicker pancakes. Microwaving is the quickest option, perfect for when time is of the essence, though it might result in a slightly wetter sweet potato. Steaming and boiling are also excellent methods, ensuring a moist and tender sweet potato. Regardless of your chosen method, the key is to have a cooked sweet potato that is easily mashable and free from any tough or undercooked parts.
- 2 Large Eggs: The binding agent and protein powerhouse! Large eggs are recommended for this recipe to provide the right balance of moisture and structure. Eggs are crucial for holding the pancakes together, adding richness, and contributing to their overall texture. They also add a significant nutritional boost, packing in protein and essential vitamins. If you’re using extra-large eggs, you might want to start with 1.5 eggs initially and adjust the batter consistency if needed. Conversely, if using medium eggs, you might consider adding a touch more sweet potato to maintain the desired batter thickness. Fresh, high-quality eggs will always yield the best results, both in terms of flavor and binding capabilities.
Optional Additions (To Enhance Flavor – Still Keeping it Minimalist):
While the magic of this recipe is in its two-ingredient nature, you can certainly enhance the flavor profile with a few simple additions without straying too far from its minimalist core. These are entirely optional, but can add a delightful layer of complexity:
- Pinch of Cinnamon: A dash of cinnamon beautifully complements the natural sweetness of the sweet potato, adding warmth and depth of flavor. Start with just a quarter teaspoon and adjust to your preference.
- Dash of Nutmeg: Similar to cinnamon, nutmeg adds a subtle spice and warmth that pairs wonderfully with sweet potato. A very small pinch is all you need, as nutmeg can be quite potent.
- Vanilla Extract (Pure): A few drops of pure vanilla extract can elevate the sweetness and round out the flavors. Use high-quality vanilla extract for the best taste. Start with ¼ teaspoon.
- Salt (Pinch): A tiny pinch of salt might seem counterintuitive in a sweet pancake recipe, but it actually enhances the sweetness and balances the flavors. Just a very small pinch is sufficient.
Remember, these additions are completely optional. The pancakes are delicious and satisfying even with just sweet potato and eggs. Experiment with these flavor enhancers once you’ve mastered the basic recipe to discover your perfect variation.
Instructions
Making these 2-Ingredient Sweet Potato Pancakes is incredibly straightforward, making them perfect for busy mornings or a quick, healthy snack. Follow these step-by-step instructions for pancake perfection:
Step 1: Prepare the Sweet Potato
- Cooking Method: Choose your preferred method for cooking the sweet potato. Baking at 400°F (200°C) for 45-60 minutes, microwaving on high for 5-8 minutes (piercing several times first), steaming for 20-25 minutes, or boiling for 15-20 minutes are all viable options. Baking often yields the best flavor and slightly drier texture, while microwaving is the quickest.
- Cool Slightly: Once cooked, let the sweet potato cool slightly until it’s comfortable to handle. This prevents the heat from cooking the eggs prematurely when you mix the batter.
- Peel (Optional but Recommended): While the skin is edible and nutritious, peeling the sweet potato will result in a smoother pancake batter. The choice is yours based on your preference and the desired texture.
- Mash Thoroughly: In a medium-sized mixing bowl, mash the cooked sweet potato thoroughly using a fork or potato masher. Ensure there are no large lumps remaining for a smooth pancake texture. The consistency should be similar to mashed potatoes.
Step 2: Combine Ingredients
- Add Eggs: Crack the eggs directly into the bowl with the mashed sweet potato.
- Mix Well: Using a fork or whisk, thoroughly combine the mashed sweet potato and eggs. Mix until you achieve a smooth, homogenous batter. It should be slightly thick but pourable. Don’t overmix; just ensure everything is well combined. If you are adding any optional spices like cinnamon, nutmeg, vanilla extract, or a pinch of salt, incorporate them at this stage and mix them in evenly.
Step 3: Cook the Pancakes
- Heat a Non-Stick Pan or Griddle: Place a non-stick skillet or griddle over medium heat. Non-stick cookware is essential for this recipe to prevent the pancakes from sticking.
- Add a Touch of Oil or Butter (Optional): While a good non-stick pan might not require it, adding a very small amount of coconut oil, butter, or cooking spray to the pan can help achieve a golden-brown exterior and prevent sticking, especially if your pan is not perfectly non-stick. Use just enough to lightly grease the surface.
- Pour Batter onto Hot Pan: Once the pan is heated, pour ¼ cup of batter onto the hot surface for each pancake. Don’t overcrowd the pan; cook in batches if necessary to maintain even cooking and prevent sticking. Leave enough space between pancakes for easy flipping.
- Cook for 3-4 Minutes per Side: Cook the pancakes for approximately 3-4 minutes per side, or until golden brown and cooked through. The edges should start to look set, and small bubbles may appear on the surface as they cook.
- Flip Carefully: Gently flip the pancakes using a spatula when the bottom is golden brown and they release easily from the pan. Cook the other side for another 2-3 minutes, or until cooked through and golden brown. To ensure they are cooked through, you can gently press down on the center of a pancake; it should feel firm, not squishy.
Step 4: Serve Immediately
- Remove from Pan: Once cooked, remove the pancakes from the pan and place them on a plate.
- Repeat with Remaining Batter: Continue cooking the remaining batter in batches, adding a touch more oil or butter to the pan if needed between batches.
- Serve Warm: These pancakes are best enjoyed immediately while they are warm and fluffy. Serve with your favorite toppings (suggestions in the “How to Serve” section below).
Tips for Success:
- Don’t Overmix: Overmixing can lead to tougher pancakes. Mix just until the ingredients are combined.
- Pan Temperature is Key: Medium heat is ideal. If the pan is too hot, the pancakes will burn on the outside before cooking through. If it’s too low, they might become dense and not brown properly.
- Adjust Batter Consistency (If Needed): If your batter seems too thick, you can add a teaspoon of water or milk (dairy or non-dairy) to thin it slightly. However, the 2-ingredient recipe is designed to work perfectly without added liquids.
- Test a Small Pancake First: If you’re unsure about the pan temperature or batter consistency, cook a small test pancake first to adjust as needed before cooking the full batch.
- Be Patient When Flipping: Wait until the pancakes are properly set and golden brown before attempting to flip them. This will prevent them from sticking and falling apart.
Nutrition Facts (Estimated)
These 2-Ingredient Sweet Potato Pancakes are not only delicious and easy to make but also surprisingly nutritious. Here’s an estimated nutritional breakdown per serving:
Servings: This recipe typically yields approximately 4-6 pancakes, depending on the size you make them. Let’s consider 2 pancakes as one serving for nutritional estimation purposes.
Calories Per Serving (2 Pancakes): Approximately 150-200 calories (This is an estimate and can vary based on the size of the sweet potato and eggs, as well as cooking oil used).
Approximate Macronutrient Breakdown Per Serving (2 Pancakes):
- Protein: 8-10 grams (Primarily from the eggs)
- Carbohydrates: 25-30 grams (Primarily from the sweet potato, including fiber and natural sugars)
- Fat: 6-8 grams (Primarily from the egg yolks, mostly healthy fats)
Other Notable Nutrients (from Sweet Potato and Eggs):
- Vitamin A: Sweet potatoes are an excellent source of Vitamin A (in the form of beta-carotene), crucial for vision, immune function, and skin health.
- Vitamin C: Sweet potatoes also provide Vitamin C, an antioxidant that supports immune function and collagen production.
- Potassium: Sweet potatoes are a good source of potassium, an electrolyte important for blood pressure regulation and muscle function.
- Fiber: Sweet potatoes contribute a good amount of dietary fiber, aiding digestion and promoting satiety.
- B Vitamins: Eggs are a good source of various B vitamins, including B12, riboflavin, and folate, essential for energy metabolism and nerve function.
- Choline: Egg yolks are rich in choline, an important nutrient for brain health and development.
- Lutein and Zeaxanthin: Egg yolks contain these antioxidants, beneficial for eye health.
Health Benefits:
- Naturally Gluten-Free: Made with just sweet potato and eggs, these pancakes are naturally gluten-free, making them a great option for those with gluten sensitivities or celiac disease.
- High in Nutrients: Packed with vitamins, minerals, and antioxidants from sweet potatoes and eggs, these pancakes offer a nutritious alternative to traditional pancakes.
- Good Source of Protein: The eggs provide a significant amount of protein, contributing to satiety and muscle building.
- Relatively Low in Calories: Compared to traditional pancakes loaded with flour, sugar, and butter, these sweet potato pancakes are lower in calories and fat, especially if you use minimal oil for cooking.
- Fiber-Rich: The fiber from sweet potatoes aids digestion and helps you feel fuller for longer.
Important Note: These nutritional values are estimates and can vary based on the specific size and type of sweet potato and eggs used, cooking methods, and any added ingredients. For more precise nutritional information, you can use online nutrition calculators and input the exact ingredients and quantities you use.
Preparation Time
One of the many advantages of these 2-Ingredient Sweet Potato Pancakes is their quick preparation time. From start to finish, you can have a stack of warm, delicious pancakes on your plate in a remarkably short amount of time.
Breakdown of Preparation Time:
- Sweet Potato Cooking Time: This is the most variable part, depending on your chosen cooking method.
- Microwave: 5-8 minutes (fastest)
- Baking: 45-60 minutes (longest, but can be done in advance)
- Steaming/Boiling: 20-25 minutes (moderate)
- Cooling and Mashing Sweet Potato: 5 minutes (allowing it to cool slightly and mashing it)
- Mixing Batter: 2 minutes (combining mashed sweet potato and eggs)
- Cooking Pancakes (per batch): 8-10 minutes (cooking 4-6 pancakes, depending on pan size and batches)
Total Estimated Preparation Time (Using Microwaved Sweet Potato):
- Total Time (Fastest): Approximately 20-25 minutes (including microwaving, mashing, mixing, and cooking)
- Active Cooking Time: Approximately 10-15 minutes (actual time spent cooking pancakes on the pan)
Time-Saving Tips:
- Cook Sweet Potato in Advance: To significantly reduce preparation time, cook your sweet potato ahead of time. Baked sweet potatoes can be stored in the refrigerator for up to 3-4 days. You can also microwave sweet potatoes the night before and store them in the fridge.
- Microwave for Speed: Microwaving is the quickest way to cook a sweet potato for this recipe if you are short on time.
- Efficient Cooking: Use a large griddle or two skillets simultaneously to cook pancakes in larger batches and reduce cooking time.
- Simple Recipe, Fast Results: The minimal ingredient list and straightforward instructions inherently make this recipe very quick to prepare.
Ideal For:
- Busy Mornings: Perfect for a healthy and quick breakfast when you’re short on time.
- Weekends Brunches: Easy enough to whip up for a relaxed weekend brunch.
- Last-Minute Snacks: A healthy and satisfying snack option that can be prepared quickly when hunger strikes.
- Weeknight Dinners (Breakfast for Dinner): A fun and easy “breakfast for dinner” option that the whole family will enjoy.
These 2-Ingredient Sweet Potato Pancakes are a testament to how delicious and nutritious food can be both simple and quick to prepare, making them a fantastic choice for any occasion.
How to Serve
These versatile 2-Ingredient Sweet Potato Pancakes can be served in a multitude of ways, catering to both sweet and savory preferences. Get creative with your toppings and enjoy them for breakfast, brunch, snack, or even dessert!
Sweet Serving Suggestions:
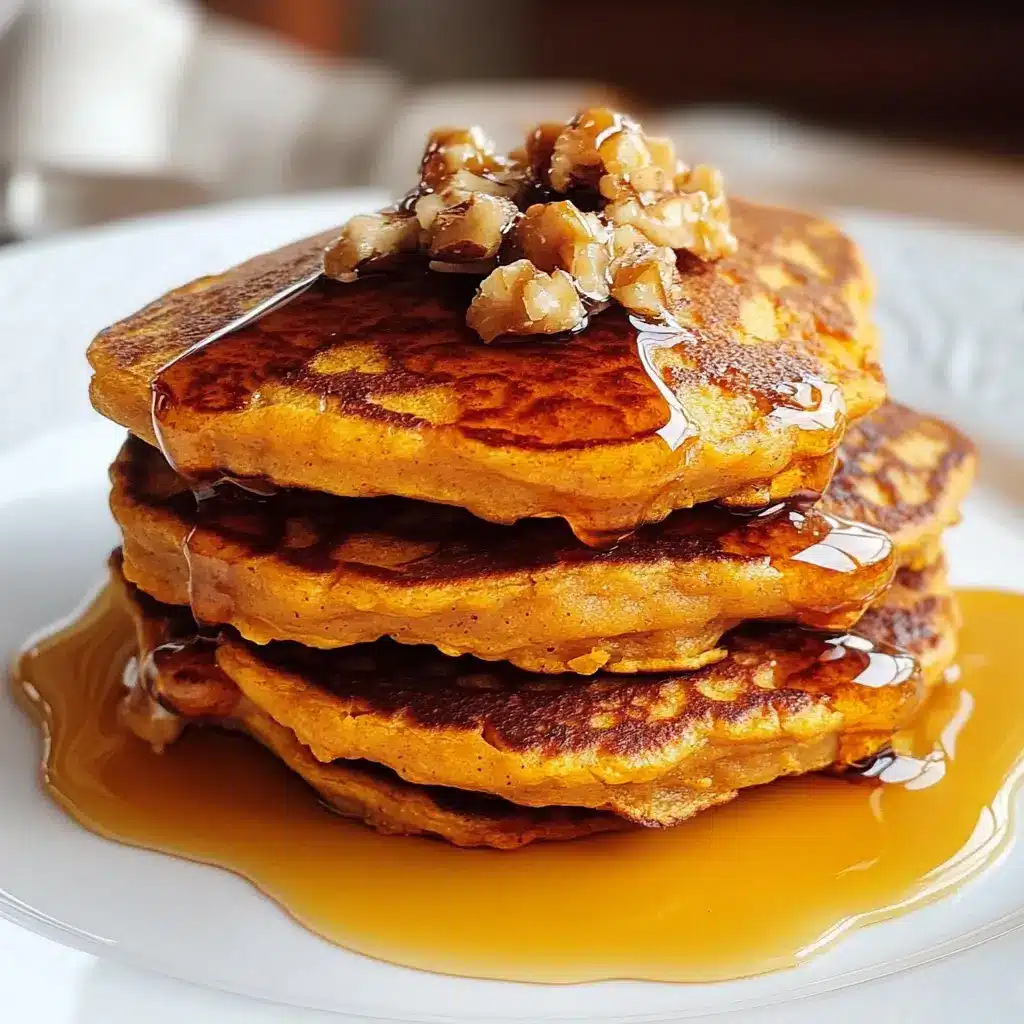
- Classic Syrup: Drizzle with pure maple syrup, agave nectar, or honey for a traditional pancake experience. The sweetness complements the subtle sweetness of the sweet potato.
- Fresh Fruit and Berries: Top with a colorful array of fresh fruits like sliced bananas, strawberries, blueberries, raspberries, peaches, or mangoes. The natural sweetness and juiciness of the fruit enhance the pancakes beautifully.
- Yogurt and Granola: Add a dollop of Greek yogurt or regular yogurt for creaminess and protein, and sprinkle with granola for added crunch and texture.
- Whipped Cream or Coconut Cream: For a more decadent treat, top with a dollop of whipped cream or coconut whipped cream (for a dairy-free option).
- Nut Butter and Banana: Spread your favorite nut butter (peanut, almond, cashew) on the pancakes and top with sliced bananas for a protein-packed and satisfying combination.
- Fruit Compote or Jam: Spoon warm fruit compote (like apple, berry, or peach) or your favorite jam or preserves over the pancakes for a flavorful and slightly more sophisticated topping.
- Chocolate Chips or Cacao Nibs: For chocolate lovers, sprinkle with mini chocolate chips or cacao nibs for a touch of indulgence and antioxidants.
- Cinnamon and Sugar: A simple yet delightful topping of cinnamon and a light dusting of powdered sugar adds warmth and classic pancake flavor.
Savory Serving Suggestions:
- Avocado and Egg: Top with mashed avocado, a fried or poached egg, and a sprinkle of salt and pepper for a savory and protein-rich meal.
- Salsa and Sour Cream: Add a dollop of salsa and sour cream or Greek yogurt for a zesty and refreshing savory twist.
- Smoked Salmon and Cream Cheese (or Dairy-Free Cream Cheese): For a more sophisticated savory option, top with smoked salmon, cream cheese (or dairy-free alternative), and fresh dill.
- Black Beans and Corn Salsa: Create a black bean and corn salsa to top the pancakes for a Tex-Mex inspired savory dish.
- Roasted Vegetables: Top with roasted vegetables like bell peppers, zucchini, onions, and tomatoes for a hearty and nutritious savory meal.
- Cheese and Herbs: Sprinkle with shredded cheese (cheddar, mozzarella, feta) and fresh herbs like chives, parsley, or cilantro for a simple savory topping.
- Pesto and Tomato: Spread pesto on the pancakes and top with sliced tomatoes for an Italian-inspired savory flavor.
Serving Ideas for Kids:
- Fun Shapes: Use cookie cutters to create fun shapes with the pancakes to make them more appealing to kids.
- Dipping Sauces: Serve with small bowls of yogurt, applesauce, or fruit puree for dipping.
- “Pancake Sandwiches”: Make pancake sandwiches by layering nut butter and sliced fruit between two pancakes.
- Mini Pancakes: Make smaller, bite-sized pancakes for little hands.
- Colorful Toppings: Use colorful toppings like rainbow sprinkles (in moderation), colorful fruits, and yogurt to make them visually appealing.
No matter how you choose to serve them, these 2-Ingredient Sweet Potato Pancakes are a blank canvas for your culinary creativity. Experiment with different toppings and find your favorite combinations!
Additional Tips
To ensure pancake perfection every time, here are five additional tips to keep in mind when making your 2-Ingredient Sweet Potato Pancakes:
Tip 1: Sweet Potato Cooking Method Matters for Texture:
The way you cook your sweet potato can subtly influence the final texture of your pancakes.
- Baking: Baking the sweet potato in the oven (wrapped in foil or directly on the rack) tends to dry it out slightly, resulting in a thicker, less wet pancake batter. This can be ideal if you prefer fluffier, less delicate pancakes. Baked sweet potatoes also develop a deeper, more caramelized sweetness.
- Microwaving: Microwaving is the fastest method, but it can result in a slightly wetter sweet potato. This might lead to a slightly thinner batter and potentially more delicate pancakes. If your microwaved sweet potato seems very wet, you can try to pat it dry slightly with a paper towel before mashing.
- Steaming or Boiling: Steaming or boiling sweet potatoes results in a moist and tender sweet potato. Similar to microwaving, this can lead to a slightly wetter batter. Ensure you drain the sweet potato well after boiling or steaming to minimize excess moisture.
Experiment with different cooking methods to see which texture you prefer for your pancakes. For beginners, baking or microwaving are often the easiest and most consistent methods.
Tip 2: Egg Quality and Freshness Impact Binding:
The quality and freshness of your eggs play a role in how well the pancakes bind together and their overall texture.
- Fresh Eggs: Fresh eggs have firmer whites and yolks, which contribute to better binding and structure in the pancakes. Older eggs might have thinner whites, which can make the batter slightly wetter and potentially harder to handle.
- Large Eggs: Using large eggs as specified in the recipe ensures the right ratio of egg to sweet potato for optimal binding. If you use smaller eggs, you might need to add a touch more sweet potato to maintain the correct batter consistency.
- Room Temperature Eggs (Optional but Helpful): While not strictly necessary, using eggs that are closer to room temperature can help them incorporate more easily into the mashed sweet potato and create a smoother batter. If your eggs are cold from the refrigerator, you can let them sit at room temperature for about 15-20 minutes before using.
Using high-quality, fresh, large eggs will generally yield the best results for these pancakes, ensuring they hold together well and have a pleasant texture.
Tip 3: Pan Temperature Control is Crucial for Even Cooking:
Maintaining the correct pan temperature is essential for cooking pancakes evenly and preventing them from burning on the outside while remaining uncooked in the center.
- Medium Heat: Medium heat is generally the sweet spot for cooking these sweet potato pancakes. It allows them to cook through without burning too quickly.
- Preheat Pan Properly: Ensure your pan or griddle is properly preheated before adding the batter. A hot pan will help the pancakes cook quickly and evenly. You can test the pan temperature by flicking a tiny drop of batter onto the pan; it should sizzle gently.
- Adjust Heat as Needed: If you notice the pancakes are browning too quickly on the outside before being cooked through in the center, reduce the heat slightly. Conversely, if they are not browning sufficiently or cooking too slowly, you can increase the heat a little.
- Avoid Overcrowding the Pan: Don’t overcrowd the pan with too many pancakes at once. Overcrowding can lower the pan temperature and lead to uneven cooking and potentially sticking. Cook in batches if necessary to maintain consistent pan temperature and allow for proper browning.
Mastering pan temperature control is key to achieving perfectly cooked, golden-brown sweet potato pancakes every time.
Tip 4: Batter Consistency – Aim for Thick but Pourable:
The ideal batter consistency for these pancakes is slightly thick but still pourable.
- Proper Mashing: Thoroughly mashing the sweet potato is crucial for achieving the right batter consistency. Ensure there are no large lumps, as they can make the batter uneven and harder to pour smoothly.
- Egg Ratio: The recipe is designed to use two large eggs for a medium sweet potato. This ratio generally results in a good batter consistency. However, the moisture content of sweet potatoes can vary.
- Adjusting Consistency (If Necessary): If your batter seems too thick and difficult to pour, you can add a teaspoon of water, milk (dairy or non-dairy), or even a little more egg white to thin it slightly. Add liquid gradually, a teaspoon at a time, and mix well until you reach a pourable consistency. If the batter seems too thin, it’s harder to fix in this 2-ingredient recipe, but you could try adding a very small amount of mashed cooked sweet potato if you have extra, or just be extra careful when flipping as thinner batter pancakes can be more delicate.
- Resting the Batter (Not Necessary but Okay): Unlike traditional pancake batter with flour, this 2-ingredient batter doesn’t require resting. You can cook it immediately after mixing. However, if you do let it sit for a few minutes, it won’t negatively impact the pancakes.
Aim for a batter that is thick enough to hold its shape when poured onto the pan but thin enough to spread slightly and cook evenly.
Tip 5: Storage and Reheating for Leftovers (Though Best Fresh):
While these pancakes are truly best enjoyed fresh and warm, you can store and reheat leftovers if needed.
- Storage: Let the cooked pancakes cool completely to room temperature. Then, store them in an airtight container in the refrigerator for up to 2-3 days. To prevent them from sticking together, you can place parchment paper between layers of pancakes.
- Reheating Methods:
- Microwave: The quickest method, but can make them slightly softer and less crisp. Microwave in short intervals (15-30 seconds) until heated through.
- Skillet/Pan: Reheating in a lightly oiled skillet or pan over medium-low heat is a good way to maintain some crispness. Reheat for a few minutes per side until warmed through.
- Toaster Oven or Oven: Reheating in a toaster oven or oven at a low temperature (around 300°F or 150°C) can help retain texture better than microwaving. Reheat for 5-10 minutes until warmed through.
Keep in mind that reheated pancakes will never be quite as perfect as freshly cooked ones, but these methods can help you enjoy leftovers without compromising too much on taste and texture. For the best experience, try to make just the amount you plan to consume immediately.
FAQ Section
Q1: Can I use different types of sweet potatoes for this recipe?
A: Yes, you can use different varieties of sweet potatoes. While Jewel or Garnet sweet potatoes, known for their moistness and sweetness, are often recommended, other types like Japanese sweet potatoes or even white sweet potatoes will work. However, keep in mind that the texture and sweetness might slightly vary depending on the type of sweet potato you use. Adjust the cooking time as needed based on the size and type of sweet potato.
Q2: Can I add flour or other ingredients to make these pancakes more like traditional pancakes?
A: While you can add flour or other ingredients, doing so would move away from the core concept of 2-Ingredient Sweet Potato Pancakes. The beauty of this recipe is its simplicity and its naturally gluten-free and grain-free nature. If you add flour (wheat, almond, oat, etc.), baking powder, or other ingredients, it will alter the texture and nutritional profile, making it more akin to a traditional pancake recipe with sweet potato added. If you’re looking for a 2-ingredient option, stick to just sweet potato and eggs. If you want a more traditional pancake, there are many other sweet potato pancake recipes that include flour and other ingredients.
Q3: Are these pancakes naturally gluten-free and dairy-free?
A: Yes, these 2-Ingredient Sweet Potato Pancakes are naturally gluten-free and dairy-free as the base recipe only contains sweet potato and eggs. Sweet potatoes are naturally gluten-free, and eggs are dairy-free. This makes them a great option for individuals with gluten sensitivities, celiac disease, or dairy intolerances. However, always double-check the ingredients of any toppings or additions you choose to add to ensure they also meet your dietary needs.
Q4: How do I prevent these pancakes from sticking to the pan?
A: Preventing sticking is key to successful pancake making. Here are some tips:
- Use a Good Non-Stick Pan: A high-quality non-stick skillet or griddle is essential for this recipe. Ensure your pan is in good condition and truly non-stick.
- Heat Pan Properly: Preheat the pan over medium heat before adding any batter. A hot pan helps the pancakes cook quickly and prevents sticking.
- Use a Little Oil or Butter (Optional): Even with a non-stick pan, adding a very small amount of coconut oil, butter, or cooking spray to lightly grease the surface can further prevent sticking and enhance browning. Use just a minimal amount.
- Don’t Flip Too Early: Wait until the pancakes are properly set and golden brown on the bottom before attempting to flip them. They should release easily from the pan when ready to flip. If they are sticking, they might not be cooked enough on the bottom yet.
- Maintain Pan Temperature: Avoid overcrowding the pan, as this can lower the temperature and increase the chances of sticking. Cook in batches if necessary.
Q5: Can I make these pancakes ahead of time and reheat them?
A: While these 2-Ingredient Sweet Potato Pancakes are best enjoyed fresh and warm, you can make them ahead of time and reheat them if needed. Store cooled pancakes in an airtight container in the refrigerator for up to 2-3 days. For reheating, microwaving is the quickest option, but can make them slightly softer. Reheating in a skillet or toaster oven helps retain more texture. Refer to the “Storage and Reheating” tip section above for more detailed reheating instructions. Keep in mind that freshly cooked pancakes will always have the best texture and flavor.
Print
2-Ingredient Sweet Potato Pancakes Recipe
Ingredients
- 1 Medium Sweet Potato: The star of the show! Choose a medium-sized sweet potato, roughly around 6-8 ounces. The type of sweet potato doesn’t drastically alter the recipe, but varieties like Jewel or Garnet, known for their moistness and sweetness, work particularly well. Ensure your sweet potato is cooked until soft. Baking, microwaving, steaming, or boiling are all viable methods, each imparting a slightly different nuance to the final pancake texture. For baking, roasting the sweet potato brings out a deeper sweetness and slightly drier texture, which can be beneficial for thicker pancakes. Microwaving is the quickest option, perfect for when time is of the essence, though it might result in a slightly wetter sweet potato. Steaming and boiling are also excellent methods, ensuring a moist and tender sweet potato. Regardless of your chosen method, the key is to have a cooked sweet potato that is easily mashable and free from any tough or undercooked parts.
- 2 Large Eggs: The binding agent and protein powerhouse! Large eggs are recommended for this recipe to provide the right balance of moisture and structure. Eggs are crucial for holding the pancakes together, adding richness, and contributing to their overall texture. They also add a significant nutritional boost, packing in protein and essential vitamins. If you’re using extra-large eggs, you might want to start with 1.5 eggs initially and adjust the batter consistency if needed. Conversely, if using medium eggs, you might consider adding a touch more sweet potato to maintain the desired batter thickness. Fresh, high-quality eggs will always yield the best results, both in terms of flavor and binding capabilities.
Instructions
Step 1: Prepare the Sweet Potato
- Cooking Method: Choose your preferred method for cooking the sweet potato. Baking at 400°F (200°C) for 45-60 minutes, microwaving on high for 5-8 minutes (piercing several times first), steaming for 20-25 minutes, or boiling for 15-20 minutes are all viable options. Baking often yields the best flavor and slightly drier texture, while microwaving is the quickest.
- Cool Slightly: Once cooked, let the sweet potato cool slightly until it’s comfortable to handle. This prevents the heat from cooking the eggs prematurely when you mix the batter.
- Peel (Optional but Recommended): While the skin is edible and nutritious, peeling the sweet potato will result in a smoother pancake batter. The choice is yours based on your preference and the desired texture.
- Mash Thoroughly: In a medium-sized mixing bowl, mash the cooked sweet potato thoroughly using a fork or potato masher. Ensure there are no large lumps remaining for a smooth pancake texture. The consistency should be similar to mashed potatoes.
Step 2: Combine Ingredients
- Add Eggs: Crack the eggs directly into the bowl with the mashed sweet potato.
- Mix Well: Using a fork or whisk, thoroughly combine the mashed sweet potato and eggs. Mix until you achieve a smooth, homogenous batter. It should be slightly thick but pourable. Don’t overmix; just ensure everything is well combined. If you are adding any optional spices like cinnamon, nutmeg, vanilla extract, or a pinch of salt, incorporate them at this stage and mix them in evenly.
Step 3: Cook the Pancakes
- Heat a Non-Stick Pan or Griddle: Place a non-stick skillet or griddle over medium heat. Non-stick cookware is essential for this recipe to prevent the pancakes from sticking.
- Add a Touch of Oil or Butter (Optional): While a good non-stick pan might not require it, adding a very small amount of coconut oil, butter, or cooking spray to the pan can help achieve a golden-brown exterior and prevent sticking, especially if your pan is not perfectly non-stick. Use just enough to lightly grease the surface.
- Pour Batter onto Hot Pan: Once the pan is heated, pour ¼ cup of batter onto the hot surface for each pancake. Don’t overcrowd the pan; cook in batches if necessary to maintain even cooking and prevent sticking. Leave enough space between pancakes for easy flipping.
- Cook for 3-4 Minutes per Side: Cook the pancakes for approximately 3-4 minutes per side, or until golden brown and cooked through. The edges should start to look set, and small bubbles may appear on the surface as they cook.
- Flip Carefully: Gently flip the pancakes using a spatula when the bottom is golden brown and they release easily from the pan. Cook the other side for another 2-3 minutes, or until cooked through and golden brown. To ensure they are cooked through, you can gently press down on the center of a pancake; it should feel firm, not squishy.
Step 4: Serve Immediately
- Remove from Pan: Once cooked, remove the pancakes from the pan and place them on a plate.
- Repeat with Remaining Batter: Continue cooking the remaining batter in batches, adding a touch more oil or butter to the pan if needed between batches.
- Serve Warm: These pancakes are best enjoyed immediately while they are warm and fluffy. Serve with your favorite toppings (suggestions in the “How to Serve” section below).
Nutrition
- Serving Size: One Normal Portion
- Calories: 150-200
- Fat: 6-8 grams
- Carbohydrates: 25-30 grams
- Protein: 8-10 grams


