


I still remember the first time I decided to tackle homemade vegetarian nuggets. My kids were going through a major “nugget phase,” and I was determined to find a healthier, more wholesome alternative to the store-bought frozen varieties. I’ll admit, I was a bit skeptical if I could replicate that satisfying crunch and savory flavor they loved. After a few trial-and-error batches, tweaking spices and perfecting the breading, this recipe emerged – and it was an absolute game-changer! The moment of truth came when I served them up with a side of their favorite ketchup. The silence, followed by enthusiastic “Mmmms!” and requests for seconds, was music to my ears. Even my partner, a self-proclaimed meat-lover, was impressed by how flavorful and substantial they were. These nuggets have since become a staple in our home, perfect for quick weeknight dinners, fun appetizers for gatherings, or even packed in lunchboxes. They’re surprisingly easy to make, wonderfully versatile, and proof that plant-based eating can be incredibly satisfying and kid-approved!
**Ingredients for the Ultimate Vegetarian Nuggets**
This recipe is designed to be flavorful, texturally satisfying, and relatively simple. We’re aiming for a batch that serves a family or provides great leftovers.
For the Nugget Mixture:
- Chickpeas: 2 cans (15 ounces / 425g each), rinsed and well-drained
- Rolled Oats: 1 cup (90g) – not instant, use old-fashioned for best texture
- Whole Wheat Flour (or All-Purpose): 1/2 cup (60g), plus more for dusting
- Nutritional Yeast: 1/4 cup (15g) – for a cheesy, umami flavor
- Onion: 1 small (about 1/2 cup chopped), finely chopped or grated
- Garlic: 3 cloves, minced
- Soy Sauce (or Tamari for gluten-free): 2 tablespoons
- Smoked Paprika: 1 teaspoon
- Dried Oregano: 1 teaspoon
- Dried Thyme: 1/2 teaspoon
- Black Pepper: 1/2 teaspoon, or to taste
- Salt: 1/4 teaspoon, or to taste (adjust based on soy sauce saltiness)
- Optional Veggie Boost: 1/2 cup grated carrot or zucchini, moisture squeezed out thoroughly
For the Breading Station:
- Bowl 1 (Flour Dredge):
- All-Purpose Flour: 1/2 cup (60g)
- Salt: 1/2 teaspoon
- Black Pepper: 1/4 teaspoon
- Bowl 2 (Wet Binder):
- Large Eggs: 2, beaten
- Vegan alternative: Flax Egg (2 tbsp ground flaxseed + 6 tbsp water, let sit for 5-10 minutes to thicken)
- Bowl 3 (Crispy Coating):
- Panko Breadcrumbs: 1 1/2 cups (90g) – Panko gives the best crunch
- Smoked Paprika: 1 teaspoon
- Garlic Powder: 1/2 teaspoon
- Onion Powder: 1/2 teaspoon
For Cooking:
- Olive Oil or Avocado Oil: 3-4 tablespoons for pan-frying, or cooking spray if baking.
Why These Ingredients Work Wonders:
- Chickpeas: Provide a hearty, protein-rich base with a neutral flavor that readily absorbs spices. Their texture, when processed correctly, mimics the tenderness of traditional nuggets.
- Rolled Oats: Act as a binder and add a pleasant chewiness. They absorb moisture and help hold the nuggets together.
- Whole Wheat Flour: Another binder that adds structure. You can use all-purpose, but whole wheat offers a bit more fiber and a slightly nuttier taste.
- Nutritional Yeast: This deactivated yeast is a powerhouse of B-vitamins and imparts a savory, cheesy, umami depth that’s crucial for vegetarian dishes aiming for richness.
- Onion & Garlic: Aromatic foundations that provide essential savory notes. Finely chopping or grating ensures they integrate seamlessly.
- Soy Sauce/Tamari: Adds saltiness and a deep umami flavor, enhancing the overall “meaty” impression.
- Spices (Smoked Paprika, Oregano, Thyme): These are key for building complex flavor. Smoked paprika gives a hint of smokiness often associated with savory foods.
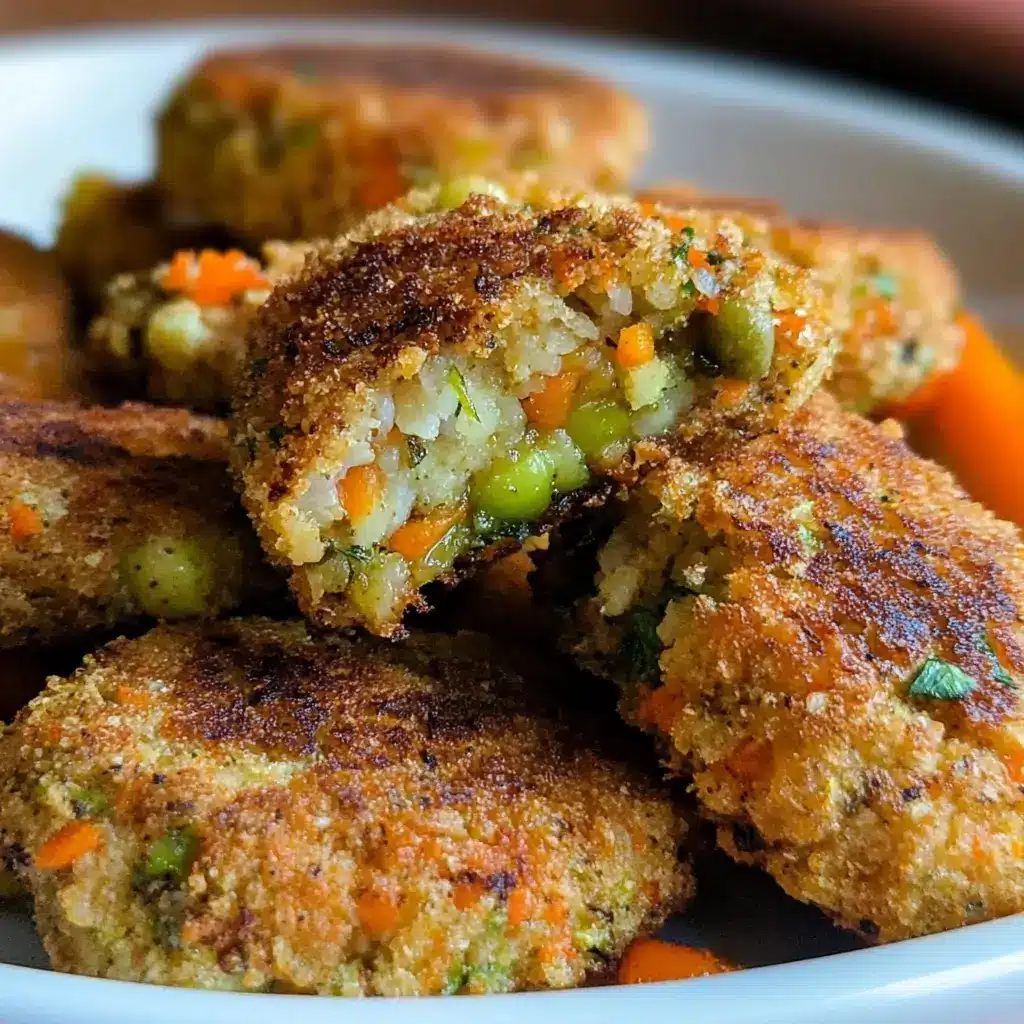
- Panko Breadcrumbs: The star for achieving that irresistible crispy exterior. Their larger, flakier texture creates a crunchier coating than regular breadcrumbs.
- Eggs (or Flax Eggs): Essential for binding the breadcrumbs to the nuggets, ensuring the crispy coating stays put.
Choosing quality ingredients will significantly impact the final taste and texture of your vegetarian nuggets. Fresh aromatics and good quality spices make all the difference!
**Step-by-Step Instructions: Crafting Your Perfect Veggie Nuggets**
Follow these instructions carefully for nuggets that are crispy on the outside and tender, flavorful on the inside.
Phase 1: Preparing the Nugget Mixture
- Prepare Aromatics: Finely chop the onion and mince the garlic. If using grated carrot or zucchini, ensure you squeeze out as much liquid as possible using a clean kitchen towel or paper towels. Excess moisture can make the nuggets mushy.
- Process Chickpeas: Add the rinsed and drained chickpeas to a food processor. Pulse a few times until they are roughly chopped but not completely smooth – some texture is desirable. Scrape down the sides of the bowl.
- Combine Dry Ingredients: To the food processor, add the rolled oats, 1/2 cup whole wheat flour, nutritional yeast, smoked paprika, dried oregano, dried thyme, black pepper, and salt.
- Add Wet Ingredients & Aromatics: Add the chopped onion, minced garlic, soy sauce (or tamari), and the optional squeezed vegetables (if using) to the food processor.
- Process to Combine: Pulse everything together until the mixture is well combined and starts to come together into a coarse, slightly sticky dough. Again, avoid over-processing into a paste; a bit of texture makes for better nuggets.
- Taste and Adjust: Carefully taste a small amount of the mixture (if comfortable doing so with raw flour/egg if you were to add it directly here, though we’re not). Adjust seasonings if necessary – more salt, pepper, or a pinch more paprika perhaps?
- Chill (Recommended): Transfer the mixture to a bowl, cover, and refrigerate for at least 30 minutes (or up to a few hours). Chilling helps the flavors meld and makes the mixture less sticky and easier to shape. This step is highly recommended for best results.
Phase 2: Setting Up the Breading Station
- While the mixture is chilling (or just before you’re ready to shape), prepare your three-stage breading station. You’ll need three shallow dishes or plates.
- Dish 1 (Flour Dredge): Combine 1/2 cup all-purpose flour with 1/2 teaspoon salt and 1/4 teaspoon black pepper. Whisk to mix.
- Dish 2 (Wet Binder): In the second dish, beat the 2 large eggs. If using the flax egg alternative, ensure it has thickened to a gel-like consistency.
- Dish 3 (Crispy Coating): In the third dish, combine the panko breadcrumbs with 1 teaspoon smoked paprika, 1/2 teaspoon garlic powder, and 1/2 teaspoon onion powder. Mix well.
- Arrange the dishes in an assembly line: Flour, Egg/Flax Egg, Panko. Place a clean baking sheet or large plate at the end of the line to hold the breaded nuggets.
Phase 3: Shaping and Breading the Nuggets
- Scoop and Shape: Take the chilled nugget mixture from the refrigerator. Using a tablespoon or a small cookie scoop, portion out the mixture. With slightly damp hands (to prevent sticking), shape each portion into a nugget form – oval, round, or classic nugget shape. Aim for about 1/2 to 3/4 inch thickness.
- First Dredge (Flour): Take a shaped nugget and lightly coat it in the seasoned flour mixture (Dish 1). Tap off any excess flour. This helps the wet binder adhere.
- Second Dip (Wet Binder): Transfer the floured nugget to the beaten egg (or flax egg) mixture (Dish 2). Ensure it’s fully coated, letting any excess drip off.
- Third Coat (Panko): Immediately transfer the egg-coated nugget to the panko breadcrumb mixture (Dish 3). Press the panko firmly onto all sides of the nugget to ensure a thick, even coating. This is where the crispiness comes from!
- Place on Tray: Place the fully breaded nugget onto the clean baking sheet or plate. Repeat with the remaining nugget mixture until it’s all used up. You should get approximately 20-24 nuggets, depending on size.
- Tip: Use one hand for dry ingredients (flour, panko) and the other for wet (egg) to prevent your fingers from becoming overly caked with breading.
Phase 4: Cooking the Vegetarian Nuggets
You have two excellent options for cooking these nuggets: baking for a healthier version, or pan-frying for ultimate crispiness.
Option 1: Baking (Healthier)
- Preheat Oven: Preheat your oven to 400°F (200°C). Line a large baking sheet with parchment paper for easy cleanup and to prevent sticking.
- Arrange Nuggets: Place the breaded nuggets in a single layer on the prepared baking sheet, ensuring there’s a little space between each one for even air circulation.
- Spray (Optional): For extra crispiness, lightly spray the tops of the nuggets with olive oil or avocado oil cooking spray.
- Bake: Bake for 20-25 minutes, flipping the nuggets halfway through (after about 10-12 minutes). They are done when they are golden brown, crispy, and heated through. Cooking time may vary slightly depending on your oven and nugget thickness.
Option 2: Pan-Frying (Crispiest)
- Heat Oil: In a large skillet or frying pan, heat 3-4 tablespoons of olive oil or avocado oil over medium heat. You want enough oil to generously coat the bottom of the pan (about 1/8 to 1/4 inch deep). The oil is ready when a breadcrumb dropped in sizzles gently.
- Fry in Batches: Carefully place the breaded nuggets into the hot oil, being sure not to overcrowd the pan. Frying in batches ensures the oil temperature stays consistent and the nuggets get crispy.
- Cook: Fry for about 3-4 minutes per side, until golden brown and crispy. Adjust the heat as needed to prevent burning; if they brown too quickly, reduce the heat slightly.
- Drain: Once cooked, remove the nuggets from the pan using a slotted spoon and transfer them to a wire rack set over a paper towel-lined plate. The wire rack helps keep the bottoms crispy as they cool.
- Repeat: Add more oil to the pan if needed between batches, allowing it to heat up before adding more nuggets.
Serve your delicious homemade vegetarian nuggets immediately with your favorite dipping sauces!
**Nutrition Facts (Approximate)**
- Servings: This recipe yields approximately 4-5 servings (about 4-6 nuggets per serving, depending on size).
- Calories per serving (baked): Approximately 320-380 calories.
- Calories per serving (pan-fried): Approximately 380-450 calories (will vary based on oil absorption).
Approximate Nutritional Breakdown (per serving, baked):
- Protein: 12-15g
- Fiber: 8-10g
- Fat: 12-16g (primarily healthier unsaturated fats if baked with minimal oil)
- Carbohydrates: 35-40g
Please Note: These are estimates. Actual nutritional values will vary depending on the specific brands of ingredients used, exact portion sizes, amount of oil used in frying, and any modifications made to the recipe.
These vegetarian nuggets offer a good source of plant-based protein and dietary fiber, thanks to the chickpeas and oats. Nutritional yeast adds B-vitamins, and if you include the optional veggies, you’ll get an extra nutrient boost. Compared to many commercially produced meat-based nuggets, these homemade vegetarian versions are generally lower in saturated fat and free from artificial preservatives when prepared mindfully.
**Preparation and Cooking Time**
Understanding the time commitment helps in planning your meal.
- Preparation Time:
- Chopping vegetables & preparing ingredients: 10-15 minutes
- Making the nugget mixture (including processing): 10-15 minutes
- Chilling time for the mixture: 30 minutes (minimum, can be longer)
- Shaping and breading nuggets: 15-20 minutes
- Total Active Prep Time (excluding chilling): Approximately 35-50 minutes
- Total Prep Time (including minimum chilling): Approximately 1 hour 5 minutes – 1 hour 20 minutes
- Cooking Time:
- Baking: 20-25 minutes (plus oven preheating time)
- Pan-Frying: 8-10 minutes per batch (if doing 2-3 batches, total 16-30 minutes active frying time)
- Total Time (from start to finish, including chilling and baking): Approximately 1 hour 30 minutes – 1 hour 50 minutes.
- Total Time (from start to finish, including chilling and pan-frying): Approximately 1 hour 25 minutes – 1 hour 55 minutes.
While it might seem like a bit of an investment in time, much of it is passive (chilling) or can be done in stages. The shaping and breading process is the most hands-on part. The delicious, wholesome results are well worth the effort!
**How to Serve Your Delicious Vegetarian Nuggets**
These vegetarian nuggets are incredibly versatile! Here are some fantastic ways to serve them, making them the star of any meal or snack time:
- Classic Kid-Friendly Meal:
- Serve with a generous side of ketchup.
- Pair with crispy French fries (baked or fried) or sweet potato fries.
- Add a simple side like steamed broccoli florets or carrot sticks.
- A small bowl of applesauce can round out the meal.
- As an Appetizer or Party Food:
- Arrange on a platter with a variety of dipping sauces:
- BBQ Sauce: Classic smoky and sweet.
- Honey Mustard: A delightful sweet and tangy option.
- Sweet Chili Sauce: For a bit of Asian-inspired flair.
- Ranch Dressing (vegan or regular): Cool and creamy.
- Garlic Aioli: A sophisticated, rich dip (mayo, garlic, lemon juice).
- Spicy Mayo: Mayonnaise mixed with sriracha or your favorite hot sauce.
- Serve alongside other finger foods like veggie sticks, cheese cubes, or mini spring rolls.
- Arrange on a platter with a variety of dipping sauces:
- In Wraps or Sandwiches:
- Tuck a few nuggets into a warm tortilla with shredded lettuce, diced tomatoes, and a drizzle of ranch or spicy mayo for a satisfying wrap.
- Use them as a “chicken” substitute in a vegetarian “chicken” parmesan sandwich, topped with marinara sauce and melted mozzarella or provolone cheese (or a vegan alternative) on a hoagie roll.
- On Top of Salads:
- Slice or serve whole over a fresh green salad for added protein and crunch.
- They pair particularly well with a Caesar salad (use a vegetarian Caesar dressing) or a mixed greens salad with a vinaigrette.
- As Part of a “Bowl” Meal:
- Create a Buddha bowl or grain bowl with a base of quinoa or brown rice, roasted vegetables, fresh greens, and top with a few vegetarian nuggets and a flavorful dressing (tahini dressing works well).
- Global Twists:
- Serve with a side of mango chutney for an Indian-inspired touch.
- Pair with a peanut dipping sauce for a Thai-inspired flavor profile.
- Simple Snack:
- Enjoy them on their own, warm or even cold from the fridge, for a quick and satisfying protein-packed snack.
The key is to have fun with it! These nuggets are a fantastic canvas for various flavors and meal ideas. Don’t be afraid to experiment with different sauces and accompaniments to find your family’s favorites.
**Additional Tips for Nugget Perfection**
Mastering homemade vegetarian nuggets is all about a few key details. Here are five extra tips to ensure yours are consistently amazing:
- Don’t Over-Process the Chickpea Mixture: This is crucial for texture. You want the chickpeas and oats to be broken down and combined, but not turned into a completely smooth paste. Leaving some small chunks and texture will result in nuggets that have a more appealing, “meatier” bite rather than being dense or gummy. Pulse the food processor in short bursts and check the consistency frequently.
- Embrace the Chill Time: While it might be tempting to skip the 30-minute (or longer) chilling period for the nugget mixture, it makes a significant difference. Chilling allows the oats and flour to fully absorb moisture, making the mixture less sticky and much easier to shape. It also helps the flavors meld together more deeply.
- Panko is Your Best Friend for Crunch: For that signature crispy, crunchy exterior, Panko breadcrumbs are superior to regular fine breadcrumbs. Panko crumbs are larger and flakier, creating a more textured and audibly crisp coating when baked or fried. Don’t skimp on pressing them firmly onto the nuggets during the breading stage.
- Season Every Layer Generously: Flavor building happens at each stage. The nugget mixture itself is seasoned, but don’t forget to season the flour dredge and the panko breadcrumbs too. Even a simple salt and pepper addition to the flour and some garlic/onion powder in the panko makes a noticeable difference to the overall taste profile of the finished nuggets.
- Avoid Overcrowding When Cooking: Whether you’re baking or pan-frying, give your nuggets some space. Overcrowding the baking sheet or frying pan lowers the temperature and causes the nuggets to steam rather than crisp up. Cook in batches if necessary to ensure each nugget gets that beautiful golden-brown, crispy exterior. This also ensures even cooking throughout.
Bonus Tip: For an extra flavor dimension, consider toasting your rolled oats lightly in a dry skillet before adding them to the food processor. This brings out a nuttier, deeper flavor.
**Frequently Asked Questions (FAQ)**
Here are answers to some common questions you might have about making these vegetarian nuggets:
- Q1: Can I make these vegetarian nuggets vegan?
- A: Absolutely! This recipe is easily adaptable for a fully vegan version. The main substitution you’ll need to make is for the eggs in the breading station. Use a “flax egg” by whisking together 2 tablespoons of ground flaxseed with 6 tablespoons of water. Let this mixture sit for 5-10 minutes until it thickens to a gel-like consistency, then use it in place of the beaten eggs. Also, ensure your soy sauce is vegan (most are, but good to check) and that any optional additions (like specific brands of breadcrumbs or condiments served alongside) are also vegan-friendly. Nutritional yeast is already a vegan staple.
- Q2: Can I make this recipe gluten-free?
- A: Yes, you can make these gluten-free with a few careful substitutions.
- Oats: Use certified gluten-free rolled oats.
- Flour: Replace the whole wheat flour in the nugget mixture and the all-purpose flour in the dredge with a good quality gluten-free all-purpose flour blend. You might also consider chickpea flour (gram flour/besan) or rice flour.
- Soy Sauce: Use Tamari, which is typically gluten-free (but always check the label), or coconut aminos.
- Panko Breadcrumbs: Look for gluten-free panko breadcrumbs, which are now widely available. Alternatively, you can make your own by toasting and crumbling gluten-free bread, or use crushed gluten-free cornflakes or rice crispies for a different type of crunchy coating.
- A: Yes, you can make these gluten-free with a few careful substitutions.
- Q3: How do I store leftover vegetarian nuggets?
- A: Allow the cooked nuggets to cool completely to room temperature. Then, store them in an airtight container in the refrigerator. They will keep well for 3-4 days. To reheat and maintain crispiness, it’s best to use an oven, toaster oven, or air fryer. Preheat to around 350°F (175°C) and heat for 5-10 minutes, or until warmed through and crispy again. Microwaving will make them soft, so it’s not recommended if you want to retain the crunch.
- Q4: Can I freeze these vegetarian nuggets for later?
- A: Yes, these nuggets freeze beautifully! You have two options:
- Freeze Uncooked: After shaping and breading the nuggets, arrange them in a single layer on a parchment-lined baking sheet. Flash freeze them for 1-2 hours, or until solid. Then, transfer the frozen nuggets to a freezer-safe bag or container. They can be stored for up to 3 months. Cook from frozen, adding a few extra minutes to the baking or frying time.
- Freeze Cooked: Allow cooked nuggets to cool completely. Then, flash freeze them on a baking sheet as described above before transferring to a freezer-safe bag or container. Reheat from frozen in an oven, toaster oven, or air fryer until hot and crispy.
- A: Yes, these nuggets freeze beautifully! You have two options:
- Q5: What other vegetables or flavor variations can I try?
- A: This recipe is a great base for experimentation!
- Vegetables: Finely chopped or grated mushrooms (sautéed first to remove moisture), cooked and mashed sweet potato (use a bit less oats/flour if it’s very moist), finely chopped bell peppers (any color), or even cooked and finely chopped spinach (ensure all excess water is squeezed out).
- Flavor Twists:
- Spicy: Add 1/2 – 1 teaspoon of cayenne pepper or a chopped jalapeño (seeds removed for less heat) to the nugget mixture.
- Italian Herb: Increase the oregano, add some dried basil, and a pinch of red pepper flakes. Serve with marinara sauce.
- Curry-Spiced: Add 1-2 teaspoons of curry powder and a pinch of turmeric to the mixture. Serve with a yogurt-mint dip.
- “Cheesier”: Increase the nutritional yeast slightly or add a small amount of finely grated Parmesan cheese (if not vegan) to the panko breading.
- A: This recipe is a great base for experimentation!
Remember to adjust seasonings and potentially the amount of binder (oats/flour) if you add ingredients with a lot of moisture. Happy experimenting!
Print
Vegetarian Nuggets Recipe
Ingredients
For the Nugget Mixture:
- Chickpeas: 2 cans (15 ounces / 425g each), rinsed and well-drained
- Rolled Oats: 1 cup (90g) – not instant, use old-fashioned for best texture
- Whole Wheat Flour (or All-Purpose): 1/2 cup (60g), plus more for dusting
- Nutritional Yeast: 1/4 cup (15g) – for a cheesy, umami flavor
- Onion: 1 small (about 1/2 cup chopped), finely chopped or grated
- Garlic: 3 cloves, minced
- Soy Sauce (or Tamari for gluten-free): 2 tablespoons
- Smoked Paprika: 1 teaspoon
- Dried Oregano: 1 teaspoon
- Dried Thyme: 1/2 teaspoon
- Black Pepper: 1/2 teaspoon, or to taste
- Salt: 1/4 teaspoon, or to taste (adjust based on soy sauce saltiness)
- Optional Veggie Boost: 1/2 cup grated carrot or zucchini, moisture squeezed out thoroughly
For the Breading Station:
- Bowl 1 (Flour Dredge):
- All-Purpose Flour: 1/2 cup (60g)
- Salt: 1/2 teaspoon
- Black Pepper: 1/4 teaspoon
- Bowl 2 (Wet Binder):
- Large Eggs: 2, beaten
- Vegan alternative: Flax Egg (2 tbsp ground flaxseed + 6 tbsp water, let sit for 5-10 minutes to thicken)
- Bowl 3 (Crispy Coating):
- Panko Breadcrumbs: 1 1/2 cups (90g) – Panko gives the best crunch
- Smoked Paprika: 1 teaspoon
- Garlic Powder: 1/2 teaspoon
- Onion Powder: 1/2 teaspoon
For Cooking:
- Olive Oil or Avocado Oil: 3-4 tablespoons for pan-frying, or cooking spray if baking.
Instructions
Phase 1: Preparing the Nugget Mixture
- Prepare Aromatics: Finely chop the onion and mince the garlic. If using grated carrot or zucchini, ensure you squeeze out as much liquid as possible using a clean kitchen towel or paper towels. Excess moisture can make the nuggets mushy.
- Process Chickpeas: Add the rinsed and drained chickpeas to a food processor. Pulse a few times until they are roughly chopped but not completely smooth – some texture is desirable. Scrape down the sides of the bowl.
- Combine Dry Ingredients: To the food processor, add the rolled oats, 1/2 cup whole wheat flour, nutritional yeast, smoked paprika, dried oregano, dried thyme, black pepper, and salt.
- Add Wet Ingredients & Aromatics: Add the chopped onion, minced garlic, soy sauce (or tamari), and the optional squeezed vegetables (if using) to the food processor.
- Process to Combine: Pulse everything together until the mixture is well combined and starts to come together into a coarse, slightly sticky dough. Again, avoid over-processing into a paste; a bit of texture makes for better nuggets.
- Taste and Adjust: Carefully taste a small amount of the mixture (if comfortable doing so with raw flour/egg if you were to add it directly here, though we’re not). Adjust seasonings if necessary – more salt, pepper, or a pinch more paprika perhaps?
- Chill (Recommended): Transfer the mixture to a bowl, cover, and refrigerate for at least 30 minutes (or up to a few hours). Chilling helps the flavors meld and makes the mixture less sticky and easier to shape. This step is highly recommended for best results.
Phase 2: Setting Up the Breading Station
- While the mixture is chilling (or just before you’re ready to shape), prepare your three-stage breading station. You’ll need three shallow dishes or plates.
- Dish 1 (Flour Dredge): Combine 1/2 cup all-purpose flour with 1/2 teaspoon salt and 1/4 teaspoon black pepper. Whisk to mix.
- Dish 2 (Wet Binder): In the second dish, beat the 2 large eggs. If using the flax egg alternative, ensure it has thickened to a gel-like consistency.
- Dish 3 (Crispy Coating): In the third dish, combine the panko breadcrumbs with 1 teaspoon smoked paprika, 1/2 teaspoon garlic powder, and 1/2 teaspoon onion powder. Mix well.
- Arrange the dishes in an assembly line: Flour, Egg/Flax Egg, Panko. Place a clean baking sheet or large plate at the end of the line to hold the breaded nuggets.
Phase 3: Shaping and Breading the Nuggets
- Scoop and Shape: Take the chilled nugget mixture from the refrigerator. Using a tablespoon or a small cookie scoop, portion out the mixture. With slightly damp hands (to prevent sticking), shape each portion into a nugget form – oval, round, or classic nugget shape. Aim for about 1/2 to 3/4 inch thickness.
- First Dredge (Flour): Take a shaped nugget and lightly coat it in the seasoned flour mixture (Dish 1). Tap off any excess flour. This helps the wet binder adhere.
- Second Dip (Wet Binder): Transfer the floured nugget to the beaten egg (or flax egg) mixture (Dish 2). Ensure it’s fully coated, letting any excess drip off.
- Third Coat (Panko): Immediately transfer the egg-coated nugget to the panko breadcrumb mixture (Dish 3). Press the panko firmly onto all sides of the nugget to ensure a thick, even coating. This is where the crispiness comes from!
- Place on Tray: Place the fully breaded nugget onto the clean baking sheet or plate. Repeat with the remaining nugget mixture until it’s all used up. You should get approximately 20-24 nuggets, depending on size.
- Tip: Use one hand for dry ingredients (flour, panko) and the other for wet (egg) to prevent your fingers from becoming overly caked with breading.
Phase 4: Cooking the Vegetarian Nuggets
You have two excellent options for cooking these nuggets: baking for a healthier version, or pan-frying for ultimate crispiness.
Option 1: Baking (Healthier)
- Preheat Oven: Preheat your oven to 400°F (200°C). Line a large baking sheet with parchment paper for easy cleanup and to prevent sticking.
- Arrange Nuggets: Place the breaded nuggets in a single layer on the prepared baking sheet, ensuring there’s a little space between each one for even air circulation.
- Spray (Optional): For extra crispiness, lightly spray the tops of the nuggets with olive oil or avocado oil cooking spray.
- Bake: Bake for 20-25 minutes, flipping the nuggets halfway through (after about 10-12 minutes). They are done when they are golden brown, crispy, and heated through. Cooking time may vary slightly depending on your oven and nugget thickness.
Option 2: Pan-Frying (Crispiest)
- Heat Oil: In a large skillet or frying pan, heat 3-4 tablespoons of olive oil or avocado oil over medium heat. You want enough oil to generously coat the bottom of the pan (about 1/8 to 1/4 inch deep). The oil is ready when a breadcrumb dropped in sizzles gently.
- Fry in Batches: Carefully place the breaded nuggets into the hot oil, being sure not to overcrowd the pan. Frying in batches ensures the oil temperature stays consistent and the nuggets get crispy.
- Cook: Fry for about 3-4 minutes per side, until golden brown and crispy. Adjust the heat as needed to prevent burning; if they brown too quickly, reduce the heat slightly.
- Drain: Once cooked, remove the nuggets from the pan using a slotted spoon and transfer them to a wire rack set over a paper towel-lined plate. The wire rack helps keep the bottoms crispy as they cool.
- Repeat: Add more oil to the pan if needed between batches, allowing it to heat up before adding more nuggets.
Nutrition
- Serving Size: One Normal Portion
- Calories: 320-380


