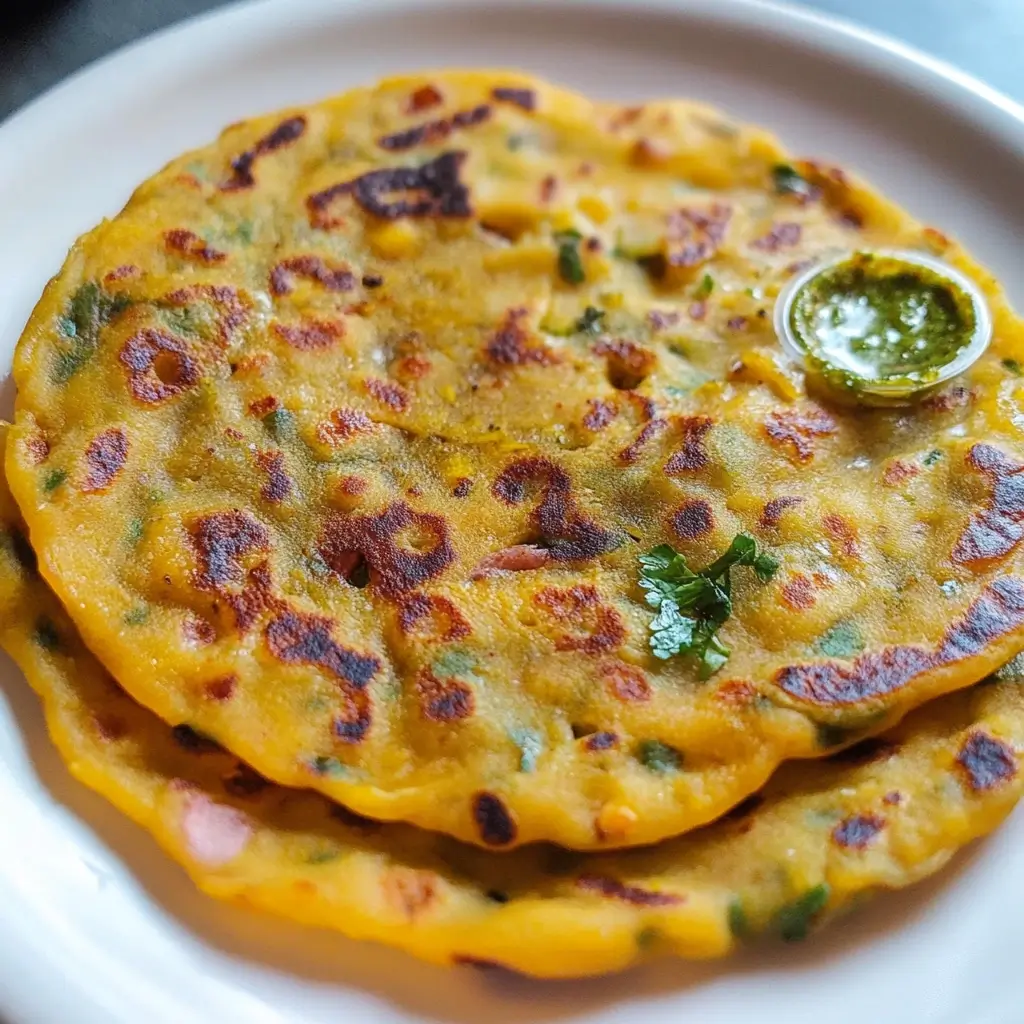
It’s a weekend morning, the aroma of spices gently wafts from the kitchen, and a symphony of sizzles fills the air. That’s the magic of Besan Chilla mornings in our home. Ever since I stumbled upon this recipe, it has become a beloved breakfast staple, a quick lunch fix, and even a light dinner option. What started as a quest for a healthy and flavorful vegetarian alternative to pancakes has transformed into a family favorite. My kids, initially skeptical of anything “healthy,” now eagerly anticipate these savory gram flour pancakes. They love the crispy edges and the soft, flavorful center, and I love how easily I can sneak in a variety of vegetables without any complaints. This Besan Chilla recipe isn’t just about a quick meal; it’s about creating moments of warmth and togetherness around a plate of wholesome, delicious food. It’s incredibly versatile, forgiving, and always delivers a satisfying and nutritious experience. If you’re looking for a recipe that’s both simple to make and a guaranteed crowd-pleaser, look no further – this Besan Chilla is your answer.
Ingredients
To embark on your Besan Chilla journey, gather these fresh and flavorful ingredients. Each element plays a crucial role in creating the perfect balance of taste and texture that makes this dish so irresistible. Using high-quality ingredients will significantly enhance the overall flavor and nutritional value of your Besan Chilla.
- Besan (Gram Flour): 2 cups. The star of the show, Besan or gram flour, is the foundation of our chilla. It’s made from ground chickpeas and is naturally gluten-free, packed with protein and fiber, and lends a slightly nutty flavor that is characteristic of Besan Chilla. Ensure you are using fresh, finely ground besan for a smooth batter and avoid any lumps.
- Water: 2 ½ cups. Water is essential for creating the batter. The right consistency is key to making thin and crispy chillas. We’ll use water gradually to ensure a lump-free batter and adjust as needed to reach the perfect pouring consistency. Room temperature water is ideal for mixing.
- Onion: 1 medium, finely chopped. Onions provide a foundational savory flavor and a slight crunch to the chilla. Red, white, or yellow onions work equally well. Finely chopping them ensures they cook evenly and distribute their flavor throughout the chilla without overpowering other ingredients.
- Green Bell Pepper: ½ medium, finely chopped. Green bell pepper adds a subtle sweetness and a refreshing crunch. It also contributes a vibrant color to the chilla. You can substitute with other colored bell peppers for variation, but green bell pepper offers a classic flavor profile.
- Tomato: 1 medium, finely chopped. Tomatoes lend a touch of acidity and juiciness to the chilla. Choose ripe, firm tomatoes for the best flavor and texture. Remove the seeds if you prefer a less watery batter. Finely chopped tomatoes blend seamlessly into the chilla and release their flavors as they cook.
- Green Chilies: 1-2, finely chopped (adjust to taste). Green chilies provide a welcome kick of heat. Adjust the quantity based on your spice preference. For a milder flavor, you can remove the seeds and membranes. Finely chop them to ensure even distribution of heat throughout the chilla. You can also use other types of chilies like Serrano or Thai green chilies for varied heat levels.
- Ginger: 1 inch piece, grated or finely chopped. Ginger adds a warm, pungent flavor that beautifully complements the other spices and vegetables. Fresh ginger is always preferred for its vibrant aroma and taste. Grate or finely chop it to ensure it blends well into the batter and releases its flavor evenly.
- Cilantro (Coriander Leaves): ¼ cup, finely chopped. Fresh cilantro adds a refreshing, herbaceous note and a vibrant green color. It’s best added towards the end of the batter preparation to retain its freshness. Finely chop the cilantro for even distribution and maximum flavor.
- Turmeric Powder: ½ teaspoon. Turmeric powder lends a beautiful golden color and a mild earthy flavor. It also has numerous health benefits, including anti-inflammatory properties. A small amount is sufficient to enhance the color and add a subtle flavor dimension.
- Red Chili Powder: ½ teaspoon (adjust to taste). Red chili powder adds a vibrant red color and an extra layer of heat. Adjust the quantity based on your spice preference. Kashmiri red chili powder can be used for color without adding too much heat, while spicier varieties will provide a more intense kick.
- Cumin Powder: 1 teaspoon. Cumin powder provides a warm, earthy, and slightly smoky flavor that enhances the savory profile of the chilla. It’s a key spice in Indian cuisine and adds depth to the overall taste.
- Asafoetida (Hing): A pinch. Asafoetida, also known as hing, has a strong, pungent aroma in its raw form, but when cooked, it imparts a savory, umami-like flavor similar to onions and garlic. It also aids digestion and is especially beneficial when cooking with lentils and beans like besan. A tiny pinch is sufficient to add its unique flavor.
- Salt: To taste. Salt is essential to balance all the flavors and enhance the taste of the chilla. Start with a teaspoon and adjust to your preference. Remember that the taste of salt can change as the batter rests, so it’s best to check and adjust just before cooking.
- Oil or Ghee: For cooking. Oil or ghee is needed for cooking the chillas on a griddle or pan. Oil provides a neutral flavor and crisps up the chillas nicely. Ghee (clarified butter) adds a rich, nutty flavor and a beautiful aroma. You can use your preferred cooking fat. Olive oil, vegetable oil, or even coconut oil can be used as alternatives.
Instructions
Follow these step-by-step instructions to create perfect Besan Chillas every time. Each step is designed to ensure the right consistency of batter, even cooking, and a flavorful, crispy result. Pay attention to the details, and you’ll be rewarded with delicious and satisfying Besan Chillas.
- Prepare the Batter: In a large mixing bowl, add the besan (gram flour). Gradually add water, a little at a time, while whisking continuously to avoid any lumps. This slow addition of water is crucial for a smooth batter. Ensure you are whisking vigorously to break down any clumps that may form. Continue adding water until you achieve a smooth, medium-thick batter that is pourable but not too runny. The consistency should be similar to pancake batter or slightly thinner.
- Add Vegetables and Spices: Once the batter is smooth, add the finely chopped onions, green bell pepper, tomatoes, green chilies, grated ginger, and chopped cilantro to the bowl. Mix well to ensure the vegetables are evenly distributed throughout the batter. Next, add the turmeric powder, red chili powder, cumin powder, asafoetida (hing), and salt. Mix all the spices thoroughly into the batter until well combined. Ensure there are no spice clumps and the batter is uniformly colored and seasoned.
- Rest the Batter (Optional but Recommended): Let the batter rest for at least 15-20 minutes. This resting period allows the besan to fully hydrate and the flavors to meld together. The batter will also thicken slightly as it rests. If you are short on time, you can skip this step, but resting the batter will improve the texture and flavor of the chillas. If the batter becomes too thick after resting, you can add a tablespoon or two of water to adjust the consistency before cooking.
- Heat the Griddle or Pan: Place a flat griddle or a non-stick pan over medium heat. Allow the griddle or pan to heat up properly before adding oil. The pan should be hot enough so that the chilla cooks evenly and doesn’t stick. To check if the pan is hot enough, sprinkle a few drops of water on it; if they sizzle and evaporate quickly, the pan is ready.
- Cook the Chillas: Once the griddle is hot, lightly grease it with oil or ghee. Pour a ladleful of batter onto the hot griddle. Immediately spread the batter in a circular motion using the back of the ladle to form a thin, even chilla, similar to making a crepe or dosa. Don’t make the chilla too thick, as thin chillas cook faster and become crispier.
- Cook on Medium Heat: Cook the chilla on medium heat. Let it cook for about 2-3 minutes on one side, or until the base starts to turn golden brown and the edges begin to lift from the griddle. You will see small bubbles forming on the surface of the chilla as it cooks.
- Flip and Cook the Other Side: Once the base is golden brown, carefully flip the chilla using a spatula. Drizzle a little oil or ghee around the edges and on top of the chilla. Cook the other side for another 2-3 minutes, or until it is also golden brown and crispy. Press gently with the spatula to ensure even cooking and crisping.
- Repeat and Serve: Remove the cooked chilla from the griddle and place it on a plate. Repeat steps 5-7 with the remaining batter, greasing the griddle lightly before each chilla. Stack the cooked chillas and serve them hot immediately. Serve with your favorite accompaniments like chutney, yogurt, or ketchup.
Nutrition Facts
Besan Chilla is not only delicious but also a nutritious choice. It’s a good source of protein, fiber, and essential nutrients. The nutritional values provided below are approximate and can vary slightly based on the specific ingredients and quantities used.
- Servings: Approximately 6-8 chillas (depending on size)
- Calories per serving (per chilla): Approximately 150-200 calories
Approximate Nutritional Information per Chilla (estimation):
- Protein: 7-9 grams
- Fiber: 4-5 grams
- Fat: 5-7 grams (primarily from oil/ghee used for cooking and naturally occurring in besan)
- Carbohydrates: 20-25 grams
- Vitamins and Minerals: Besan Chilla is a good source of:
- Iron: Contributes to red blood cell formation and energy levels.
- Magnesium: Important for muscle and nerve function, blood sugar control, and blood pressure regulation.
- Potassium: Essential for maintaining fluid balance, nerve signals, and muscle contractions.
- Folate (Vitamin B9): Crucial for cell growth and DNA synthesis.
- B Vitamins: Including B6 and others, which play roles in energy metabolism and nerve function.
- Vitamin C: From vegetables like bell peppers and tomatoes, important for immune function and antioxidant properties.
- Vitamin K: From green leafy vegetables and bell peppers, essential for blood clotting and bone health.
Important Note: These values are estimates. The exact nutritional content will depend on the specific ingredients used, the size of the chillas, and the amount of oil or ghee used for cooking. Using more vegetables will increase the vitamin and fiber content, while using more oil will increase the fat and calorie count. For precise nutritional information, you can use online nutrition calculators and input the exact quantities of ingredients you use.
Preparation Time
Besan Chilla is a quick and easy recipe that’s perfect for busy mornings or when you need a fast and nutritious meal. The preparation time is minimal, and the cooking process is also quite efficient.
- Prep Time: 15-20 minutes (includes chopping vegetables and mixing the batter)
- Cook Time: 20-25 minutes (cooking each chilla takes approximately 4-5 minutes, and this is for 6-8 chillas)
- Total Time: 35-45 minutes
Time Breakdown:
- Vegetable Chopping: 10-12 minutes. This is the most time-consuming part of the prep. Having your vegetables prepped in advance can significantly reduce the overall preparation time.
- Batter Mixing: 5-8 minutes. Mixing the batter is quick, especially if you whisk it well to avoid lumps. Resting time is optional but adds to the flavor and texture.
- Cooking Each Chilla: 4-5 minutes per chilla (approximately). Cooking time can vary slightly depending on the heat of your pan and the thickness of the chilla. Cooking multiple chillas simultaneously on a large griddle can speed up the process.
Tips to Reduce Preparation Time:
- Pre-chop Vegetables: Chop vegetables in advance and store them in airtight containers in the refrigerator. This can save significant time, especially on busy weekdays.
- Use a Food Processor (for chopping): If you have a food processor, you can use it to quickly chop the vegetables, though for Besan Chilla, finely chopped vegetables are best achieved by hand for better texture.
- Rest the Batter While Prepping Other Things: While the batter is resting, you can prepare accompaniments like chutney or yogurt, set the table, or do other kitchen tasks to utilize the time efficiently.
- Cook on a Large Griddle: Using a large griddle or multiple pans allows you to cook several chillas at once, reducing the overall cooking time.
How to Serve
Besan Chilla is incredibly versatile and can be enjoyed in numerous ways. Whether you are having it for breakfast, lunch, or dinner, there are plenty of delicious accompaniments and serving suggestions to elevate your meal.
Classic and Traditional Servings:
- Green Chutney: A classic pairing for Besan Chilla. Mint-coriander chutney or cilantro chutney adds a refreshing, tangy, and spicy kick that complements the savory chilla beautifully.
- Tomato Ketchup: A simple and universally loved option, especially popular with kids. The sweetness and tanginess of ketchup provide a nice contrast to the savory chilla.
- Yogurt (Dahi): Plain yogurt or raita (yogurt with vegetables and spices) offers a cooling and soothing contrast to the warmth of the chilla. It also adds a creamy texture and balances the flavors.
- Pickle (Achar): Indian pickles, especially mango pickle or mixed vegetable pickle, add a spicy, tangy, and pungent element that enhances the overall taste experience. Choose pickles that are not too oily for a healthier option.
- Butter or Ghee: A dollop of butter or ghee on top of hot chillas adds richness and flavor. It also makes the chillas even more indulgent and comforting.
Creative and Modern Servings:
- Stuffing: Besan Chillas can be used as wraps or crepes. Stuff them with paneer (Indian cheese), scrambled eggs, or spiced potatoes to make them a more substantial meal. You can also add sautéed vegetables or lentils for a healthier stuffing option.
- Pizza Chilla: Spread pizza sauce, cheese, and your favorite pizza toppings on a cooked chilla and bake or grill until the cheese melts. This is a fun and kid-friendly way to enjoy Besan Chilla.
- Chilla Quesadilla: Layer cheese and salsa between two Besan Chillas and grill or pan-fry until the cheese melts. This fusion twist adds a cheesy and spicy dimension.
- Side Dish with Curry: Besan Chilla can be served as a side dish with vegetable curries or lentil-based dishes. It can act as a bread alternative to soak up the flavorful gravies.
- Salad Accompaniment: Serve chopped Besan Chilla pieces over a fresh salad to add protein and texture. It can be a great addition to a Mediterranean salad or a simple green salad.
- Breakfast Platter: Create a breakfast platter with Besan Chilla, fresh fruits, yogurt, and a side of chutney for a balanced and wholesome morning meal.
Serving Tips:
- Serve Hot: Besan Chillas are best enjoyed hot and fresh off the griddle when they are crispy and flavorful.
- Cut into Triangles or Rolls: For easier eating, especially for kids, you can cut the chillas into triangles or roll them up.
- Garnish: Garnish with fresh cilantro, a sprinkle of red chili flakes, or a drizzle of yogurt for added visual appeal and flavor.
- Presentation: Arrange the chillas attractively on a plate with your chosen accompaniments. A good presentation enhances the dining experience.
Additional Tips
To master the art of making perfect Besan Chillas, here are five essential tips that will help you achieve consistent results and enhance the flavor and texture of your chillas. These tips are based on common mistakes and best practices to ensure your Besan Chilla experience is always delightful.
- Batter Consistency is Key: The consistency of the batter is the most crucial factor in making perfect Besan Chillas. The batter should be medium-thick and pourable, similar to pancake batter or slightly thinner. If the batter is too thick, the chillas will be dense and doughy. If it’s too thin, they will be difficult to spread and may tear easily. Always add water gradually while whisking to achieve the right consistency. If the batter becomes too thick after resting, add a tablespoon or two of water to adjust it.
- Don’t Overmix the Batter: While it’s important to whisk the batter well to remove lumps, avoid overmixing it once the vegetables and spices are added. Overmixing can develop gluten (even though besan is gluten-free, excessive mixing can still affect texture negatively), making the chillas tough. Mix just until everything is combined. Gentle mixing after adding vegetables and spices is sufficient.
- Heat Control is Crucial: Cooking Besan Chillas on the right heat is essential for even cooking and crispiness. The griddle or pan should be heated to medium heat. If the heat is too low, the chillas will take longer to cook and may become chewy instead of crispy. If the heat is too high, they will brown too quickly on the outside and may remain uncooked in the center. Maintain medium heat throughout the cooking process and adjust as needed.
- Use a Non-Stick Pan or Well-Seasoned Griddle: A non-stick pan or a well-seasoned cast iron griddle is ideal for making Besan Chillas. This prevents the chillas from sticking and makes them easier to flip and remove. If using a regular pan, ensure it is properly heated and greased before pouring the batter. Lightly greasing the pan before each chilla is also important to prevent sticking and ensure even browning.
- Customize with Vegetables and Spices: Besan Chilla is a very versatile dish, and you can easily customize it to your taste by adding different vegetables and spices. Experiment with grated carrots, spinach, beetroot, or even finely chopped cauliflower. For spices, you can add ajwain (carom seeds) for digestion, garam masala for warmth, or chaat masala for a tangy flavor. Don’t be afraid to experiment with different combinations to find your favorite variations. You can also adjust the spice levels to suit your preference by increasing or decreasing the amount of green chilies and red chili powder.
FAQ Section
Here are five frequently asked questions about Besan Chilla, along with detailed answers to help you understand the recipe better and troubleshoot any issues you might encounter.
Q1: Can I make Besan Chilla gluten-free?
A: Yes, absolutely! Besan (gram flour) itself is naturally gluten-free as it is made from ground chickpeas. Therefore, Besan Chilla is inherently a gluten-free dish. Ensure all other ingredients you use, such as spices and any additions, are also gluten-free to maintain its gluten-free nature. This makes Besan Chilla an excellent option for those following a gluten-free diet or with gluten sensitivities.
Q2: How can I make my Besan Chillas crispy?
A: Achieving crispy Besan Chillas involves a few key factors:
- Batter Consistency: Ensure the batter is not too thick. A slightly thinner batter tends to cook into crispier chillas.
- Heat Control: Cook the chillas on medium heat. Medium heat allows them to cook through and crisp up without burning too quickly.
- Oil/Ghee: Use a sufficient amount of oil or ghee while cooking. Drizzling oil around the edges and on top helps in achieving a crispy texture.
- Thin Chillas: Spread the batter thinly on the griddle. Thin chillas cook faster and become crispier than thick ones.
- Don’t Overcrowd the Pan: Cook chillas one or two at a time to maintain proper heat and allow them to crisp up effectively.
Q3: Can I prepare Besan Chilla batter in advance?
A: Yes, you can prepare the Besan Chilla batter in advance. You can mix the batter and store it in the refrigerator for up to 24 hours. However, keep in mind that the batter may thicken as it sits due to the besan absorbing more water. If you find the batter has become too thick, simply add a tablespoon or two of water to adjust the consistency before cooking. It’s best to add the vegetables and spices just before resting or cooking to maintain their freshness and flavor. If you are preparing the batter significantly in advance (more than a few hours), store the dry besan and water mix separately from the chopped vegetables and spices and combine them closer to cooking time for the best results.
Q4: What vegetables can I add to Besan Chilla besides the ones mentioned in the recipe?
A: Besan Chilla is incredibly versatile, and you can add a wide variety of vegetables to it. Some excellent additions include:
- Grated Vegetables: Carrots, beetroot, zucchini, bottle gourd (lauki), radish (mooli). Grated vegetables blend well into the batter and add moisture and nutrients.
- Finely Chopped Vegetables: Spinach, fenugreek leaves (methi), cabbage, cauliflower (finely chopped or grated), peas, corn kernels. Leafy greens and finely chopped vegetables add texture and flavor.
- Other Additions: Mushrooms (finely chopped), paneer (crumbled), tofu (crumbled), sprouts. These add protein and different flavor profiles.
When adding vegetables, ensure they are finely chopped or grated so they cook evenly within the chilla and don’t make it too thick or difficult to cook. Adjust the amount of vegetables based on your preference and batter consistency.
Q5: Can I freeze cooked Besan Chillas?
A: While it’s best to enjoy Besan Chillas fresh, you can freeze cooked Besan Chillas if needed. However, the texture may change slightly upon thawing and reheating; they might not be as crispy as freshly made chillas. To freeze them:
- Cool Completely: Allow the cooked chillas to cool completely to room temperature.
- Layer with Parchment Paper: Stack the chillas with parchment paper in between each to prevent them from sticking together.
- Freeze in Airtight Container or Freezer Bags: Place the stacked chillas in an airtight container or freezer bags.
- Freeze: Freeze for up to 1-2 months.
To reheat frozen Besan Chillas:
- Thaw (Optional): You can thaw them in the refrigerator overnight or reheat them directly from frozen.
- Reheat on Griddle or Pan: Reheat them on a lightly greased griddle or pan over medium heat until heated through and slightly crispy.
- Microwave (Less Recommended): Microwaving is possible but will make them softer and less crispy.
For the best taste and texture, it is always recommended to enjoy Besan Chillas fresh. However, freezing is a convenient option for meal prepping or using up leftovers.
Print
Vegetarian Besan Chilla Recipe
Ingredients
- Besan (Gram Flour): 2 cups. The star of the show, Besan or gram flour, is the foundation of our chilla. It’s made from ground chickpeas and is naturally gluten-free, packed with protein and fiber, and lends a slightly nutty flavor that is characteristic of Besan Chilla. Ensure you are using fresh, finely ground besan for a smooth batter and avoid any lumps.
- Water: 2 ½ cups. Water is essential for creating the batter. The right consistency is key to making thin and crispy chillas. We’ll use water gradually to ensure a lump-free batter and adjust as needed to reach the perfect pouring consistency. Room temperature water is ideal for mixing.
- Onion: 1 medium, finely chopped. Onions provide a foundational savory flavor and a slight crunch to the chilla. Red, white, or yellow onions work equally well. Finely chopping them ensures they cook evenly and distribute their flavor throughout the chilla without overpowering other ingredients.
- Green Bell Pepper: ½ medium, finely chopped. Green bell pepper adds a subtle sweetness and a refreshing crunch. It also contributes a vibrant color to the chilla. You can substitute with other colored bell peppers for variation, but green bell pepper offers a classic flavor profile.
- Tomato: 1 medium, finely chopped. Tomatoes lend a touch of acidity and juiciness to the chilla. Choose ripe, firm tomatoes for the best flavor and texture. Remove the seeds if you prefer a less watery batter. Finely chopped tomatoes blend seamlessly into the chilla and release their flavors as they cook.
- Green Chilies: 1-2, finely chopped (adjust to taste). Green chilies provide a welcome kick of heat. Adjust the quantity based on your spice preference. For a milder flavor, you can remove the seeds and membranes. Finely chop them to ensure even distribution of heat throughout the chilla. You can also use other types of chilies like Serrano or Thai green chilies for varied heat levels.
- Ginger: 1 inch piece, grated or finely chopped. Ginger adds a warm, pungent flavor that beautifully complements the other spices and vegetables. Fresh ginger is always preferred for its vibrant aroma and taste. Grate or finely chop it to ensure it blends well into the batter and releases its flavor evenly.
- Cilantro (Coriander Leaves): ¼ cup, finely chopped. Fresh cilantro adds a refreshing, herbaceous note and a vibrant green color. It’s best added towards the end of the batter preparation to retain its freshness. Finely chop the cilantro for even distribution and maximum flavor.
- Turmeric Powder: ½ teaspoon. Turmeric powder lends a beautiful golden color and a mild earthy flavor. It also has numerous health benefits, including anti-inflammatory properties. A small amount is sufficient to enhance the color and add a subtle flavor dimension.
- Red Chili Powder: ½ teaspoon (adjust to taste). Red chili powder adds a vibrant red color and an extra layer of heat. Adjust the quantity based on your spice preference. Kashmiri red chili powder can be used for color without adding too much heat, while spicier varieties will provide a more intense kick.
- Cumin Powder: 1 teaspoon. Cumin powder provides a warm, earthy, and slightly smoky flavor that enhances the savory profile of the chilla. It’s a key spice in Indian cuisine and adds depth to the overall taste.
- Asafoetida (Hing): A pinch. Asafoetida, also known as hing, has a strong, pungent aroma in its raw form, but when cooked, it imparts a savory, umami-like flavor similar to onions and garlic. It also aids digestion and is especially beneficial when cooking with lentils and beans like besan. A tiny pinch is sufficient to add its unique flavor.
- Salt: To taste. Salt is essential to balance all the flavors and enhance the taste of the chilla. Start with a teaspoon and adjust to your preference. Remember that the taste of salt can change as the batter rests, so it’s best to check and adjust just before cooking.
- Oil or Ghee: For cooking. Oil or ghee is needed for cooking the chillas on a griddle or pan. Oil provides a neutral flavor and crisps up the chillas nicely. Ghee (clarified butter) adds a rich, nutty flavor and a beautiful aroma. You can use your preferred cooking fat. Olive oil, vegetable oil, or even coconut oil can be used as alternatives.
Instructions
- Prepare the Batter: In a large mixing bowl, add the besan (gram flour). Gradually add water, a little at a time, while whisking continuously to avoid any lumps. This slow addition of water is crucial for a smooth batter. Ensure you are whisking vigorously to break down any clumps that may form. Continue adding water until you achieve a smooth, medium-thick batter that is pourable but not too runny. The consistency should be similar to pancake batter or slightly thinner.
- Add Vegetables and Spices: Once the batter is smooth, add the finely chopped onions, green bell pepper, tomatoes, green chilies, grated ginger, and chopped cilantro to the bowl. Mix well to ensure the vegetables are evenly distributed throughout the batter. Next, add the turmeric powder, red chili powder, cumin powder, asafoetida (hing), and salt. Mix all the spices thoroughly into the batter until well combined. Ensure there are no spice clumps and the batter is uniformly colored and seasoned.
- Rest the Batter (Optional but Recommended): Let the batter rest for at least 15-20 minutes. This resting period allows the besan to fully hydrate and the flavors to meld together. The batter will also thicken slightly as it rests. If you are short on time, you can skip this step, but resting the batter will improve the texture and flavor of the chillas. If the batter becomes too thick after resting, you can add a tablespoon or two of water to adjust the consistency before cooking.
- Heat the Griddle or Pan: Place a flat griddle or a non-stick pan over medium heat. Allow the griddle or pan to heat up properly before adding oil. The pan should be hot enough so that the chilla cooks evenly and doesn’t stick. To check if the pan is hot enough, sprinkle a few drops of water on it; if they sizzle and evaporate quickly, the pan is ready.
- Cook the Chillas: Once the griddle is hot, lightly grease it with oil or ghee. Pour a ladleful of batter onto the hot griddle. Immediately spread the batter in a circular motion using the back of the ladle to form a thin, even chilla, similar to making a crepe or dosa. Don’t make the chilla too thick, as thin chillas cook faster and become crispier.
- Cook on Medium Heat: Cook the chilla on medium heat. Let it cook for about 2-3 minutes on one side, or until the base starts to turn golden brown and the edges begin to lift from the griddle. You will see small bubbles forming on the surface of the chilla as it cooks.
- Flip and Cook the Other Side: Once the base is golden brown, carefully flip the chilla using a spatula. Drizzle a little oil or ghee around the edges and on top of the chilla. Cook the other side for another 2-3 minutes, or until it is also golden brown and crispy. Press gently with the spatula to ensure even cooking and crisping.
- Repeat and Serve: Remove the cooked chilla from the griddle and place it on a plate. Repeat steps 5-7 with the remaining batter, greasing the griddle lightly before each chilla. Stack the cooked chillas and serve them hot immediately. Serve with your favorite accompaniments like chutney, yogurt, or ketchup.
Nutrition
- Serving Size: one normal portion
- Calories: 150-200
- Fat: 5-7 grams
- Carbohydrates: 20-25 grams
- Fiber: 4-5 grams
- Protein: 7-9 grams