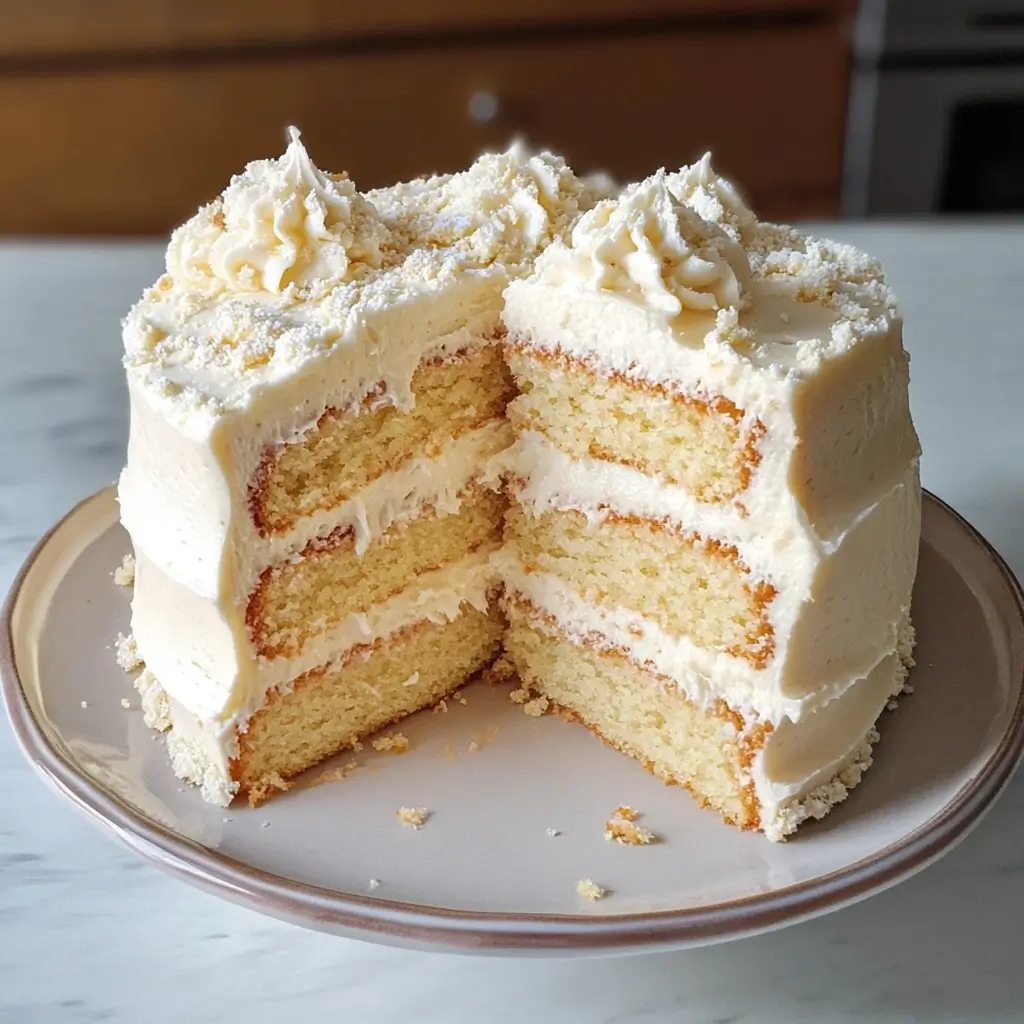
There’s something undeniably comforting and classic about a vanilla layer cake. It’s the dessert equivalent of a warm hug, a timeless treat that brings smiles to faces of all ages. Recently, I decided to bake this Vanilla Layer Cake with Creamy Vanilla Frosting recipe for my family’s weekend gathering, and let me tell you, it was a resounding success. From the moment the delicate aroma of vanilla filled the kitchen to the last crumb devoured, this cake was a true delight. The layers were incredibly moist and tender, possessing that perfect crumb that melts in your mouth. And the frosting? Oh, the frosting! It was a cloud of creamy, vanilla-bean-flecked perfection, striking the ideal balance of sweetness without being cloying. If you’re searching for a cake that embodies elegance, simplicity, and pure deliciousness, look no further. This recipe is a keeper, promising to become your go-to for birthdays, celebrations, or simply a joyful weekend bake. Let’s dive into the secrets of creating this vanilla masterpiece!
Ingredients
To create this exquisite Vanilla Layer Cake with Creamy Vanilla Frosting, you’ll need a collection of high-quality ingredients. Each component plays a crucial role in achieving the perfect texture, flavor, and overall deliciousness of this dessert. Let’s break down what you’ll need for both the cake layers and the luscious frosting:
Vanilla Layer Cake Ingredients
These are the building blocks of our moist and flavorful vanilla cake layers. Quality ingredients are key to achieving that perfect crumb and unforgettable vanilla taste.
- 1¼ cups (284 grams) unsalted butter, softened: Butter is the foundation of richness and tenderness in our cake. Using unsalted butter allows us to control the overall salt level in the recipe. Ensure it’s properly softened – not melted, but easily pliable – for optimal creaming with the sugar. Softened butter creates air pockets as it’s creamed, contributing to a light and airy cake texture.
- 2½ cups (500 grams) granulated sugar: Sugar not only sweetens the cake but also contributes to its moisture and tenderness. Granulated sugar is ideal for creaming with butter, creating that light and fluffy base for the batter. The right amount of sugar ensures the cake is sweet without being overwhelmingly so, perfectly complementing the vanilla flavor.
- 5 large eggs (250 grams), room temperature: Eggs are essential for structure, richness, and moisture in baking. Using large eggs at room temperature is crucial. Room temperature eggs emulsify more readily into the batter, creating a smoother and more stable emulsion. This leads to a cake with a finer crumb and better texture. Adding eggs one at a time ensures each one is fully incorporated, contributing to a homogenous batter.
- 1½ tablespoons (19.5 grams) Heilala Pure Vanilla Extract: Vanilla is the star of the show in this recipe, and using a high-quality pure vanilla extract, like Heilala, makes all the difference. Pure vanilla extract provides a complex and authentic vanilla flavor that artificial extracts simply can’t replicate. Heilala, known for its exceptional quality, will elevate the vanilla notes in your cake, making it truly exceptional.
- 3¾ cups (469 grams) unbleached cake flour: Cake flour is the secret to achieving a tender and delicate cake crumb. It has a lower protein content than all-purpose flour, which means it develops less gluten. Less gluten results in a softer, more delicate texture, perfect for a classic layer cake. Unbleached cake flour is preferred by many bakers for its pure flavor.
- 1¾ teaspoons (8.75 grams) baking powder: Baking powder is a chemical leavening agent that provides lift and lightness to the cake. It reacts with both moisture and heat, creating carbon dioxide bubbles that make the cake rise. Using the correct amount of baking powder is crucial for achieving the desired rise and airy texture.
- 1 teaspoon (3 grams) kosher salt: Salt might seem counterintuitive in a sweet cake, but it’s essential for enhancing flavors. Kosher salt, with its clean taste, balances the sweetness of the sugar and intensifies the vanilla flavor. It also helps to control the leavening action of the baking powder and baking soda.
- ½ teaspoon (2.5 grams) baking soda: Baking soda is another leavening agent, and in this recipe, it reacts with the acidity of the buttermilk to create additional lift. It also contributes to the cake’s tender crumb and slightly tangy flavor profile, which complements the vanilla beautifully.
- 1½ cups (360 grams) whole buttermilk, room temperature: Buttermilk is a key ingredient for achieving a moist and tender cake. Its acidity tenderizes the gluten in the cake flour, resulting in a softer texture. It also adds a subtle tanginess that balances the sweetness and enhances the overall flavor complexity. Using whole buttermilk at room temperature, similar to the eggs, ensures better emulsion and incorporation into the batter.
Creamy Vanilla Frosting Ingredients
The frosting is the crowning glory of this cake, adding sweetness, moisture, and an extra layer of vanilla goodness. The creamy texture and intense vanilla flavor perfectly complement the delicate cake layers.
- 2 cups (454 grams) unsalted butter, softened: Just like in the cake, butter is the foundation of this frosting, providing richness and structure. Using unsalted butter allows for precise control over the saltiness. Softened butter is essential for creating a smooth and creamy frosting. It should be soft enough to easily incorporate air but not melted.
- ½ teaspoon (1.5 grams) kosher salt: Salt plays the same crucial flavor-enhancing role in the frosting as it does in the cake. It balances the sweetness of the confectioners’ sugar and brings out the vanilla notes, preventing the frosting from being overly sweet and one-dimensional.
- 1 (2-pound) bag (907 grams) confectioners’ sugar: Confectioners’ sugar, also known as powdered sugar or icing sugar, is the primary sweetener and thickening agent for this frosting. Its fine texture ensures a smooth and lump-free frosting. The large quantity is necessary to create the desired volume and structure for frosting a layer cake.
- ½ cup (120 grams) heavy whipping cream: Heavy whipping cream adds moisture and richness to the frosting, creating a light and airy texture. It helps to loosen the frosting and makes it easier to spread and pipe. The fat content in heavy cream contributes to the frosting’s creamy consistency and luxurious mouthfeel.
- 1 tablespoon (18 grams) Heilala Pure Vanilla Bean Paste: To elevate the vanilla flavor to the next level in the frosting, we use vanilla bean paste. Vanilla bean paste contains vanilla bean seeds, which not only add intense vanilla flavor but also beautiful visual flecks throughout the frosting, signifying its real vanilla content. Heilala Pure Vanilla Bean Paste, again, ensures exceptional quality and flavor.
Instructions
Now that we have our ingredients ready, let’s embark on the delightful journey of baking this Vanilla Layer Cake with Creamy Vanilla Frosting. Follow these step-by-step instructions carefully for perfect results every time.
Vanilla Layer Cake Instructions
Baking the cake layers requires precision and attention to detail. Follow these steps to create moist, tender, and perfectly vanilla-flavored cake layers.
- Preheat and Prepare Pans: Begin by preheating your oven to 350°F (180°C). This ensures the oven is at the correct temperature when you place the cake pans inside, promoting even baking. Next, prepare your 2 (9-inch) round cake pans. Spray them generously with baking spray that contains flour. This type of spray is particularly effective at preventing cakes from sticking. After spraying, line the bottom of each pan with parchment paper rounds. Parchment paper provides an extra layer of insurance against sticking and makes it incredibly easy to remove the cakes from the pans once they are cooled. The combination of baking spray and parchment paper is your best bet for perfectly released cake layers.
- Cream Butter and Sugar: In the bowl of a stand mixer fitted with the paddle attachment (or using a hand mixer), combine the softened unsalted butter and granulated sugar. Beat at medium speed until the mixture becomes light and fluffy. This process, known as creaming, is crucial for incorporating air into the batter, which contributes to the cake’s light and airy texture. It typically takes about 3 to 4 minutes. Be sure to stop the mixer periodically to scrape down the sides of the bowl with a spatula. This ensures that all the butter and sugar are evenly incorporated and that no ingredients are left stuck to the sides.
- Incorporate Eggs and Vanilla: Once the butter and sugar are creamed, add the room temperature eggs, one at a time, to the mixing bowl. Beat well after each addition, ensuring that each egg is fully incorporated into the batter before adding the next. This gradual addition helps to maintain the emulsion and prevents the batter from curdling. After all the eggs are incorporated, beat in the Heilala Pure Vanilla Extract. Vanilla is a delicate flavor, so adding it at this stage, after the fat and eggs, helps to disperse it evenly throughout the batter and maximize its flavor impact.
- Combine Dry Ingredients: In a separate large bowl, whisk together the unbleached cake flour, baking powder, kosher salt, and baking soda. Whisking these dry ingredients together is essential for evenly distributing the leavening agents (baking powder and baking soda) and salt throughout the flour. This ensures consistent rising and flavor in the final cake.
- Alternate Wet and Dry Ingredients: Now, it’s time to combine the wet and dry ingredients. Gradually add the flour mixture to the butter mixture alternately with the room temperature whole buttermilk. Begin and end with the flour mixture. This alternating method is crucial for preventing gluten development, which can lead to a tough cake. Start by adding about one-third of the flour mixture to the butter mixture and beat until just combined. Then, add half of the buttermilk and mix until just combined. Repeat, adding another third of the flour, then the remaining buttermilk, and finally the last third of the flour mixture. Beat until just well combined after each addition. Be careful not to overmix the batter at this stage. Overmixing can develop gluten, resulting in a dense and tough cake. Mix only until the ingredients are just incorporated and the batter is smooth.
- Divide and Smooth Batter: Divide the cake batter evenly between the prepared cake pans. A kitchen scale can be helpful for ensuring even layers. Using a small offset spatula, smooth the tops of the batter in each pan. This ensures even baking and level cake layers. To release any trapped air bubbles and ensure an even cake texture, forcefully tap the pans on the counter several times. This step is often overlooked but can make a significant difference in the final texture of your cake.
- Bake to Perfection: Place the cake pans in the preheated oven and bake until a wooden pick inserted in the center of a cake comes out clean. This usually takes about 35 minutes. Baking time can vary slightly depending on your oven, so it’s essential to check for doneness using the toothpick test. When the toothpick comes out clean, it indicates that the cake is fully baked through.
- Cool and Release: Once baked, let the cakes cool in the pans for 10 minutes. This allows the cakes to set slightly and become easier to handle. After 10 minutes, carefully invert the cakes onto wire racks. Remove the parchment paper from the bottom of the cakes and let them cool completely, parchment side down, on the wire racks. Cooling the cakes completely is crucial before frosting. Frosting warm cakes can cause the frosting to melt and slide off.
- Level and Assemble: Once the cake layers are completely cool, use a serrated knife or a cake leveler to level the tops of the cake layers if desired. Leveling ensures that the cake will be even and stable when frosted and stacked. Discard the parchment paper. Place one cake layer on a serving plate or cake stand.
- Frost and Decorate: Prepare your piping bag fitted with a ½-inch round piping tip (Wilton 1A). Spoon about 2½ cups (about 496 grams) of the Creamy Vanilla Frosting into the piping bag. Pipe frosting evenly over the first cake layer, starting from the outside edge and working your way inwards in a spiral. Smooth the frosting layer with a small offset spatula, creating an even surface for the next cake layer. Carefully place the remaining cake layer on top of the frosted layer. Spoon another 2½ cups (about 496 grams) of frosting into the piping bag and repeat the piping process on top of the second cake layer. Smooth the top layer of frosting with a small offset spatula. Spoon the remaining frosting into the piping bag. Pipe frosting all over the sides of the cake. Holding a bench scraper or a large offset spatula against the sides of the cake, scrape off the excess frosting until the sides are smooth and some of the cake layers are somewhat exposed, creating a semi-naked or rustic look. Pile any excess frosting that is scraped off onto the top of the cake. Using the back of a spoon or a large offset spatula, spread and swirl the frosting on top of the cake as desired, creating artistic peaks and valleys. For a final touch of polish, use a bench scraper or a large offset spatula held against the sides of the cake one more time to scrape the frosting, giving the sides a smooth, finished look. This final scrape helps to define the edges and creates a clean and professional appearance.
Creamy Vanilla Frosting Instructions
Creating the perfect creamy vanilla frosting is just as important as baking the cake itself. This frosting is rich, smooth, and bursting with vanilla flavor.
- Cream Butter and Salt: In the bowl of a stand mixer fitted with the paddle attachment (or using a hand mixer), beat the softened unsalted butter and kosher salt at medium speed until creamy and smooth. This typically takes about 1 minute. Stop the mixer occasionally to scrape down the sides of the bowl with a spatula to ensure all the butter and salt are evenly incorporated. Creaming the butter at this stage creates a smooth base for the frosting and helps to incorporate air, making it light and fluffy.
- Add Confectioners’ Sugar and Cream Alternately: With the mixer on low speed, gradually add the confectioners’ sugar alternately with the heavy whipping cream. Begin and end with the confectioners’ sugar. Add about one-third of the confectioners’ sugar, mixing on low speed until just combined. Then, add half of the heavy whipping cream and mix until just combined. Repeat, adding another third of the confectioners’ sugar, then the remaining heavy whipping cream, and finally the last third of the confectioners’ sugar. Be sure to beat just until combined after each addition. Mixing on low speed and alternating the sugar and cream prevents the sugar from flying out of the bowl and ensures a smooth incorporation of ingredients. Avoid overmixing at this stage to prevent the frosting from becoming tough.
- Incorporate Vanilla Bean Paste: Once all the confectioners’ sugar and cream are incorporated, beat in the Heilala Pure Vanilla Bean Paste. The vanilla bean paste adds an intense vanilla flavor and beautiful vanilla bean specks to the frosting. Mix until just combined.
- Whip to Fluffy Perfection: Increase the mixer speed to medium and beat until the frosting is light, fluffy, and noticeably paler in color. This usually takes about 2 minutes. Whipping the frosting at medium speed incorporates more air, making it incredibly light and airy. The change in color is a visual cue that the frosting has reached the desired consistency.
- Use Immediately: For best results, use the Creamy Vanilla Frosting immediately to frost your cooled Vanilla Layer Cake. Freshly made frosting is at its optimal consistency for spreading and piping. If you need to make the frosting ahead of time, store it in an airtight container at room temperature for a short period or in the refrigerator for longer storage. If refrigerated, allow it to come to room temperature and re-whip it briefly before using to restore its creamy texture.
Nutrition Facts (Estimated)
Please note that these are estimated nutrition facts and can vary based on specific ingredient brands and serving sizes. These values are approximate per serving assuming the cake is cut into 12 slices.
- Servings: 12
- Calories per serving: Approximately 650-750 calories
It’s important to remember that this is a rich dessert, intended for occasional indulgence. Enjoy in moderation as part of a balanced diet.
Preparation Time
This Vanilla Layer Cake with Creamy Vanilla Frosting is a labor of love, but the delicious results are well worth the time invested. Here’s a breakdown of the estimated preparation time:
- Prep Time: 1 hour (includes ingredient gathering, batter preparation, and frosting making)
- Bake Time: 35 minutes
- Cooling Time: 2 hours (for cake layers to cool completely)
- Frosting and Assembly Time: 30 minutes
- Total Time: Approximately 4 hours and 5 minutes
While the total time might seem lengthy, much of it is hands-off cooling time. The active preparation and baking time are manageable, especially when broken down into stages.
How to Serve
This Vanilla Layer Cake with Creamy Vanilla Frosting is incredibly versatile and can be served in numerous delightful ways. Here are some serving suggestions to elevate your vanilla cake experience:
- Classic Slice: The most straightforward and satisfying way to enjoy this cake is as a simple slice. Serve it on its own, allowing the pure vanilla flavors to shine.
- With Fresh Berries: Fresh berries, such as strawberries, raspberries, blueberries, or blackberries, provide a beautiful contrast to the rich vanilla cake. Their tartness and freshness cut through the sweetness of the cake and frosting, creating a balanced and refreshing dessert. Arrange a mix of berries alongside or on top of each slice.
- Paired with Ice Cream: A scoop of high-quality vanilla bean ice cream or a complementary flavor like strawberry or raspberry ice cream elevates the dessert to another level. The cold ice cream melts slightly against the cake, creating a delightful textural contrast.
- Coffee or Tea Pairing: Vanilla cake is a perfect accompaniment to a warm beverage. Serve it with a cup of freshly brewed coffee, a latte, or a soothing cup of tea. The vanilla notes in the cake harmonize beautifully with the flavors of coffee and tea.
- Celebration Cake: This cake is an ideal centerpiece for birthdays, anniversaries, holidays, and other special celebrations. Its classic elegance and delicious flavor make it a crowd-pleaser for any festive occasion.
- Afternoon Treat: Enjoy a slice of this vanilla cake as a delightful afternoon treat. It’s perfect for satisfying a sweet craving and adding a touch of joy to your day.
- Layered Dessert Parfaits: For a more creative presentation, crumble the cake layers and layer them in parfaits with the creamy vanilla frosting and fresh berries. This creates a visually appealing and delicious individual dessert.
Additional Tips for Baking the Perfect Vanilla Layer Cake
To ensure your Vanilla Layer Cake with Creamy Vanilla Frosting is a resounding success, consider these helpful tips and tricks gleaned from baking experience:
- Room Temperature Ingredients are Key: This cannot be stressed enough. Ensure your butter, eggs, and buttermilk are all at room temperature before you begin baking. Room temperature ingredients emulsify together much more easily, creating a smoother batter and resulting in a cake with a superior texture. Cold ingredients can lead to a batter that curdles or doesn’t mix properly, affecting the final outcome.
- Measure Flour Accurately: Baking is a science, and accurate measurements are crucial, especially for flour. Too much flour can result in a dry and dense cake. Use the “spoon and level” method when measuring flour. Lightly spoon the flour into your measuring cup and then level it off with a straight edge, like the back of a knife. Avoid scooping flour directly from the bag, as this can compact the flour and lead to using too much.
- Don’t Overmix the Batter: Overmixing the cake batter develops gluten, which can make the cake tough and chewy instead of tender and light. Mix the wet and dry ingredients just until they are combined and the batter is smooth. A few streaks of flour are okay; they will disappear during baking. Stop mixing as soon as everything is incorporated to prevent overmixing.
- Level Cake Layers for a Professional Finish: Leveling your cake layers before frosting makes a significant difference in the final appearance of your cake. Uneven layers can make the cake look lopsided and unstable. Once the cakes are completely cooled, use a serrated knife or a cake leveler to trim off any domed tops, creating flat, even layers. This ensures that the cake stacks neatly and the frosting is applied evenly.
- Cool Cakes Completely Before Frosting: Patience is key! Make sure the cake layers are completely cool before you start frosting. Frosting a warm cake will cause the frosting to melt and slide off, creating a messy and less appealing finish. Allow ample time for the cakes to cool on wire racks, ideally for at least 2 hours, before proceeding with frosting.
Frequently Asked Questions (FAQ)
Baking can sometimes bring up questions, especially for those new to cake making. Here are answers to some frequently asked questions about this Vanilla Layer Cake recipe:
Q1: Can I use all-purpose flour instead of cake flour?
A: While cake flour is highly recommended for the most tender and delicate crumb, you can substitute all-purpose flour in a pinch. However, it’s important to make a slight adjustment to mimic the lower protein content of cake flour. For every cup of cake flour, use 1 cup of all-purpose flour minus 2 tablespoons, and then add back 2 tablespoons of cornstarch. This substitution will help to reduce the gluten development and create a slightly more tender cake, though it may not be quite as delicate as using cake flour. For the best results, stick with cake flour if possible.
Q2: Can I make this cake ahead of time?
A: Yes, you can definitely make the cake layers ahead of time. Once the cake layers are completely cooled, wrap each layer tightly in plastic wrap and then in foil. You can store them at room temperature for up to 2 days or in the refrigerator for up to 5 days. The frosting is best made fresh or on the same day as frosting the cake, but it can also be made ahead and stored in an airtight container in the refrigerator for up to 3 days. Let the frosting come to room temperature and re-whip it briefly to restore its creamy texture before using. Assemble and frost the cake on the day you plan to serve it for the freshest and most delicious results.
Q3: How should I store the finished Vanilla Layer Cake?
A: Once the cake is frosted, store it in an airtight container at room temperature for up to 2 days or in the refrigerator for up to 5 days. If storing at room temperature, ensure it’s in a cool, dry place away from direct sunlight. Refrigerating the cake will help to extend its freshness, especially if the weather is warm or humid. When refrigerating, bring the cake to room temperature for about 30 minutes to an hour before serving to allow the frosting to soften slightly and the cake to regain its best texture.
Q4: Can I double this recipe to make a larger cake or cupcakes?
A: Yes, you can easily double this recipe to make a larger layer cake or cupcakes. If doubling for a larger layer cake, you might need to use 3 (9-inch) pans or consider using larger pans, such as 10-inch pans. Baking time may need to be adjusted slightly for larger cakes – check for doneness with a toothpick. For cupcakes, the baking time will be significantly shorter, typically around 18-22 minutes. Fill cupcake liners about two-thirds full. Doubling the frosting recipe is also recommended to ensure you have enough to generously frost a larger cake or a batch of cupcakes.
Q5: Can I use a different type of frosting with this vanilla cake?
A: Absolutely! While the Creamy Vanilla Frosting is a perfect pairing for this vanilla cake, you can certainly experiment with other frostings to create different flavor profiles. Some delicious alternatives include:
- Chocolate Buttercream: A classic chocolate buttercream frosting would complement the vanilla cake beautifully, creating a timeless combination.
- Strawberry Buttercream: A light and fruity strawberry buttercream would add a refreshing twist, especially when served with fresh strawberries.
- Lemon Buttercream: A tangy lemon buttercream frosting would provide a bright and zesty contrast to the sweet vanilla cake.
- Cream Cheese Frosting: A cream cheese frosting, with its slightly tangy and rich flavor, would also be a delicious alternative, especially if you enjoy a less intensely sweet frosting.
Feel free to get creative and choose a frosting that suits your taste preferences and the occasion!
This Vanilla Layer Cake with Creamy Vanilla Frosting is more than just a recipe; it’s an invitation to create something truly special. With its moist, tender layers and dreamy frosting, it’s guaranteed to become a beloved dessert for any celebration or simple moment of indulgence. Happy baking!
Print
Vanilla Layer Cake with Creamy Vanilla Frosting Recipe
Ingredients
Vanilla Layer Cake Ingredients
These are the building blocks of our moist and flavorful vanilla cake layers. Quality ingredients are key to achieving that perfect crumb and unforgettable vanilla taste.
- 1¼ cups (284 grams) unsalted butter, softened: Butter is the foundation of richness and tenderness in our cake. Using unsalted butter allows us to control the overall salt level in the recipe. Ensure it’s properly softened – not melted, but easily pliable – for optimal creaming with the sugar. Softened butter creates air pockets as it’s creamed, contributing to a light and airy cake texture.
- 2½ cups (500 grams) granulated sugar: Sugar not only sweetens the cake but also contributes to its moisture and tenderness. Granulated sugar is ideal for creaming with butter, creating that light and fluffy base for the batter. The right amount of sugar ensures the cake is sweet without being overwhelmingly so, perfectly complementing the vanilla flavor.
- 5 large eggs (250 grams), room temperature: Eggs are essential for structure, richness, and moisture in baking. Using large eggs at room temperature is crucial. Room temperature eggs emulsify more readily into the batter, creating a smoother and more stable emulsion. This leads to a cake with a finer crumb and better texture. Adding eggs one at a time ensures each one is fully incorporated, contributing to a homogenous batter.
- 1½ tablespoons (19.5 grams) Heilala Pure Vanilla Extract: Vanilla is the star of the show in this recipe, and using a high-quality pure vanilla extract, like Heilala, makes all the difference. Pure vanilla extract provides a complex and authentic vanilla flavor that artificial extracts simply can’t replicate. Heilala, known for its exceptional quality, will elevate the vanilla notes in your cake, making it truly exceptional.
- 3¾ cups (469 grams) unbleached cake flour: Cake flour is the secret to achieving a tender and delicate cake crumb. It has a lower protein content than all-purpose flour, which means it develops less gluten. Less gluten results in a softer, more delicate texture, perfect for a classic layer cake. Unbleached cake flour is preferred by many bakers for its pure flavor.
- 1¾ teaspoons (8.75 grams) baking powder: Baking powder is a chemical leavening agent that provides lift and lightness to the cake. It reacts with both moisture and heat, creating carbon dioxide bubbles that make the cake rise. Using the correct amount of baking powder is crucial for achieving the desired rise and airy texture.
- 1 teaspoon (3 grams) kosher salt: Salt might seem counterintuitive in a sweet cake, but it’s essential for enhancing flavors. Kosher salt, with its clean taste, balances the sweetness of the sugar and intensifies the vanilla flavor. It also helps to control the leavening action of the baking powder and baking soda.
- ½ teaspoon (2.5 grams) baking soda: Baking soda is another leavening agent, and in this recipe, it reacts with the acidity of the buttermilk to create additional lift. It also contributes to the cake’s tender crumb and slightly tangy flavor profile, which complements the vanilla beautifully.
- 1½ cups (360 grams) whole buttermilk, room temperature: Buttermilk is a key ingredient for achieving a moist and tender cake. Its acidity tenderizes the gluten in the cake flour, resulting in a softer texture. It also adds a subtle tanginess that balances the sweetness and enhances the overall flavor complexity. Using whole buttermilk at room temperature, similar to the eggs, ensures better emulsion and incorporation into the batter.
Creamy Vanilla Frosting Ingredients
The frosting is the crowning glory of this cake, adding sweetness, moisture, and an extra layer of vanilla goodness. The creamy texture and intense vanilla flavor perfectly complement the delicate cake layers.
- 2 cups (454 grams) unsalted butter, softened: Just like in the cake, butter is the foundation of this frosting, providing richness and structure. Using unsalted butter allows for precise control over the saltiness. Softened butter is essential for creating a smooth and creamy frosting. It should be soft enough to easily incorporate air but not melted.
- ½ teaspoon (1.5 grams) kosher salt: Salt plays the same crucial flavor-enhancing role in the frosting as it does in the cake. It balances the sweetness of the confectioners’ sugar and brings out the vanilla notes, preventing the frosting from being overly sweet and one-dimensional.
- 1 (2-pound) bag (907 grams) confectioners’ sugar: Confectioners’ sugar, also known as powdered sugar or icing sugar, is the primary sweetener and thickening agent for this frosting. Its fine texture ensures a smooth and lump-free frosting. The large quantity is necessary to create the desired volume and structure for frosting a layer cake.
- ½ cup (120 grams) heavy whipping cream: Heavy whipping cream adds moisture and richness to the frosting, creating a light and airy texture. It helps to loosen the frosting and makes it easier to spread and pipe. The fat content in heavy cream contributes to the frosting’s creamy consistency and luxurious mouthfeel.
- 1 tablespoon (18 grams) Heilala Pure Vanilla Bean Paste: To elevate the vanilla flavor to the next level in the frosting, we use vanilla bean paste. Vanilla bean paste contains vanilla bean seeds, which not only add intense vanilla flavor but also beautiful visual flecks throughout the frosting, signifying its real vanilla content. Heilala Pure Vanilla Bean Paste, again, ensures exceptional quality and flavor.
Instructions
Vanilla Layer Cake Instructions
Baking the cake layers requires precision and attention to detail. Follow these steps to create moist, tender, and perfectly vanilla-flavored cake layers.
- Preheat and Prepare Pans: Begin by preheating your oven to 350°F (180°C). This ensures the oven is at the correct temperature when you place the cake pans inside, promoting even baking. Next, prepare your 2 (9-inch) round cake pans. Spray them generously with baking spray that contains flour. This type of spray is particularly effective at preventing cakes from sticking. After spraying, line the bottom of each pan with parchment paper rounds. Parchment paper provides an extra layer of insurance against sticking and makes it incredibly easy to remove the cakes from the pans once they are cooled. The combination of baking spray and parchment paper is your best bet for perfectly released cake layers.
- Cream Butter and Sugar: In the bowl of a stand mixer fitted with the paddle attachment (or using a hand mixer), combine the softened unsalted butter and granulated sugar. Beat at medium speed until the mixture becomes light and fluffy. This process, known as creaming, is crucial for incorporating air into the batter, which contributes to the cake’s light and airy texture. It typically takes about 3 to 4 minutes. Be sure to stop the mixer periodically to scrape down the sides of the bowl with a spatula. This ensures that all the butter and sugar are evenly incorporated and that no ingredients are left stuck to the sides.
- Incorporate Eggs and Vanilla: Once the butter and sugar are creamed, add the room temperature eggs, one at a time, to the mixing bowl. Beat well after each addition, ensuring that each egg is fully incorporated into the batter before adding the next. This gradual addition helps to maintain the emulsion and prevents the batter from curdling. After all the eggs are incorporated, beat in the Heilala Pure Vanilla Extract. Vanilla is a delicate flavor, so adding it at this stage, after the fat and eggs, helps to disperse it evenly throughout the batter and maximize its flavor impact.
- Combine Dry Ingredients: In a separate large bowl, whisk together the unbleached cake flour, baking powder, kosher salt, and baking soda. Whisking these dry ingredients together is essential for evenly distributing the leavening agents (baking powder and baking soda) and salt throughout the flour. This ensures consistent rising and flavor in the final cake.
- Alternate Wet and Dry Ingredients: Now, it’s time to combine the wet and dry ingredients. Gradually add the flour mixture to the butter mixture alternately with the room temperature whole buttermilk. Begin and end with the flour mixture. This alternating method is crucial for preventing gluten development, which can lead to a tough cake. Start by adding about one-third of the flour mixture to the butter mixture and beat until just combined. Then, add half of the buttermilk and mix until just combined. Repeat, adding another third of the flour, then the remaining buttermilk, and finally the last third of the flour mixture. Beat until just well combined after each addition. Be careful not to overmix the batter at this stage. Overmixing can develop gluten, resulting in a dense and tough cake. Mix only until the ingredients are just incorporated and the batter is smooth.
- Divide and Smooth Batter: Divide the cake batter evenly between the prepared cake pans. A kitchen scale can be helpful for ensuring even layers. Using a small offset spatula, smooth the tops of the batter in each pan. This ensures even baking and level cake layers. To release any trapped air bubbles and ensure an even cake texture, forcefully tap the pans on the counter several times. This step is often overlooked but can make a significant difference in the final texture of your cake.
- Bake to Perfection: Place the cake pans in the preheated oven and bake until a wooden pick inserted in the center of a cake comes out clean. This usually takes about 35 minutes. Baking time can vary slightly depending on your oven, so it’s essential to check for doneness using the toothpick test. When the toothpick comes out clean, it indicates that the cake is fully baked through.
- Cool and Release: Once baked, let the cakes cool in the pans for 10 minutes. This allows the cakes to set slightly and become easier to handle. After 10 minutes, carefully invert the cakes onto wire racks. Remove the parchment paper from the bottom of the cakes and let them cool completely, parchment side down, on the wire racks. Cooling the cakes completely is crucial before frosting. Frosting warm cakes can cause the frosting to melt and slide off.
- Level and Assemble: Once the cake layers are completely cool, use a serrated knife or a cake leveler to level the tops of the cake layers if desired. Leveling ensures that the cake will be even and stable when frosted and stacked. Discard the parchment paper. Place one cake layer on a serving plate or cake stand.
- Frost and Decorate: Prepare your piping bag fitted with a ½-inch round piping tip (Wilton 1A). Spoon about 2½ cups (about 496 grams) of the Creamy Vanilla Frosting into the piping bag. Pipe frosting evenly over the first cake layer, starting from the outside edge and working your way inwards in a spiral. Smooth the frosting layer with a small offset spatula, creating an even surface for the next cake layer. Carefully place the remaining cake layer on top of the frosted layer. Spoon another 2½ cups (about 496 grams) of frosting into the piping bag and repeat the piping process on top of the second cake layer. Smooth the top layer of frosting with a small offset spatula. Spoon the remaining frosting into the piping bag. Pipe frosting all over the sides of the cake. Holding a bench scraper or a large offset spatula against the sides of the cake, scrape off the excess frosting until the sides are smooth and some of the cake layers are somewhat exposed, creating a semi-naked or rustic look. Pile any excess frosting that is scraped off onto the top of the cake. Using the back of a spoon or a large offset spatula, spread and swirl the frosting on top of the cake as desired, creating artistic peaks and valleys. For a final touch of polish, use a bench scraper or a large offset spatula held against the sides of the cake one more time to scrape the frosting, giving the sides a smooth, finished look. This final scrape helps to define the edges and creates a clean and professional appearance.
Creamy Vanilla Frosting Instructions
Creating the perfect creamy vanilla frosting is just as important as baking the cake itself. This frosting is rich, smooth, and bursting with vanilla flavor.
- Cream Butter and Salt: In the bowl of a stand mixer fitted with the paddle attachment (or using a hand mixer), beat the softened unsalted butter and kosher salt at medium speed until creamy and smooth. This typically takes about 1 minute. Stop the mixer occasionally to scrape down the sides of the bowl with a spatula to ensure all the butter and salt are evenly incorporated. Creaming the butter at this stage creates a smooth base for the frosting and helps to incorporate air, making it light and fluffy.
- Add Confectioners’ Sugar and Cream Alternately: With the mixer on low speed, gradually add the confectioners’ sugar alternately with the heavy whipping cream. Begin and end with the confectioners’ sugar. Add about one-third of the confectioners’ sugar, mixing on low speed until just combined. Then, add half of the heavy whipping cream and mix until just combined. Repeat, adding another third of the confectioners’ sugar, then the remaining heavy whipping cream, and finally the last third of the confectioners’ sugar. Be sure to beat just until combined after each addition. Mixing on low speed and alternating the sugar and cream prevents the sugar from flying out of the bowl and ensures a smooth incorporation of ingredients. Avoid overmixing at this stage to prevent the frosting from becoming tough.
- Incorporate Vanilla Bean Paste: Once all the confectioners’ sugar and cream are incorporated, beat in the Heilala Pure Vanilla Bean Paste. The vanilla bean paste adds an intense vanilla flavor and beautiful vanilla bean specks to the frosting. Mix until just combined.
- Whip to Fluffy Perfection: Increase the mixer speed to medium and beat until the frosting is light, fluffy, and noticeably paler in color. This usually takes about 2 minutes. Whipping the frosting at medium speed incorporates more air, making it incredibly light and airy. The change in color is a visual cue that the frosting has reached the desired consistency.
- Use Immediately: For best results, use the Creamy Vanilla Frosting immediately to frost your cooled Vanilla Layer Cake. Freshly made frosting is at its optimal consistency for spreading and piping. If you need to make the frosting ahead of time, store it in an airtight container at room temperature for a short period or in the refrigerator for longer storage. If refrigerated, allow it to come to room temperature and re-whip it briefly before using to restore its creamy texture.
Nutrition
- Serving Size: One Normal Portion
- Calories: 650-750