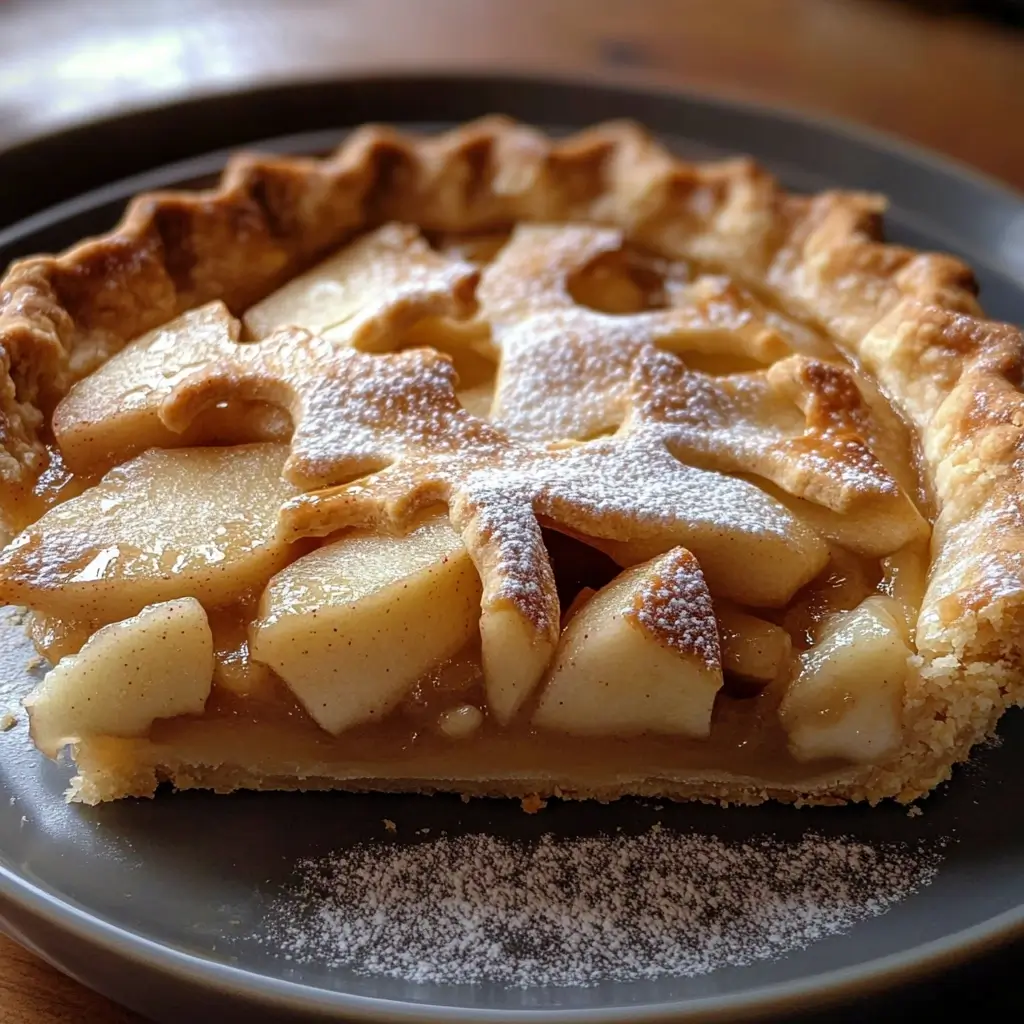
Sheila’s Apple Pie is more than just a dessert in our family; it’s a warm, comforting hug baked into a golden crust. From the moment the cinnamon-spiced aroma fills the kitchen to the last crumb devoured, this pie is a testament to simple pleasures and homemade goodness. Sheila, a dear family friend, shared this recipe years ago, and it has been a staple ever since. Weekends, holidays, or just a Tuesday night craving – there’s never a bad time for Sheila’s Apple Pie. What truly sets this recipe apart is its perfect balance of sweet and tart, the flaky, buttery crust that practically melts in your mouth, and the ease with which it comes together. Even novice bakers can achieve pie perfection with Sheila’s guidance. It’s a recipe that has been passed down, tweaked slightly over time to suit our tastes, and always, always met with enthusiastic cheers and empty pie plates. If you’re looking for an apple pie that’s not just good, but truly memorable, look no further. Sheila’s Apple Pie is waiting to become your family’s favorite too.
Ingredients
For a truly exceptional Sheila’s Apple Pie, quality ingredients are key. Each component plays a crucial role in creating the symphony of flavors and textures that make this pie so irresistible. Let’s break down what you’ll need, ensuring you have everything ready before you begin your baking adventure.
For the Crust:
- 2 ½ cups all-purpose flour: The foundation of our flaky crust. All-purpose flour provides the right balance of gluten for structure while still allowing for tenderness. For an even more tender crust, consider using pastry flour or a combination of all-purpose and pastry flour.
- 1 teaspoon salt: Salt is not just about flavor; it enhances the sweetness of the filling and balances the richness of the butter. It also plays a role in gluten development, contributing to a more tender crust.
- 1 cup (2 sticks) unsalted butter, very cold and cut into ½ inch cubes: Cold butter is absolutely crucial for a flaky pie crust. As the pie bakes, the cold butter melts and creates steam, which separates the layers of dough, resulting in that desirable flakiness. Unsalted butter allows you to control the saltiness of the crust.
- ½ cup ice water, plus more if needed: Ice water keeps the dough cold and prevents the gluten from developing too much, which can lead to a tough crust. Add the water gradually, just until the dough comes together. The amount of water needed can vary depending on humidity and flour type.
For the Filling:
- 6-7 medium apples, about 3 pounds total, a mix of firm and flavorful varieties: The heart of our pie! Using a mix of apple varieties adds complexity and depth to the filling. Firm apples hold their shape during baking, preventing a mushy filling, while flavorful varieties contribute to a rich taste. Excellent choices include:
- Granny Smith: Tart and firm, providing a lovely contrast to the sweetness.
- Honeycrisp: Sweet, crisp, and juicy, with a balanced flavor.
- Fuji: Sweet and firm, with a delicate floral note.
- Gala: Mildly sweet and crisp, a good all-purpose apple.
- Braeburn: Sweet-tart and firm, with a complex flavor.
- ¾ cup granulated sugar, plus more for sprinkling: Sugar sweetens the filling and helps to draw out the juices from the apples, creating a delicious sauce as the pie bakes. Granulated sugar provides a clean sweetness.
- ¼ cup packed light brown sugar: Brown sugar adds a touch of molasses flavor and moisture to the filling, contributing to a richer, more complex sweetness. The molasses also helps to create a beautiful caramelization.
- ¼ cup all-purpose flour: Flour acts as a thickener, absorbing excess juices from the apples and preventing the filling from becoming too runny.
- 1 teaspoon ground cinnamon: Cinnamon is the quintessential apple pie spice, adding warmth and classic flavor. Use fresh cinnamon for the best aroma and taste.
- ½ teaspoon ground nutmeg: Nutmeg adds a subtle warmth and depth of flavor that complements the cinnamon beautifully. Freshly grated nutmeg is even more aromatic and flavorful.
- ¼ teaspoon ground cloves: Cloves provide a warm, pungent note that adds complexity to the spice blend. Use cloves sparingly, as they can be overpowering.
- 1 tablespoon lemon juice, freshly squeezed: Lemon juice brightens the flavors of the apples and spices, preventing the filling from being overly sweet. It also helps to prevent the apples from browning.
- 2 tablespoons unsalted butter, cut into small pieces: Dotting the filling with butter adds richness and flavor, and helps to create a glossy, slightly caramelized top to the filling.
Optional Ingredients:
- 1 large egg, beaten, for egg wash: Egg wash brushed over the top crust before baking gives it a beautiful golden brown color and a slight shine.
- Coarse sugar or sparkling sugar, for sprinkling: Sprinkling sugar over the egg wash adds a touch of sweetness and sparkle to the crust.
Having all these ingredients measured and ready to go will make the pie-making process smooth and enjoyable. Take a moment to appreciate the quality of each ingredient – it’s the foundation of a truly delicious Sheila’s Apple Pie.
Instructions
Now that we have our quality ingredients prepared, let’s embark on the delightful journey of baking Sheila’s Apple Pie. Follow these step-by-step instructions carefully, and you’ll be rewarded with a pie that’s both beautiful and bursting with flavor.
Making the Crust:
- Combine dry ingredients: In a large bowl, whisk together the flour and salt. This ensures the salt is evenly distributed throughout the flour.
- Incorporate cold butter: Add the cold, cubed butter to the flour mixture. Using a pastry blender or your fingertips, cut the butter into the flour until the mixture resembles coarse crumbs with some pea-sized pieces of butter remaining. The goal is to keep the butter cold and create small pockets of butter that will create flakiness as they melt during baking. Work quickly to prevent the butter from warming up too much.
- Add ice water gradually: Gradually add the ice water, one tablespoon at a time, mixing gently after each addition. Mix just until the dough starts to come together and forms a shaggy mass. Be careful not to overmix, as this can develop the gluten and make the crust tough. You may not need to use all the ice water, or you may need a little more, depending on the humidity and flour.
- Form dough disks: Divide the dough in half. Gently form each half into a disk about 1 inch thick. Wrap each disk tightly in plastic wrap and refrigerate for at least 1 hour, or preferably 2 hours, or even overnight. This chilling time is crucial for relaxing the gluten in the dough and allowing the butter to firm up again, making the dough easier to roll out and preventing shrinkage during baking.
Preparing the Apple Filling:
- Prepare the apples: While the dough is chilling, prepare the apple filling. Peel, core, and slice the apples into ¼ to ½ inch thick slices. A mandoline slicer can be helpful for achieving uniform slices, but a sharp knife works just as well.
- Combine filling ingredients: In a large bowl, combine the sliced apples, granulated sugar, brown sugar, flour, cinnamon, nutmeg, cloves, and lemon juice. Toss gently to coat the apples evenly with the sugar and spices. The flour will help to thicken the juices as the pie bakes.
Assembling and Baking the Pie:
- Preheat oven and prepare pie plate: Preheat oven to 400°F (200°C). Lightly grease a 9-inch pie plate.
- Roll out bottom crust: On a lightly floured surface, roll out one disk of chilled dough into a 12-inch circle, about ⅛ inch thick. Gently transfer the dough to the prepared pie plate, easing it into the plate and trimming any excess dough that hangs over the edge, leaving about a ½ inch overhang. Crimp the edges of the bottom crust as desired. You can use a fork to crimp or create a decorative edge with your fingers.
- Add apple filling: Pour the apple filling into the prepared pie crust, mounding it slightly in the center. Dot the top of the filling with the 2 tablespoons of butter, cut into small pieces.
- Roll out top crust: Roll out the second disk of chilled dough into a 12-inch circle. Gently place the top crust over the filling. Trim any excess dough, leaving a ½ inch overhang. Crimp the edges of the top and bottom crusts together to seal, ensuring a tight seal to prevent filling from leaking out.
- Cut vents in top crust: Cut several vents in the top crust using a sharp knife. These vents allow steam to escape during baking, preventing the crust from puffing up and cracking. You can create simple slits or decorative shapes.
- Egg wash and sugar (optional): If desired, brush the top crust with beaten egg wash for a golden brown finish. Sprinkle with coarse sugar or sparkling sugar for added sweetness and sparkle.
- Bake the pie: Bake in the preheated oven for 15 minutes at 400°F (200°C). Then, reduce the oven temperature to 375°F (190°C) and bake for an additional 40-50 minutes, or until the crust is golden brown and the filling is bubbly. If the crust starts to brown too quickly, you can loosely tent the pie with foil for the last 15-20 minutes of baking.
- Cool before serving: Let the pie cool on a wire rack for at least 1 hour before slicing and serving. This allows the filling to set slightly and makes it easier to slice. While it’s tempting to dig in right away, patience will be rewarded!
Following these instructions meticulously will guide you in creating a Sheila’s Apple Pie that’s not only delicious but also a testament to the art of homemade baking. Enjoy the process, and savor the incredible aroma filling your kitchen!
Nutrition Facts
Sheila’s Apple Pie is a delightful treat, but like all good things, it’s best enjoyed in moderation. Here’s an estimated nutritional breakdown for this recipe. Please note that these are approximations, and actual values may vary based on specific ingredients and portion sizes.
Servings: This recipe is typically cut into 8 generous servings.
Approximate Nutrition Facts per Serving (1/8 of pie):
- Calories: 450-550 kcal
- Total Fat: 25-30g
- Saturated Fat: 15-20g
- Trans Fat: 0g (primarily from butter)
- Monounsaturated Fat: 5-7g
- Polyunsaturated Fat: 2-3g
- Cholesterol: 60-80mg
- Sodium: 200-250mg
- Total Carbohydrates: 60-70g
- Dietary Fiber: 3-5g
- Sugars: 35-45g (includes naturally occurring sugars from apples and added sugars)
- Protein: 4-6g
Important Considerations:
- Variations: Using different types of apples, crust ingredients (e.g., shortening instead of butter), or adding extra sugar will alter these nutritional values.
- Portion Size: Serving sizes can vary. A larger slice will naturally increase the calorie and macronutrient content.
- Homemade vs. Store-bought: Homemade pies generally have more control over ingredients, but nutritional values can still be significant. Store-bought pies often contain added preservatives and may have different nutritional profiles.
This nutritional information is intended as a general guide. For more precise values, you can use online nutrition calculators, inputting the specific ingredients and quantities used. Enjoy Sheila’s Apple Pie as a special treat, keeping portion sizes in mind as part of a balanced diet.
Preparation Time
Planning your time in the kitchen is essential for a smooth baking experience. Here’s a breakdown of the preparation time for Sheila’s Apple Pie, from start to finish.
Active Preparation Time:
- Crust Making: 20-30 minutes (mixing dough, shaping disks)
- Filling Preparation: 15-20 minutes (peeling, slicing apples, mixing filling ingredients)
- Rolling and Assembling: 20-30 minutes (rolling out crusts, assembling pie)
Total Active Prep Time: Approximately 55-80 minutes
Inactive Time:
- Crust Chilling: Minimum 1 hour, ideally 2 hours, or overnight (refrigeration time for dough)
- Baking Time: 55-65 minutes (initial bake at 400°F, then at 375°F)
- Cooling Time: Minimum 1 hour (cooling before slicing and serving)
Total Inactive Time: Approximately 3 hours 55 minutes – 5 hours 5 minutes (depending on chilling time)
Total Time (Active + Inactive): Approximately 4 hours 50 minutes – 6 hours 25 minutes
Timeline Breakdown:
- Day 1 (Optional): Prepare the pie crust dough in the evening and refrigerate overnight. This breaks up the workload and allows the dough to chill perfectly.
- Day 2 (Baking Day):
- Morning/Afternoon: Prepare the apple filling (15-20 minutes).
- Mid-Afternoon: Roll out the crusts and assemble the pie (20-30 minutes).
- Late Afternoon/Early Evening: Bake the pie (55-65 minutes).
- Evening: Cool the pie (minimum 1 hour), then serve and enjoy!
Tips for Time Management:
- Make the crust ahead: The pie crust dough can be made up to 2-3 days in advance and stored in the refrigerator, or frozen for longer storage. Thaw frozen dough in the refrigerator overnight before using.
- Prep ingredients in advance: Peel and slice the apples up to a few hours ahead of time and toss them with lemon juice to prevent browning. Measure out all dry and wet ingredients beforehand.
- Double the recipe: If you’re making pies for a crowd or want to freeze one for later, double the recipe to save time in the long run.
While Sheila’s Apple Pie takes some time to prepare, especially with the chilling and baking, the hands-on active time is manageable. The reward of a homemade, delicious apple pie is well worth the effort!
How to Serve
Sheila’s Apple Pie is a star on its own, but the right serving suggestions can elevate the experience even further. Here are some delightful ways to serve and enjoy this classic dessert:
- Warm and Classic:
- Warm from the oven: Slightly cooled but still warm is arguably the most classic and comforting way to enjoy apple pie. The filling is gooey, and the crust is perfectly tender.
- Reheated slices: Leftover pie reheats beautifully. Warm slices in the oven at 350°F (175°C) for 10-15 minutes, or gently microwave for a quicker warm-up.
- With Cold Accompaniments:
- Vanilla Ice Cream: The quintessential pairing! The cold, creamy vanilla ice cream melts slightly on the warm pie, creating a delightful contrast in temperature and texture. Try classic vanilla bean or French vanilla for an extra touch.
- Cinnamon Ice Cream: Enhance the spice notes of the pie with cinnamon ice cream. This creates a harmonious flavor combination and adds another layer of warmth.
- Caramel Ice Cream: For a richer and sweeter experience, pair the pie with caramel ice cream. The caramel complements the apples and spices beautifully.
- Whipped Cream: A light and airy topping. Homemade whipped cream is especially delicious and easy to make. You can even flavor it with a touch of vanilla or cinnamon.
- Crème Fraîche or Sour Cream: For a tangy counterpoint to the sweetness of the pie, serve with a dollop of crème fraîche or sour cream. This adds a sophisticated touch and cuts through the richness.
- Elevated Garnishes:
- Caramel Sauce: Drizzle warm caramel sauce over slices of pie for an extra layer of sweetness and indulgence. Homemade or high-quality store-bought caramel sauce works wonderfully.
- Maple Syrup: A drizzle of pure maple syrup adds a subtle sweetness and a hint of woodsy flavor that complements apple pie.
- Chopped Nuts: Sprinkle toasted chopped pecans, walnuts, or almonds over the pie for added texture and nutty flavor.
- Cinnamon Sugar: A simple dusting of cinnamon sugar on top of the pie adds a touch of sweetness and visual appeal.
- Beverage Pairings:
- Coffee: A classic pairing! The warmth of coffee complements the spices in the pie perfectly, especially for breakfast or brunch.
- Tea: Black tea, chai tea, or herbal teas like chamomile or apple cinnamon tea are all excellent choices to enjoy with apple pie.
- Milk: A glass of cold milk is a comforting and nostalgic pairing, especially for children (and adults who are kids at heart!).
- Apple Cider: Embrace the apple theme with a glass of warm or cold apple cider, particularly during the fall season.
- Dessert Wine: For a more sophisticated pairing, try a dessert wine like Sauternes or a late-harvest Riesling. The sweetness and fruitiness of these wines complement the apple pie beautifully.
No matter how you choose to serve it, Sheila’s Apple Pie is sure to be a crowd-pleaser. Experiment with different toppings and pairings to find your favorite combination and create a memorable dessert experience.
Additional Tips for Pie Perfection
Baking Sheila’s Apple Pie is a rewarding experience, and with a few extra tips, you can elevate your pie from delicious to absolutely unforgettable. Here are five additional tips to ensure pie perfection every time:
- Choose the Right Apples (and a Mix is Best!): As mentioned earlier, the type of apples you use significantly impacts the flavor and texture of your pie. Opt for a mix of firm, flavorful apples that hold their shape during baking. Granny Smith apples provide tartness, Honeycrisp offer sweetness and crispness, and Fuji or Gala add a balanced flavor. Avoid apples that are too soft or mealy, as they will turn to mush during baking.
- Don’t Overwork the Dough: Overmixing the pie crust dough develops the gluten, resulting in a tough crust. Mix the dough just until it comes together, and handle it gently when forming the disks and rolling it out. Chilling the dough is also crucial for relaxing the gluten and preventing shrinkage during baking. Less is more when it comes to working with pie dough!
- Blind Bake for a Crispy Bottom Crust (Especially for Juicy Fillings): If you are concerned about a soggy bottom crust, especially with very juicy apples, consider blind baking the bottom crust. Line the pie crust with parchment paper and fill it with pie weights or dried beans. Bake at 375°F (190°C) for 15-20 minutes, then remove the weights and parchment and bake for another 5-7 minutes until lightly golden. Let the crust cool slightly before adding the filling and top crust.
- Spice it Up (or Down) to Your Taste: The spice blend in Sheila’s Apple Pie is classic and comforting, but feel free to adjust it to your preferences. If you love cinnamon, add a bit more. If you prefer a warmer spice profile, increase the nutmeg or cloves slightly. You can also experiment with other spices like cardamom, ginger, or allspice. For a milder spice flavor, reduce the amounts of cinnamon, nutmeg, and cloves.
- Let the Pie Cool Completely (Almost!): Patience is key! While it’s tempting to slice into a warm pie right out of the oven, letting it cool for at least an hour (or even longer) allows the filling to set and thicken. This makes slicing much easier and prevents a runny, messy pie. However, serving the pie slightly warm is ideal for the best flavor and texture. A gentle reheating of cooled slices can also bring back that warm pie experience.
By incorporating these additional tips into your baking process, you’ll be well on your way to creating Sheila’s Apple Pie that is not only delicious but also visually appealing and perfectly textured. Happy baking!
Frequently Asked Questions (FAQ)
Got questions about making Sheila’s Apple Pie? You’re not alone! Here are answers to some frequently asked questions to help you bake with confidence and achieve pie perfection.
Q1: Can I use pre-made pie crust to save time?
A: Yes, absolutely! While homemade pie crust is undeniably delicious and contributes to the overall quality of Sheila’s Apple Pie, using pre-made pie crust is a convenient option when you’re short on time. Look for high-quality refrigerated pie crusts in the grocery store. Make sure to follow the package instructions for thawing and using the crust. Keep in mind that pre-made crusts may vary in flavor and texture compared to homemade, but they can still produce a very satisfying pie.
Q2: What are the best apples to use for apple pie?
A: The best apple pie uses a mix of apple varieties! Ideal apples are firm and flavorful, holding their shape during baking and contributing a balance of sweetness and tartness. Excellent choices include Granny Smith (tart and firm), Honeycrisp (sweet and crisp), Fuji (sweet and firm), Gala (mildly sweet and crisp), and Braeburn (sweet-tart and firm). Combining 2-3 different types of apples will create a more complex and delicious filling. Avoid apples that are too soft or mealy, such as Red Delicious, as they tend to become mushy when baked.
Q3: How do I prevent my apple pie crust from getting soggy on the bottom?
A: A soggy bottom crust is a common pie baking woe, but there are several ways to prevent it:
- Blind Bake the Bottom Crust: As mentioned in the tips, blind baking the bottom crust partially before adding the filling helps to set the crust and prevent it from becoming soggy.
- Use a Hot Oven Initially: Starting with a higher oven temperature (400°F/200°C) for the first 15 minutes helps to set the bottom crust quickly.
- Don’t Overfill the Pie: Too much filling can release excess moisture and lead to a soggy crust. Follow the recipe measurements and don’t overfill the pie plate.
- Thicken the Filling Properly: The flour in the filling acts as a thickener. Ensure you use the correct amount of flour to absorb excess juices from the apples.
- Bake on the Lower Rack: Baking the pie on the lower rack of the oven can help to ensure the bottom crust cooks through properly.
Q4: Can I freeze Sheila’s Apple Pie, and if so, how?
A: Yes, you can freeze Sheila’s Apple Pie, either baked or unbaked.
- To Freeze Baked Pie: Let the pie cool completely after baking. Wrap it tightly in plastic wrap, then wrap again in foil. Freeze for up to 2-3 months. To reheat, thaw in the refrigerator overnight. Bake in a preheated oven at 350°F (175°C) for 20-30 minutes, or until heated through.
- To Freeze Unbaked Pie: Assemble the pie as directed, but do not bake. Wrap tightly in plastic wrap, then foil. Freeze for up to 3 months. Bake from frozen: Preheat oven to 400°F (200°C) and bake for 20 minutes. Reduce oven temperature to 375°F (190°C) and bake for an additional 50-60 minutes, or until the crust is golden brown and the filling is bubbly. You may need to add extra baking time when baking from frozen.
Q5: Can I make Sheila’s Apple Pie ahead of time?
A: Absolutely! Sheila’s Apple Pie is a great make-ahead dessert.
- Make the dough ahead: The pie crust dough can be made 2-3 days in advance and stored in the refrigerator, or frozen for longer storage.
- Assemble the pie ahead (unbaked): You can assemble the unbaked pie a day ahead and store it in the refrigerator, tightly covered. Bake as directed when ready to serve.
- Bake the pie ahead: Baked apple pie can be made a day or two in advance and stored at room temperature, loosely covered, or in the refrigerator for longer storage. Reheat gently before serving for the best flavor and texture.
We hope these FAQs have answered your questions and boosted your confidence in baking Sheila’s Apple Pie. Happy baking, and enjoy every delicious slice!
Print
Sheila’s Apple Pie Recipe
Ingredients
For the Crust:
- 2 ½ cups all-purpose flour: The foundation of our flaky crust. All-purpose flour provides the right balance of gluten for structure while still allowing for tenderness. For an even more tender crust, consider using pastry flour or a combination of all-purpose and pastry flour.
- 1 teaspoon salt: Salt is not just about flavor; it enhances the sweetness of the filling and balances the richness of the butter. It also plays a role in gluten development, contributing to a more tender crust.
- 1 cup (2 sticks) unsalted butter, very cold and cut into ½ inch cubes: Cold butter is absolutely crucial for a flaky pie crust. As the pie bakes, the cold butter melts and creates steam, which separates the layers of dough, resulting in that desirable flakiness. Unsalted butter allows you to control the saltiness of the crust.
- ½ cup ice water, plus more if needed: Ice water keeps the dough cold and prevents the gluten from developing too much, which can lead to a tough crust. Add the water gradually, just until the dough comes together. The amount of water needed can vary depending on humidity and flour type.
For the Filling:
- 6-7 medium apples, about 3 pounds total, a mix of firm and flavorful varieties: The heart of our pie! Using a mix of apple varieties adds complexity and depth to the filling. Firm apples hold their shape during baking, preventing a mushy filling, while flavorful varieties contribute to a rich taste. Excellent choices include:
- Granny Smith: Tart and firm, providing a lovely contrast to the sweetness.
- Honeycrisp: Sweet, crisp, and juicy, with a balanced flavor.
- Fuji: Sweet and firm, with a delicate floral note.
- Gala: Mildly sweet and crisp, a good all-purpose apple.
- Braeburn: Sweet-tart and firm, with a complex flavor.
- ¾ cup granulated sugar, plus more for sprinkling: Sugar sweetens the filling and helps to draw out the juices from the apples, creating a delicious sauce as the pie bakes. Granulated sugar provides a clean sweetness.
- ¼ cup packed light brown sugar: Brown sugar adds a touch of molasses flavor and moisture to the filling, contributing to a richer, more complex sweetness. The molasses also helps to create a beautiful caramelization.
- ¼ cup all-purpose flour: Flour acts as a thickener, absorbing excess juices from the apples and preventing the filling from becoming too runny.
- 1 teaspoon ground cinnamon: Cinnamon is the quintessential apple pie spice, adding warmth and classic flavor. Use fresh cinnamon for the best aroma and taste.
- ½ teaspoon ground nutmeg: Nutmeg adds a subtle warmth and depth of flavor that complements the cinnamon beautifully. Freshly grated nutmeg is even more aromatic and flavorful.
- ¼ teaspoon ground cloves: Cloves provide a warm, pungent note that adds complexity to the spice blend. Use cloves sparingly, as they can be overpowering.
- 1 tablespoon lemon juice, freshly squeezed: Lemon juice brightens the flavors of the apples and spices, preventing the filling from being overly sweet. It also helps to prevent the apples from browning.
- 2 tablespoons unsalted butter, cut into small pieces: Dotting the filling with butter adds richness and flavor, and helps to create a glossy, slightly caramelized top to the filling.
Instructions
Making the Crust:
- Combine dry ingredients: In a large bowl, whisk together the flour and salt. This ensures the salt is evenly distributed throughout the flour.
- Incorporate cold butter: Add the cold, cubed butter to the flour mixture. Using a pastry blender or your fingertips, cut the butter into the flour until the mixture resembles coarse crumbs with some pea-sized pieces of butter remaining. The goal is to keep the butter cold and create small pockets of butter that will create flakiness as they melt during baking. Work quickly to prevent the butter from warming up too much.
- Add ice water gradually: Gradually add the ice water, one tablespoon at a time, mixing gently after each addition. Mix just until the dough starts to come together and forms a shaggy mass. Be careful not to overmix, as this can develop the gluten and make the crust tough. You may not need to use all the ice water, or you may need a little more, depending on the humidity and flour.
- Form dough disks: Divide the dough in half. Gently form each half into a disk about 1 inch thick. Wrap each disk tightly in plastic wrap and refrigerate for at least 1 hour, or preferably 2 hours, or even overnight. This chilling time is crucial for relaxing the gluten in the dough and allowing the butter to firm up again, making the dough easier to roll out and preventing shrinkage during baking.
Preparing the Apple Filling:
- Prepare the apples: While the dough is chilling, prepare the apple filling. Peel, core, and slice the apples into ¼ to ½ inch thick slices. A mandoline slicer can be helpful for achieving uniform slices, but a sharp knife works just as well.
- Combine filling ingredients: In a large bowl, combine the sliced apples, granulated sugar, brown sugar, flour, cinnamon, nutmeg, cloves, and lemon juice. Toss gently to coat the apples evenly with the sugar and spices. The flour will help to thicken the juices as the pie bakes.
Assembling and Baking the Pie:
- Preheat oven and prepare pie plate: Preheat oven to 400°F (200°C). Lightly grease a 9-inch pie plate.
- Roll out bottom crust: On a lightly floured surface, roll out one disk of chilled dough into a 12-inch circle, about ⅛ inch thick. Gently transfer the dough to the prepared pie plate, easing it into the plate and trimming any excess dough that hangs over the edge, leaving about a ½ inch overhang. Crimp the edges of the bottom crust as desired. You can use a fork to crimp or create a decorative edge with your fingers.
- Add apple filling: Pour the apple filling into the prepared pie crust, mounding it slightly in the center. Dot the top of the filling with the 2 tablespoons of butter, cut into small pieces.
- Roll out top crust: Roll out the second disk of chilled dough into a 12-inch circle. Gently place the top crust over the filling. Trim any excess dough, leaving a ½ inch overhang. Crimp the edges of the top and bottom crusts together to seal, ensuring a tight seal to prevent filling from leaking out.
- Cut vents in top crust: Cut several vents in the top crust using a sharp knife. These vents allow steam to escape during baking, preventing the crust from puffing up and cracking. You can create simple slits or decorative shapes.
- Egg wash and sugar (optional): If desired, brush the top crust with beaten egg wash for a golden brown finish. Sprinkle with coarse sugar or sparkling sugar for added sweetness and sparkle.
- Bake the pie: Bake in the preheated oven for 15 minutes at 400°F (200°C). Then, reduce the oven temperature to 375°F (190°C) and bake for an additional 40-50 minutes, or until the crust is golden brown and the filling is bubbly. If the crust starts to brown too quickly, you can loosely tent the pie with foil for the last 15-20 minutes of baking.
- Cool before serving: Let the pie cool on a wire rack for at least 1 hour before slicing and serving. This allows the filling to set slightly and makes it easier to slice. While it’s tempting to dig in right away, patience will be rewarded!
Nutrition
- Serving Size: One Normal Portion
- Calories: 450-550 kcal
- Sugar: 35-45g
- Sodium: 200-250mg
- Fat: 25-30g
- Saturated Fat: 15-20g
- Carbohydrates: 60-70g
- Fiber: 3-5g
- Protein: 4-6g
- Cholesterol: 60-80mg