


Of all the culinary combinations that evoke pure, unadulterated nostalgia, peanut butter and jelly stands in a league of its own. For me, it’s the taste of childhood afternoons, of simple packed lunches, and of comfort in its most elemental form. When my family and I transitioned to a ketogenic lifestyle, one of the first pangs of longing I felt was for that classic PB&J sandwich. The bread was an obvious no-go, and the sugar-laden jelly was a fast track to getting kicked out of ketosis. I was determined to find a way to recapture that perfect harmony of salty, nutty peanut butter and sweet, fruity jam without the carbs and sugar. After several attempts, tweaking ratios and testing ingredients, these PB&J Fat Bombs were born. The first time I offered one to my husband, a notorious skeptic of “healthified” treats, his eyes widened. “This is incredible,” he said, reaching for a second. “It’s like the best part of a PB&J, without the bread getting in the way.” They’ve since become a staple in our house—our go-to solution for curbing a sweet tooth, a quick energy boost before a workout, or a satisfying dessert to end the day. They are, quite simply, joy in a bite-sized, keto-friendly package.
What Are Fat Bombs, Anyway?
Before we dive into the delicious details of this specific recipe, let’s talk about the concept of a “fat bomb” itself, especially for those who might be new to the low-carb or ketogenic world. The name can sound a little intense, but the purpose is wonderfully simple.
A fat bomb is a small, high-fat, low-carb, and low-protein snack. The primary goal of a fat bomb is to provide a quick and easy source of healthy fats, helping you meet your daily macronutrient targets on a ketogenic diet. When you drastically reduce carbohydrates, your body shifts its primary fuel source from glucose (from carbs) to ketones (from fat). This metabolic state is called ketosis. To maintain ketosis and feel your best, consuming an adequate amount of fat is crucial.
Fat bombs serve several key purposes:
- Energy Boost: Fat is a dense and slow-burning source of energy. Unlike the quick spike and subsequent crash from sugar, the energy from a fat bomb is sustained, making them perfect for overcoming a midday slump.
- Satiety: Fat is incredibly satiating. A single fat bomb can curb hunger pangs and keep you feeling full and satisfied between meals, which is a powerful tool for preventing mindless snacking on less-than-ideal foods.
- Cravings Crusher: Many fat bomb recipes, like this PB&J version, are designed to taste like decadent desserts. They can satisfy a powerful craving for something sweet without the sugar, helping you stay on track with your health goals.
- Macro Management: Sometimes at the end of the day, you might find you’ve hit your protein and carb limits but are still short on your fat goal. A fat bomb is the perfect tool to help you “hit your macros” without adding significant amounts of other nutrients.
In essence, think of them as a strategic tool and a delicious treat rolled into one. They are the keto dieter’s secret weapon for staying energized, full, and happy.
Why You’ll Fall in Love with These PB&J Fat Bombs
There are countless fat bomb recipes out there, but this one holds a special place in our recipe rotation, and I’m confident it will in yours, too. Here’s why this recipe is a cut above the rest:
- Incredibly Easy to Make: This is a no-bake recipe that requires minimal effort and equipment. If you can melt, mix, and pour, you can make these fat bombs. It’s a fantastic recipe for beginners and seasoned keto cooks alike.
- Minimal Ingredients: You only need a handful of simple, easy-to-find ingredients. There’s nothing exotic or complicated here, just wholesome staples of a low-carb pantry.
- Perfectly Portioned: The recipe is designed to be made in mini muffin tins or silicone molds, creating perfectly portioned, single-serving treats. This helps with mindful eating and makes tracking your macros a breeze.
- The Ultimate Nostalgia Trip: The flavor is a home run. It perfectly captures the beloved taste of a peanut butter and jelly sandwich, satisfying that deep-seated craving for a classic comfort food.
- Completely Customizable: As you’ll see in the tips section, this recipe is a fantastic base for customization. You can swap nut butters, use different jam flavors, or add other mix-ins to make it your own.
- Meal-Prep Friendly: You can whip up a batch on a Sunday and have delicious, grab-and-go snacks ready for the entire week. They store beautifully in the fridge or freezer.
The Complete PB&J Fat Bomb Recipe
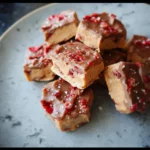
This recipe creates a layered fat bomb with a rich, creamy peanut butter base and a sweet, fruity jelly topping. The two components are made separately and then combined in the mold for that classic PB&J effect.
Ingredients
This recipe is divided into two parts: the peanut butter layer and the jelly layer.
For the Peanut Butter Layer:
- 1 cup Creamy, Unsweetened Peanut Butter: It is crucial to use a natural peanut butter where the only ingredients are peanuts and maybe salt. Avoid brands with added sugars, hydrogenated oils, or other fillers.
- 1/2 cup Coconut Oil, melted: Use a high-quality virgin or refined coconut oil. Virgin will have a slight coconut flavor, while refined is more neutral.
- 1/4 cup Powdered Erythritol (or other powdered keto sweetener): Using a powdered sweetener is key to avoiding a gritty texture. You can powder granular sweetener in a coffee grinder if needed. Adjust the amount to your desired sweetness.
- 1 teaspoon Vanilla Extract: Adds a depth of flavor that complements the peanut butter.
- 1/4 teaspoon Sea Salt: Enhances all the flavors and balances the sweetness. Omit if your peanut butter is already quite salty.
For the Jelly Layer:
- 1/2 cup Sugar-Free Raspberry or Strawberry Jam/Preserves: Look for a brand that is sweetened with keto-friendly sweeteners like erythritol, stevia, or allulose. Reading the label is essential to ensure it’s truly low-carb. Alternatively, you can make a quick chia seed jam (see tips).
Equipment
- Mini muffin tin (24-cup) or silicone candy molds
- Mini paper or silicone liners (if using a muffin tin)
- Two small microwave-safe bowls
- Spatula or whisk
- Measuring cups and spoons
Step-by-Step Instructions
Follow these simple steps for perfect fat bombs every time.
Step 1: Prepare Your Molds
If you’re using a mini muffin tin, place a paper or silicone liner in each cup. This is a critical step that will save you a massive headache later, as it makes removing the fat bombs effortless. If you’re using silicone molds, you can skip the liners as they are naturally non-stick. Set the prepared tin or molds on a small baking sheet; this makes it much easier to transfer them to the fridge/freezer without spilling.
Step 2: Create the Peanut Butter Base
In a medium-sized, microwave-safe bowl, combine the unsweetened peanut butter and the coconut oil. Microwave in 30-second intervals, stirring in between, until the mixture is completely melted and smooth. Be careful not to overheat it. Alternatively, you can do this in a small saucepan over low heat or using a double boiler.
Step 3: Sweeten and Flavor the Base
Once the peanut butter and coconut oil mixture is smooth, whisk in the powdered erythritol, vanilla extract, and sea salt. Continue to whisk until the sweetener is fully dissolved and the mixture is uniform. You shouldn’t feel any grittiness. Taste the mixture and adjust the sweetener or salt if needed.
Step 4: Pour the First Layer
Carefully pour or spoon the peanut butter mixture into your prepared molds or muffin liners. Fill each one about halfway to two-thirds full, leaving room for the jelly topping.
Step 5: First Chill
Place the baking sheet with the molds into the freezer for about 15-20 minutes, or until the peanut butter layer is firm to the touch. This step is important to create a distinct layer; if you add the jelly while the base is still liquid, they will mix together.
Step 6: Prepare the Jelly Topping
While the base is chilling, prepare your jelly layer. Place the sugar-free jam in a small microwave-safe bowl. If your jam is very thick, you can warm it in the microwave for 10-15 seconds to make it slightly more liquid and easier to spoon. Stir it well to get a consistent, spreadable texture.
Step 7: Add the Jelly Layer
Once the peanut butter layer is firm, remove the molds from the freezer. Spoon a small amount of the prepared sugar-free jam (about 1/2 to 1 teaspoon) onto the center of each peanut butter base. You can leave it as a dollop in the middle or gently spread it out towards the edges, depending on the look you prefer.
Step 8: Final Freeze
Return the molds to the freezer for at least 1 hour, or until the fat bombs are completely solid. This final, longer freeze ensures they are firm enough to be easily removed from the molds and hold their shape.
Step 9: Store and Enjoy
Once solid, pop the PB&J Fat Bombs out of their molds. They are now ready to be enjoyed! Store them in an airtight container in the refrigerator or freezer.
Nutrition Facts
- Servings: This recipe makes approximately 24 fat bombs.
- Calories per serving (1 fat bomb): Approximately 115 calories.
Approximate Nutritional Breakdown per Fat Bomb:
- Net Carbs: 2g
- Fat: 11g
- Protein: 2g
- Fiber: 1g
Disclaimer: The nutritional information provided is an estimate and can vary depending on the specific brands of ingredients used (especially the peanut butter and jam). Please calculate your own macros using the exact ingredients you use for the most accurate information.
Preparation Time
- Active Prep Time: 15 minutes
- Chilling/Freezing Time: 1 hour 20 minutes
- Total Time: 1 hour 35 minutes
How to Serve Your PB&J Fat Bombs
These little bites are incredibly versatile. While they’re perfect on their own, here are a few ways to serve and enjoy them:
- The Midday Energizer: Keep a stash in the office fridge for a quick and satisfying snack to beat the 3 PM slump. It’s the perfect replacement for a sugary coffee drink or vending machine snack.
- Pre-Workout Fuel: Have one about 30-45 minutes before a workout for a source of sustained, non-jittery energy to power you through your session.
- Post-Dinner Dessert: Enjoy one or two fat bombs after your evening meal to satisfy your sweet tooth and signal to your body that the meal is over. They are wonderful with a cup of decaf coffee or herbal tea.
- On-the-Go Treat: Because they are small and tidy, they are easy to pack in a small container for a road trip, a hike, or a busy day of running errands. Just be mindful of temperature, as they will soften.
- Yogurt or “Oatmeal” Topping: Crumble a fat bomb over a bowl of keto-friendly yogurt (like plain, full-fat Greek yogurt) or a bowl of keto “noatmeal” (made with hemp hearts, chia, and flax) for a decadent and flavorful topping.
- Part of a Keto Charcuterie Board: Add a few fat bombs to a dessert-themed platter with keto cookies, berries, and squares of dark chocolate for a fun and impressive shareable treat.
Additional Tips for a Perfect Batch
Here are five tips to help you master this recipe and customize it to your liking.
- Make Your Own 2-Ingredient Chia Jam: If you can’t find a good store-bought sugar-free jam or want a healthier, whole-food option, make your own! Simply heat 1 cup of raspberries or strawberries (fresh or frozen) in a small saucepan until they break down. Mash them with a fork, stir in 2 tablespoons of chia seeds and your preferred keto sweetener to taste. Let it sit for 15-20 minutes to thicken. It’s that easy, and you control all the ingredients.
- Experiment with Nut Butters: Don’t feel locked into peanut butter. This recipe works beautifully with other low-carb nut or seed butters. Try it with creamy almond butter, macadamia nut butter for an extra fatty boost, or SunButter (sunflower seed butter) for a nut-free version. Just ensure they are unsweetened and natural.
- Achieve the Perfect Texture: The ratio of coconut oil to peanut butter determines the final texture. The recipe as written creates a firm-yet-creamy bomb. If you prefer a softer, fudgier texture, slightly reduce the coconut oil. If you live in a very warm climate and need them to be extra stable, you can slightly increase it or add a tablespoon of grass-fed butter or cacao butter to the base for more solidity.
- Get Creative with Your Molds: Half the fun of fat bombs is their shape! Invest in a few fun silicone molds—hearts, stars, flowers, or even classic peanut butter cup shapes. This makes them more appealing, especially if you’re serving them to guests or trying to get kids to enjoy a healthy treat.
- Add a Salty Crunch: For a “salted caramel” PB&J vibe, sprinkle a tiny pinch of flaky sea salt (like Maldon) on top of the jelly layer just before you put them in for their final freeze. The little crunch and pop of salt provide a wonderful contrast to the creamy, sweet base.
Frequently Asked Questions (FAQ)
1. Why are my fat bombs oily or soft at room temperature?
This is completely normal! The main ingredient is coconut oil, which has a low melting point (around 76°F or 24°C). This is why fat bombs must be stored in the refrigerator or freezer. If yours are excessively soft even when cold, you may have used a slightly higher ratio of oil to peanut butter. You can adjust this in your next batch by adding a little more peanut butter or a little less oil.
2. Are fat bombs actually healthy?
In the context of a well-formulated low-carb or ketogenic diet, yes. They provide healthy fats that are used for energy, can help with satiety, and prevent cravings for unhealthy, sugary foods. However, they are calorically dense. The key is moderation. They are a tool and a treat, not a meal replacement. It’s still important to get the majority of your nutrients from whole foods like meat, fish, eggs, and low-carb vegetables.
3. How many fat bombs can I eat in a day?
This depends entirely on your individual daily macros (your personal targets for fat, protein, and carbs) and your caloric needs. For most people, one to two fat bombs per day is a reasonable amount to fit into their plan without displacing more nutrient-dense foods. Always track them in your food log to see how they fit into your day.
4. Can I make these fat bombs dairy-free?
Yes! This recipe is naturally dairy-free as written. Just be sure to double-check that your chosen peanut butter and sugar-free jam contain no dairy derivatives. If you decide to substitute some of the coconut oil with butter for a different flavor, you can use a high-quality dairy-free butter substitute or ghee (which has most of the milk solids removed and is tolerated by many).
5. My peanut butter base separated. What did I do wrong?
Separation can sometimes happen, especially with natural peanut butters. It usually means the mixture wasn’t emulsified well enough or that it was heated too quickly. The key is to melt the peanut butter and coconut oil together slowly and stir it very well. When you add the sweetener and vanilla, continue to whisk vigorously until everything is homogenous and glossy. If it does separate, you can often save it by continuing to whisk as it cools slightly. Pouring it into the molds quickly while it’s well-mixed also helps.
PB&J Fat Bombs Recipe
Ingredients
For the Peanut Butter Layer:
- 1 cup Creamy, Unsweetened Peanut Butter: It is crucial to use a natural peanut butter where the only ingredients are peanuts and maybe salt. Avoid brands with added sugars, hydrogenated oils, or other fillers.
- 1/2 cup Coconut Oil, melted: Use a high-quality virgin or refined coconut oil. Virgin will have a slight coconut flavor, while refined is more neutral.
- 1/4 cup Powdered Erythritol (or other powdered keto sweetener): Using a powdered sweetener is key to avoiding a gritty texture. You can powder granular sweetener in a coffee grinder if needed. Adjust the amount to your desired sweetness.
- 1 teaspoon Vanilla Extract: Adds a depth of flavor that complements the peanut butter.
- 1/4 teaspoon Sea Salt: Enhances all the flavors and balances the sweetness. Omit if your peanut butter is already quite salty.
For the Jelly Layer:
- 1/2 cup Sugar-Free Raspberry or Strawberry Jam/Preserves: Look for a brand that is sweetened with keto-friendly sweeteners like erythritol, stevia, or allulose. Reading the label is essential to ensure it’s truly low-carb. Alternatively, you can make a quick chia seed jam (see tips).
Instructions
Step 1: Prepare Your Molds
If you’re using a mini muffin tin, place a paper or silicone liner in each cup. This is a critical step that will save you a massive headache later, as it makes removing the fat bombs effortless. If you’re using silicone molds, you can skip the liners as they are naturally non-stick. Set the prepared tin or molds on a small baking sheet; this makes it much easier to transfer them to the fridge/freezer without spilling.
Step 2: Create the Peanut Butter Base
In a medium-sized, microwave-safe bowl, combine the unsweetened peanut butter and the coconut oil. Microwave in 30-second intervals, stirring in between, until the mixture is completely melted and smooth. Be careful not to overheat it. Alternatively, you can do this in a small saucepan over low heat or using a double boiler.
Step 3: Sweeten and Flavor the Base
Once the peanut butter and coconut oil mixture is smooth, whisk in the powdered erythritol, vanilla extract, and sea salt. Continue to whisk until the sweetener is fully dissolved and the mixture is uniform. You shouldn’t feel any grittiness. Taste the mixture and adjust the sweetener or salt if needed.
Step 4: Pour the First Layer
Carefully pour or spoon the peanut butter mixture into your prepared molds or muffin liners. Fill each one about halfway to two-thirds full, leaving room for the jelly topping.
Step 5: First Chill
Place the baking sheet with the molds into the freezer for about 15-20 minutes, or until the peanut butter layer is firm to the touch. This step is important to create a distinct layer; if you add the jelly while the base is still liquid, they will mix together.
Step 6: Prepare the Jelly Topping
While the base is chilling, prepare your jelly layer. Place the sugar-free jam in a small microwave-safe bowl. If your jam is very thick, you can warm it in the microwave for 10-15 seconds to make it slightly more liquid and easier to spoon. Stir it well to get a consistent, spreadable texture.
Step 7: Add the Jelly Layer
Once the peanut butter layer is firm, remove the molds from the freezer. Spoon a small amount of the prepared sugar-free jam (about 1/2 to 1 teaspoon) onto the center of each peanut butter base. You can leave it as a dollop in the middle or gently spread it out towards the edges, depending on the look you prefer.
Step 8: Final Freeze
Return the molds to the freezer for at least 1 hour, or until the fat bombs are completely solid. This final, longer freeze ensures they are firm enough to be easily removed from the molds and hold their shape.
Step 9: Store and Enjoy
Once solid, pop the PB&J Fat Bombs out of their molds. They are now ready to be enjoyed! Store them in an airtight container in the refrigerator or freezer.
Nutrition
- Serving Size: One Normal Portion
- Calories: 115
- Fat: 11g
- Carbohydrates: 2g
- Fiber: 1g
- Protein: 2g


