


Okay, let’s dive into the decadent world of peanut butter and chocolate! There are few flavor combinations as universally adored, and when you transform that pairing into a cool, creamy pie, it’s pure magic. The first time I made this Reese’s Peanut Butter Pie for a family barbecue, I wasn’t sure what to expect. Would it be too rich? Would it hold up in the summer heat? Let me tell you, it disappeared faster than any dessert I’d ever brought before. My brother-in-law, a notorious dessert skeptic, actually went back for a second slice, declaring it “dangerously good.” My kids, predictably, were obsessed, licking their plates clean and immediately asking when I could make it again. It became an instant legend in our house – the go-to celebration dessert, the ultimate comfort food treat. It’s surprisingly straightforward to make, yet delivers a “wow” factor that makes you feel like a pastry chef. The contrast of the crunchy, chocolatey crust, the unbelievably smooth and intensely peanut-buttery filling studded with chunks of Reese’s cups, and the rich chocolate topping is simply divine. It’s more than just a dessert; it’s an experience, a guaranteed crowd-pleaser that brings smiles to faces, young and old.
Why This Reese’s Peanut Butter Pie Recipe Reigns Supreme
In the vast universe of desserts, peanut butter pie holds a special place. But this Reese’s Peanut Butter Pie? It takes things to a whole new level. It’s not just about the peanut butter; it’s about capturing the specific, beloved flavor profile of Reese’s Peanut Butter Cups – that perfect balance of salty peanut butter and sweet milk chocolate. This recipe achieves that through a few key elements:
- The Perfect Crust: We’re using an Oreo cookie crust. Why? Because the deep cocoa flavor of Oreos complements the peanut butter filling beautifully, adding another layer of chocolatey goodness and a delightful crunch that contrasts perfectly with the creamy filling. It mimics the chocolate shell of the candy.
- Intense Peanut Butter Flavor: We don’t skimp on the peanut butter here. Combined with cream cheese for tang and stability, and powdered sugar for sweetness, the filling is unapologetically rich and peanut-buttery. Crucially, we’re also folding in chopped Reese’s Peanut Butter Cups into the filling, ensuring that iconic candy flavor is present in every single bite.
- Creamy, Dreamy Texture: Whether you opt for stabilized whipped cream or Cool Whip (for ultimate ease), the result is an incredibly light, airy, yet decadent texture. It melts in your mouth, delivering velvety smoothness that makes this pie dangerously easy to eat.
- No-Bake Brilliance: One of the biggest advantages? This is primarily a no-bake recipe (unless you choose to briefly bake the crust for extra crispness, which is optional). This makes it perfect for warmer months when you don’t want to turn on the oven, or for busy times when you need a dessert that mostly requires chilling time rather than active cooking.
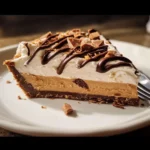
- Showstopper Presentation: With a simple chocolate ganache topping and a garnish of more Reese’s cups, this pie looks as incredible as it tastes. It’s effortlessly impressive, making it ideal for potlucks, holidays, birthdays, or any occasion that calls for a truly special dessert.
This recipe isn’t just about mixing ingredients; it’s about creating a moment of pure indulgence, a nostalgic nod to a favorite candy bar transformed into an elegant, unforgettable pie.
Gather Your Ingredients: The Foundation of Peanut Butter Perfection
Precision is key in baking, even for a no-bake recipe! Using the right amounts and types of ingredients ensures the perfect texture and flavor balance. Here’s what you’ll need to create your Reese’s Peanut Butter Pie masterpiece:
For the Chocolate Cookie Crust:
- Oreo Cookies: 24-26 whole cookies (regular, not Double Stuf), including the filling. This usually equates to about one standard package or roughly 2 cups of fine crumbs.
- Unsalted Butter: 6 tablespoons (85g), melted. Using unsalted butter allows you to control the saltiness of the final dish.
For the Creamy Peanut Butter Filling:
- Cream Cheese: 8 ounces (226g), full-fat, softened to room temperature. Crucial for a smooth, lump-free filling. Full-fat provides the best richness and texture.
- Creamy Peanut Butter: 1 cup (256g). Use a standard commercial creamy peanut butter like Jif or Skippy. Natural peanut butter can separate and affect the texture, so it’s generally not recommended for this recipe unless you’re experienced with adjusting for it.
- Powdered Sugar: 1 cup (120g), sifted. Also known as confectioners’ sugar. Sifting prevents clumps and ensures a smooth filling.
- Vanilla Extract: 1 teaspoon. Use pure vanilla extract for the best flavor.
- Heavy Whipping Cream: 1 ½ cups (360ml), cold. This will be whipped to form the light, airy base of the filling. Alternatively, you can substitute one 8-ounce container of frozen whipped topping (like Cool Whip), thawed. Using real whipped cream offers a richer flavor, while Cool Whip provides excellent stability and ease.
- Reese’s Peanut Butter Cups: 1 cup (about 10-12 regular-sized cups), chopped. Chop them into small, irregular pieces. You can use minis, but regular cups provide more satisfying chunks.
For the Chocolate Ganache Topping:
- Semi-Sweet Chocolate Chips: 1 cup (170g). You can also use chopped semi-sweet baking chocolate. Milk chocolate can be used for a sweeter topping reminiscent of the actual Reese’s coating.
- Heavy Whipping Cream: ½ cup (120ml). This creates a smooth, pourable ganache that sets beautifully.
For Garnish (Optional but Recommended):
- Additional Reese’s Peanut Butter Cups: 4-6 regular-sized cups, chopped, halved, or minis.
- Peanut Butter Drizzle: A tablespoon or two of peanut butter, slightly warmed or mixed with a tiny bit of neutral oil to make it drizzle-able.
- Whipped Cream: Dollops around the edge.
- Chopped Peanuts: For extra crunch and peanut flavor.
Ingredient Notes:
- Room Temperature Cream Cheese: This is non-negotiable for a smooth filling. Cold cream cheese will result in lumps. Take it out of the fridge at least an hour before you start.
- Cold Heavy Cream: For whipping, heavy cream needs to be very cold to achieve stiff peaks. You can even chill your mixing bowl and whisk/beaters.
- Peanut Butter Choice: As mentioned, processed creamy peanut butter works best here for consistency.
Having all your ingredients measured out and ready (mise en place) will make the assembly process smooth and enjoyable.
Step-by-Step Instructions: Crafting Your Reese’s Masterpiece
Follow these steps carefully to ensure your Reese’s Peanut Butter Pie turns out perfectly creamy, decadent, and delicious.
Part 1: Prepare the Oreo Crust
- Crush the Oreos: Place the whole Oreo cookies (including filling) into the bowl of a food processor. Pulse until they are fine crumbs. If you don’t have a food processor, place the cookies in a large, sturdy zip-top bag, seal it tightly removing excess air, and crush them using a rolling pin or mallet until you have fine crumbs. Aim for about 2 cups of crumbs.
- Combine with Butter: Transfer the Oreo crumbs to a medium bowl. Pour the 6 tablespoons of melted unsalted butter over the crumbs. Stir with a fork until all the crumbs are evenly moistened. The mixture should resemble wet sand.
- Form the Crust: Tip the buttery crumbs into a 9-inch pie plate (standard depth, not deep-dish unless you plan to double the filling). Using the bottom of a flat measuring cup or glass, press the crumbs firmly and evenly onto the bottom and up the sides of the pie plate. Ensure the sides are well-compacted so they hold their shape.
- Chill the Crust: Place the pie plate with the crust into the freezer for at least 15-20 minutes (or the refrigerator for 30 minutes) to firm up while you prepare the filling. This helps prevent the crust from crumbling when you add the filling. (Optional Bake: For an extra crisp crust, you can bake it at 350°F (175°C) for 8-10 minutes. Let it cool completely before adding the filling).
Part 2: Make the Peanut Butter Filling
- Beat Cream Cheese and Sugar: In a large mixing bowl, using an electric hand mixer or a stand mixer fitted with the paddle attachment, beat the softened 8 ounces of cream cheese on medium speed until completely smooth and creamy, scraping down the sides of the bowl as needed. This should take about 1-2 minutes. Add the 1 cup of sifted powdered sugar and continue beating on low speed initially (to avoid a sugar cloud!), then increase to medium speed until fully combined and smooth.
- Incorporate Peanut Butter and Vanilla: Add the 1 cup of creamy peanut butter and 1 teaspoon of vanilla extract to the cream cheese mixture. Beat on medium speed until well combined and the mixture is smooth and uniform in color. Scrape down the sides and bottom of the bowl again to ensure everything is incorporated.
- Whip the Heavy Cream (if using): In a separate, clean, cold bowl, pour the 1 ½ cups of cold heavy whipping cream. Using clean beaters (or the whisk attachment of your stand mixer), whip the cream on medium-high speed until stiff peaks form. Stiff peaks mean that when you lift the beaters out of the cream, the peak holds its shape and doesn’t flop over. Be careful not to over-whip, or it will turn buttery. (If using Cool Whip: Skip this step and proceed to step 8, using the thawed 8-ounce container).
- Fold in Whipped Cream/Topping: Gently fold about one-third of the whipped cream (or thawed Cool Whip) into the peanut butter mixture using a rubber spatula. This lightens the peanut butter base. Then, add the remaining whipped cream (or Cool Whip) and continue to fold gently until just combined. Be careful not to deflate the whipped cream – fold by running the spatula down the center, across the bottom, up the side, and folding over the top, rotating the bowl as you go. Stop folding as soon as no major streaks remain.
- Add Chopped Reese’s: Gently fold in the 1 cup of chopped Reese’s Peanut Butter Cups until they are evenly distributed throughout the filling.
- Fill the Crust: Retrieve the chilled crust from the freezer or refrigerator. Spoon the peanut butter filling into the prepared crust. Spread it evenly using an offset spatula or the back of a spoon, smoothing the top.
Part 3: Chill and Top the Pie
- Initial Chill: Cover the pie loosely with plastic wrap (try not to let it touch the surface of the filling) or foil. Place the pie in the refrigerator to chill for at least 4-6 hours, or preferably overnight. This allows the filling to set properly and the flavors to meld. The pie needs to be thoroughly chilled and firm before adding the ganache.
- Make the Chocolate Ganache: Once the pie is well-chilled and firm, prepare the ganache. Place the 1 cup of semi-sweet chocolate chips in a heatproof bowl. Heat the ½ cup of heavy whipping cream in a small saucepan over medium heat until it just begins to simmer (small bubbles form around the edges). Do not let it come to a rolling boil. Immediately pour the hot cream over the chocolate chips. Let it sit undisturbed for 5 minutes.
- Stir the Ganache: After 5 minutes, whisk the chocolate and cream mixture gently, starting from the center and working your way out, until it becomes smooth, glossy, and fully combined. If any chocolate pieces remain unmelted, you can microwave the mixture in 10-second bursts, stirring well after each, until smooth. Let the ganache cool slightly for 5-10 minutes; it should still be pourable but not hot.
- Top the Pie: Pour the slightly cooled ganache over the center of the chilled peanut butter pie. Gently tilt the pie plate or use an offset spatula to spread the ganache evenly over the top surface, letting it drip slightly down the sides if desired.
- Garnish: Immediately, while the ganache is still wet, arrange your desired garnish on top. Sprinkle with chopped Reese’s cups, add peanut butter drizzles, pipe whipped cream dollops, or sprinkle with chopped peanuts.
- Final Chill: Place the pie back in the refrigerator, uncovered (so the ganache sets nicely), for at least 30 minutes to an hour for the ganache to set before slicing and serving.
Your magnificent Reese’s Peanut Butter Pie is now ready to impress!
Understanding the Nutrition: A Look at the Numbers
While this Reese’s Peanut Butter Pie is undeniably a treat meant for indulgence, here’s a general nutritional estimate to keep in mind. Please note that these values are approximations and can vary significantly based on the specific brands of ingredients used (especially peanut butter, Oreos, cream cheese, and chocolate chips) and the final serving size.
- Servings: This recipe typically yields 8 generous servings, or potentially 10 slightly smaller servings.
- Calories Per Serving (Approximate): Based on 8 servings, each slice can range from 650 to 800 calories.
Breakdown: This pie is rich in fats (from butter, cream cheese, heavy cream, peanut butter, chocolate) and sugars (from Oreos, powdered sugar, peanut butter, chocolate, Reese’s cups). It does offer some protein primarily from the peanut butter and dairy.
Disclaimer: This information is provided as a general guideline only. For precise nutritional data, it’s recommended to use an online recipe calculator and input your specific ingredients and quantities. Remember, this is a dessert designed for enjoyment on special occasions or as a decadent treat!
Time Commitment: Planning Your Pie-Making Adventure
Knowing the time involved helps you plan when to start making this delicious pie, especially considering the necessary chilling time.
- Active Preparation Time: Approximately 30-40 minutes. This includes crushing the cookies, making the crust, mixing the filling, and preparing the ganache.
- Chilling Time (Crucial):
- Crust Chilling: 15-30 minutes.
- Filling Chilling (Main Set): Minimum 4-6 hours, overnight (8+ hours) is highly recommended for the best texture and easiest slicing.
- Ganache Setting: 30-60 minutes.
- Total Time (Start to Finish): Minimum 5.5 hours, but realistically closer to 9-10 hours when including overnight chilling for the best results.
Why So Much Chilling?
Chilling is absolutely essential for a no-bake pie like this:
- Firms the Crust: Ensures the crust holds together when sliced.
- Sets the Filling: The cream cheese, whipped cream, and peanut butter mixture needs ample time to firm up into a sliceable consistency. Rushing this step will result in a soft, potentially messy pie.
- Melds Flavors: Allows the different flavors – chocolate, peanut butter, vanilla, tanginess from the cream cheese – to blend beautifully.
- Sets the Ganache: Provides time for the chocolate topping to firm up slightly, making for cleaner slices.
Plan ahead! This is the perfect dessert to make the day before you intend to serve it.
Serving Suggestions: Presenting Your Peanut Butter Pie
This Reese’s Peanut Butter Pie is a star on its own, but a little extra flair can elevate the presentation and complement the flavors. Here are some serving ideas:
- Keep it Classic: Serve slices just as they are, letting the layers and ganache topping shine. The built-in Reese’s garnish is often enough!
- Whipped Cream Cloud: Add a generous dollop of freshly whipped cream (lightly sweetened) or a swirl of piped whipped cream alongside or on top of each slice. This adds lightness and cuts through the richness.
- Extra Drizzles:
- Chocolate Sauce: A drizzle of good quality chocolate syrup enhances the chocolate notes.
- Caramel Sauce: The salty-sweetness of caramel pairs wonderfully with peanut butter and chocolate.
- Peanut Butter Drizzle: Warm a little peanut butter slightly (add a tiny bit of oil if needed to thin) and drizzle over the slice for an extra peanut butter punch.
- Textural Contrast:
- Chopped Peanuts: Sprinkle roasted, salted peanuts over the slice or around the plate for extra crunch and saltiness.
- Mini Chocolate Chips: A few mini chocolate chips add texture and visual appeal.
- À La Mode: A small scoop of high-quality vanilla bean ice cream or even chocolate or peanut butter ice cream served alongside a slice is pure decadence.
- Presentation is Key:
- Clean Slices: For the neatest slices, dip a sharp knife in hot water and wipe it clean between each cut.
- Plate Decoration: Use drizzles or a dusting of cocoa powder on the plate itself before placing the slice.
Choose one or two accompaniments – you don’t want to overwhelm the magnificent pie itself! Serve chilled directly from the refrigerator for the best texture.
Additional Tips for Pie Perfection: Elevate Your Reese’s Pie Game
Want to ensure your pie is absolutely flawless? Here are five pro tips:
- Master the Crust: Don’t underestimate the importance of pressing the crust firmly. Use the flat bottom of a glass or measuring cup to really compact the crumbs, especially up the sides. If the sides seem weak, add slightly more crumbs there. Chilling (or the optional brief bake) is crucial for stability. Bonus Crust Tip: Feel free to experiment! A graham cracker crust (add 1/4 cup sugar) or even a Nutter Butter cookie crust would also be delicious variations.
- Ensure Smooth Filling (Temperature is Key!): The single most important factor for a smooth, non-lumpy filling is having your cream cheese truly at room temperature. If it’s even slightly cool, it won’t incorporate smoothly. Also, sift your powdered sugar to avoid little hard lumps. Beat the cream cheese thoroughly before adding other ingredients.
- Whipping Cream Wisdom: If using real heavy cream, make sure it’s very cold, and whip it to stiff peaks. Don’t walk away during the last stages, as it can go from perfect peaks to over-whipped (grainy/buttery) very quickly. When folding it into the peanut butter mixture, be gentle and stop as soon as it’s combined to maintain that light, airy texture. Over-mixing will deflate the cream.
- Embrace the Chill Time: Seriously, don’t rush the chilling. Giving the pie a full 8 hours (or overnight) in the refrigerator allows the filling to set completely, resulting in clean slices and the perfect melt-in-your-mouth texture. Trying to slice it too early can lead to a soft mess. It also allows the flavors to deepen and meld beautifully.
- Make-Ahead & Storage Savvy: This pie is ideal for making ahead! Prepare it completely (including ganache and garnish) 1-2 days before serving and store it covered in the refrigerator. It actually tastes even better the next day! For longer storage, freeze it. Freeze the pie before slicing for about 1 hour until firm, then wrap it tightly in plastic wrap followed by a layer of aluminum foil. It can be frozen for up to 1-2 months. Thaw overnight in the refrigerator before serving. Note that the texture might be slightly denser after freezing and thawing.
Frequently Asked Questions (FAQ) about Reese’s Peanut Butter Pie
Here are answers to some common questions about making this decadent dessert:
- Q: Can I use a different type of crust?
- A: Absolutely! While the Oreo crust provides a fantastic chocolate flavor that complements the Reese’s theme, you have options. A traditional graham cracker crust (about 1.5 cups crumbs, 1/4 cup sugar, 6 tbsp melted butter) is a classic choice. For intense peanut flavor, try a Nutter Butter cookie crust (use the same method as the Oreo crust). A pre-made store-bought Oreo or graham cracker crust can also work in a pinch, though homemade usually tastes better and is sturdier.
- Q: Can I use natural peanut butter?
- A: It’s generally not recommended for this specific recipe. Natural peanut butter tends to separate (oil rising to the top) and often has a grittier texture and less sweetness. This can affect the final texture and consistency of the pie filling, potentially making it oily or less smooth and stable. Standard commercial creamy peanut butter (like Jif, Skippy, or Peter Pan) provides the best, most consistent results for this type of no-bake pie filling.
- Q: How long will this Reese’s Peanut Butter Pie last in the refrigerator?
- A: Properly covered (either with plastic wrap or in an airtight pie container), the pie will last for 3 to 5 days in the refrigerator. The crust may soften slightly over time, but the flavor often gets even better on day 2! Keep it well-chilled until ready to serve.
- Q: Can I make this pie gluten-free?
- A: Yes, you can adapt this recipe to be gluten-free relatively easily. Use certified gluten-free chocolate sandwich cookies (several brands make good GF Oreos) for the crust. Ensure your Reese’s Peanut Butter Cups are gluten-free (most standard varieties are, but always check packaging as formulations can change) and verify that your other ingredients (like powdered sugar and vanilla extract) are certified GF if cross-contamination is a concern. The filling ingredients are naturally gluten-free.
- Q: My filling seems a bit soft. What did I do wrong?
- A: Soft filling usually points to one of a few things:
- Insufficient Chilling: The most common culprit. The pie needs at least 4-6 hours, but ideally overnight, to fully set.
- Under-whipped Cream: If using heavy cream, ensure you whipped it to stiff peaks. If the cream was only softly whipped, the filling won’t have enough structure.
- Over-mixing: Folding the whipped cream too vigorously or for too long can deflate it, leading to a denser, softer filling.
- Warm Ingredients: While the cream cheese needs to be soft, the heavy cream needs to be very cold. Using room temperature cream might hinder proper whipping.
- Measurement Issues: Using significantly less cream cheese or more liquid ingredients could also result in a softer set. Double-check your measurements next time!
- A: Soft filling usually points to one of a few things:
Reese’s Peanut Butter Pie Recipe
Ingredients
For the Chocolate Cookie Crust:
- Oreo Cookies: 24-26 whole cookies (regular, not Double Stuf), including the filling. This usually equates to about one standard package or roughly 2 cups of fine crumbs.
- Unsalted Butter: 6 tablespoons (85g), melted. Using unsalted butter allows you to control the saltiness of the final dish.
For the Creamy Peanut Butter Filling:
- Cream Cheese: 8 ounces (226g), full-fat, softened to room temperature. Crucial for a smooth, lump-free filling. Full-fat provides the best richness and texture.
- Creamy Peanut Butter: 1 cup (256g). Use a standard commercial creamy peanut butter like Jif or Skippy. Natural peanut butter can separate and affect the texture, so it’s generally not recommended for this recipe unless you’re experienced with adjusting for it.
- Powdered Sugar: 1 cup (120g), sifted. Also known as confectioners’ sugar. Sifting prevents clumps and ensures a smooth filling.
- Vanilla Extract: 1 teaspoon. Use pure vanilla extract for the best flavor.
- Heavy Whipping Cream: 1 ½ cups (360ml), cold. This will be whipped to form the light, airy base of the filling. Alternatively, you can substitute one 8-ounce container of frozen whipped topping (like Cool Whip), thawed. Using real whipped cream offers a richer flavor, while Cool Whip provides excellent stability and ease.
- Reese’s Peanut Butter Cups: 1 cup (about 10-12 regular-sized cups), chopped. Chop them into small, irregular pieces. You can use minis, but regular cups provide more satisfying chunks.
For the Chocolate Ganache Topping:
- Semi-Sweet Chocolate Chips: 1 cup (170g). You can also use chopped semi-sweet baking chocolate. Milk chocolate can be used for a sweeter topping reminiscent of the actual Reese’s coating.
- Heavy Whipping Cream: ½ cup (120ml). This creates a smooth, pourable ganache that sets beautifully.
For Garnish (Optional but Recommended):
- Additional Reese’s Peanut Butter Cups: 4-6 regular-sized cups, chopped, halved, or minis.
- Peanut Butter Drizzle: A tablespoon or two of peanut butter, slightly warmed or mixed with a tiny bit of neutral oil to make it drizzle-able.
- Whipped Cream: Dollops around the edge.
- Chopped Peanuts: For extra crunch and peanut flavor.
Instructions
Part 1: Prepare the Oreo Crust
- Crush the Oreos: Place the whole Oreo cookies (including filling) into the bowl of a food processor. Pulse until they are fine crumbs. If you don’t have a food processor, place the cookies in a large, sturdy zip-top bag, seal it tightly removing excess air, and crush them using a rolling pin or mallet until you have fine crumbs. Aim for about 2 cups of crumbs.
- Combine with Butter: Transfer the Oreo crumbs to a medium bowl. Pour the 6 tablespoons of melted unsalted butter over the crumbs. Stir with a fork until all the crumbs are evenly moistened. The mixture should resemble wet sand.
- Form the Crust: Tip the buttery crumbs into a 9-inch pie plate (standard depth, not deep-dish unless you plan to double the filling). Using the bottom of a flat measuring cup or glass, press the crumbs firmly and evenly onto the bottom and up the sides of the pie plate. Ensure the sides are well-compacted so they hold their shape.
- Chill the Crust: Place the pie plate with the crust into the freezer for at least 15-20 minutes (or the refrigerator for 30 minutes) to firm up while you prepare the filling. This helps prevent the crust from crumbling when you add the filling. (Optional Bake: For an extra crisp crust, you can bake it at 350°F (175°C) for 8-10 minutes. Let it cool completely before adding the filling).
Part 2: Make the Peanut Butter Filling
- Beat Cream Cheese and Sugar: In a large mixing bowl, using an electric hand mixer or a stand mixer fitted with the paddle attachment, beat the softened 8 ounces of cream cheese on medium speed until completely smooth and creamy, scraping down the sides of the bowl as needed. This should take about 1-2 minutes. Add the 1 cup of sifted powdered sugar and continue beating on low speed initially (to avoid a sugar cloud!), then increase to medium speed until fully combined and smooth.
- Incorporate Peanut Butter and Vanilla: Add the 1 cup of creamy peanut butter and 1 teaspoon of vanilla extract to the cream cheese mixture. Beat on medium speed until well combined and the mixture is smooth and uniform in color. Scrape down the sides and bottom of the bowl again to ensure everything is incorporated.
- Whip the Heavy Cream (if using): In a separate, clean, cold bowl, pour the 1 ½ cups of cold heavy whipping cream. Using clean beaters (or the whisk attachment of your stand mixer), whip the cream on medium-high speed until stiff peaks form. Stiff peaks mean that when you lift the beaters out of the cream, the peak holds its shape and doesn’t flop over. Be careful not to over-whip, or it will turn buttery. (If using Cool Whip: Skip this step and proceed to step 8, using the thawed 8-ounce container).
- Fold in Whipped Cream/Topping: Gently fold about one-third of the whipped cream (or thawed Cool Whip) into the peanut butter mixture using a rubber spatula. This lightens the peanut butter base. Then, add the remaining whipped cream (or Cool Whip) and continue to fold gently until just combined. Be careful not to deflate the whipped cream – fold by running the spatula down the center, across the bottom, up the side, and folding over the top, rotating the bowl as you go. Stop folding as soon as no major streaks remain.
- Add Chopped Reese’s: Gently fold in the 1 cup of chopped Reese’s Peanut Butter Cups until they are evenly distributed throughout the filling.
- Fill the Crust: Retrieve the chilled crust from the freezer or refrigerator. Spoon the peanut butter filling into the prepared crust. Spread it evenly using an offset spatula or the back of a spoon, smoothing the top.
Part 3: Chill and Top the Pie
- Initial Chill: Cover the pie loosely with plastic wrap (try not to let it touch the surface of the filling) or foil. Place the pie in the refrigerator to chill for at least 4-6 hours, or preferably overnight. This allows the filling to set properly and the flavors to meld. The pie needs to be thoroughly chilled and firm before adding the ganache.
- Make the Chocolate Ganache: Once the pie is well-chilled and firm, prepare the ganache. Place the 1 cup of semi-sweet chocolate chips in a heatproof bowl. Heat the ½ cup of heavy whipping cream in a small saucepan over medium heat until it just begins to simmer (small bubbles form around the edges). Do not let it come to a rolling boil. Immediately pour the hot cream over the chocolate chips. Let it sit undisturbed for 5 minutes.
- Stir the Ganache: After 5 minutes, whisk the chocolate and cream mixture gently, starting from the center and working your way out, until it becomes smooth, glossy, and fully combined. If any chocolate pieces remain unmelted, you can microwave the mixture in 10-second bursts, stirring well after each, until smooth. Let the ganache cool slightly for 5-10 minutes; it should still be pourable but not hot.
- Top the Pie: Pour the slightly cooled ganache over the center of the chilled peanut butter pie. Gently tilt the pie plate or use an offset spatula to spread the ganache evenly over the top surface, letting it drip slightly down the sides if desired.
- Garnish: Immediately, while the ganache is still wet, arrange your desired garnish on top. Sprinkle with chopped Reese’s cups, add peanut butter drizzles, pipe whipped cream dollops, or sprinkle with chopped peanuts.
- Final Chill: Place the pie back in the refrigerator, uncovered (so the ganache sets nicely), for at least 30 minutes to an hour for the ganache to set before slicing and serving.
Nutrition
- Serving Size: One Normal Portion
- Calories: 650 to 800


