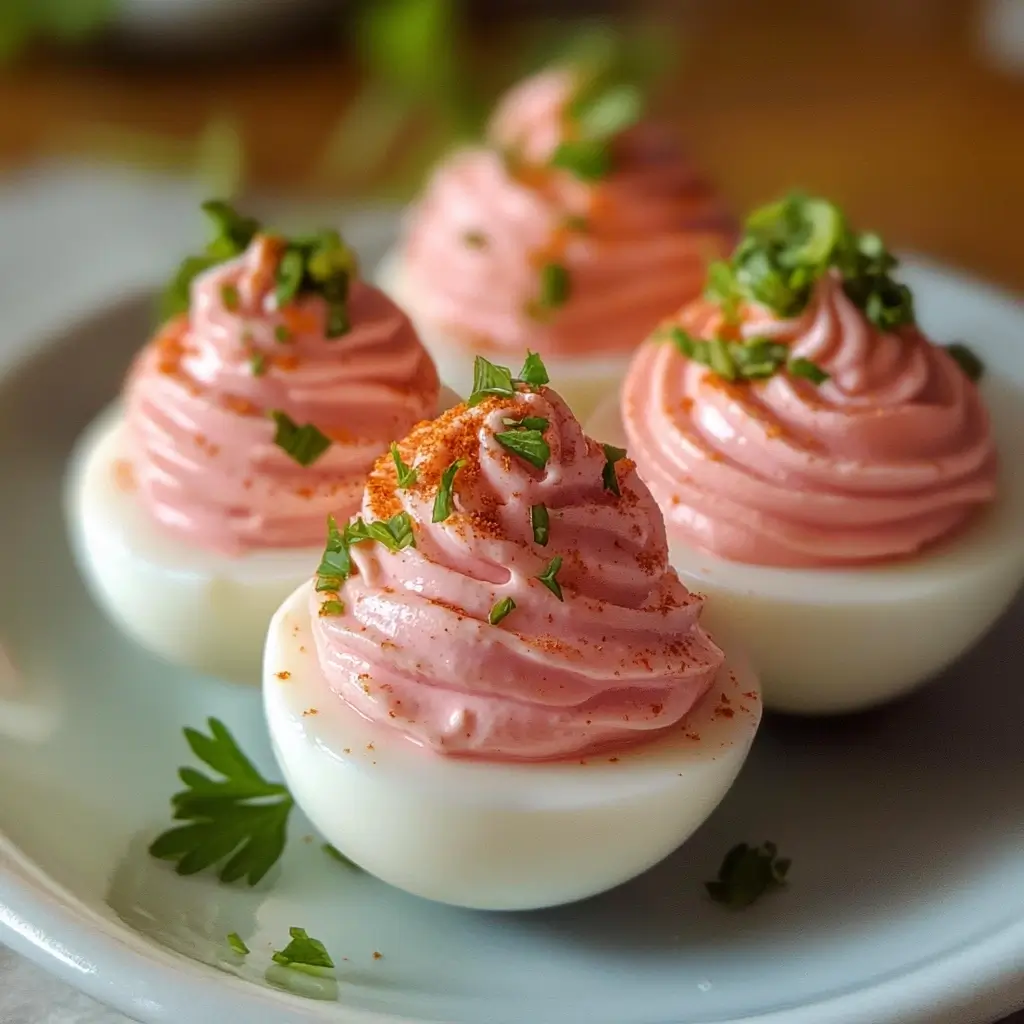

Pink Deviled Eggs have become a delightful staple in our family gatherings, particularly around Easter and spring celebrations. Initially, I was drawn to their charming pastel hue – a refreshing departure from the classic deviled egg. But it wasn’t just their visual appeal that won us over; it was the subtle sweetness and earthy undertones that the beet juice infusion brought to the familiar creamy filling. The kids are especially fond of them, often referring to them as “fairy eggs,” and they disappear from the appetizer platter almost as quickly as I can make them. This recipe is not just about aesthetics; it’s about elevating a timeless classic with a touch of whimsy and a hint of sophisticated flavor that is surprisingly easy to achieve. From picnics to potlucks, these Pink Deviled Eggs are always a conversation starter and a crowd-pleaser, proving that sometimes, a little color can make all the difference in transforming a simple dish into something truly special.
Ingredients
To create these beautifully vibrant Pink Deviled Eggs, you will need a handful of readily available ingredients. The magic lies in the beet juice, which not only imparts the lovely pink color but also adds a subtle sweetness and earthiness that complements the creamy deviled egg filling. Choosing high-quality ingredients will ensure the best flavor and texture for your deviled eggs. Here is what you will need:
- Large Eggs: 12 large eggs. Opt for fresh, high-quality eggs. Older eggs are often easier to peel after boiling, but freshness contributes to overall flavor.
- Mayonnaise: ½ cup of mayonnaise. Full-fat mayonnaise provides the richest flavor and creamiest texture. You can also use light mayonnaise for a slightly lighter version, but be aware that it may affect the richness. For a tangier flavor, consider using a high-quality aioli as a substitute or blend.
- Dijon Mustard: 2 tablespoons of Dijon mustard. Dijon mustard adds a sharp, pungent flavor that balances the richness of the mayonnaise and egg yolks. Its smooth texture blends seamlessly into the filling. If you prefer a milder mustard flavor, you can use yellow mustard, but Dijon is recommended for its depth of flavor.
- Pickled Beet Juice: ¼ cup of pickled beet juice (from a jar of pickled beets). This is the star ingredient that gives the eggs their signature pink hue and a subtly sweet and tangy flavor. Ensure you are using the juice from pickled beets, not just regular beet juice, as the pickling brine contributes to the overall taste profile. If you are using fresh beet juice, you might need to add a touch of vinegar or lemon juice to replicate the tangy element from pickled beet juice.
- White Vinegar: 1 teaspoon of white vinegar (for boiling eggs). Adding vinegar to the boiling water helps to prevent the egg whites from cracking during cooking and also makes them easier to peel.
- Salt: ½ teaspoon of salt, plus more for seasoning the boiling water and to taste in the filling. Salt enhances the flavors of all the ingredients and is crucial for a well-seasoned deviled egg.
- Black Pepper: ¼ teaspoon of freshly ground black pepper, plus more to taste in the filling and for garnish. Freshly ground black pepper provides a more robust and aromatic flavor compared to pre-ground pepper.
- Paprika (for garnish, optional): Sweet paprika or smoked paprika for dusting. Paprika adds a touch of color and a subtle smoky or sweet flavor, depending on the type you choose. It’s primarily used for visual appeal but also adds a slight flavor dimension.
- Fresh Dill or Parsley (for garnish, optional): Fresh herbs for a vibrant green garnish. Finely chopped fresh dill or parsley adds freshness and visual appeal. They also provide a contrasting flavor that complements the richness of the deviled eggs. Other fresh herbs like chives or tarragon can also be used.
- Pickled Beet slices (for garnish, optional): Thin slices or small cubes of pickled beets for a thematic garnish. Using pickled beet slices or small cubes as garnish reinforces the pink theme and provides a visual cue to the flavor profile. It also adds a pleasant textural contrast.
Ingredient Notes for Optimization:
- Egg Quality: Using pasture-raised or organic eggs can enhance the flavor and nutritional value. Look for eggs with deep yellow yolks for a richer flavor and color.
- Mayonnaise Alternatives: For a healthier twist, consider using Greek yogurt or avocado mayonnaise as partial substitutes for regular mayonnaise. These options will alter the flavor profile slightly but can reduce the fat content and add nutritional benefits. Vegan mayonnaise can also be used for a vegan version of Pink Deviled Eggs.
- Mustard Variations: Experiment with different types of mustard, such as whole grain mustard or honey mustard, for subtle flavor variations. Whole grain mustard will add texture and a slightly different flavor profile. Honey mustard will introduce a touch of sweetness.
- Beet Juice Alternatives (for Color): While pickled beet juice is recommended for flavor and color, you can use other natural food colorings if you want to avoid beets or are looking for different shades of pink. Consider using:
- Fresh Beet Juice: Boil or roast beets, then blend them and strain the juice. You will need to add a touch of vinegar or lemon juice to mimic the tanginess of pickled beet juice.
- Beet Powder: A small amount of beet powder can be added to the mayonnaise mixture for color. Start with a small amount and add more gradually to achieve the desired shade of pink. Beet powder will have a more earthy flavor than beet juice.
- Pink Food Coloring (Natural): Natural pink food colorings derived from sources like radishes or hibiscus can also be used, although they might not impart the same subtle flavor as beet juice.
- Spice Enhancements: For a spicier kick, consider adding a pinch of cayenne pepper, hot sauce (like Tabasco or Sriracha), or a finely minced jalapeño to the filling. A dash of smoked paprika in the filling (in addition to garnish) can also add depth of flavor.
- Herb Infusions: Infuse the mayonnaise with fresh herbs like tarragon, chives, or dill for an extra layer of flavor. Finely chop the herbs and mix them into the mayonnaise a few hours before preparing the deviled eggs to allow the flavors to meld.
- Acidic Balance: Taste the filling and adjust the acidity with a squeeze of lemon juice or a dash of apple cider vinegar if needed. The acidity balances the richness of the mayonnaise and egg yolks.
By carefully selecting your ingredients and considering these optimization tips, you can create Pink Deviled Eggs that are not only visually stunning but also bursting with flavor and perfectly tailored to your taste preferences.
Instructions
Creating Pink Deviled Eggs is a straightforward process, even for beginner cooks. The key to success lies in properly boiling and peeling the eggs and then achieving the right balance of flavors in the creamy filling. Follow these step-by-step instructions for perfect Pink Deviled Eggs every time:
Step 1: Prepare the Eggs for Boiling
- Place Eggs in a Pot: Gently place the 12 large eggs in a large saucepan or pot. Arrange them in a single layer to ensure even cooking.
- Add Cold Water: Cover the eggs completely with cold water. The water level should be about an inch above the eggs. Starting with cold water helps prevent the eggs from cracking due to sudden temperature changes.
- Add Vinegar and Salt: Add 1 teaspoon of white vinegar and ½ teaspoon of salt to the water. As mentioned earlier, vinegar aids in preventing cracking and makes peeling easier, while salt slightly flavors the egg whites.
Step 2: Boil the Eggs
- Bring to a Boil: Place the pot over high heat and bring the water to a rolling boil. Once the water is boiling vigorously, reduce the heat slightly to maintain a gentle boil.
- Cook for 10-12 Minutes: Cook the eggs for 10-12 minutes for hard-boiled yolks. For slightly softer yolks (if preferred), cook for 9-10 minutes. The cooking time is crucial for achieving the desired yolk consistency. Overcooking can lead to dry, chalky yolks, while undercooking will result in yolks that are too soft for deviled eggs.
- Prepare an Ice Bath: While the eggs are boiling, prepare an ice bath. Fill a large bowl with ice and cold water. This will immediately stop the cooking process and further aid in easy peeling.
Step 3: Cool and Peel the Eggs
- Transfer to Ice Bath: As soon as the cooking time is up, immediately transfer the boiled eggs to the ice bath using a slotted spoon or tongs. Let them cool in the ice bath for at least 15-20 minutes. This rapid cooling is critical for preventing the yolks from developing a green ring and for making peeling significantly easier.
- Peel the Eggs: Once the eggs are thoroughly cooled, gently tap each egg all over on a hard surface to crack the shell. Start peeling under cool running water, working your way under the membrane and peeling off the shell. The cold water helps to separate the shell from the egg white. If you find peeling difficult, try starting from the wider end of the egg where there is often an air pocket. Ensure you remove all shell fragments.
Step 4: Prepare the Deviled Egg Filling
- Halve the Eggs: Once all eggs are peeled, pat them dry with paper towels. Slice each egg lengthwise in half.
- Remove Yolks: Carefully scoop out the yolks from each egg half and place them in a medium-sized mixing bowl. Arrange the egg white halves on a serving platter or a plate lined with paper towels.
- Mash the Yolks: Using a fork, mash the egg yolks until they are smooth and crumb-free. This will ensure a creamy filling. You can also use a potato masher or a fine-mesh sieve to achieve an even smoother texture.
- Add Mayonnaise, Mustard, and Seasonings: Add ½ cup of mayonnaise, 2 tablespoons of Dijon mustard, ½ teaspoon of salt, and ¼ teaspoon of black pepper to the mashed yolks.
- Incorporate Pickled Beet Juice: Gradually add ¼ cup of pickled beet juice, mixing well after each addition. Start with a smaller amount and add more until you achieve your desired shade of pink. Taste the mixture and adjust the amount of beet juice based on your preference for color and flavor.
- Mix Thoroughly: Mix all the ingredients together until the filling is smooth, creamy, and well combined. Taste the filling and adjust seasoning as needed. You may want to add a pinch more salt, pepper, or mustard to taste.
Step 5: Fill and Garnish the Deviled Eggs
- Fill the Egg Whites: You have a few options for filling the egg whites:
- Spoon Filling: Use a spoon to scoop the pink filling into each egg white cavity. This is the simplest method.
- Piping Bag (for a more polished look): Transfer the filling to a piping bag fitted with a decorative tip (star tip or round tip). Pipe the filling into each egg white half for a more professional and elegant presentation.
- Garnish (Optional): Garnish each Pink Deviled Egg as desired. Some popular garnishing options include:
- Paprika: Dust lightly with sweet or smoked paprika.
- Fresh Herbs: Sprinkle with finely chopped fresh dill or parsley.
- Pickled Beet Slices/Cubes: Top with small slices or cubes of pickled beets.
- Black Pepper: A light sprinkle of freshly ground black pepper.
- Chives: Finely chopped chives for a mild oniony flavor and green color.
- Everything Bagel Seasoning: For a savory and textural garnish.
Step 6: Chill and Serve
- Chill the Deviled Eggs: Arrange the garnished Pink Deviled Eggs on a serving platter and cover loosely with plastic wrap. Refrigerate for at least 30 minutes to allow them to chill and for the flavors to meld. Chilling also helps the filling to firm up slightly.
- Serve Cold: Serve the Pink Deviled Eggs chilled. They are best enjoyed within 2-3 days when stored properly in the refrigerator.
By following these detailed instructions, you will be able to create perfect Pink Deviled Eggs that are not only beautiful to look at but also delicious and flavorful. The pink hue adds a fun and festive touch, making them a delightful appetizer for any occasion.
Nutrition Facts
The nutritional content of Pink Deviled Eggs will vary slightly depending on the specific ingredients used, particularly the type of mayonnaise and any optional additions. However, a general estimate for a serving of two Pink Deviled Eggs is provided below.
Serving Size: 2 deviled egg halves (1 whole egg)
Approximate Nutritional Values per Serving:
- Calories: 150-180 calories
- Total Fat: 12-15 grams
- Saturated Fat: 2-3 grams
- Monounsaturated Fat: 7-9 grams
- Polyunsaturated Fat: 2-3 grams
- Cholesterol: 180-200 mg
- Sodium: 150-200 mg (can vary based on salt added and mayonnaise used)
- Total Carbohydrates: 1-2 grams
- Dietary Fiber: 0 grams
- Sugars: 0-1 gram (primarily from beet juice and mayonnaise)
- Protein: 6-7 grams
- Vitamin A: Approximately 2-4% of Daily Value (DV)
- Vitamin D: Approximately 6-8% of DV
- Vitamin B12: Approximately 8-10% of DV
- Riboflavin (B2): Approximately 8-10% of DV
- Folate (B9): Approximately 4-6% of DV
- Phosphorus: Approximately 6-8% of DV
- Selenium: Approximately 15-20% of DV
Notes on Nutritional Information:
- Fat Content: The majority of the fat comes from the egg yolks and mayonnaise. Using light mayonnaise can reduce the fat and calorie content slightly.
- Cholesterol: Deviled eggs are relatively high in cholesterol due to the egg yolks. However, dietary cholesterol has less of an impact on blood cholesterol levels for most people than previously thought.
- Protein: Eggs are a good source of high-quality protein, providing essential amino acids.
- Vitamins and Minerals: Eggs are rich in several vitamins and minerals, including Vitamin D, Vitamin B12, Riboflavin, Folate, Phosphorus, and Selenium.
- Sodium: Sodium content can be adjusted by using low-sodium mayonnaise and controlling the amount of salt added. Pickled beet juice also contributes to sodium content.
- Beet Juice Benefits: Beet juice adds a small amount of antioxidants and nitrates, which are associated with potential health benefits like improved blood pressure and exercise performance. However, the quantity in deviled eggs is relatively small.
Disclaimer: These nutritional values are estimates and can vary. For precise nutritional information, use a nutrition calculator app or website and input the specific brands and quantities of ingredients used in your recipe.
Pink Deviled Eggs can be a part of a balanced diet when consumed in moderation. They provide protein and essential nutrients, but it’s important to be mindful of the fat and cholesterol content, especially if you are watching your intake of these nutrients.
Preparation Time
The preparation time for Pink Deviled Eggs is relatively short and straightforward, making them a convenient appetizer for parties or gatherings. Here is a breakdown of the estimated time involved:
Total Time: Approximately 35-40 minutes
Breakdown:
- Prep Time: 15-20 minutes (includes preparing the eggs for boiling, making ice bath, peeling eggs, and preparing filling ingredients).
- Setting up for boiling eggs: 5 minutes
- Making ice bath: 2 minutes
- Peeling cooled eggs: 8-10 minutes
- Preparing filling ingredients (measuring, chopping herbs if using): 5 minutes
- Cook Time: 10-12 minutes (boiling the eggs)
- Cooling Time: 15-20 minutes (cooling eggs in ice bath)
- Assembly Time: 5-10 minutes (halving eggs, removing yolks, mixing filling, filling egg whites, garnishing)
- Chilling Time: Minimum 30 minutes (recommended, but optional if serving immediately). Chilling enhances flavor and texture.
Timeline Summary:
- Start: Begin boiling eggs (0 minutes).
- Boiling: Eggs boil for 10-12 minutes (10-12 minutes elapsed).
- Ice Bath: Eggs cool in ice bath for 15-20 minutes (25-32 minutes elapsed). During this cooling time, you can prepare the filling ingredients.
- Peeling & Filling: Peel eggs, prepare filling, and assemble deviled eggs (30-42 minutes elapsed).
- Chilling (Optional but Recommended): Chill for at least 30 minutes before serving (60-72 minutes elapsed, if chilling).
Tips to Speed Up Preparation:
- Multi-tasking: While the eggs are boiling and cooling, you can prepare the filling ingredients to save time.
- Pre-peeled Eggs (less recommended for best quality): In a pinch, you could use pre-peeled hard-boiled eggs, but freshly boiled eggs generally taste better and have a better texture.
- Efficient Peeling Techniques: Practice efficient egg peeling techniques (starting under running water, tapping all over, starting from the wider end) to minimize peeling time.
- Simple Garnishes: Opt for simple garnishes like paprika or chopped herbs to reduce garnishing time.
- Make Ahead: Deviled eggs can be made a day ahead of time. Prepare them completely, cover, and store in the refrigerator. This can significantly reduce your preparation time on the day of serving.
Pink Deviled Eggs are a relatively quick appetizer to make, especially considering the elegant and flavorful result. The active preparation time is quite manageable, making them a great choice even when you are short on time but want to impress.
How to Serve Pink Deviled Eggs
Pink Deviled Eggs are incredibly versatile and can be served in a variety of ways, making them perfect for numerous occasions. Their vibrant color and delicious flavor make them a standout appetizer or side dish. Here are some ideas on how to serve them:
Serving Occasions:
- Easter Brunch or Dinner: Their pastel pink color makes them exceptionally fitting for Easter celebrations. They add a festive touch to any Easter spread.
- Spring Gatherings: Perfect for spring picnics, garden parties, and outdoor barbecues. The light and refreshing flavor is ideal for warmer weather.
- Baby Showers or Gender Reveal Parties: The pink hue makes them thematic and delightful for baby showers, especially for baby girls. They can also be easily adapted to blue or other colors for gender reveals.
- Bridal Showers and Luncheons: Elegant and visually appealing, Pink Deviled Eggs are a sophisticated choice for bridal showers and luncheons.
- Holiday Appetizer Platters: Include them on appetizer platters for holidays like Christmas, Thanksgiving, or New Year’s Eve to add a pop of color and a classic favorite.
- Potlucks and Parties: They are easy to transport and always a crowd-pleaser at potlucks, birthday parties, and casual get-togethers.
- Picnics and Outdoor Events: Pack them in a container that keeps them cool for picnics, beach trips, and outdoor concerts.
- Cocktail Parties: Serve them as elegant hors d’oeuvres at cocktail parties. They pair well with light and refreshing drinks.
- Simple Appetizer or Snack: Enjoy them as a simple yet satisfying appetizer or snack any time of the year.
Serving Suggestions & Presentation:
- Deviled Egg Platters:
- Use a dedicated deviled egg platter with individual indentations to hold each egg securely and beautifully. These platters come in various materials and styles.
- Arrange them on a tiered serving platter for a more dramatic presentation, especially when serving a large quantity.
- Garnish Variety:
- Offer a variety of garnishes on the side so guests can customize their deviled eggs. Options include: paprika, fresh dill, chives, pickled beet slices, crispy bacon bits, hot sauce, everything bagel seasoning.
- Create different garnish patterns on the deviled eggs for visual interest on the platter.
- Lettuce Cups or Beds:
- Serve Pink Deviled Eggs on a bed of fresh lettuce leaves (like butter lettuce or romaine) for added freshness and a visually appealing green contrast.
- Place individual deviled eggs in small lettuce cups for a neat and easy-to-eat presentation.
- Pair with Crackers or Crostini:
- While traditionally eaten on their own, you can offer a side of crackers, toasted baguette slices (crostini), or vegetable sticks for those who prefer to eat them with a base.
- Accompaniments:
- Serve alongside other appetizers like crudités with dip, cheese and crackers, olives, or fruit skewers for a balanced appetizer spread.
- Offer a light vinaigrette salad as a refreshing counterpoint to the richness of the deviled eggs.
- Temperature:
- Serve Pink Deviled Eggs chilled. Ensure they are kept refrigerated until just before serving to maintain food safety and optimal flavor.
- If serving outdoors on a warm day, keep the platter on ice or use a chilled serving dish to maintain coolness.
- Creative Presentation:
- Use edible flowers (like pansies or violets) as a garnish for an extra touch of elegance, especially for spring or garden-themed events.
- Pipe the filling in decorative swirls using different piping tips for a more refined look.
- Consider mini deviled eggs using quail eggs for a dainty and sophisticated appetizer option.
By considering these serving suggestions and presentation ideas, you can elevate your Pink Deviled Eggs from a simple appetizer to a visually stunning and delicious highlight of any meal or gathering.
Additional Tips for Perfect Pink Deviled Eggs
To ensure your Pink Deviled Eggs are not only beautiful but also incredibly delicious, consider these additional tips and tricks:
1. Perfectly Cooked Eggs for Easy Peeling:
- Start with Cold Water: Always start boiling eggs in cold water. This gradual heating helps prevent the shells from cracking due to sudden temperature changes.
- Vinegar and Baking Soda in Boiling Water: Adding 1 teaspoon of white vinegar to the boiling water, as mentioned in the instructions, is crucial for easier peeling. Some cooks also recommend adding a ½ teaspoon of baking soda to the boiling water, which is believed to further loosen the shell membrane.
- Ice Bath is Essential: Immediately transferring the cooked eggs to an ice bath is critical. The rapid cooling contracts the egg white, making it separate more easily from the shell. Let them cool completely in the ice bath for at least 15-20 minutes.
- Peel Under Running Water: Peeling eggs under cool running water helps to lubricate between the egg white and shell, making the process smoother and preventing the egg white from tearing.
2. Achieving the Ideal Pink Hue:
- Pickled Beet Juice is Key: Using pickled beet juice not only provides the pink color but also adds a subtle tanginess that complements the deviled egg filling. Ensure you use juice from pickled beets, not just plain beet juice.
- Gradually Add Beet Juice: Add the beet juice to the filling gradually and taste as you go. This allows you to control the shade of pink and the level of beet flavor. You can always add more, but you can’t take it away.
- Adjust for Beet Intensity: Different brands of pickled beets can have varying intensities of color and flavor. Adjust the amount of beet juice accordingly to achieve your desired pink shade and flavor profile.
- For Deeper Pink: If you want a deeper, more vibrant pink, let the peeled egg white halves soak in pickled beet juice for 10-15 minutes before filling. Pat them dry before adding the filling. This will color the egg whites themselves a deeper pink, enhancing the overall visual effect.
3. Enhancing Flavor of the Filling:
- Taste and Adjust Seasoning: Always taste the filling before filling the egg whites. Adjust seasoning as needed. You might want to add more salt, pepper, Dijon mustard, or a touch of acidity (lemon juice or vinegar) to balance the flavors.
- High-Quality Mayonnaise: Use high-quality, full-fat mayonnaise for the richest flavor and creamiest texture. The mayonnaise is a significant component of the filling, so its quality matters.
- Dijon Mustard Depth: Dijon mustard adds a sharpness and depth of flavor. Don’t substitute with yellow mustard unless you prefer a much milder flavor.
- Spice it Up (Optional): For a hint of spice, add a pinch of cayenne pepper, a dash of hot sauce (like Tabasco or Sriracha), or a finely minced jalapeño to the filling.
- Fresh Herb Infusion: Mix finely chopped fresh herbs like dill, chives, or tarragon into the filling for added freshness and aromatic complexity.
4. Make-Ahead Tips and Storage:
- Prepare Components in Advance: You can boil and peel the eggs a day ahead of time. Store the peeled eggs in a container of water in the refrigerator to keep them moist. The filling can also be prepared a day ahead and stored in an airtight container in the refrigerator. Assemble the deviled eggs just before serving for the freshest taste and best presentation.
- Storing Filled Deviled Eggs: Once filled and garnished, Pink Deviled Eggs are best stored in an airtight container in the refrigerator. Arrange them in a single layer to prevent them from getting squished. They are best enjoyed within 2-3 days.
- Garnish Just Before Serving: If using fresh herb garnishes, it’s best to add them just before serving to prevent them from wilting or becoming soggy. Paprika and pickled beet garnishes can be added earlier.
5. Creative Variations:
- Smoked Salmon Pink Deviled Eggs: Add finely chopped smoked salmon and a squeeze of lemon juice to the filling for a more sophisticated flavor profile. Garnish with a small piece of smoked salmon and fresh dill.
- Avocado Pink Deviled Eggs (Healthier Option): Replace some of the mayonnaise with mashed avocado for a healthier and creamier filling. The avocado will also contribute to the creamy texture and add healthy fats.
- Spicy Sriracha Pink Deviled Eggs: Add Sriracha sauce to the filling for a spicy kick. Garnish with a drizzle of Sriracha and chopped cilantro.
- Mediterranean Pink Deviled Eggs: Incorporate finely chopped Kalamata olives, sun-dried tomatoes, and feta cheese into the filling for a Mediterranean twist. Garnish with a sprinkle of oregano.
- Vegan Pink Deviled Eggs: Use vegan mayonnaise and silken tofu or mashed potatoes in place of egg yolks for a vegan version. Use beet juice for the pink color as usual.
By incorporating these tips and exploring creative variations, you can master the art of making Pink Deviled Eggs and impress your guests with a visually stunning and exceptionally flavorful appetizer every time.
FAQ Section: Pink Deviled Eggs
Here are some frequently asked questions about making Pink Deviled Eggs, to help you troubleshoot and perfect your recipe:
Q1: Why are my deviled eggs not turning pink enough?
A: The pink color in Pink Deviled Eggs comes primarily from the pickled beet juice. If your eggs are not pink enough, consider these factors:
- Insufficient Beet Juice: You may not have used enough pickled beet juice. Gradually add more juice, a teaspoon at a time, until you achieve your desired shade of pink. Remember to taste and adjust seasoning as you add more juice.
- Weak Beet Juice: The intensity of color can vary between different brands of pickled beets. Some brands may have a lighter colored juice. If your beet juice seems pale, try using juice from a different brand or consider adding a drop or two of natural pink food coloring (beetroot-based) to enhance the color.
- Yolk Color: The natural yellow color of egg yolks can slightly affect the final pink hue. If your yolks are very dark yellow, the pink might appear more muted. Using eggs with paler yolks might result in a brighter pink.
- Alternative Coloring: If you are still struggling to achieve a vibrant pink, you can soak the peeled egg white halves in pickled beet juice for 10-15 minutes before filling. This will directly color the egg whites a deeper pink.
Q2: How can I make deviled eggs easier to peel?
A: Easy-to-peel eggs are crucial for deviled eggs. Here are the key steps:
- Start with Older Eggs (for boiling): While fresh eggs are great for frying and poaching, slightly older eggs (about 1 week old) are often easier to peel after boiling. The pH of the egg white changes as eggs age, causing the shell membrane to separate more easily.
- Boiling Method: Start eggs in cold water, add vinegar and salt to the water, and avoid boiling too vigorously.
- Ice Bath: Immediately plunge the hot eggs into an ice bath for at least 15-20 minutes. This is the most critical step for easy peeling.
- Peel Under Running Water: Peel the eggs under cool running water. The water helps to lubricate between the egg white and shell, making peeling smoother.
- Tap and Roll: Gently tap the egg all over to crack the shell evenly, then gently roll it on the countertop to loosen the shell further before peeling.
- Start Peeling from the Wider End: Start peeling from the wider end of the egg where there is often an air pocket. This can make it easier to get under the shell membrane.
Q3: Can I make Pink Deviled Eggs ahead of time?
A: Yes, you can prepare Pink Deviled Eggs in advance, which is convenient for parties and gatherings. Here’s how:
- Prepare Components Separately: Boil and peel the eggs a day ahead. Store peeled eggs in a container of water in the refrigerator. Prepare the filling a day ahead and store it in an airtight container in the refrigerator.
- Assemble Just Before Serving (Recommended): For the freshest taste and best texture, it’s ideal to fill and garnish the deviled eggs a few hours before serving, or even just before serving. This prevents the filling from drying out and the garnishes from wilting.
- Storing Filled Deviled Eggs: If you need to fill them further in advance, store filled and garnished deviled eggs in an airtight container in the refrigerator for up to 24 hours. Arrange them in a single layer to prevent them from getting squished.
- Garnish Timing: If using fresh herb garnishes, it’s best to add them just before serving to keep them fresh and vibrant. Paprika and pickled beet garnishes can be added earlier.
Q4: What can I use instead of mayonnaise in deviled eggs?
A: While mayonnaise is traditional for deviled eggs, you can use alternatives for flavor or dietary reasons:
- Greek Yogurt: Plain Greek yogurt can replace some or all of the mayonnaise for a lighter, tangier version. It will reduce the fat content and add a slightly different flavor profile. You may need to adjust seasoning as Greek yogurt is less rich than mayonnaise.
- Avocado: Mashed ripe avocado can be used as a partial or full substitute for mayonnaise. Avocado adds creaminess, healthy fats, and a mild, buttery flavor. It will also slightly change the color of the filling to a pale green-pink.
- Sour Cream: Sour cream can be used to replace some of the mayonnaise for a tangier flavor. It will result in a slightly thinner consistency, so you may need to adjust the amount accordingly.
- Vegan Mayonnaise: For a vegan version, use vegan mayonnaise. There are many good quality vegan mayonnaises available that mimic the taste and texture of traditional mayonnaise.
Q5: How long can Pink Deviled Eggs be left out at room temperature?
A: Deviled eggs are perishable and should not be left at room temperature for extended periods due to food safety concerns.
- The 2-Hour Rule: According to food safety guidelines, perishable foods, including deviled eggs, should not be left at room temperature for more than 2 hours. If the ambient temperature is above 90°F (32°C), this time is reduced to 1 hour.
- Refrigeration is Key: Always refrigerate Pink Deviled Eggs promptly after serving and store them in the refrigerator when not being consumed.
- Serving at Outdoor Events: When serving deviled eggs at outdoor events, especially on warm days, keep them chilled on ice or in a cooler until serving time. Replenish ice as needed to maintain a cold temperature.
- Discard if Left Out Too Long: If deviled eggs have been left at room temperature for longer than 2 hours (or 1 hour in hot weather), it is best to discard them to avoid the risk of foodborne illness.
By understanding these FAQs, you can confidently prepare, store, and serve delicious and safe Pink Deviled Eggs for any occasion!
Print
Pink Deviled Eggs Recipe
Ingredients
- Large Eggs: 12 large eggs. Opt for fresh, high-quality eggs. Older eggs are often easier to peel after boiling, but freshness contributes to overall flavor.
- Mayonnaise: ½ cup of mayonnaise. Full-fat mayonnaise provides the richest flavor and creamiest texture. You can also use light mayonnaise for a slightly lighter version, but be aware that it may affect the richness. For a tangier flavor, consider using a high-quality aioli as a substitute or blend.
- Dijon Mustard: 2 tablespoons of Dijon mustard. Dijon mustard adds a sharp, pungent flavor that balances the richness of the mayonnaise and egg yolks. Its smooth texture blends seamlessly into the filling. If you prefer a milder mustard flavor, you can use yellow mustard, but Dijon is recommended for its depth of flavor.
- Pickled Beet Juice: ¼ cup of pickled beet juice (from a jar of pickled beets). This is the star ingredient that gives the eggs their signature pink hue and a subtly sweet and tangy flavor. Ensure you are using the juice from pickled beets, not just regular beet juice, as the pickling brine contributes to the overall taste profile. If you are using fresh beet juice, you might need to add a touch of vinegar or lemon juice to replicate the tangy element from pickled beet juice.
- White Vinegar: 1 teaspoon of white vinegar (for boiling eggs). Adding vinegar to the boiling water helps to prevent the egg whites from cracking during cooking and also makes them easier to peel.
- Salt: ½ teaspoon of salt, plus more for seasoning the boiling water and to taste in the filling. Salt enhances the flavors of all the ingredients and is crucial for a well-seasoned deviled egg.
- Black Pepper: ¼ teaspoon of freshly ground black pepper, plus more to taste in the filling and for garnish. Freshly ground black pepper provides a more robust and aromatic flavor compared to pre-ground pepper.
- Paprika (for garnish, optional): Sweet paprika or smoked paprika for dusting. Paprika adds a touch of color and a subtle smoky or sweet flavor, depending on the type you choose. It’s primarily used for visual appeal but also adds a slight flavor dimension.
- Fresh Dill or Parsley (for garnish, optional): Fresh herbs for a vibrant green garnish. Finely chopped fresh dill or parsley adds freshness and visual appeal. They also provide a contrasting flavor that complements the richness of the deviled eggs. Other fresh herbs like chives or tarragon can also be used.
- Pickled Beet slices (for garnish, optional): Thin slices or small cubes of pickled beets for a thematic garnish. Using pickled beet slices or small cubes as garnish reinforces the pink theme and provides a visual cue to the flavor profile. It also adds a pleasant textural contrast.
Instructions
Step 1: Prepare the Eggs for Boiling
- Place Eggs in a Pot: Gently place the 12 large eggs in a large saucepan or pot. Arrange them in a single layer to ensure even cooking.
- Add Cold Water: Cover the eggs completely with cold water. The water level should be about an inch above the eggs. Starting with cold water helps prevent the eggs from cracking due to sudden temperature changes.
- Add Vinegar and Salt: Add 1 teaspoon of white vinegar and ½ teaspoon of salt to the water. As mentioned earlier, vinegar aids in preventing cracking and makes peeling easier, while salt slightly flavors the egg whites.
Step 2: Boil the Eggs
- Bring to a Boil: Place the pot over high heat and bring the water to a rolling boil. Once the water is boiling vigorously, reduce the heat slightly to maintain a gentle boil.
- Cook for 10-12 Minutes: Cook the eggs for 10-12 minutes for hard-boiled yolks. For slightly softer yolks (if preferred), cook for 9-10 minutes. The cooking time is crucial for achieving the desired yolk consistency. Overcooking can lead to dry, chalky yolks, while undercooking will result in yolks that are too soft for deviled eggs.
- Prepare an Ice Bath: While the eggs are boiling, prepare an ice bath. Fill a large bowl with ice and cold water. This will immediately stop the cooking process and further aid in easy peeling.
Step 3: Cool and Peel the Eggs
- Transfer to Ice Bath: As soon as the cooking time is up, immediately transfer the boiled eggs to the ice bath using a slotted spoon or tongs. Let them cool in the ice bath for at least 15-20 minutes. This rapid cooling is critical for preventing the yolks from developing a green ring and for making peeling significantly easier.
- Peel the Eggs: Once the eggs are thoroughly cooled, gently tap each egg all over on a hard surface to crack the shell. Start peeling under cool running water, working your way under the membrane and peeling off the shell. The cold water helps to separate the shell from the egg white. If you find peeling difficult, try starting from the wider end of the egg where there is often an air pocket. Ensure you remove all shell fragments.
Step 4: Prepare the Deviled Egg Filling
- Halve the Eggs: Once all eggs are peeled, pat them dry with paper towels. Slice each egg lengthwise in half.
- Remove Yolks: Carefully scoop out the yolks from each egg half and place them in a medium-sized mixing bowl. Arrange the egg white halves on a serving platter or a plate lined with paper towels.
- Mash the Yolks: Using a fork, mash the egg yolks until they are smooth and crumb-free. This will ensure a creamy filling. You can also use a potato masher or a fine-mesh sieve to achieve an even smoother texture.
- Add Mayonnaise, Mustard, and Seasonings: Add ½ cup of mayonnaise, 2 tablespoons of Dijon mustard, ½ teaspoon of salt, and ¼ teaspoon of black pepper to the mashed yolks.
- Incorporate Pickled Beet Juice: Gradually add ¼ cup of pickled beet juice, mixing well after each addition. Start with a smaller amount and add more until you achieve your desired shade of pink. Taste the mixture and adjust the amount of beet juice based on your preference for color and flavor.
- Mix Thoroughly: Mix all the ingredients together until the filling is smooth, creamy, and well combined. Taste the filling and adjust seasoning as needed. You may want to add a pinch more salt, pepper, or mustard to taste.
Step 5: Fill and Garnish the Deviled Eggs
- Fill the Egg Whites: You have a few options for filling the egg whites:
- Spoon Filling: Use a spoon to scoop the pink filling into each egg white cavity. This is the simplest method.
- Piping Bag (for a more polished look): Transfer the filling to a piping bag fitted with a decorative tip (star tip or round tip). Pipe the filling into each egg white half for a more professional and elegant presentation.
- Garnish (Optional): Garnish each Pink Deviled Egg as desired. Some popular garnishing options include:
- Paprika: Dust lightly with sweet or smoked paprika.
- Fresh Herbs: Sprinkle with finely chopped fresh dill or parsley.
- Pickled Beet Slices/Cubes: Top with small slices or cubes of pickled beets.
- Black Pepper: A light sprinkle of freshly ground black pepper.
- Chives: Finely chopped chives for a mild oniony flavor and green color.
- Everything Bagel Seasoning: For a savory and textural garnish.
Step 6: Chill and Serve
- Chill the Deviled Eggs: Arrange the garnished Pink Deviled Eggs on a serving platter and cover loosely with plastic wrap. Refrigerate for at least 30 minutes to allow them to chill and for the flavors to meld. Chilling also helps the filling to firm up slightly.
- Serve Cold: Serve the Pink Deviled Eggs chilled. They are best enjoyed within 2-3 days when stored properly in the refrigerator.
Nutrition
- Serving Size: One Normal Portion
- Calories: 150-180
- Sugar: 0-1 gram
- Sodium: 150-200 mg
- Fat: 12-15 grams
- Carbohydrates: 1-2 grams
- Fiber: 0 grams
- Protein: 6-7 grams
- Cholesterol: 180-200 mg