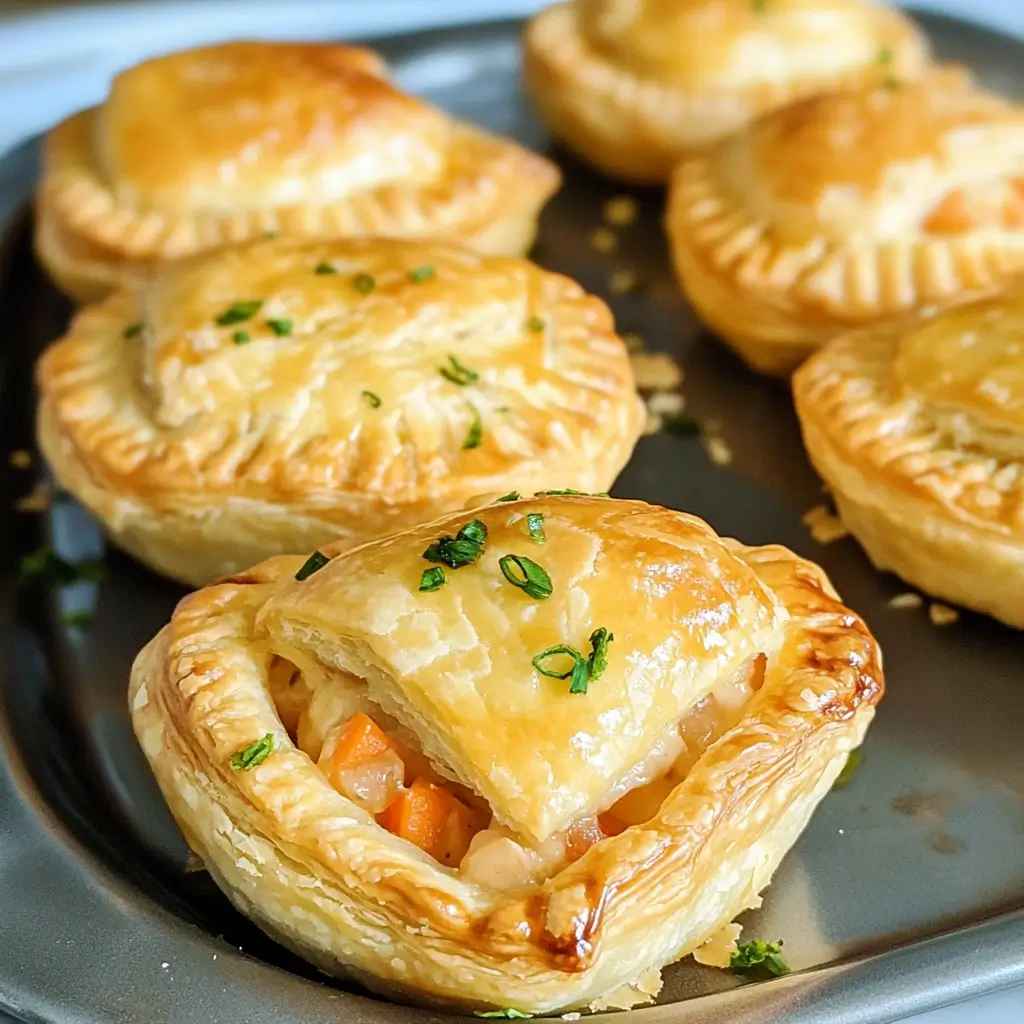
There’s something incredibly comforting about the aroma of chicken pot pie baking in the oven. That flaky crust giving way to a rich, creamy filling studded with tender chicken and vegetables – it’s the culinary equivalent of a warm hug. For years, a large, family-style pot pie was a staple in our house, especially on chilly evenings. But then, I discovered the magic of mini chicken pot pies. Honestly, it was a revelation! The first time I made these individual portions, my family went wild. The kids loved having their own perfect little pie, the crust-to-filling ratio felt even more satisfying, and cleanup was surprisingly easier. They became an instant hit, perfect for weeknight dinners, special lunches, or even serving as hearty appetizers at gatherings. They feel a little more special than a big pie, yet they deliver all the same comforting, homestyle goodness we crave. This recipe has become my go-to, refined over time to achieve that perfect balance of creamy, savory filling and a reliably golden, flaky crust, all in a delightful, individual package.
The Enduring Appeal of Chicken Pot Pie: Comfort in a Crust
Chicken pot pie holds a cherished place in the pantheon of comfort foods. Its origins are debated, with potential links stretching back to Roman times and evolving through medieval European meat pies. However, the modern iteration, particularly popular in North America, represents a harmonious blend of simple, wholesome ingredients transformed into something truly special. It speaks of home, warmth, and nourishment. The combination of tender poultry, familiar vegetables like carrots, peas, and celery, all enveloped in a savory, creamy sauce and topped with a buttery crust, triggers nostalgia and satisfies a deep-seated craving for hearty, uncomplicated fare. It’s a dish that transcends trends, remaining a beloved classic because it delivers consistently on flavour and comfort. Whether made from scratch with love or assembled quickly on a busy weeknight, chicken pot pie offers a sense of security and satisfaction that few other dishes can match.
Why Mini Chicken Pot Pies are a Game Changer
While a large chicken pot pie is undoubtedly wonderful, transitioning to the mini format offers several distinct advantages that might just make you a convert:
- Perfect Portions: Individual pies eliminate the guesswork of serving sizes and prevent arguments over who got the piece with the most crust. Everyone gets their own complete, perfectly proportioned pie. This is particularly great for families with varying appetites.
- Improved Crust-to-Filling Ratio: For crust lovers (and who isn’t?), mini pies are a dream. You get significantly more golden, flaky edge and top crust per bite compared to a slice from a larger pie.
- Faster Cooking Time: Smaller pies naturally bake faster than one large pie, getting that comforting meal on the table quicker on busy nights.
- Easier Serving & Handling: No messy slicing required! Mini pies are easy to serve directly from the muffin tin (once slightly cooled) or plated individually. They are also inherently more portable for lunches or potlucks.
- Ideal for Entertaining: Mini chicken pot pies look elegant and are fantastic for parties or gatherings. They can be served as substantial appetizers or as part of a main course buffet. Guests appreciate the individual servings.
- Freezer-Friendly: Individual portions are incredibly convenient for freezing. You can bake a batch and freeze leftovers for quick, single-serving meals later on.
Gathering Your Ingredients: The Foundation of Flavor
The beauty of chicken pot pie lies in its relatively simple ingredients, which combine to create something truly delicious. Precision isn’t always paramount, but using quality components makes a difference. Here’s what you’ll need, along with some thoughts on selection:
(Yields: 12 Mini Pies / Prep time: 45 mins / Cook time: 25-30 mins)
- For the Filling:
- Cooked Chicken: 2 cups, diced (about 1 lb boneless, skinless chicken breast or thighs, cooked)
- Notes: Leftover roasted chicken or rotisserie chicken is perfect here and adds great flavour. You can also quickly poach or pan-fry chicken breasts or thighs specifically for this recipe. Ensure it’s cut into small, bite-sized pieces (around 1/2 inch).
- Butter: 1/2 cup (1 stick, unsalted)
- Notes: Unsalted butter gives you better control over the final seasoning. It forms the base of the roux for the creamy sauce.
- Yellow Onion: 1 small, finely chopped (about 1 cup)
- Notes: Provides a fundamental aromatic base. Shallots can be substituted for a milder flavour.
- Carrots: 1 cup, finely diced (about 2 medium carrots)
- Notes: Adds sweetness and colour. Dice them small (1/4 inch) so they cook through evenly and quickly.
- Celery: 1/2 cup, finely chopped (about 1 large stalk)
- Notes: Offers a subtle savoury note and slight crunch. Chop finely like the carrots.
- All-Purpose Flour: 1/2 cup
- Notes: This is the thickener for the sauce, creating the roux with the butter.
- Chicken Broth: 2 cups (low-sodium preferred)
- Notes: Use a good quality broth for better flavour. Low-sodium allows you to adjust saltiness yourself. Vegetable broth can work in a pinch.
- Milk or Heavy Cream: 1 cup
- Notes: Milk creates a lovely creamy sauce. Heavy cream makes it richer and more decadent. Half-and-half is a good middle ground. Use whole milk for best results if not using cream.
- Frozen Peas: 1 cup
- Notes: Added at the end to retain their bright colour and pop of sweetness. No need to thaw first. Frozen corn is another popular addition or substitution.
- Fresh Thyme: 1 tablespoon, chopped (or 1 teaspoon dried thyme)
- Notes: Thyme pairs beautifully with chicken. Fresh herbs always offer brighter flavour, but dried works well too. Rosemary or sage are also excellent alternatives.
- Salt: 1 teaspoon (or to taste)
- Black Pepper: 1/2 teaspoon (freshly ground preferred, or to taste)
- Optional: A pinch of nutmeg, a splash of white wine (added after vegetables, before flour), a bay leaf (simmered with sauce, removed before assembly).
- Cooked Chicken: 2 cups, diced (about 1 lb boneless, skinless chicken breast or thighs, cooked)
- For the Crust:
- Refrigerated Pie Crusts: 2 boxes (4 crusts total)
- Notes: Store-bought crusts are a fantastic time-saver and yield reliably flaky results. Ensure they are the type you roll out. Alternatively, use your favourite homemade double-crust pie dough recipe (enough for two 9-inch pies). Puff pastry can also be used for a lighter, airier topping (though it might not work as well for the bottom crust in a muffin tin).
- Egg: 1 large, beaten (for egg wash)
- Notes: Brushing the top crust with beaten egg creates a beautiful golden-brown, glossy finish. A splash of water or milk can be added to the egg.
- Refrigerated Pie Crusts: 2 boxes (4 crusts total)
Essential Equipment for Perfect Mini Pies
You don’t need highly specialized equipment, but having the right tools makes the process smoother:
- Standard 12-Cup Muffin Tin: This is the vessel for your mini pies. A non-stick tin is helpful, but greasing it well is still recommended.
- Round Cookie or Biscuit Cutters: You’ll need two sizes.
- One larger cutter (around 3.5 – 4 inches diameter) for the bottom crusts. The exact size depends on your muffin tin – it should be large enough to line the bottom and come up the sides of the cup.
- One smaller cutter (around 2.5 – 3 inches diameter) for the top crusts. It should be large enough to cover the filling and seal onto the edge of the bottom crust. Alternatively, you can cut strips for a lattice top.
- Large Saucepan or Dutch Oven: For cooking the filling.
- Whisk: Essential for creating a smooth, lump-free sauce (roux).
- Spatula or Wooden Spoon: For stirring the filling.
- Cutting Board & Sharp Knife: For prepping the vegetables and chicken.
- Measuring Cups & Spoons: For accurate ingredient measurement.
- Rolling Pin: If using homemade dough or needing to slightly thin store-bought dough.
- Pastry Brush: For applying the egg wash.
- Small Bowl: For beating the egg.
Step-by-Step Instructions: Crafting Your Mini Masterpieces
Follow these steps carefully for delicious, perfectly baked mini chicken pot pies:
1. Prepare the Filling Base:
* Melt Butter: In your large saucepan or Dutch oven, melt the 1/2 cup of butter over medium heat.
* Sauté Aromatics: Add the chopped onion, diced carrots, and chopped celery to the melted butter. Sauté, stirring occasionally, for about 7-10 minutes, or until the vegetables have softened slightly and the onion is translucent. Don’t brown them heavily.
2. Create the Creamy Sauce (Roux):
* Add Flour: Sprinkle the 1/2 cup of all-purpose flour over the sautéed vegetables. Stir constantly with a whisk or wooden spoon, coating the vegetables evenly. Cook for 1-2 minutes, still stirring. This cooks out the raw flour taste and forms the roux, which will thicken the sauce.
* Gradually Add Liquids: Slowly pour in the 2 cups of chicken broth while whisking constantly. Whisk vigorously to prevent lumps from forming. Once the broth is incorporated and smooth, slowly whisk in the 1 cup of milk or heavy cream.
* Simmer and Thicken: Bring the mixture to a gentle simmer, still whisking or stirring frequently. Let it simmer for about 5 minutes, or until the sauce has thickened enough to coat the back of a spoon. It should be thick but still pourable – it will thicken more as it cools slightly and bakes.
3. Finish the Filling:
* Stir in Chicken & Seasonings: Remove the saucepan from the heat. Stir in the 2 cups of cooked, diced chicken, the 1 cup of frozen peas, the 1 tablespoon of fresh chopped thyme (or 1 tsp dried), 1 teaspoon of salt, and 1/2 teaspoon of black pepper.
* Taste and Adjust: Taste the filling and adjust seasonings if necessary. Add more salt, pepper, or herbs to your liking.
* Cool Slightly: Set the filling aside to cool for at least 10-15 minutes. This is important! Adding piping hot filling to the pie crust can make the bottom soggy.
4. Prepare the Muffin Tin and Crusts:
* Preheat Oven: Preheat your oven to 400°F (200°C).
* Grease Muffin Tin: Lightly grease your 12-cup muffin tin with butter, cooking spray, or shortening, even if it’s non-stick. This ensures easy removal.
* Prepare Dough: Unroll your refrigerated pie crusts onto a lightly floured surface. If using homemade dough, roll it out to about 1/8-inch thickness.
* Cut Bottom Crusts: Using your larger round cutter (3.5-4 inches), cut out 12 circles. Gently press one circle into each muffin cup, ensuring it lines the bottom and comes up the sides. Try not to stretch the dough too much. You may need to gently pleat it to fit snugly. Re-roll scraps as needed.
* Cut Top Crusts: Using your smaller round cutter (2.5-3 inches), cut out 12 circles for the tops. Alternatively, cut thin strips if you prefer a lattice top.
* Vent Tops: If using solid top crusts, cut small slits (vents) in the center of each top circle with a sharp knife. This allows steam to escape during baking, preventing the filling from bursting out.
5. Assemble the Mini Pies:
* Fill the Crusts: Spoon the slightly cooled chicken pot pie filling evenly into the 12 crust-lined muffin cups. Fill them generously, almost to the top edge of the bottom crust.
* Place Top Crusts: Gently place one top crust circle (or arrange lattice strips) over the filling in each cup.
* Seal the Edges: Press the edges of the top crust onto the edges of the bottom crust to seal them together. You can use your fingers or the tines of a fork to crimp the edges decoratively.
6. Bake to Golden Perfection:
* Egg Wash: In a small bowl, beat the large egg with a teaspoon of water or milk. Using a pastry brush, lightly brush the tops of the pies with the egg wash. This gives them a beautiful golden color and shine. Be careful not to let excess egg wash pool around the base.
* Bake: Place the muffin tin on a baking sheet (this catches any potential drips). Bake in the preheated 400°F (200°C) oven for 25-30 minutes, or until the crusts are deeply golden brown and the filling is bubbly. If the crusts start to brown too quickly, you can loosely tent the muffin tin with aluminum foil for the last 10 minutes.
* Cool Before Serving: Once baked, remove the muffin tin from the oven and let the mini pies cool in the tin for at least 10-15 minutes. This allows the filling to set slightly and makes them easier (and safer) to remove without falling apart. Run a thin knife or offset spatula around the edge of each pie to help release it if needed.
Estimated Nutrition Facts: A Guideline
- Servings: 12 mini pot pies
- Calories Per Serving (1 mini pie): Approximately 350-450 kcal
Disclaimer: Nutritional information is an estimate only and can vary significantly based on specific ingredients used (e.g., type of milk/cream, fat content of chicken, brand of pie crust, added optional ingredients). These figures are provided as a general guideline. For precise nutritional data, consider using an online calculator with your exact ingredients and measurements. The estimate accounts for a standard recipe using whole milk and store-bought crusts. Using heavy cream or a richer homemade crust will increase the calorie count.
Time Commitment: Planning Your Pot Pie Adventure
Understanding the time involved helps you plan when to make these delightful pies:
- Preparation Time: Approximately 45 minutes. This includes chopping vegetables, dicing cooked chicken (if not already done), making the sauce, and assembling the pies in the muffin tin. Using pre-chopped veggies or rotisserie chicken can slightly reduce this time.
- Cooking Time: Approximately 25-30 minutes in the oven.
- Cooling Time: Allow at least 10-15 minutes for cooling in the tin before attempting removal and serving.
- Total Time: Approximately 1 hour 20 minutes to 1 hour 30 minutes (plus cooling time).
How to Serve: Elevating Your Mini Chicken Pot Pies
These versatile mini pies can be served in various ways, suiting different occasions:
- Simple & Classic:
- Serve one or two pies hot, straight from the oven (after cooling slightly), as a comforting lunch or light dinner.
- They are perfectly satisfying on their own.
- With Sides for a Full Meal:
- Salad: A crisp green salad with a vinaigrette dressing provides a fresh counterpoint to the rich pie. Think mixed greens, spinach, or arugula.
- Mashed Potatoes: Creamy mashed potatoes alongside are the ultimate comfort food pairing.
- Steamed Vegetables: Simple steamed green beans, broccoli, or asparagus add colour and nutrients.
- Cranberry Sauce: A dollop of tangy cranberry sauce (especially around the holidays) cuts through the richness beautifully.
- Fruit Salad: A light fruit salad can be a refreshing side or dessert.
- For Parties & Gatherings:
- Arrange the mini pies on a platter as hearty, elegant appetizers. Ensure they have cooled enough to be handled.
- Include them as part of a buffet spread alongside other finger foods or mains.
- Provide small plates and forks for easy eating.
- Drink Pairings:
- Wine: A medium-bodied white wine like an unoaked or lightly oaked Chardonnay, or a crisp Sauvignon Blanc complements the creamy filling. A dry Rosé also works well.
- Beer: A Pale Ale, an Amber Ale, or even a lighter Lager pairs nicely. Avoid overly bitter IPAs.
- Non-Alcoholic: Sparkling cider, iced tea, or a crisp sparkling water with lemon are great options.
Pro Tips for Pot Pie Perfection: Beyond the Basics
Take your mini chicken pot pies from great to absolutely unforgettable with these additional tips:
- Achieve Crust Nirvana: Don’t overwork your pie dough, whether homemade or store-bought, as this develops gluten and makes it tough. Keep the dough cold for maximum flakiness. Ensure the oven is fully preheated before the pies go in; the initial blast of heat helps set the crust quickly. The egg wash is key for that professional, golden finish.
- Master Filling Consistency: Aim for a filling that’s thick enough to be creamy and hold its shape but not so thick it becomes stodgy. It should gently coat the chicken and vegetables. If your filling seems too thin after simmering, let it cook a minute or two longer, or make a small slurry (1 tsp cornstarch mixed with 1 tbsp cold water) and whisk it in, simmering until thickened. Conversely, if it’s too thick, thin it with a splash more broth or milk. Remember it thickens upon cooling and baking.
- Embrace Make-Ahead Strategies: You can prepare the filling up to 2 days in advance. Store it in an airtight container in the refrigerator. Let it warm slightly or come closer to room temperature before filling the cold crusts to ensure even baking. You can also cut out the pie crust circles ahead of time and store them, layered between parchment paper, in the fridge. This breaks down the process, making assembly quicker on the day you bake.
- Get Creative with Variations: Don’t be afraid to customize!
- Protein: Substitute leftover turkey (great after holidays!), cooked ham, or even beef stew meat. For a vegetarian version, use hearty mushrooms (like cremini or shiitake), potatoes, and perhaps some white beans or lentils, swapping chicken broth for vegetable broth.
- Vegetables: Add parsnips, potatoes (diced small and pre-cooked slightly), green beans, corn, or mushrooms. Pearl onions are also a classic addition.
- Herbs & Spices: Experiment with different herbs like rosemary, sage, parsley, or a pinch of poultry seasoning. A dash of smoked paprika can add depth.
- Freezing and Reheating Wisdom: Mini pot pies freeze beautifully!
- Freezing Baked Pies: Let the baked pies cool completely. You can freeze them directly in the muffin tin (covered tightly) or remove them and wrap individually in plastic wrap and then foil, or place them in a freezer-safe container/bag. They last up to 3 months.
- Freezing Unbaked Pies: Assemble the pies fully in the muffin tin (without the egg wash). Freeze until solid, then remove, wrap individually, and store. This often yields a slightly flakier bottom crust upon baking.
- Reheating: To reheat baked frozen pies, bake directly from frozen (do not thaw) at 375°F (190°C) for 20-30 minutes, or until heated through and the crust is crisp. For unbaked frozen pies, brush with egg wash and bake at 400°F (200°C) for 30-40 minutes, or until golden and bubbly. Tent with foil if the crust browns too quickly.
Troubleshooting Common Mini Pot Pie Pitfalls
Even seasoned bakers encounter issues sometimes. Here’s how to tackle common problems:
- Soggy Bottom Crust: This is often caused by filling the crusts while the filling is too hot or too wet, or by not baking long enough. Solutions: Let the filling cool significantly before assembling. Ensure your filling isn’t watery (thicken if needed). Make sure the oven is fully preheated. Consider placing the muffin tin on a preheated baking sheet for the first 10 minutes of baking to help set the bottom crust faster.
- Runny Filling After Baking: The sauce may not have been thickened enough initially, or perhaps watery vegetables were used without adjusting. Solutions: Ensure the sauce coats the back of a spoon before assembling. If using vegetables with high water content, you might need slightly less liquid or a bit more flour/cornstarch slurry. Letting the pies rest for a good 10-15 minutes after baking allows the filling to set further.
- Burnt Crust / Pale Filling: Uneven oven heating or incorrect temperature/timing can cause this. Solutions: If the crust edges are browning too fast, loosely tent the muffin tin with aluminum foil during the last 10-15 minutes of baking. If the filling isn’t bubbly when the crust looks done, your oven might be running hot; consider lowering the temperature slightly next time. Use an oven thermometer to check accuracy. Ensure the pies are baked long enough for the filling to get hot and bubbly.
Frequently Asked Questions (FAQ)
1. Can I use puff pastry instead of regular pie crust?
Yes, you absolutely can, especially for the top crust! Puff pastry creates a very light, flaky, and impressive-looking top. Cut squares or circles slightly larger than the muffin cup opening, place on top of the filling (no need to seal tightly), brush with egg wash, and bake. It might puff up significantly. Using puff pastry for the bottom crust in a muffin tin can be tricky, as it might not hold its shape as well or could get soggy; traditional pie crust is usually better for lining the cups.
2. How can I make these mini chicken pot pies gluten-free?
To make them gluten-free, you’ll need two main substitutions. First, use a gluten-free all-purpose flour blend (one containing xanthan gum usually works best) for the roux. Second, use your favourite gluten-free pie crust recipe or a store-bought gluten-free pie crust. Ensure your chicken broth is also certified gluten-free. The rest of the ingredients are typically naturally gluten-free, but always double-check labels.
3. How long will leftover mini chicken pot pies last in the refrigerator?
Once baked and cooled, leftover mini chicken pot pies can be stored in an airtight container in the refrigerator for 3-4 days. Reheat them in an oven or toaster oven at around 350°F (175°C) for 10-15 minutes, or until heated through, to help re-crisp the crust. Microwaving will work but tends to make the crust softer.
4. Can I prepare the entire pies ahead of time and bake them later?
Yes, you can assemble the pies completely (line cups, fill, top, seal – but hold the egg wash), cover the muffin tin tightly with plastic wrap, and refrigerate for up to 24 hours before baking. When ready to bake, brush with egg wash and bake as directed, possibly adding a few extra minutes to the baking time since they are starting cold.
5. My filling seems too thick/thin, what should I do?
If too thick: While still warm in the saucepan (before filling the crusts), whisk in a little more warm chicken broth or milk, a tablespoon at a time, until it reaches the desired consistency.
If too thin: Ensure it has simmered long enough (at least 5 minutes after adding liquids). If still too thin, create a slurry by mixing 1 teaspoon of cornstarch with 1 tablespoon of cold water or milk. Whisk the slurry into the simmering filling and cook for another minute or two until it thickens. Remember it continues to thicken as it cools and bakes.
These Mini Chicken Pot Pies are more than just a meal; they are little parcels of joy, comfort, and deliciousness. The process is straightforward, the results are consistently rewarding, and the individual portions make them incredibly versatile. Whether you’re feeding your family on a weeknight, looking for a comforting lunch, or planning a menu for guests, this recipe is sure to become a favourite in your household, just as it has in mine. Enjoy the process, savor the aroma, and delight in every flaky, creamy bite!
Print
Mini Chicken Pot Pies Recipe
Ingredients
- For the Filling:
- Cooked Chicken: 2 cups, diced (about 1 lb boneless, skinless chicken breast or thighs, cooked)
- Notes: Leftover roasted chicken or rotisserie chicken is perfect here and adds great flavour. You can also quickly poach or pan-fry chicken breasts or thighs specifically for this recipe. Ensure it’s cut into small, bite-sized pieces (around 1/2 inch).
- Butter: 1/2 cup (1 stick, unsalted)
- Notes: Unsalted butter gives you better control over the final seasoning. It forms the base of the roux for the creamy sauce.
- Yellow Onion: 1 small, finely chopped (about 1 cup)
- Notes: Provides a fundamental aromatic base. Shallots can be substituted for a milder flavour.
- Carrots: 1 cup, finely diced (about 2 medium carrots)
- Notes: Adds sweetness and colour. Dice them small (1/4 inch) so they cook through evenly and quickly.
- Celery: 1/2 cup, finely chopped (about 1 large stalk)
- Notes: Offers a subtle savoury note and slight crunch. Chop finely like the carrots.
- All-Purpose Flour: 1/2 cup
- Notes: This is the thickener for the sauce, creating the roux with the butter.
- Chicken Broth: 2 cups (low-sodium preferred)
- Notes: Use a good quality broth for better flavour. Low-sodium allows you to adjust saltiness yourself. Vegetable broth can work in a pinch.
- Milk or Heavy Cream: 1 cup
- Notes: Milk creates a lovely creamy sauce. Heavy cream makes it richer and more decadent. Half-and-half is a good middle ground. Use whole milk for best results if not using cream.
- Frozen Peas: 1 cup
- Notes: Added at the end to retain their bright colour and pop of sweetness. No need to thaw first. Frozen corn is another popular addition or substitution.
- Fresh Thyme: 1 tablespoon, chopped (or 1 teaspoon dried thyme)
- Notes: Thyme pairs beautifully with chicken. Fresh herbs always offer brighter flavour, but dried works well too. Rosemary or sage are also excellent alternatives.
- Salt: 1 teaspoon (or to taste)
- Black Pepper: 1/2 teaspoon (freshly ground preferred, or to taste)
- Optional: A pinch of nutmeg, a splash of white wine (added after vegetables, before flour), a bay leaf (simmered with sauce, removed before assembly).
- Cooked Chicken: 2 cups, diced (about 1 lb boneless, skinless chicken breast or thighs, cooked)
- For the Crust:
- Refrigerated Pie Crusts: 2 boxes (4 crusts total)
- Notes: Store-bought crusts are a fantastic time-saver and yield reliably flaky results. Ensure they are the type you roll out. Alternatively, use your favourite homemade double-crust pie dough recipe (enough for two 9-inch pies). Puff pastry can also be used for a lighter, airier topping (though it might not work as well for the bottom crust in a muffin tin).
- Egg: 1 large, beaten (for egg wash)
- Notes: Brushing the top crust with beaten egg creates a beautiful golden-brown, glossy finish. A splash of water or milk can be added to the egg.
- Refrigerated Pie Crusts: 2 boxes (4 crusts total)
Instructions
1. Prepare the Filling Base:
* Melt Butter: In your large saucepan or Dutch oven, melt the 1/2 cup of butter over medium heat.
* Sauté Aromatics: Add the chopped onion, diced carrots, and chopped celery to the melted butter. Sauté, stirring occasionally, for about 7-10 minutes, or until the vegetables have softened slightly and the onion is translucent. Don’t brown them heavily.
2. Create the Creamy Sauce (Roux):
* Add Flour: Sprinkle the 1/2 cup of all-purpose flour over the sautéed vegetables. Stir constantly with a whisk or wooden spoon, coating the vegetables evenly. Cook for 1-2 minutes, still stirring. This cooks out the raw flour taste and forms the roux, which will thicken the sauce.
* Gradually Add Liquids: Slowly pour in the 2 cups of chicken broth while whisking constantly. Whisk vigorously to prevent lumps from forming. Once the broth is incorporated and smooth, slowly whisk in the 1 cup of milk or heavy cream.
* Simmer and Thicken: Bring the mixture to a gentle simmer, still whisking or stirring frequently. Let it simmer for about 5 minutes, or until the sauce has thickened enough to coat the back of a spoon. It should be thick but still pourable – it will thicken more as it cools slightly and bakes.
3. Finish the Filling:
* Stir in Chicken & Seasonings: Remove the saucepan from the heat. Stir in the 2 cups of cooked, diced chicken, the 1 cup of frozen peas, the 1 tablespoon of fresh chopped thyme (or 1 tsp dried), 1 teaspoon of salt, and 1/2 teaspoon of black pepper.
* Taste and Adjust: Taste the filling and adjust seasonings if necessary. Add more salt, pepper, or herbs to your liking.
* Cool Slightly: Set the filling aside to cool for at least 10-15 minutes. This is important! Adding piping hot filling to the pie crust can make the bottom soggy.
4. Prepare the Muffin Tin and Crusts:
* Preheat Oven: Preheat your oven to 400°F (200°C).
* Grease Muffin Tin: Lightly grease your 12-cup muffin tin with butter, cooking spray, or shortening, even if it’s non-stick. This ensures easy removal.
* Prepare Dough: Unroll your refrigerated pie crusts onto a lightly floured surface. If using homemade dough, roll it out to about 1/8-inch thickness.
* Cut Bottom Crusts: Using your larger round cutter (3.5-4 inches), cut out 12 circles. Gently press one circle into each muffin cup, ensuring it lines the bottom and comes up the sides. Try not to stretch the dough too much. You may need to gently pleat it to fit snugly. Re-roll scraps as needed.
* Cut Top Crusts: Using your smaller round cutter (2.5-3 inches), cut out 12 circles for the tops. Alternatively, cut thin strips if you prefer a lattice top.
* Vent Tops: If using solid top crusts, cut small slits (vents) in the center of each top circle with a sharp knife. This allows steam to escape during baking, preventing the filling from bursting out.
5. Assemble the Mini Pies:
* Fill the Crusts: Spoon the slightly cooled chicken pot pie filling evenly into the 12 crust-lined muffin cups. Fill them generously, almost to the top edge of the bottom crust.
* Place Top Crusts: Gently place one top crust circle (or arrange lattice strips) over the filling in each cup.
* Seal the Edges: Press the edges of the top crust onto the edges of the bottom crust to seal them together. You can use your fingers or the tines of a fork to crimp the edges decoratively.
6. Bake to Golden Perfection:
* Egg Wash: In a small bowl, beat the large egg with a teaspoon of water or milk. Using a pastry brush, lightly brush the tops of the pies with the egg wash. This gives them a beautiful golden color and shine. Be careful not to let excess egg wash pool around the base.
* Bake: Place the muffin tin on a baking sheet (this catches any potential drips). Bake in the preheated 400°F (200°C) oven for 25-30 minutes, or until the crusts are deeply golden brown and the filling is bubbly. If the crusts start to brown too quickly, you can loosely tent the muffin tin with aluminum foil for the last 10 minutes.
* Cool Before Serving: Once baked, remove the muffin tin from the oven and let the mini pies cool in the tin for at least 10-15 minutes. This allows the filling to set slightly and makes them easier (and safer) to remove without falling apart. Run a thin knife or offset spatula around the edge of each pie to help release it if needed.
Nutrition
- Serving Size: One Normal Portion
- Calories: 350-450 kcal