


There’s something incredibly nostalgic and comforting about the creamy, melt-in-your-mouth texture of a well-made Milk Powder Burfi. For me, this isn’t just a sweet; it’s a taste of childhood, a reminder of festive seasons, and impromptu celebrations. I remember my grandmother effortlessly whipping up batches of this delightful confection, the aroma of roasting milk powder and cardamom filling our home. When I first tried making it myself, I was pleasantly surprised by its simplicity. The key, I discovered, lies in patience and paying attention to the details – the gentle roasting of the milk powder, the precise consistency of the sugar syrup. The first time my family tasted my homemade version, their eyes lit up. My kids, who are usually quite picky, declared it “the best sweet ever!” and my husband, a connoisseur of Indian sweets, gave it his hearty approval. It has since become a staple in our household, especially during Diwali and Raksha Bandhan, or whenever we crave a quick, yet luxurious, homemade treat. It’s a recipe that’s forgiving for beginners but offers enough nuance for seasoned cooks to perfect. The beauty of Milk Powder Burfi is its unassuming nature, which then blossoms into an explosion of delicate, milky sweetness on the palate.
Ingredients for Perfect Milk Powder Burfi
Crafting the perfect Milk Powder Burfi hinges on using good quality ingredients. While the list is short, each component plays a vital role in achieving that sought-after creamy texture and rich flavor. Ensure your milk powder is fresh and free of lumps for the smoothest result.
- Full-Fat Milk Powder (Dairy Whitener): 2 cups (approximately 200-220g). This is the star ingredient, providing the milky base and structure. Full-fat yields a richer, creamier burfi.
- Ghee (Clarified Butter): ½ cup (approximately 100-110g). Ghee adds richness, a characteristic nutty aroma, and helps in roasting the milk powder.
- Granulated Sugar: 1 cup (approximately 200g). This provides sweetness and, when cooked to the right consistency, the structure for the burfi.
- Whole Milk (or Water/Heavy Cream): ½ cup (120 ml). This is used to make the sugar syrup. Using milk can add extra richness, while water keeps it classic. Heavy cream will make it even richer.
- Cardamom Powder: ½ to 1 teaspoon, freshly ground if possible. This imparts the classic aromatic flavor. Adjust to your preference.
- Chopped Nuts (Pistachios, Almonds): ¼ cup, for garnish and added texture. You can also mix some into the burfi itself.
- Optional: Saffron Strands: A few strands, soaked in a tablespoon of warm milk, for color and a luxurious aroma.
- Optional: Edible Silver Leaf (Vark): For a traditional festive decoration.
A note on milk powder: While often called “Dairy Whitener” in India, ensure you’re using a good quality, unsweetened, full-fat milk powder. Avoid coffee creamers or sweetened milk powders as they will alter the taste and texture significantly. The richness from full-fat milk powder is what gives this burfi its characteristic indulgent quality. Ghee, too, plays a crucial part. Homemade ghee is wonderful, but a good quality store-bought one works perfectly. The fragrance it releases when roasting the milk powder is one of the first signs you’re on your way to a delicious batch of burfi.
Step-by-Step Instructions: Crafting Your Milk Powder Burfi
Making Milk Powder Burfi is a process that requires attention, particularly during the roasting and syrup-making stages. Follow these steps carefully for a delightful outcome. Remember, patience is key!
- Preparation is Key:
- Grease a thali (plate with a rim), a square baking tin (approx. 8×8 inches), or a tray with a thin layer of ghee. This will prevent the burfi from sticking and make it easier to remove once set.
- Chop your nuts (pistachios, almonds) if you haven’t already. Keep them aside for garnish.
- If using saffron, soak the strands in 1 tablespoon of warm milk and set aside.
- Roasting the Milk Powder:
- In a heavy-bottomed pan or kadai, add the ½ cup of ghee and let it melt over low heat.
- Once the ghee has melted, add the 2 cups of milk powder.
- Stir continuously on low to medium-low heat. This is a crucial step. You need to roast the milk powder until it turns a very light golden or pale beige color and emits a pleasant, nutty aroma. This can take anywhere from 8-12 minutes.
- Be vigilant during this stage, as milk powder can burn very easily. If it burns, the burfi will have a bitter taste. Keep scraping the bottom and sides of the pan.
- Once roasted to perfection (aromatic and slightly changed in color), remove the pan from the heat and transfer the roasted milk powder to a separate bowl or plate to prevent further cooking from the residual heat of the pan.
- Preparing the Sugar Syrup:
- In the same pan (wipe it clean if there are any browned milk powder bits) or a different clean saucepan, add the 1 cup of granulated sugar and the ½ cup of whole milk (or water).
- Place the pan over medium heat and stir until the sugar dissolves completely.
- Once the sugar has dissolved, bring the mixture to a boil. Continue to cook, stirring occasionally.
- You are looking for a “one-string consistency” (ek taar chashni). To check this:
- Carefully take a tiny drop of the syrup between your thumb and forefinger (ensure it has cooled slightly to avoid burns).
- Gently pull your fingers apart. A single thread or string should form and hold its shape for a second before breaking.
- Alternatively, drop a little syrup onto a small plate. Let it cool for a few seconds. Tilt the plate; the syrup should not be too runny. When you touch it with a finger and pull away, it should feel sticky and form a short thread.
- This stage is critical. If the syrup is undercooked, the burfi won’t set properly. If it’s overcooked, the burfi will become hard and crystalline. It usually takes about 5-7 minutes after the boil to reach this consistency.
- Combining and Cooking the Burfi Mixture:
- Once the one-string consistency is achieved, immediately reduce the heat to low.
- Add the roasted milk powder to the sugar syrup all at once.
- Stir vigorously and continuously to break any lumps and combine everything well. The mixture will start to thicken.
- Add the ½ to 1 teaspoon of cardamom powder and the soaked saffron milk (if using). If you want to add some chopped nuts into the burfi itself (not just as garnish), add them now.
- Continue to cook on low heat, stirring constantly, for another 3-5 minutes. The mixture will start to leave the sides of the pan and come together like a soft, non-sticky dough or mass. It should look glossy.
- To test if it’s ready, you can take a tiny portion and try to roll it into a small ball once it’s cool enough to handle. It should form a non-sticky ball. Don’t overcook at this stage, or the burfi will become chewy.
- Setting the Burfi:
- Quickly transfer the burfi mixture to the prepared greased thali or baking tin.
- Spread it evenly using the back of a ghee-greased spoon or a spatula to a thickness of about ½ to ¾ inch.
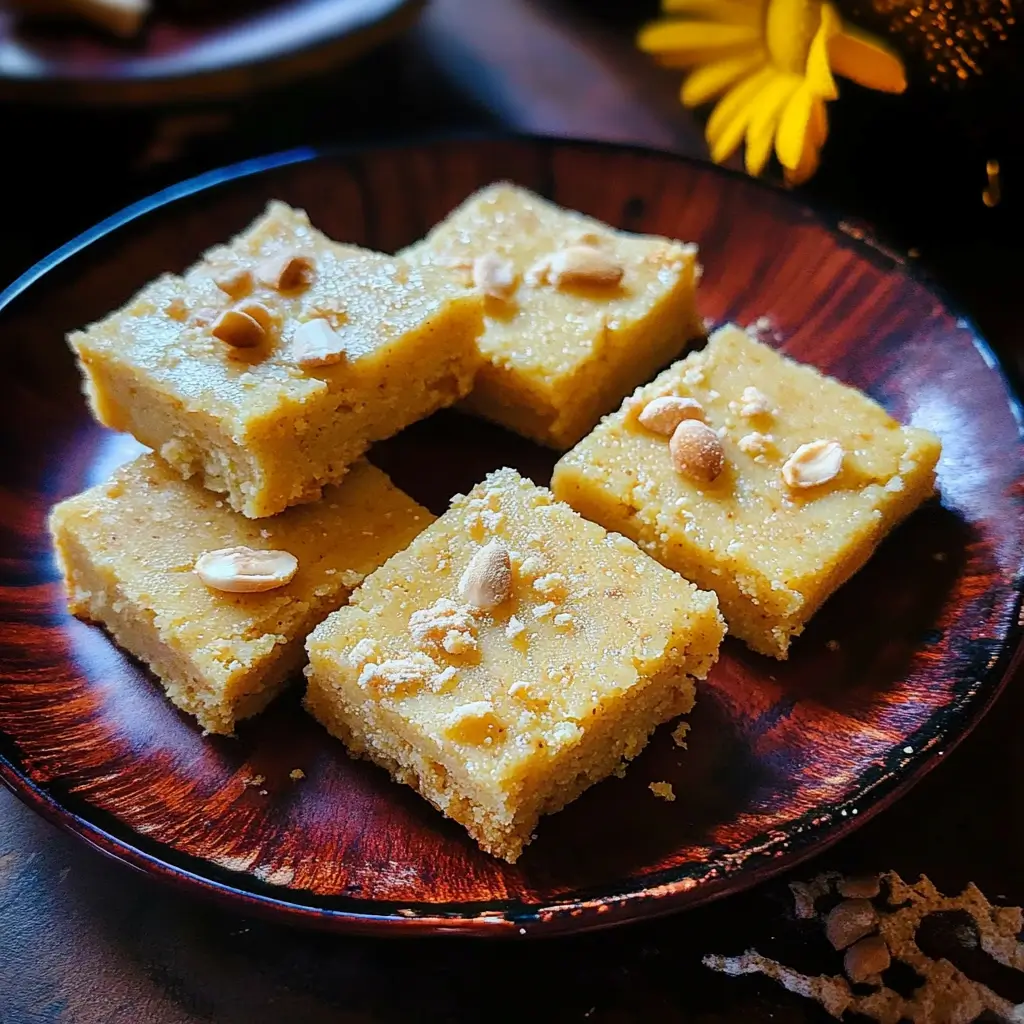
- Sprinkle the chopped pistachios and almonds (and any other desired nuts) evenly over the top. Gently press them into the burfi with the spatula so they adhere well.
- If using edible silver leaf (vark), apply it carefully now while the burfi is still warm and slightly sticky.
- Cooling and Cutting:
- Let the burfi cool down completely at room temperature. This can take anywhere from 2 to 4 hours, or even longer depending on the ambient temperature. Avoid refrigerating it to set, as this can sometimes make it too hard or change the texture.
- Once it’s set and firm to the touch, use a sharp, ghee-greased knife to cut the burfi into desired shapes – squares, diamonds, or rectangles.
- Gently lift the pieces from the tray. If they are a bit difficult to remove, you can slightly warm the bottom of the tray for a few seconds.
Your delicious homemade Milk Powder Burfi is now ready to be enjoyed! The careful roasting, the precise syrup, and the gentle cooking all culminate in a sweet treat that’s hard to resist.
Nutritional Snapshot: Understanding Your Indulgence
While Milk Powder Burfi is undeniably a treat, it’s helpful to have an idea of its nutritional content. Please note that these values are approximate and can vary based on the specific ingredients used, their brands, and exact quantities.
- Servings: This recipe typically yields about 16-20 medium-sized pieces, depending on how thickly you spread it and the size of your cuts.
- Calories per serving (approximate for 1 piece, assuming 16 servings): 150-180 kcal
Breakdown of Primary Contributors:
- Milk Powder: Provides protein, calcium, and carbohydrates (lactose). Full-fat versions contribute significantly to the fat content.
- Ghee: Primarily saturated and unsaturated fats, contributing to the calorie count but also providing richness and aiding in the absorption of fat-soluble vitamins.
- Sugar: Pure carbohydrates, providing energy and sweetness.
- Nuts: Offer healthy fats, protein, fiber, and various micronutrients, though used in smaller quantities primarily for garnish.
Indian sweets, or “mithai,” are traditionally rich and are meant to be enjoyed in moderation, especially during festive occasions or as a special dessert. The use of ghee, while high in calories, is considered beneficial in Ayurveda when consumed appropriately. This burfi is a source of quick energy due to its sugar content. Enjoying a piece or two as part of a balanced diet is perfectly fine. The homemade nature also means you control the quality of ingredients, avoiding artificial preservatives or excessive sweetness often found in store-bought varieties.
Time Commitment: From Prep to Perfection
Understanding the time involved can help you plan when to make this delightful sweet. While not overly time-consuming in terms of active cooking, the setting time is crucial.
- Preparation Time: 10-15 minutes
- This includes greasing the tray, chopping nuts, measuring out ingredients, and soaking saffron (if using).
- Cooking Time: 25-35 minutes
- Roasting milk powder: 8-12 minutes
- Making sugar syrup: 5-7 minutes (after sugar dissolves and boils)
- Cooking the burfi mixture after combining: 3-5 minutes
- Setting Time: 2-4 hours (at room temperature)
- This is essential for the burfi to firm up properly for cutting. It can sometimes take longer in humid or warmer climates. Patience here is rewarded with perfectly textured pieces.
- Total Time (excluding setting): Approximately 35-50 minutes
- Total Time (including average setting): Approximately 2.5 to 5 hours
While the active cooking part is under an hour, it’s best to make this burfi when you have a few hours to allow it to set undisturbed. Many people prefer to make it a day ahead of an event or festival. The process itself is quite meditative, especially the continuous stirring, making it a rewarding culinary experience.
Serving Suggestions: Elevating Your Burfi Experience
Milk Powder Burfi is delightful on its own, but here are a few ways to serve and enjoy it, enhancing the experience:
- As a Standalone Sweet:
- This is the most common way. Arrange the perfectly cut pieces on a platter and serve at room temperature. Its inherent richness and delicate flavor need no accompaniment.
- With Hot Beverages:
- Pair a piece of burfi with a cup of unsweetened hot chai (Indian tea) or coffee. The warmth of the beverage complements the sweetness of the burfi beautifully.
- Part of a Mithai Platter:
- During festivals like Diwali, Holi, or Raksha Bandhan, include Milk Powder Burfi as part of a larger assortment of Indian sweets (mithai) like ladoos, jalebis, or kaju katli. Its creamy white or pale beige color offers a lovely contrast.
- For Gifting:
- Homemade Milk Powder Burfi makes a wonderful edible gift. Pack it in decorative sweet boxes lined with parchment paper. It’s a thoughtful and personal gesture for friends and family.
- Dessert After a Meal:
- Serve a small piece as a delightful end to an Indian meal. Its sweetness provides a satisfying finish.
- Garnish Variations:
- While pistachios and almonds are classic, you can also try:
- Rose Petals: Dried, edible rose petals add a beautiful color and subtle floral aroma.
- Charoli (Chironji) Nuts: These tiny nuts add a unique, mild flavor.
- A Pinch of Saffron: A few extra strands of saffron on top of each piece for visual appeal.
- While pistachios and almonds are classic, you can also try:
- With a Glass of Milk:
- For children (and adults who love milk!), a piece of burfi with a glass of warm or cold milk is a comforting treat.
- Crumble over Ice Cream:
- For a fusion dessert, try crumbling a piece of burfi over vanilla or pistachio ice cream. It adds a lovely texture and milky sweetness.
No matter how you choose to serve it, Milk Powder Burfi is sure to be a hit. Its simplicity and elegance make it suitable for both grand celebrations and quiet moments of indulgence.
Pro Tips for Burfi Brilliance (5 Tips)
Achieving that perfect, melt-in-your-mouth Milk Powder Burfi consistently requires attention to a few key details. Here are five pro tips to elevate your burfi game:
- Low and Slow Roasting is Paramount:
- Tip: Always roast the milk powder with ghee on a consistently low to medium-low flame, stirring continuously.
- Why: Milk powder burns very easily due to its fine texture and sugar content (lactose). High heat will scorch it quickly, leading to a bitter taste and uneven color. Slow roasting develops a beautiful nutty aroma, cooks off the raw taste of the milk powder, and gives a delicate, even beige hue. Patience here is non-negotiable for superior flavor.
- Nail the Sugar Syrup Consistency:
- Tip: Aim for a perfect one-string consistency (ek taar chashni) for your sugar syrup.
- Why: This is the backbone of your burfi’s texture. If the syrup is undercooked (less than one-string), the burfi will be too soft and might not set properly, resulting in a fudgy, sticky mess. If it’s overcooked (two-string or harder), the burfi will turn out hard, crystalline, or crumbly. Test frequently as it approaches the right stage.
- Don’t Overcook After Combining:
- Tip: Once you add the roasted milk powder to the sugar syrup, mix well and cook only until the mixture starts to leave the sides of the pan and comes together as a non-sticky mass (usually 3-5 minutes on low heat).
- Why: Overcooking at this stage can make the burfi chewy or hard. The residual heat will continue to cook the mixture even after you transfer it to the setting tray. The goal is a soft, pliable dough that is manageable but not overly dry.
- Quality of Ingredients Matters:
- Tip: Use good quality, full-fat milk powder and fresh ghee. If possible, use freshly ground cardamom.
- Why: Full-fat milk powder provides the necessary richness and creaminess. Old or low-quality milk powder can result in a less flavorful or even off-tasting burfi. Fresh ghee imparts a wonderful aroma and taste that is central to traditional Indian sweets. Freshly ground cardamom has a much more vibrant fragrance than pre-ground powder.
- Patience During Setting:
- Tip: Allow the burfi to cool and set completely at room temperature for at least 2-4 hours, or even longer if needed, before attempting to cut it.
- Why: Cutting the burfi while it’s still warm or not fully set will result in misshapen pieces and a messy presentation. It needs time to firm up to the right consistency for clean cuts. Resist the temptation to rush this step or to set it in the refrigerator, as rapid cooling can sometimes make it too hard or affect the texture.
By keeping these tips in mind, you’re well on your way to making Milk Powder Burfi that is not just delicious but also has the perfect texture and appearance – a true testament to your culinary skills!
Frequently Asked Questions (FAQ) – Your Burfi Queries Answered
Here are answers to some common questions you might have about making Milk Powder Burfi:
- Q: Why did my Milk Powder Burfi turn out hard or chewy?
- A: This is usually due to one of two reasons:
- Overcooked Sugar Syrup: If the sugar syrup was cooked beyond the one-string consistency (e.g., to a two-string or hard-ball stage), the burfi will invariably become hard and crystalline.
- Overcooking the Mixture: If you cooked the milk powder and sugar syrup mixture for too long after combining them, it can also lead to a hard or chewy texture. The mixture should just come together and leave the sides of the pan.
- A: This is usually due to one of two reasons:
- Q: My burfi is too soft and not setting properly. What went wrong?
- A: This is typically because the sugar syrup was undercooked and didn’t reach the crucial one-string consistency. If the syrup is too watery, it doesn’t have the structural integrity to bind the milk powder and allow it to set firm. Another less common reason could be an excess of liquid (milk/water) in proportion to the sugar and milk powder. Ensure your measurements are accurate.
- Q: Can I use non-fat milk powder instead of full-fat milk powder?
- A: Yes, you can use non-fat milk powder, but the results will differ. Full-fat milk powder contributes significantly to the rich, creamy texture and taste characteristic of traditional burfi. Using non-fat milk powder will likely result in a drier, less rich, and slightly chewier burfi. You might need to adjust the ghee quantity slightly if you go this route. For the best, most authentic taste and texture, full-fat is highly recommended.
- Q: How should I store Milk Powder Burfi, and how long does it last?
- A: Store Milk Powder Burfi in an airtight container to prevent it from drying out or absorbing odors.
- At Room Temperature: It stays fresh for 3-4 days in a cool, dry place.
- In the Refrigerator: It can last for up to 7-10 days. If refrigerated, let it come to room temperature for about 15-20 minutes before serving, as it tends to harden when cold, and the flavors are best at room temperature.
- Avoid exposing it to direct sunlight or high humidity.
- A: Store Milk Powder Burfi in an airtight container to prevent it from drying out or absorbing odors.
- Q: Can I make this Milk Powder Burfi vegan?
- A: Making a truly traditional Milk Powder Burfi vegan is challenging because milk powder and ghee are central to its identity. However, you can create a similar sweet using plant-based alternatives:
- Milk Powder: Use soy milk powder, rice milk powder, or coconut milk powder. The flavor and texture will be different. Coconut milk powder works particularly well for a coconut-flavored burfi.
- Ghee: Substitute with vegan butter, refined coconut oil (which is more neutral in flavor than virgin), or a neutral vegetable oil.
- Milk (for syrup): Use any plant-based milk like almond, soy, or oat milk.
The taste and texture will not be identical to the dairy version but can still result in a delicious plant-based sweet. You might need to experiment with quantities to achieve your desired consistency.
- A: Making a truly traditional Milk Powder Burfi vegan is challenging because milk powder and ghee are central to its identity. However, you can create a similar sweet using plant-based alternatives:

Milk Powder Burfi Recipe
Ingredients
- Full-Fat Milk Powder (Dairy Whitener): 2 cups (approximately 200-220g). This is the star ingredient, providing the milky base and structure. Full-fat yields a richer, creamier burfi.
- Ghee (Clarified Butter): ½ cup (approximately 100-110g). Ghee adds richness, a characteristic nutty aroma, and helps in roasting the milk powder.
- Granulated Sugar: 1 cup (approximately 200g). This provides sweetness and, when cooked to the right consistency, the structure for the burfi.
- Whole Milk (or Water/Heavy Cream): ½ cup (120 ml). This is used to make the sugar syrup. Using milk can add extra richness, while water keeps it classic. Heavy cream will make it even richer.
- Cardamom Powder: ½ to 1 teaspoon, freshly ground if possible. This imparts the classic aromatic flavor. Adjust to your preference.
- Chopped Nuts (Pistachios, Almonds): ¼ cup, for garnish and added texture. You can also mix some into the burfi itself.
- Optional: Saffron Strands: A few strands, soaked in a tablespoon of warm milk, for color and a luxurious aroma.
- Optional: Edible Silver Leaf (Vark): For a traditional festive decoration.
Instructions
- Preparation is Key:
- Grease a thali (plate with a rim), a square baking tin (approx. 8×8 inches), or a tray with a thin layer of ghee. This will prevent the burfi from sticking and make it easier to remove once set.
- Chop your nuts (pistachios, almonds) if you haven’t already. Keep them aside for garnish.
- If using saffron, soak the strands in 1 tablespoon of warm milk and set aside.
- Roasting the Milk Powder:
- In a heavy-bottomed pan or kadai, add the ½ cup of ghee and let it melt over low heat.
- Once the ghee has melted, add the 2 cups of milk powder.
- Stir continuously on low to medium-low heat. This is a crucial step. You need to roast the milk powder until it turns a very light golden or pale beige color and emits a pleasant, nutty aroma. This can take anywhere from 8-12 minutes.
- Be vigilant during this stage, as milk powder can burn very easily. If it burns, the burfi will have a bitter taste. Keep scraping the bottom and sides of the pan.
- Once roasted to perfection (aromatic and slightly changed in color), remove the pan from the heat and transfer the roasted milk powder to a separate bowl or plate to prevent further cooking from the residual heat of the pan.
- Preparing the Sugar Syrup:
- In the same pan (wipe it clean if there are any browned milk powder bits) or a different clean saucepan, add the 1 cup of granulated sugar and the ½ cup of whole milk (or water).
- Place the pan over medium heat and stir until the sugar dissolves completely.
- Once the sugar has dissolved, bring the mixture to a boil. Continue to cook, stirring occasionally.
- You are looking for a “one-string consistency” (ek taar chashni). To check this:
- Carefully take a tiny drop of the syrup between your thumb and forefinger (ensure it has cooled slightly to avoid burns).
- Gently pull your fingers apart. A single thread or string should form and hold its shape for a second before breaking.
- Alternatively, drop a little syrup onto a small plate. Let it cool for a few seconds. Tilt the plate; the syrup should not be too runny. When you touch it with a finger and pull away, it should feel sticky and form a short thread.
- This stage is critical. If the syrup is undercooked, the burfi won’t set properly. If it’s overcooked, the burfi will become hard and crystalline. It usually takes about 5-7 minutes after the boil to reach this consistency.
- Combining and Cooking the Burfi Mixture:
- Once the one-string consistency is achieved, immediately reduce the heat to low.
- Add the roasted milk powder to the sugar syrup all at once.
- Stir vigorously and continuously to break any lumps and combine everything well. The mixture will start to thicken.
- Add the ½ to 1 teaspoon of cardamom powder and the soaked saffron milk (if using). If you want to add some chopped nuts into the burfi itself (not just as garnish), add them now.
- Continue to cook on low heat, stirring constantly, for another 3-5 minutes. The mixture will start to leave the sides of the pan and come together like a soft, non-sticky dough or mass. It should look glossy.
- To test if it’s ready, you can take a tiny portion and try to roll it into a small ball once it’s cool enough to handle. It should form a non-sticky ball. Don’t overcook at this stage, or the burfi will become chewy.
- Setting the Burfi:
- Quickly transfer the burfi mixture to the prepared greased thali or baking tin.
- Spread it evenly using the back of a ghee-greased spoon or a spatula to a thickness of about ½ to ¾ inch.
- Sprinkle the chopped pistachios and almonds (and any other desired nuts) evenly over the top. Gently press them into the burfi with the spatula so they adhere well.
- If using edible silver leaf (vark), apply it carefully now while the burfi is still warm and slightly sticky.
- Cooling and Cutting:
- Let the burfi cool down completely at room temperature. This can take anywhere from 2 to 4 hours, or even longer depending on the ambient temperature. Avoid refrigerating it to set, as this can sometimes make it too hard or change the texture.
- Once it’s set and firm to the touch, use a sharp, ghee-greased knife to cut the burfi into desired shapes – squares, diamonds, or rectangles.
- Gently lift the pieces from the tray. If they are a bit difficult to remove, you can slightly warm the bottom of the tray for a few seconds.
Nutrition
- Serving Size: One Normal Portion
- Calories: 150-180 kcal


