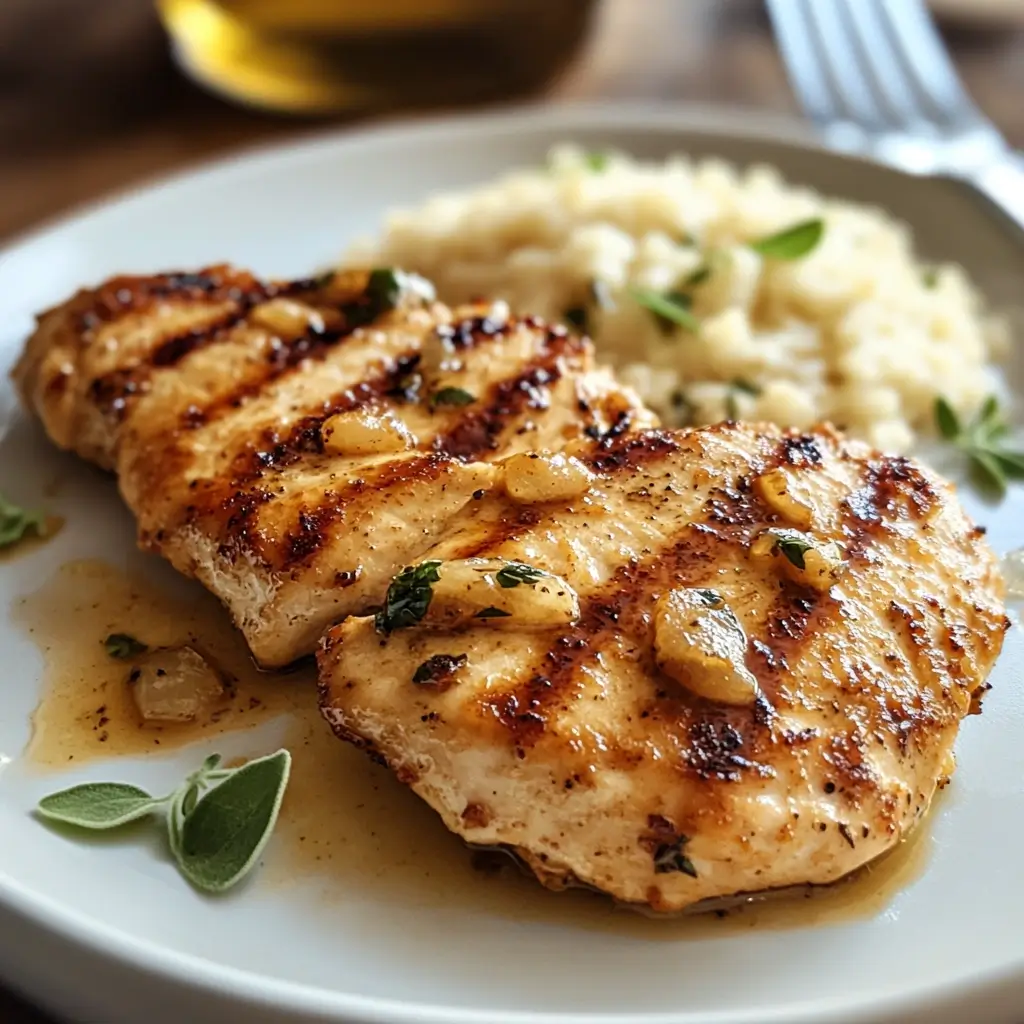
The aroma wafted through the house, a tantalizing promise of dinner. My family, usually a tough crowd when it comes to chicken breast, were practically buzzing with anticipation. You see, chicken breast in our home has often been relegated to the “necessary but not exciting” category – lean, healthy, but sometimes… well, let’s be honest, a bit dry and bland. That was until I stumbled upon this recipe. The words “melt in your mouth” were a bold claim, but desperation (and a desire for a truly enjoyable weeknight meal) led me to try it. The result? Pure culinary magic. Silence fell over the table as everyone took their first bite, followed by murmurs of “Wow,” “This is amazing,” and “Can we have this again tomorrow?” It was official: chicken breast had been elevated. This isn’t just another chicken breast recipe; it’s a game-changer. Prepare to experience chicken breast like never before – juicy, flavorful, and yes, truly melt-in-your-mouth tender. Get ready to ditch the dry chicken doldrums and embrace a recipe that will transform your weeknight dinners forever.
Ingredients for Melt-In-Your-Mouth Chicken Breast
The secret to truly exceptional chicken breast isn’t just in the technique, but also in the quality of ingredients and the thoughtful combination of flavors. While this recipe is wonderfully simple, each ingredient plays a crucial role in achieving that coveted melt-in-your-mouth texture and unforgettable taste. Let’s delve into each component and understand why they are essential for creating chicken breast perfection.
- Boneless, Skinless Chicken Breasts: The star of our show! Opt for high-quality chicken breasts, preferably air-chilled if available. The size of the breasts will impact cooking time, so aim for breasts that are roughly the same thickness for even cooking. Fresh chicken is always best for optimal flavor and texture, but properly thawed frozen chicken will also work beautifully. We recommend about 1 ½ to 2 pounds of chicken breast for a family of four, but adjust accordingly based on your needs and appetites.
- Olive Oil (Extra Virgin): Olive oil is the foundation of our flavor and moisture infusion. Extra virgin olive oil not only adds a rich, fruity flavor but also helps to tenderize the chicken and prevent it from drying out during cooking. Its healthy fats contribute to the overall juiciness and luxurious mouthfeel of the final dish. Don’t skimp on quality here – a good olive oil makes a noticeable difference.
- Lemon Juice (Freshly Squeezed): The bright, zesty acidity of fresh lemon juice is a game-changer for chicken. Lemon juice acts as a natural tenderizer, breaking down muscle fibers and ensuring a more succulent texture. It also brightens the overall flavor profile, cutting through the richness of the olive oil and adding a refreshing tang that complements the chicken beautifully. Avoid bottled lemon juice if possible, as fresh juice offers a far superior flavor.
- Garlic (Minced): Garlic is the aromatic backbone of countless savory dishes, and it’s no different here. Minced garlic infuses the chicken with a pungent, savory depth that is simply irresistible. Freshly minced garlic is always preferred for its robust flavor, but pre-minced garlic from a jar can be a convenient alternative in a pinch. Don’t be shy with the garlic – it really elevates the taste of the chicken.
- Dried Herbs (Italian Blend or Herbs de Provence): A blend of dried herbs adds layers of complex flavor to our chicken. Italian seasoning, with its combination of oregano, basil, rosemary, thyme, and marjoram, provides a classic Mediterranean profile. Herbs de Provence, a French blend featuring rosemary, thyme, savory, marjoram, oregano, and sometimes lavender, offers a slightly more floral and nuanced aroma. Either blend works wonderfully, so choose your favorite or what you have readily available. Dried herbs are perfect for this recipe as they infuse flavor slowly and steadily during cooking.
- Paprika (Smoked or Sweet): Paprika brings a touch of warmth and subtle smoky (if using smoked paprika) or sweet (if using sweet paprika) notes to the chicken. Smoked paprika, in particular, adds a delightful depth and complexity that mimics the flavor of grilling or roasting. Sweet paprika provides a milder, fruitier flavor and beautiful color. You can use either type, or even a combination, depending on your preference.
- Salt (Kosher or Sea Salt): Salt is essential for seasoning and enhancing the natural flavors of the chicken. Kosher salt and sea salt are preferred by many cooks for their clean, pure taste and larger crystals, which are easier to control when seasoning. Salt not only seasons the chicken but also helps to retain moisture, contributing to the melt-in-your-mouth texture.
- Black Pepper (Freshly Ground): Freshly ground black pepper adds a pungent, aromatic bite that complements the other flavors perfectly. The act of grinding pepper fresh releases volatile oils that contribute significantly to the overall taste. Pre-ground pepper tends to lose its potency over time, so freshly ground is always recommended for the best flavor.
- Optional: Onion Powder and Garlic Powder: For an extra layer of savory depth, you can add a touch of onion powder and garlic powder to the seasoning blend. These powdered spices provide a concentrated burst of flavor that enhances the overall taste of the chicken. Use them sparingly to complement the fresh garlic and herbs without overpowering them.
By gathering these simple yet impactful ingredients, you’re setting the stage for a truly remarkable chicken breast dish. Each element works in harmony to create a symphony of flavors and textures that will transform your perception of what chicken breast can be.
Step-by-Step Instructions for Perfect Melt-In-Your-Mouth Chicken Breast
Creating truly melt-in-your-mouth chicken breast is less about complicated techniques and more about understanding the key principles of moisture retention and flavor infusion. This recipe is designed to be straightforward and accessible to home cooks of all levels, ensuring consistently juicy and delicious results every time. Follow these step-by-step instructions carefully, and you’ll be amazed at how easy it is to achieve chicken breast perfection.
Step 1: Prepare the Chicken Breasts
- Pounding for Even Thickness (Crucial for Even Cooking): Place your chicken breasts on a cutting board. If they are uneven in thickness (which they often are!), this is a critical step. Cover each breast with a piece of plastic wrap or place it inside a resealable plastic bag. Using a meat mallet or the bottom of a heavy skillet, gently pound the thicker parts of the chicken breast until it is uniformly about ½-inch thick throughout. This ensures that the chicken cooks evenly, preventing thin parts from drying out before the thicker parts are cooked through. Pounding also tenderizes the chicken, further contributing to the melt-in-your-mouth texture.
- Pat Dry with Paper Towels (Essential for Browning): After pounding, pat the chicken breasts thoroughly dry with paper towels. Removing excess moisture from the surface of the chicken is crucial for achieving a beautiful golden-brown sear or baked crust. Excess moisture will steam the chicken instead of allowing it to brown properly.
Step 2: Create the Flavorful Marinade (Infusion of Moisture and Taste)
- Combine Marinade Ingredients: In a medium-sized bowl, whisk together the olive oil, fresh lemon juice, minced garlic, dried herbs (Italian blend or Herbs de Provence), paprika (smoked or sweet), salt, and freshly ground black pepper (and optional onion powder and garlic powder, if using). Whisk vigorously to ensure all ingredients are well combined and emulsified. This marinade is a powerhouse of flavor and tenderizing agents.
- Marinate the Chicken (Flavor Penetration and Tenderization): Place the patted-dry chicken breasts in the bowl with the marinade. Use your hands or tongs to ensure that each chicken breast is thoroughly coated in the marinade, front and back. Massage the marinade into the chicken for a minute or two to help it penetrate the meat.
- Marinating Time (Optimal Flavor Development): Cover the bowl with plastic wrap or transfer the chicken and marinade to a resealable plastic bag. Marinate in the refrigerator for at least 30 minutes, and ideally for 1 to 4 hours. Longer marinating times allow for deeper flavor penetration and further tenderization. If you’re short on time, even 30 minutes will make a noticeable difference. Avoid marinating for longer than 4 hours, as the lemon juice can start to break down the chicken protein too much, potentially affecting the texture.
Step 3: Cooking the Chicken to Juicy Perfection (Choosing Your Method)
You have two excellent options for cooking your marinated chicken breasts to melt-in-your-mouth perfection: oven-baking and pan-searing. Both methods, when executed correctly, will yield incredibly juicy and flavorful chicken.
Option 1: Oven-Baking (Hands-Off and Even Cooking)
- Preheat Oven (Consistent Temperature is Key): Preheat your oven to 400°F (200°C). Ensure your oven is fully preheated before placing the chicken inside for consistent cooking temperature.
- Prepare Baking Dish (Prevent Sticking): Lightly grease a baking dish with olive oil or cooking spray. You can also line the dish with parchment paper for easier cleanup.
- Arrange Chicken in Baking Dish (Avoid Overcrowding): Place the marinated chicken breasts in the prepared baking dish in a single layer. Avoid overcrowding the dish, as this can lead to steaming rather than baking and uneven cooking. If necessary, use two baking dishes.
- Bake the Chicken (Time Varies by Thickness): Bake for 18-25 minutes, or until the internal temperature of the chicken reaches 165°F (74°C) using a meat thermometer inserted into the thickest part of the breast. Cooking time will vary depending on the thickness of your chicken breasts and your oven’s calibration. Start checking for doneness around 18 minutes and adjust time accordingly.
- Rest the Chicken (Lock in Juices): Once cooked through, remove the baking dish from the oven and let the chicken breasts rest for 5-10 minutes before slicing or serving. Resting allows the juices to redistribute throughout the chicken, resulting in a more tender and moist final product. Do not skip this crucial step!
Option 2: Pan-Searing (Golden Crust and Quick Cooking)
- Heat Skillet (Proper Heat for Searing): Heat a tablespoon of olive oil in a large skillet over medium-high heat. Use a skillet that is large enough to accommodate the chicken breasts in a single layer without overcrowding. Cast iron or stainless steel skillets work best for searing.
- Sear Chicken Breasts (Develop Flavor and Color): Once the skillet is hot and the oil is shimmering, carefully place the marinated chicken breasts in the skillet. Sear for 3-4 minutes per side, or until golden brown and nicely seared. Resist the urge to move the chicken around too much during searing – allow it to develop a good crust before flipping.
- Reduce Heat and Cook Through (Gentle Cooking to Prevent Drying): After searing both sides, reduce the heat to medium-low, cover the skillet with a lid, and continue cooking for another 5-8 minutes, or until the internal temperature reaches 165°F (74°C). Covering the skillet helps to trap heat and steam, ensuring the chicken cooks through without drying out.
- Rest the Chicken (Essential for Juiciness): Remove the chicken from the skillet and let it rest for 5-10 minutes before slicing or serving. Resting is just as important for pan-seared chicken as it is for baked chicken to ensure maximum juiciness.
Step 4: Serve and Enjoy! (The Delicious Reward)
Once your chicken breasts are cooked to perfection and rested, they are ready to be served and enjoyed! The possibilities are endless. Refer to the “How to Serve” section below for a plethora of serving suggestions.
By following these detailed instructions and choosing your preferred cooking method, you are well on your way to creating truly melt-in-your-mouth chicken breast that will impress your family and friends and become a staple in your recipe repertoire.
Nutrition Facts for Melt-In-Your-Mouth Chicken Breast (Estimated)
Understanding the nutritional content of your meals is important for maintaining a balanced diet. Please note that the following nutrition facts are estimates and can vary slightly depending on the specific ingredients used, the size of the chicken breasts, and portion sizes. This information is based on a serving size of one average-sized chicken breast prepared using this recipe.
Servings: Approximately 4 servings
Calories Per Serving (Estimated): 250-350 calories
Approximate Macronutrient Breakdown Per Serving:
- Protein: 35-45 grams
- Fat: 10-15 grams (primarily from olive oil and chicken fat)
- Carbohydrates: 2-5 grams (primarily from lemon juice and herbs)
Key Nutritional Highlights:
- Excellent Source of Lean Protein: Chicken breast is renowned for being a high-quality source of lean protein, essential for muscle building, repair, and overall bodily functions.
- Relatively Low in Fat: When skinless and boneless, chicken breast is naturally low in fat, especially saturated fat. The added olive oil in this recipe contributes healthy monounsaturated fats.
- Good Source of Vitamins and Minerals: Chicken provides essential nutrients such as niacin, selenium, vitamin B6, and phosphorus.
- Versatile and Healthy Meal Option: This melt-in-your-mouth chicken breast is a versatile and healthy protein source that can be incorporated into a wide variety of balanced meals.
Disclaimer: These nutrition facts are estimates only and should be considered as a general guide. For precise nutritional information, you can use online nutrition calculators, inputting the specific brands and quantities of ingredients you use. Always consult with a registered dietitian or nutritionist for personalized dietary advice.
Preparation Time for Melt-In-Your-Mouth Chicken Breast
One of the many advantages of this recipe is its relatively quick preparation time, making it perfect for busy weeknights or when you need a delicious meal without spending hours in the kitchen. Here’s a breakdown of the estimated preparation time:
- Prep Time (Including Pounding, Marinade Preparation, and Marinating): 20-30 minutes (This includes 10-15 minutes of active prep and a minimum of 30 minutes for marinating, though longer marinating is recommended).
- Cook Time (Oven-Baking or Pan-Searing): 18-25 minutes (for oven-baking) or 10-15 minutes (for pan-searing). Actual cooking time will vary based on chicken breast thickness and cooking method.
- Rest Time: 5-10 minutes (Essential for juiciness, regardless of cooking method).
Total Time (Approximate): 45-65 minutes (including minimum marinating time)
Tips for Time Management:
- Marinate Ahead: You can prepare the marinade and marinate the chicken breasts in the morning or even the night before for even quicker dinner preparation. Just ensure the chicken is stored properly in the refrigerator.
- Prep Ingredients in Advance: Mince the garlic, measure out the herbs and spices, and squeeze the lemon juice ahead of time to streamline the active prep process.
- Choose Pan-Searing for Faster Cooking: If you are truly pressed for time, pan-searing is the faster cooking method compared to oven-baking.
This recipe is designed to be efficient without sacrificing flavor or quality, making it a go-to option for delicious and relatively quick meals.
How to Serve Your Exquisite Chicken Breast
The versatility of this melt-in-your-mouth chicken breast is truly remarkable. Its delicate flavor profile and tender texture make it a perfect centerpiece for countless meals. Whether you are looking for a simple weeknight dinner or an elegant dish for entertaining, here are some delightful ways to serve your chicken breast:
Classic Sides for a Balanced Meal:
- Roasted Vegetables: Pair your chicken with roasted vegetables like broccoli, asparagus, Brussels sprouts, carrots, or bell peppers. Roasting brings out the natural sweetness of vegetables and creates a healthy and flavorful side dish. Toss vegetables with olive oil, salt, pepper, and your favorite herbs before roasting.
- Mashed Potatoes or Sweet Potato Mash: Creamy mashed potatoes or a vibrant sweet potato mash provide a comforting and satisfying accompaniment to the chicken. Add garlic, herbs, or cheese to your mash for extra flavor.
- Rice or Quinoa: Serve your chicken with a bed of fluffy white rice, brown rice, or quinoa for a wholesome and gluten-free option. Consider adding herbs, lemon zest, or a drizzle of olive oil to the rice or quinoa for enhanced flavor.
- Steamed Green Beans or Asparagus: Simple steamed green beans or asparagus, lightly seasoned with salt, pepper, and a squeeze of lemon juice, offer a fresh and healthy side dish that complements the richness of the chicken.
- Salad: A crisp green salad with a light vinaigrette provides a refreshing contrast to the tender chicken. Add your favorite vegetables, nuts, seeds, or cheese to the salad for extra texture and flavor.
Sauces and Toppings to Elevate the Flavor:
- Lemon Butter Sauce: A classic lemon butter sauce, made with butter, lemon juice, garlic, and herbs, adds a luxurious and tangy element to the chicken.
- Mushroom Sauce: A creamy mushroom sauce, made with sautéed mushrooms, cream, garlic, and herbs, provides a rich and earthy flavor profile that pairs beautifully with chicken.
- Pesto: A vibrant pesto sauce, made with basil, pine nuts, Parmesan cheese, garlic, and olive oil, adds a fresh and herbaceous touch to the chicken.
- Salsa: A fresh salsa, made with tomatoes, onions, cilantro, jalapeños, and lime juice, offers a zesty and refreshing topping for the chicken, especially for a lighter, summery meal.
- Avocado Crema: A creamy avocado crema, made with avocado, sour cream or Greek yogurt, lime juice, and cilantro, adds a cool and refreshing element to the chicken.
Global Inspirations:
- Mediterranean Platter: Serve sliced chicken breast on a platter with hummus, pita bread, olives, feta cheese, cucumber, and tomatoes for a delicious Mediterranean-inspired meal.
- Chicken Caesar Salad: Slice the chicken breast and serve it atop a classic Caesar salad for a protein-packed and satisfying lunch or dinner.
- Chicken Tacos or Fajitas: Shred or slice the chicken breast and use it as a filling for tacos or fajitas, along with your favorite toppings like salsa, guacamole, sour cream, and shredded cheese.
- Chicken and Pasta: Toss sliced chicken breast with your favorite pasta, vegetables, and a light sauce (like pesto, marinara, or Alfredo) for a complete and comforting meal.
- Chicken Stir-Fry: Cut the chicken breast into bite-sized pieces and stir-fry it with your favorite vegetables and stir-fry sauce for a quick and healthy Asian-inspired dish.
These are just a few ideas to get you started. Feel free to get creative and experiment with different sides, sauces, and cuisines to discover your favorite ways to enjoy this incredibly versatile and melt-in-your-mouth chicken breast recipe.
Additional Tips for Chicken Breast Mastery
While this recipe is designed to be foolproof, incorporating a few extra tips and tricks can elevate your melt-in-your-mouth chicken breast to even greater heights of culinary perfection. Here are five additional tips to ensure consistently juicy, flavorful, and tender results every time:
- Brining for Extra Insurance: For even more insurance against dryness and to further enhance tenderness, consider a quick brine. Before marinating, dissolve ¼ cup of salt in 4 cups of water. Submerge the chicken breasts in the brine for 30 minutes to 1 hour. Brining helps the chicken retain moisture during cooking, resulting in exceptionally juicy meat. Remember to rinse the chicken thoroughly after brining and before marinating.
- Don’t Overcook! Use a Meat Thermometer: The most common mistake when cooking chicken breast is overcooking, which leads to dry and tough meat. Invest in a reliable meat thermometer and use it! The instant-read type is particularly helpful. Insert the thermometer into the thickest part of the chicken breast, ensuring you don’t touch the bone (if bone-in chicken is used, though this recipe is for boneless). Remove the chicken from the heat when it reaches an internal temperature of 165°F (74°C). Carryover cooking will continue to raise the temperature slightly as it rests.
- Rest is Your Best Friend: As mentioned earlier, resting the chicken after cooking is absolutely crucial for achieving maximum juiciness. Don’t be tempted to slice into the chicken immediately after it comes out of the oven or skillet. Allow it to rest for at least 5-10 minutes, loosely tented with foil. This resting period allows the juices to redistribute throughout the meat, preventing them from running out when you slice it.
- Experiment with Marinade Variations: While the lemon-herb marinade in this recipe is delicious, don’t be afraid to experiment with different flavor combinations to suit your taste preferences. Consider trying:
- Asian-Inspired: Soy sauce, ginger, garlic, sesame oil, rice vinegar.
- Spicy Southwestern: Chili powder, cumin, smoked paprika, oregano, lime juice.
- Mediterranean with a Twist: Sun-dried tomatoes, Kalamata olives, feta cheese, oregano, garlic.
- Honey-Garlic: Honey, soy sauce, garlic, ginger, red pepper flakes.
Get creative and tailor the marinade to complement your chosen sides and overall meal theme.
- Proper Storage for Leftovers: If you have leftover melt-in-your-mouth chicken breast (though it’s so good, there might not be!), store it properly to maintain its quality. Let the chicken cool completely, then store it in an airtight container in the refrigerator for up to 3-4 days. To reheat, gently warm it in the oven, skillet, or microwave, taking care not to overheat and dry it out. Adding a splash of chicken broth or water during reheating can help retain moisture. Leftover chicken breast is fantastic in salads, sandwiches, wraps, and soups.
By incorporating these additional tips into your cooking routine, you’ll be well-equipped to consistently create incredibly delicious and melt-in-your-mouth chicken breast that will be the envy of everyone at your table.
Frequently Asked Questions (FAQ) About Melt-In-Your-Mouth Chicken Breast
We understand that you might have some questions as you embark on your journey to create the perfect melt-in-your-mouth chicken breast. Here are answers to some frequently asked questions to help you achieve culinary success:
Q1: Can I use bone-in, skin-on chicken breasts for this recipe?
A: While this recipe is specifically designed for boneless, skinless chicken breasts for optimal tenderness and even cooking, you can adapt it for bone-in, skin-on chicken breasts. However, you will need to adjust the cooking time significantly, as bone-in chicken takes longer to cook. Also, skin-on chicken will be less receptive to the marinade, so you might want to marinate for a longer period. Ensure the internal temperature reaches 165°F (74°C) near the bone. Keep in mind that boneless, skinless breasts are generally preferred for achieving the “melt-in-your-mouth” texture.
Q2: What if I don’t have all the dried herbs listed? Can I substitute or omit some?
A: Absolutely! Recipes are guidelines, and flexibility is key in the kitchen. If you don’t have Italian seasoning or Herbs de Provence, you can use a combination of other dried herbs you have on hand, such as oregano, basil, thyme, rosemary, or marjoram. If you’re missing a particular herb, simply omit it or increase the amount of another herb you enjoy. The core flavors of garlic, lemon, and paprika will still shine through. Fresh herbs can also be used; use about 1 tablespoon of fresh herbs for every teaspoon of dried herbs.
Q3: Can I marinate the chicken for longer than 4 hours?
A: While marinating for longer than 4 hours is generally not recommended for lemon-juice based marinades (as the acid can start to break down the chicken protein excessively, potentially affecting texture), you can marinate for slightly longer, up to 6 hours, if needed. However, for optimal texture and flavor, sticking to a marinating time between 30 minutes and 4 hours is ideal. If you need to prep further in advance, you can prepare the marinade separately and add it to the chicken closer to cooking time.
Q4: My chicken breasts are very thick. Do I still pound them?
A: Yes, definitely! Pounding thick chicken breasts to an even ½-inch thickness is even more crucial when they are particularly thick. Thick breasts are prone to cooking unevenly, with the outside drying out before the inside is cooked through. Pounding ensures even thickness, promoting even cooking and preventing dryness. If your chicken breasts are exceptionally thick, you may even need to butterfly them (slice them horizontally almost all the way through and open them up like a book) before pounding to achieve an even thickness.
Q5: Can I grill these marinated chicken breasts instead of baking or pan-searing?
A: Yes, grilling is another excellent cooking method for these marinated chicken breasts! Preheat your grill to medium-high heat. Grill the chicken breasts for about 4-6 minutes per side, or until grill marks appear and the internal temperature reaches 165°F (74°C). Grilling will impart a lovely smoky flavor and char to the chicken. Be mindful of grill temperature and avoid overcooking. Rest the grilled chicken just as you would with baked or pan-seared chicken for optimal juiciness.
We hope these FAQs address any questions you may have. Don’t hesitate to experiment and adapt this recipe to your liking. The most important thing is to enjoy the process of cooking and savor the delicious results of your melt-in-your-mouth chicken breast creation!
Print
Melt In Your Mouth Chicken Breast Recipe
Ingredients
- Boneless, Skinless Chicken Breasts: The star of our show! Opt for high-quality chicken breasts, preferably air-chilled if available. The size of the breasts will impact cooking time, so aim for breasts that are roughly the same thickness for even cooking. Fresh chicken is always best for optimal flavor and texture, but properly thawed frozen chicken will also work beautifully. We recommend about 1 ½ to 2 pounds of chicken breast for a family of four, but adjust accordingly based on your needs and appetites.
- Olive Oil (Extra Virgin): Olive oil is the foundation of our flavor and moisture infusion. Extra virgin olive oil not only adds a rich, fruity flavor but also helps to tenderize the chicken and prevent it from drying out during cooking. Its healthy fats contribute to the overall juiciness and luxurious mouthfeel of the final dish. Don’t skimp on quality here – a good olive oil makes a noticeable difference.
- Lemon Juice (Freshly Squeezed): The bright, zesty acidity of fresh lemon juice is a game-changer for chicken. Lemon juice acts as a natural tenderizer, breaking down muscle fibers and ensuring a more succulent texture. It also brightens the overall flavor profile, cutting through the richness of the olive oil and adding a refreshing tang that complements the chicken beautifully. Avoid bottled lemon juice if possible, as fresh juice offers a far superior flavor.
- Garlic (Minced): Garlic is the aromatic backbone of countless savory dishes, and it’s no different here. Minced garlic infuses the chicken with a pungent, savory depth that is simply irresistible. Freshly minced garlic is always preferred for its robust flavor, but pre-minced garlic from a jar can be a convenient alternative in a pinch. Don’t be shy with the garlic – it really elevates the taste of the chicken.
- Dried Herbs (Italian Blend or Herbs de Provence): A blend of dried herbs adds layers of complex flavor to our chicken. Italian seasoning, with its combination of oregano, basil, rosemary, thyme, and marjoram, provides a classic Mediterranean profile. Herbs de Provence, a French blend featuring rosemary, thyme, savory, marjoram, oregano, and sometimes lavender, offers a slightly more floral and nuanced aroma. Either blend works wonderfully, so choose your favorite or what you have readily available. Dried herbs are perfect for this recipe as they infuse flavor slowly and steadily during cooking.
- Paprika (Smoked or Sweet): Paprika brings a touch of warmth and subtle smoky (if using smoked paprika) or sweet (if using sweet paprika) notes to the chicken. Smoked paprika, in particular, adds a delightful depth and complexity that mimics the flavor of grilling or roasting. Sweet paprika provides a milder, fruitier flavor and beautiful color. You can use either type, or even a combination, depending on your preference.
- Salt (Kosher or Sea Salt): Salt is essential for seasoning and enhancing the natural flavors of the chicken. Kosher salt and sea salt are preferred by many cooks for their clean, pure taste and larger crystals, which are easier to control when seasoning. Salt not only seasons the chicken but also helps to retain moisture, contributing to the melt-in-your-mouth texture.
- Black Pepper (Freshly Ground): Freshly ground black pepper adds a pungent, aromatic bite that complements the other flavors perfectly. The act of grinding pepper fresh releases volatile oils that contribute significantly to the overall taste. Pre-ground pepper tends to lose its potency over time, so freshly ground is always recommended for the best flavor.
- Optional: Onion Powder and Garlic Powder: For an extra layer of savory depth, you can add a touch of onion powder and garlic powder to the seasoning blend. These powdered spices provide a concentrated burst of flavor that enhances the overall taste of the chicken. Use them sparingly to complement the fresh garlic and herbs without overpowering them.
Instructions
Step 1: Prepare the Chicken Breasts
- Pounding for Even Thickness (Crucial for Even Cooking): Place your chicken breasts on a cutting board. If they are uneven in thickness (which they often are!), this is a critical step. Cover each breast with a piece of plastic wrap or place it inside a resealable plastic bag. Using a meat mallet or the bottom of a heavy skillet, gently pound the thicker parts of the chicken breast until it is uniformly about ½-inch thick throughout. This ensures that the chicken cooks evenly, preventing thin parts from drying out before the thicker parts are cooked through. Pounding also tenderizes the chicken, further contributing to the melt-in-your-mouth texture.
- Pat Dry with Paper Towels (Essential for Browning): After pounding, pat the chicken breasts thoroughly dry with paper towels. Removing excess moisture from the surface of the chicken is crucial for achieving a beautiful golden-brown sear or baked crust. Excess moisture will steam the chicken instead of allowing it to brown properly.
Step 2: Create the Flavorful Marinade (Infusion of Moisture and Taste)
- Combine Marinade Ingredients: In a medium-sized bowl, whisk together the olive oil, fresh lemon juice, minced garlic, dried herbs (Italian blend or Herbs de Provence), paprika (smoked or sweet), salt, and freshly ground black pepper (and optional onion powder and garlic powder, if using). Whisk vigorously to ensure all ingredients are well combined and emulsified. This marinade is a powerhouse of flavor and tenderizing agents.
- Marinate the Chicken (Flavor Penetration and Tenderization): Place the patted-dry chicken breasts in the bowl with the marinade. Use your hands or tongs to ensure that each chicken breast is thoroughly coated in the marinade, front and back. Massage the marinade into the chicken for a minute or two to help it penetrate the meat.
- Marinating Time (Optimal Flavor Development): Cover the bowl with plastic wrap or transfer the chicken and marinade to a resealable plastic bag. Marinate in the refrigerator for at least 30 minutes, and ideally for 1 to 4 hours. Longer marinating times allow for deeper flavor penetration and further tenderization. If you’re short on time, even 30 minutes will make a noticeable difference. Avoid marinating for longer than 4 hours, as the lemon juice can start to break down the chicken protein too much, potentially affecting the texture.
Step 3: Cooking the Chicken to Juicy Perfection (Choosing Your Method)
You have two excellent options for cooking your marinated chicken breasts to melt-in-your-mouth perfection: oven-baking and pan-searing. Both methods, when executed correctly, will yield incredibly juicy and flavorful chicken.
Option 1: Oven-Baking (Hands-Off and Even Cooking)
- Preheat Oven (Consistent Temperature is Key): Preheat your oven to 400°F (200°C). Ensure your oven is fully preheated before placing the chicken inside for consistent cooking temperature.
- Prepare Baking Dish (Prevent Sticking): Lightly grease a baking dish with olive oil or cooking spray. You can also line the dish with parchment paper for easier cleanup.
- Arrange Chicken in Baking Dish (Avoid Overcrowding): Place the marinated chicken breasts in the prepared baking dish in a single layer. Avoid overcrowding the dish, as this can lead to steaming rather than baking and uneven cooking. If necessary, use two baking dishes.
- Bake the Chicken (Time Varies by Thickness): Bake for 18-25 minutes, or until the internal temperature of the chicken reaches 165°F (74°C) using a meat thermometer inserted into the thickest part of the breast. Cooking time will vary depending on the thickness of your chicken breasts and your oven’s calibration. Start checking for doneness around 18 minutes and adjust time accordingly.
- Rest the Chicken (Lock in Juices): Once cooked through, remove the baking dish from the oven and let the chicken breasts rest for 5-10 minutes before slicing or serving. Resting allows the juices to redistribute throughout the chicken, resulting in a more tender and moist final product. Do not skip this crucial step!
Option 2: Pan-Searing (Golden Crust and Quick Cooking)
- Heat Skillet (Proper Heat for Searing): Heat a tablespoon of olive oil in a large skillet over medium-high heat. Use a skillet that is large enough to accommodate the chicken breasts in a single layer without overcrowding. Cast iron or stainless steel skillets work best for searing.
- Sear Chicken Breasts (Develop Flavor and Color): Once the skillet is hot and the oil is shimmering, carefully place the marinated chicken breasts in the skillet. Sear for 3-4 minutes per side, or until golden brown and nicely seared. Resist the urge to move the chicken around too much during searing – allow it to develop a good crust before flipping.
- Reduce Heat and Cook Through (Gentle Cooking to Prevent Drying): After searing both sides, reduce the heat to medium-low, cover the skillet with a lid, and continue cooking for another 5-8 minutes, or until the internal temperature reaches 165°F (74°C). Covering the skillet helps to trap heat and steam, ensuring the chicken cooks through without drying out.
- Rest the Chicken (Essential for Juiciness): Remove the chicken from the skillet and let it rest for 5-10 minutes before slicing or serving. Resting is just as important for pan-seared chicken as it is for baked chicken to ensure maximum juiciness.
Step 4: Serve and Enjoy! (The Delicious Reward)
Once your chicken breasts are cooked to perfection and rested, they are ready to be served and enjoyed! The possibilities are endless. Refer to the “How to Serve” section below for a plethora of serving suggestions.
Nutrition
- Serving Size: one normal portion
- Calories: 250-350
- Fat: 10-15 grams
- Carbohydrates: 2-5 grams
- Protein: 35-45 grams