


There’s something truly magical about the aroma of a cherry pie baking in the oven. It fills the house with a sweet, fruity scent that instantly evokes feelings of warmth, home, and happy memories. For my family, cherry pie isn’t just dessert; it’s a tradition. From summer picnics to cozy winter evenings, a slice of warm cherry pie has been the centerpiece of countless gatherings. Over the years, I’ve tweaked and perfected this recipe, and let me tell you, the result is simply divine. The flaky, buttery crust gives way to a luscious, tangy-sweet cherry filling that bursts with flavor in every bite. It’s the kind of pie that disappears quickly, leaving behind only satisfied smiles and requests for seconds (and sometimes thirds!). This isn’t just a cherry pie recipe; it’s the cherry pie recipe that will become a cherished part of your own family traditions. Get ready to experience pie perfection!
Ingredients: The Heart of a Perfect Cherry Pie
The quality of your ingredients is paramount when it comes to baking a truly exceptional cherry pie. Using fresh, high-quality cherries, along with good butter and flour, makes all the difference. Here’s what you’ll need to create this masterpiece:
- For the Crust:
- 2 ½ cups all-purpose flour, unbleached is preferred for a slightly tender crust.
- 1 teaspoon salt, kosher salt is recommended for its pure flavor.
- 1 cup (2 sticks) unsalted butter, very cold, cut into small cubes. Using cold butter is crucial for creating flaky layers.
- ½ cup ice water, plus more if needed, added gradually to bring the dough together.
- 1 tablespoon apple cider vinegar (optional, but helps tenderize the crust).
- For the Filling:
- 6 cups fresh cherries, pitted and stemmed. You can use sweet cherries like Bing or Rainier, or a mix for a more complex flavor. Frozen cherries (thawed and drained) can also be used when fresh are not in season.
- ¾ cup granulated sugar, adjust to taste depending on the sweetness of your cherries.
- ¼ cup cornstarch, for thickening the cherry juices.
- ¼ cup fresh lemon juice, brightens the cherry flavor and balances the sweetness.
- ½ teaspoon almond extract (optional, but enhances the cherry flavor beautifully).
- ¼ teaspoon salt, to balance the sweetness and enhance flavors.
- 2 tablespoons unsalted butter, cut into small pieces, dotted over the filling before topping with the crust.
- 1 large egg, beaten with 1 tablespoon of water (for egg wash, optional, for a golden crust).
- Turbinado sugar or coarse sugar (for sprinkling on top, optional, for added texture and sparkle).
Ingredient Notes for Baking Brilliance:
- Flour Power: All-purpose flour is the standard choice for pie crusts, offering a good balance of gluten development for structure and tenderness. Unbleached flour is often preferred by bakers for its slightly less processed nature and subtle flavor difference.
- Butter is Better (Cold!): Cold butter is the secret weapon for a flaky pie crust. As the cold butter melts in the oven, it releases steam, creating pockets of air that result in those desirable layers of flakiness. Make sure your butter is thoroughly chilled before you begin.
- Water Works Wonders (Ice Cold!): Just like the butter, ice water helps keep the dough cold, which is essential for flakiness. Add the water gradually, as too much can make the dough tough, and too little will make it crumbly.
- Cherry Choices: Fresh cherries are ideal when in season, offering the best flavor and texture. If using frozen cherries, be sure to thaw them completely and drain off any excess juice before using them in the filling. This will prevent a soggy pie. You can use a mix of sweet and tart cherries for a more nuanced flavor profile.
- Sugar Sensibility: The amount of sugar can be adjusted based on your preference and the sweetness of the cherries you are using. Taste a cherry before you begin and adjust accordingly.
- Lemon Zest and Juice: Fresh lemon juice adds a crucial touch of acidity that balances the sweetness of the cherries and brightens the overall flavor. You can also add a teaspoon of lemon zest for an extra layer of citrusy aroma and flavor.
- Almond Extract’s Secret: Almond extract is a wonderful complement to cherry flavor, enhancing its natural sweetness and adding a subtle depth. A little goes a long way, so be mindful of the measurement.
- Egg Wash Elegance: An egg wash is an optional step, but it creates a beautiful golden-brown crust with a lovely sheen. The egg wash also helps to seal the crust, preventing it from becoming soggy.
- Sugar Sprinkles: A sprinkle of coarse sugar, like turbinado sugar, before baking adds a delightful crunch and sparkle to the top crust. It’s a simple touch that elevates the presentation and texture of the pie.
Instructions: Crafting Your Cherry Pie Masterpiece Step-by-Step
Baking a cherry pie might seem daunting, but with these clear, step-by-step instructions, you’ll find it’s a rewarding and enjoyable process. Take your time, follow each step carefully, and you’ll be rewarded with a pie that’s both beautiful and delicious.
Step 1: Prepare the Pie Crust (The Foundation of Flavor)
- Combine Dry Ingredients: In a large bowl, whisk together the flour and salt. This ensures the salt is evenly distributed throughout the dough.
- Incorporate Cold Butter: Add the cold, cubed butter to the flour mixture. Using a pastry blender or your fingertips, cut the butter into the flour until the mixture resembles coarse crumbs with some pea-sized pieces of butter remaining. This step is crucial for flakiness. The goal is to keep the butter cold and not overwork the dough.
- Add Ice Water and Vinegar (Optional): Gradually add the ice water, one tablespoon at a time, mixing gently after each addition. If using apple cider vinegar, add it with the first addition of water. Mix until the dough just comes together and is no longer dry. Be careful not to overmix; overmixing develops gluten, which can result in a tough crust. The dough should be slightly shaggy but hold together when pinched.
- Form Dough Discs: Divide the dough in half and shape each half into a disc. Wrap each disc tightly in plastic wrap and refrigerate for at least 1 hour, or up to 2 days. This chilling time is essential as it allows the gluten to relax and the butter to firm up, making the dough easier to roll out and preventing shrinkage during baking.
Step 2: Prepare the Cherry Filling (The Sweet and Tangy Heart)
- Prepare the Cherries: If using fresh cherries, pit and stem them. If using frozen cherries, thaw them completely and drain off any excess juice.
- Combine Filling Ingredients: In a large bowl, gently toss together the cherries, granulated sugar, cornstarch, lemon juice, almond extract (if using), and salt. Ensure the cornstarch is evenly distributed to prevent clumps.
- Let Filling Rest (Optional but Recommended): Allow the cherry filling to sit for about 15-20 minutes. This allows the sugar to draw out some of the juices from the cherries, which will then be thickened by the cornstarch during baking, creating a luscious filling.
Step 3: Assemble and Bake the Pie (Bringing it All Together)
- Preheat Oven and Prepare Pie Plate: Preheat your oven to 400°F (200°C). Place a baking sheet on the lower rack of the oven to catch any potential drips from the pie filling. This will save you from cleaning up a sticky mess later.
- Roll Out Bottom Crust: On a lightly floured surface, roll out one disc of pie dough into a 12-inch circle, about ⅛-inch thick. Gently transfer the dough to a 9-inch pie plate. Trim the edges of the dough, leaving about a ½-inch overhang. Crimp the edges of the bottom crust as desired. You can use a fork to prick the bottom crust several times; this is called “docking” and helps prevent the crust from puffing up too much during baking.
- Add Cherry Filling: Pour the prepared cherry filling into the pie crust, spreading it evenly. Dot the top of the filling with the 2 tablespoons of butter, cut into small pieces. This adds richness and flavor to the filling.
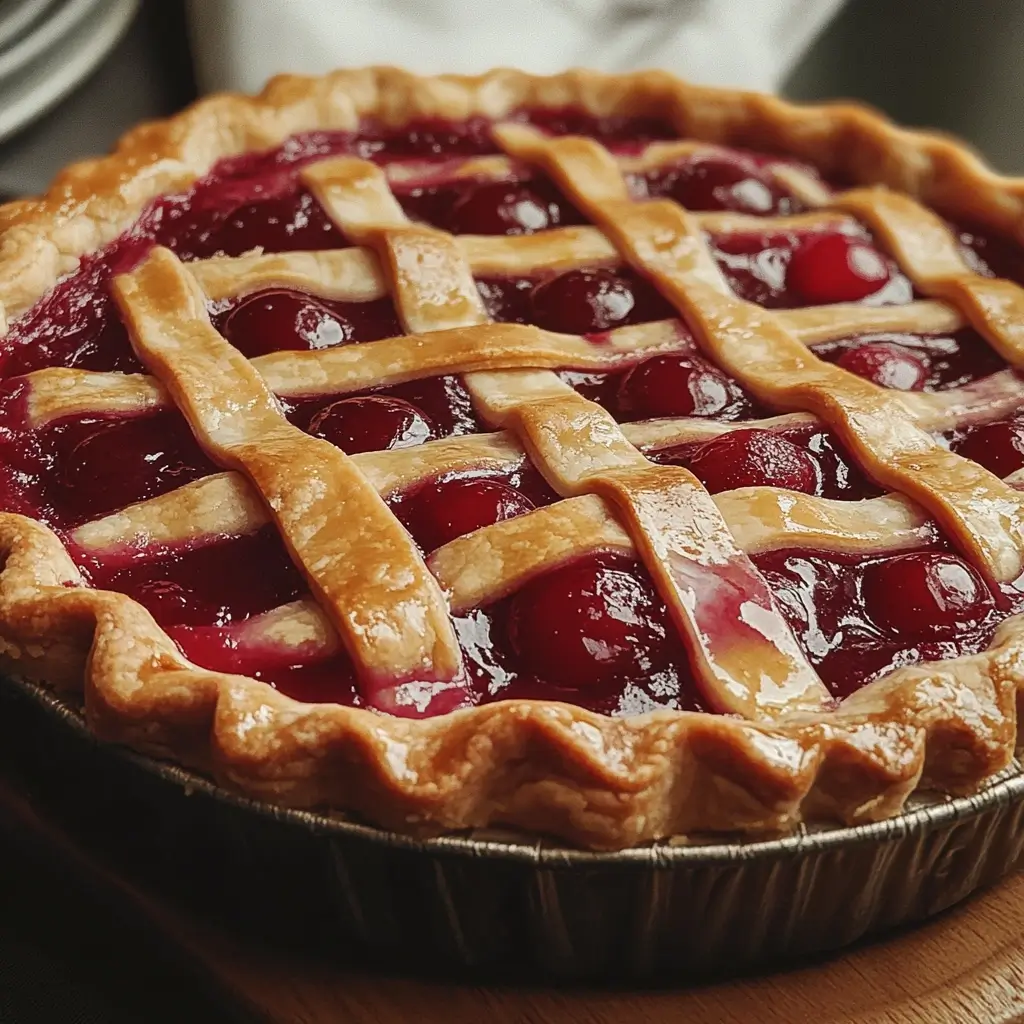
- Roll Out Top Crust: Roll out the second disc of pie dough into another 12-inch circle. Gently place it over the cherry filling. Trim the edges and crimp them together with the bottom crust to seal the pie. Ensure there are no gaps in the seal.
- Cut Vents: Cut several vents in the top crust using a sharp knife or decorative cutters. These vents allow steam to escape during baking, preventing the crust from cracking and ensuring the filling cooks properly.
- Egg Wash and Sugar (Optional): If desired, brush the top crust with the egg wash (beaten egg and water mixture) for a golden-brown finish. Sprinkle with turbinado sugar or coarse sugar for added texture and sparkle.
- Bake the Pie: Bake in the preheated oven for 15 minutes at 400°F (200°C). Then, reduce the oven temperature to 375°F (190°C) and bake for an additional 40-50 minutes, or until the crust is golden brown and the filling is bubbly. If the crust starts to brown too quickly, you can loosely tent the pie with aluminum foil for the last 15-20 minutes of baking.
- Cool Completely: Remove the pie from the oven and let it cool completely on a wire rack for at least 2-3 hours before slicing and serving. This cooling time is crucial as it allows the filling to thicken properly and set, preventing a runny pie. Resist the temptation to cut into it while it’s still hot, as the filling will be too liquid.
Nutrition Facts: A Treat to Enjoy in Moderation
While cherry pie is undeniably delicious, it’s also a dessert best enjoyed in moderation as part of a balanced diet. Here’s an approximate nutritional breakdown per serving:
- Servings: 8 slices per pie (This recipe is designed for a standard 9-inch pie, typically yielding 8 servings).
- Calories per serving (approximate): 350-450 calories (This is an estimate and can vary based on specific ingredients and serving size. Homemade pies tend to have slightly lower calorie counts than commercially prepared pies, which often contain more added sugars and fats).
Important Note: These are estimations and can vary. Factors like the type of cherries, amount of sugar, thickness of the crust, and serving size will all influence the final nutritional content. For more precise nutritional information, you can use online recipe analyzers or nutrition calculators, inputting the exact ingredients and quantities you used.
Preparation Time: Planning for Pie Perfection
Making a homemade cherry pie takes a little time, but the delicious results are well worth the effort. Here’s a breakdown of the estimated preparation time:
- Prep Time: Approximately 45-60 minutes (This includes making the pie crust, preparing the cherry filling, and assembling the pie). This time can be reduced if you make the pie crust ahead of time.
- Chill Time: Minimum 1 hour for the pie crust (This is essential for the crust to be flaky and easy to work with).
- Bake Time: Approximately 55-65 minutes (This includes the initial high-heat bake and the subsequent lower-temperature bake).
- Cooling Time: Minimum 2-3 hours (Crucial for the filling to set properly).
- Total Time (from start to slice): Approximately 4 hours to 5 hours (including chilling and cooling time). However, active hands-on time is significantly less, around 1.5-2 hours.
Tips for Time Management:
- Make the Pie Crust Ahead: The pie crust dough can be made up to 2 days in advance and stored in the refrigerator, or even frozen for longer storage. This breaks up the workload and makes pie baking more manageable.
- Use Frozen Cherries (Out of Season): Using frozen cherries (thawed and drained) can save you the time of pitting fresh cherries, especially if you’re making a large pie.
- Prep Ingredients in Advance: Measure out all your ingredients before you start baking. This Mise en Place (French for “everything in its place”) technique streamlines the process and makes baking more efficient.
How to Serve: Elevating Your Cherry Pie Experience
Cherry pie is delightful on its own, but pairing it with the right accompaniments can elevate the dessert experience to a whole new level. Here are some delicious ways to serve your homemade cherry pie:
- Classic à la Mode: A scoop of vanilla ice cream melting over a warm slice of cherry pie is a timeless and irresistible combination. The cold, creamy ice cream perfectly complements the warm, sweet pie.
- Whipped Cream Dream: A dollop of freshly whipped cream adds a light, airy sweetness and enhances the richness of the pie. You can also flavor your whipped cream with a touch of vanilla extract or almond extract for extra complexity.
- Cheddar Cheese Companion: In some regions, especially in the Midwest and New England, cherry pie is traditionally served with a slice of sharp cheddar cheese. The salty, savory cheese provides a surprising and delightful contrast to the sweet cherry filling.
- Warm Custard Comfort: A creamy vanilla custard or crème anglaise drizzled over warm cherry pie adds a luxurious touch and enhances the overall richness and flavor.
- Simple and Sweet: Enjoy it plain! Sometimes, the pure, unadulterated flavor of a perfectly baked cherry pie is all you need. Serve it warm or at room temperature, and savor every bite.
- Beverage Pairings:
- Coffee or Tea: A classic pairing that complements the sweetness of the pie.
- Sweet Wine: A dessert wine like Moscato or Riesling can enhance the fruity notes of the cherry pie.
- Milk: A glass of cold milk is a comforting and satisfying pairing, especially for children (and adults who are kids at heart!).
- Sparkling Cider: For a festive touch, serve with sparkling cider or non-alcoholic sparkling wine.
Additional Tips for Cherry Pie Perfection
Baking the perfect cherry pie is a journey of learning and refinement. Here are five additional tips to help you achieve pie perfection every time:
- Keep Everything Cold: This cannot be stressed enough for pie crust success. Cold butter, cold water, and cold dough are crucial for creating flaky layers. If your kitchen is warm, consider chilling your flour and mixing bowl as well.
- Don’t Overwork the Dough: Overmixing pie dough develops gluten, resulting in a tough crust. Mix just until the dough comes together, and then let chilling do its work. Gentle handling is key.
- Blind Bake for a Crisper Bottom Crust (Optional): If you prefer a very crisp bottom crust, you can blind bake it before adding the filling. To blind bake, line the pie crust with parchment paper or foil, fill it with pie weights or dried beans, and bake at 375°F (190°C) for 15-20 minutes. Remove the weights and paper and bake for another 5-10 minutes until lightly golden. Let cool slightly before adding the filling.
- Thicken the Filling Just Right: Cornstarch is used in this recipe to thicken the cherry filling. Too much cornstarch can make the filling gummy, while too little can result in a runny pie. The amount specified in the recipe should provide a nicely thickened filling when cooled. You can also use tapioca starch as an alternative thickener.
- Let the Pie Cool Completely Before Slicing: Patience is a virtue when it comes to pie baking. Resist the urge to slice into the pie while it’s still hot. Cooling for at least 2-3 hours allows the filling to set properly, resulting in clean slices and a less messy pie.
FAQ: Your Cherry Pie Questions Answered
Here are answers to some frequently asked questions about making cherry pie, to help you troubleshoot and bake with confidence:
Q1: Can I use canned cherry pie filling instead of making my own?
A: While you can use canned cherry pie filling for convenience, the flavor and texture will be significantly different from homemade filling. Homemade filling allows you to control the sweetness, flavor, and quality of ingredients. For the best cherry pie experience, homemade filling is highly recommended. However, if you are short on time, using canned filling is an option.
Q2: My pie crust always shrinks when baking. How can I prevent this?
A: Pie crust shrinkage is a common issue. Here are a few tips to minimize it:
* Chill the Dough Thoroughly: Chilling relaxes the gluten and firms up the butter, reducing shrinkage.
* Don’t Stretch the Dough: When placing the dough in the pie plate, gently ease it in without stretching it. Stretching makes the dough want to spring back during baking.
* Let the Assembled Pie Chill: Chilling the assembled pie (with filling in the crust) for 15-20 minutes before baking can also help reduce shrinkage.
* Use Pie Weights During Blind Baking (If Blind Baking): Pie weights prevent the crust from puffing up and shrinking during the initial blind bake.
Q3: My cherry pie filling is always runny. What am I doing wrong?
A: A runny cherry pie filling can be due to a few reasons:
* Not Enough Thickener: Ensure you are using the correct amount of cornstarch (or other thickener) as specified in the recipe.
* Using Too Much Juice from Frozen Cherries: If using frozen cherries, make sure to thaw them completely and drain off excess juice before using them in the filling.
* Not Baking Long Enough: Ensure the pie is baked long enough for the filling to bubble and the cornstarch to activate fully. The filling will thicken further as it cools.
* Cutting into the Pie Too Soon: As mentioned earlier, cooling the pie completely is crucial for the filling to set properly.
Q4: Can I freeze cherry pie?
A: Yes, cherry pie freezes beautifully! You can freeze either baked or unbaked cherry pie.
* To Freeze Baked Pie: Let the baked pie cool completely. Wrap it tightly in plastic wrap, then in aluminum foil. Freeze for up to 3 months. To reheat, bake from frozen in a preheated oven at 350°F (175°C) for about 45-60 minutes, or until heated through.
* To Freeze Unbaked Pie: Assemble the pie (crust and filling) in a freezer-safe pie plate. Wrap tightly in plastic wrap, then in aluminum foil. Freeze for up to 3 months. To bake, do not thaw. Bake from frozen in a preheated oven at 400°F (200°C) for 20 minutes, then reduce heat to 375°F (190°C) and bake for another 60-75 minutes, or until crust is golden brown and filling is bubbly. You may need to tent the edges of the crust with foil to prevent over-browning.
Q5: Can I use a different fruit for this pie recipe?
A: Yes, while this recipe is specifically for cherry pie, the crust recipe is versatile and can be used for other fruit pies. For other fillings, you’ll need to adjust the sugar and thickener amounts depending on the fruit’s sweetness and juice content. For example, for apple pie, you might need less sugar and a slightly different spice blend. For berry pies, you might need to increase the thickener slightly due to their higher water content. Explore and enjoy experimenting with different fruit fillings!
Enjoy the process of baking this delightful cherry pie, and savor every delicious slice! It’s a dessert that’s sure to bring joy and warmth to any occasion.
Print
Homemade Cherry Pie Recipe
Ingredients
- For the Crust:
- 2 ½ cups all-purpose flour, unbleached is preferred for a slightly tender crust.
- 1 teaspoon salt, kosher salt is recommended for its pure flavor.
- 1 cup (2 sticks) unsalted butter, very cold, cut into small cubes. Using cold butter is crucial for creating flaky layers.
- ½ cup ice water, plus more if needed, added gradually to bring the dough together.
- 1 tablespoon apple cider vinegar (optional, but helps tenderize the crust).
- For the Filling:
- 6 cups fresh cherries, pitted and stemmed. You can use sweet cherries like Bing or Rainier, or a mix for a more complex flavor. Frozen cherries (thawed and drained) can also be used when fresh are not in season.
- ¾ cup granulated sugar, adjust to taste depending on the sweetness of your cherries.
- ¼ cup cornstarch, for thickening the cherry juices.
- ¼ cup fresh lemon juice, brightens the cherry flavor and balances the sweetness.
- ½ teaspoon almond extract (optional, but enhances the cherry flavor beautifully).
- ¼ teaspoon salt, to balance the sweetness and enhance flavors.
- 2 tablespoons unsalted butter, cut into small pieces, dotted over the filling before topping with the crust.
- 1 large egg, beaten with 1 tablespoon of water (for egg wash, optional, for a golden crust).
- Turbinado sugar or coarse sugar (for sprinkling on top, optional, for added texture and sparkle).
Instructions
Step 1: Prepare the Pie Crust (The Foundation of Flavor)
- Combine Dry Ingredients: In a large bowl, whisk together the flour and salt. This ensures the salt is evenly distributed throughout the dough.
- Incorporate Cold Butter: Add the cold, cubed butter to the flour mixture. Using a pastry blender or your fingertips, cut the butter into the flour until the mixture resembles coarse crumbs with some pea-sized pieces of butter remaining. This step is crucial for flakiness. The goal is to keep the butter cold and not overwork the dough.
- Add Ice Water and Vinegar (Optional): Gradually add the ice water, one tablespoon at a time, mixing gently after each addition. If using apple cider vinegar, add it with the first addition of water. Mix until the dough just comes together and is no longer dry. Be careful not to overmix; overmixing develops gluten, which can result in a tough crust. The dough should be slightly shaggy but hold together when pinched.
- Form Dough Discs: Divide the dough in half and shape each half into a disc. Wrap each disc tightly in plastic wrap and refrigerate for at least 1 hour, or up to 2 days. This chilling time is essential as it allows the gluten to relax and the butter to firm up, making the dough easier to roll out and preventing shrinkage during baking.
Step 2: Prepare the Cherry Filling (The Sweet and Tangy Heart)
- Prepare the Cherries: If using fresh cherries, pit and stem them. If using frozen cherries, thaw them completely and drain off any excess juice.
- Combine Filling Ingredients: In a large bowl, gently toss together the cherries, granulated sugar, cornstarch, lemon juice, almond extract (if using), and salt. Ensure the cornstarch is evenly distributed to prevent clumps.
- Let Filling Rest (Optional but Recommended): Allow the cherry filling to sit for about 15-20 minutes. This allows the sugar to draw out some of the juices from the cherries, which will then be thickened by the cornstarch during baking, creating a luscious filling.
Step 3: Assemble and Bake the Pie (Bringing it All Together)
- Preheat Oven and Prepare Pie Plate: Preheat your oven to 400°F (200°C). Place a baking sheet on the lower rack of the oven to catch any potential drips from the pie filling. This will save you from cleaning up a sticky mess later.
- Roll Out Bottom Crust: On a lightly floured surface, roll out one disc of pie dough into a 12-inch circle, about ⅛-inch thick. Gently transfer the dough to a 9-inch pie plate. Trim the edges of the dough, leaving about a ½-inch overhang. Crimp the edges of the bottom crust as desired. You can use a fork to prick the bottom crust several times; this is called “docking” and helps prevent the crust from puffing up too much during baking.
- Add Cherry Filling: Pour the prepared cherry filling into the pie crust, spreading it evenly. Dot the top of the filling with the 2 tablespoons of butter, cut into small pieces. This adds richness and flavor to the filling.
- Roll Out Top Crust: Roll out the second disc of pie dough into another 12-inch circle. Gently place it over the cherry filling. Trim the edges and crimp them together with the bottom crust to seal the pie. Ensure there are no gaps in the seal.
- Cut Vents: Cut several vents in the top crust using a sharp knife or decorative cutters. These vents allow steam to escape during baking, preventing the crust from cracking and ensuring the filling cooks properly.
- Egg Wash and Sugar (Optional): If desired, brush the top crust with the egg wash (beaten egg and water mixture) for a golden-brown finish. Sprinkle with turbinado sugar or coarse sugar for added texture and sparkle.
- Bake the Pie: Bake in the preheated oven for 15 minutes at 400°F (200°C). Then, reduce the oven temperature to 375°F (190°C) and bake for an additional 40-50 minutes, or until the crust is golden brown and the filling is bubbly. If the crust starts to brown too quickly, you can loosely tent the pie with aluminum foil for the last 15-20 minutes of baking.
- Cool Completely: Remove the pie from the oven and let it cool completely on a wire rack for at least 2-3 hours before slicing and serving. This cooling time is crucial as it allows the filling to thicken properly and set, preventing a runny pie. Resist the temptation to cut into it while it’s still hot, as the filling will be too liquid.
Nutrition
- Serving Size: one normal portion
- Calories: 350-450


