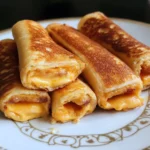
Let me tell you, these Grilled Cheese Roll Ups have become an absolute sensation in our household. The first time I whipped them up, it was on a whim – I was looking for a fun twist on the classic grilled cheese, something that would excite the kids and still satisfy the adults. The moment they hit the pan, sizzling in that golden butter, the aroma alone had everyone migrating to the kitchen. And the reveal? Pure magic. The kids were fascinated by the dippable, roll-up shape, and my partner, a self-proclaimed grilled cheese purist, was instantly converted. That satisfying crunch as you bite through the buttery, toasted bread, followed by the ooey-gooey river of melted cheese – it’s a textural and flavorful masterpiece. They’re incredibly easy to make, surprisingly quick, and the perfect vehicle for dunking into a warm bowl of tomato soup. We’ve since made them for quick lunches, after-school snacks, and even as fun appetizers when friends are over. They disappear almost as fast as I can make them, and the chorus of “Can we have more?” is a testament to their simple brilliance. Trust me, this isn’t just another recipe; it’s a memory-maker.
Ingredients
To create these delightful Grilled Cheese Roll Ups, you’ll need a few simple, high-quality ingredients. The beauty of this recipe lies in its simplicity, but using good ingredients will elevate the final product from good to absolutely irresistible. Below are the recommended amounts, typically yielding about 8-10 roll-ups, perfect for a small family snack or a hearty lunch for two.
- Bread: 8-10 slices of soft white sandwich bread (crusts removed). The softer and fresher the bread, the easier it will be to flatten and roll without tearing. Wonder Bread or similar generic white bread works exceptionally well due to its pliability. Whole wheat can be used, but ensure it’s a soft variety.
- Cheese: 8-10 slices of your favorite melting cheese. Classic choices include:
- Cheddar Cheese: Provides a sharp, tangy flavor. Medium or sharp cheddar works beautifully.
- American Cheese: The ultimate melter, offering a creamy, classic grilled cheese taste.
- Monterey Jack: Mild, buttery, and melts exceptionally well.
- Colby Jack: A delightful swirl of Colby and Monterey Jack, offering mild flavor and great meltability.
- Provolone: Offers a slightly more complex, mild, and smoky flavor with excellent stretch.
- You can also use shredded cheese, but slices tend to be neater for rolling. If using shredded, don’t overfill.
- Butter: 4-5 tablespoons of unsalted butter, softened to room temperature or melted. Salted butter can also be used; if so, you might want to omit any additional salt when seasoning. The butter is crucial for achieving that golden-brown, crispy exterior.
- Optional Seasonings (for the butter or cheese):
- Garlic Powder: 1/4 teaspoon mixed into the softened butter adds a lovely aromatic touch.
- Paprika: A pinch on the cheese before rolling can add a hint of color and smoky flavor.
- Dried Italian Herbs: A small sprinkle over the cheese can add a Mediterranean flair.
Choosing the right bread and cheese is paramount. The bread needs to be compliant enough to be flattened very thinly without cracking or falling apart. Stale or overly crusty bread will not work well. For the cheese, pre-sliced varieties are convenient and ensure even thickness. If you’re slicing your own from a block, aim for slices that are about 1/8 inch thick. Too thick, and it might be hard to roll or could ooze out excessively. Too thin, and you won’t get that satisfying cheese pull.
Instructions
Follow these step-by-step instructions to create perfectly golden, crispy, and cheesy Grilled Cheese Roll Ups. The process is straightforward, but a little care at each stage ensures the best results.
- Prepare the Bread:
- Carefully cut off the crusts from each slice of bread using a sharp knife. Removing the crusts makes the bread much easier to flatten and roll, and results in a more tender roll-up.
- Place one slice of crustless bread on a clean, flat surface. Using a rolling pin, firmly but gently roll the bread as thinly as possible, almost like a tortilla. Aim for a thickness of about 1/16 to 1/8 inch. Roll in multiple directions to ensure it’s evenly flattened. Repeat with all slices of bread. This step is crucial; if the bread isn’t thin enough, it will be difficult to roll tightly and may unroll during cooking.
- Add the Cheese:
- Take one slice of your chosen cheese. If your cheese slices are the same size as the bread, you might want to trim them slightly so they don’t extend beyond the edges of the flattened bread once rolled. This helps prevent excessive cheese leakage during cooking.
- Place the cheese slice (or a neat line of shredded cheese) along one edge of the flattened bread, leaving a small border (about 1/4 inch) on the sides. If using optional seasonings like paprika or herbs, sprinkle them over the cheese now.
- Roll ‘Em Up:
- Starting from the edge with the cheese, tightly roll the bread up into a compact cylinder. The tighter the roll, the better it will hold its shape. The moisture from the bread and the pressure should help it seal, but if it seems to be unrolling, you can pinch the seam gently or place it seam-down while you prepare the others.
- Butter the Rolls (Two Methods):
- Method 1 (Brush with Melted Butter): Melt the butter in a small bowl. Using a pastry brush, lightly brush the entire exterior of each roll-up with melted butter. This ensures an even coating.
- Method 2 (Spread Softened Butter): If using softened butter, gently spread a thin, even layer over the entire surface of each roll-up. This can be a bit more delicate but works just as well.
- Grill to Perfection:
- Heat a large non-stick skillet, griddle, or frying pan over medium-low to medium heat. It’s important not to have the heat too high, as the bread can burn before the cheese has a chance to melt thoroughly.
- Carefully place the buttered roll-ups seam-side down in the preheated skillet. You may need to cook them in batches to avoid overcrowding the pan, which can lower the temperature and result in less crispy roll-ups.
- Cook for 2-4 minutes on the first side, or until golden brown and crispy.
- Using tongs, carefully turn the roll-ups to cook on another side. Continue to cook and turn, approximately 1-2 minutes per “side,” until all sides are golden brown and crispy, and the cheese inside is fully melted and gooey. This usually takes a total of 5-8 minutes. You’ll notice some cheese might start to ooze out – this is perfectly fine and often creates delicious, crispy cheese bits on the outside!
- Serve Immediately:
- Once cooked, remove the Grilled Cheese Roll Ups from the skillet and place them on a serving plate.
- It’s best to serve them immediately while they are hot, the bread is crispy, and the cheese is at its meltiest.
Patience during the grilling process is key. Resisting the urge to crank up the heat will reward you with evenly cooked, perfectly golden roll-ups rather than burnt exteriors with unmelted cheese centers.
Nutrition Facts
- Servings: This recipe, using 8 slices of bread and cheese, typically makes 8 roll-ups.
- Serving Size: 2 roll-ups per person is a common serving size for a snack or light lunch.
- Calories per serving (approximately 2 roll-ups): 350-450 calories.
Important Disclaimer: The nutritional information provided is an estimate and can vary significantly based on several factors:
* Type and brand of bread: Whole wheat bread will have different nutritional values than white bread. Calorie counts per slice vary by brand.
* Type and amount of cheese: Different cheeses (cheddar, provolone, American) have varying fat and calorie contents. The thickness of the slices also matters.
* Amount of butter used: The more butter, the higher the fat and calorie content.
* Serving size: Adjust calculations if your serving size differs.
A rough breakdown for a serving of two roll-ups using standard white bread, cheddar cheese slices, and a moderate amount of butter might look something like this:
* Fat: 20-28g
* Saturated Fat: 10-15g
* Cholesterol: 50-70mg
* Sodium: 600-800mg (can be higher with salted butter and certain cheeses)
* Carbohydrates: 25-35g
* Fiber: 1-2g
* Sugar: 3-5g
* Protein: 12-18g
For a more precise calculation, it’s recommended to use an online nutrition calculator and input the specific brands and quantities of ingredients you use. To make a lighter version, you could consider using light bread, reduced-fat cheese, and a minimal amount of butter or a light cooking spray, though this will alter the classic taste and texture.
Preparation Time
The beauty of Grilled Cheese Roll Ups lies not only in their deliciousness but also in their quick preparation and cooking time, making them an ideal choice for a speedy meal or snack.
- Preparation Time (Prep Time): 10-15 minutes
- This includes gathering ingredients, removing crusts from the bread, flattening each slice with a rolling pin, adding the cheese, and rolling them up. If you’re quick with a rolling pin, you might even do this in under 10 minutes. Working with very fresh, soft bread can speed up the flattening process.
- Cooking Time (Cook Time): 5-8 minutes per batch
- This is the time the roll-ups spend in the skillet, getting golden brown and melty. If you have a large griddle and can cook all roll-ups at once, this will be the total cooking time. If cooking in two batches, it might take 10-16 minutes. The key is medium-low heat to ensure the cheese melts thoroughly without burning the bread.
- Total Time: Approximately 15-25 minutes
- From start to finish, you can have these delightful treats ready to eat in well under half an hour. This makes them perfect for busy weekdays, impatient kids, or when a sudden craving for comfort food strikes.
The efficiency of this recipe is one of its major selling points. There’s no lengthy marinating, chopping, or complex assembly. It’s about transforming simple pantry staples into something fun and exciting with minimal effort.
How to Serve
Grilled Cheese Roll Ups are wonderfully versatile and can be served in various fun and appealing ways. Their dippable nature makes them particularly engaging. Here are some serving suggestions:
- Classic Comfort Combo:
- Serve hot alongside a warm bowl of creamy tomato soup. This is the quintessential pairing, with the tangy soup perfectly complementing the rich, cheesy roll-ups. Dipping is mandatory!
- A small side of pickle spears or cornichons adds a lovely acidic crunch.
- Kid-Friendly Snack Attack:
- Offer a variety of dipping sauces on the side. Popular choices include:
- Ketchup
- Ranch dressing
- Marinara sauce (especially if you add a little Italian seasoning to the cheese)
- Honey mustard
- Arrange them on a platter for an easy-to-grab after-school snack.
- Cut them in half crosswise to make even smaller, bite-sized pieces for younger children.
- Offer a variety of dipping sauces on the side. Popular choices include:
- Appetizer Style:
- Arrange the roll-ups neatly on a platter, perhaps standing them up in a small glass or bowl for a more dynamic presentation.
- Garnish with a sprinkle of fresh parsley or chives for a pop of color.
- Serve with more sophisticated dips like a spicy aioli, a pesto-yogurt dip, or a roasted red pepper dip.
- Light Lunch Option:
- Pair with a fresh green salad dressed with a light vinaigrette to balance the richness of the roll-ups.
- Serve with a side of fruit salad or apple slices for a refreshing contrast.
- Breakfast Twist:
- Believe it or not, these can be a fun breakfast item!
- Serve alongside scrambled eggs or with a side of bacon or sausage.
- Consider a “sweet” version by using a milder cheese like mozzarella and serving with a berry compote or a drizzle of maple syrup for dipping (an adventurous but potentially delightful option!).
- Presentation Pointers:
- Stack them: Lincoln Log style on a plate.
- Fan them out: Arrange them artfully on a platter.
- Individual Portions: Serve two or three roll-ups per person with their chosen dip in a small ramekin.
No matter how you choose to serve them, ensure they are served hot for the best experience – that crispy exterior and molten cheesy interior are what make these roll-ups truly special.
Additional Tips
To ensure your Grilled Cheese Roll Ups are a roaring success every time, here are five additional tips to elevate your game:
- Choose the Right Bread (and Treat it Right):
- The softest, freshest white sandwich bread is your best friend here. Avoid artisanal or crusty breads as they won’t flatten well and will likely crack. If your bread isn’t super fresh, you can microwave it for a very brief 5-10 seconds (wrapped in a barely damp paper towel) to soften it slightly before flattening. Be careful not to over-flatten or the bread will become too brittle. Even, gentle pressure is key.
- Don’t Overstuff with Cheese:
- While the temptation for an epic cheese pull is strong, overfilling the roll-ups will cause excessive cheese leakage during cooking. This can make a mess in the pan and lead to unevenly cooked roll-ups as the cheese burns before the bread is perfectly golden. A single slice of standard thickness cheese, or a modest line of shredded cheese, is usually sufficient. If your cheese slices are large, trim them to fit within the bread’s edges once rolled.
- Master the Pan Heat:
- Medium-low to medium heat is crucial. If the pan is too hot, the butter and bread will brown (or burn) too quickly, leaving you with a beautifully colored exterior but a still-solid block of cheese inside. If the heat is too low, the roll-ups will take forever to brown and can end up absorbing too much butter, making them greasy. Test your pan with a small piece of butter; it should melt and sizzle gently, not smoke or brown instantly.
- Get Creative with Fillings (But Keep it Slim):
- While classic cheese is fantastic, you can introduce other thinly sliced or finely minced ingredients. Consider:
- A very thin slice of deli ham or prosciutto.
- A smear of pesto or tapenade under the cheese.
- Finely crumbled cooked bacon.
- A sprinkle of finely chopped jalapeños for a kick.
- The key is to keep any additions minimal and thin so the roll-up can still be rolled tightly and cook evenly.
- While classic cheese is fantastic, you can introduce other thinly sliced or finely minced ingredients. Consider:
- Press Gently While Cooking (Optional):
- For an even crispier exterior and to help the roll-ups maintain their shape, you can use a spatula to gently press down on them as they cook, especially during the first minute or two after placing them seam-down. This also helps encourage good contact with the pan for even browning. Don’t press too hard, or you’ll squeeze out all the cheese. This is particularly helpful if your rolls seem a little loose.
Bonus Tip: Make a big batch! These tend to disappear quickly. If you’re making them for a crowd, use a large electric griddle to cook more at once.
FAQ Section
Here are answers to some frequently asked questions about making Grilled Cheese Roll Ups:
Q1: Can I make Grilled Cheese Roll Ups ahead of time?
- A: Yes, partially. You can prepare the roll-ups (flatten bread, add cheese, roll them up) a few hours in advance. Arrange them on a plate, cover tightly with plastic wrap, and refrigerate. When ready to serve, butter them and cook as directed. Cooked roll-ups are best eaten immediately for optimal crispiness and meltiness. Reheating can make them a bit less crisp, though still delicious.
Q2: What’s the best way to reheat leftover Grilled Cheese Roll Ups?
- A: For the best results, reheat them in a dry skillet over medium-low heat for a few minutes per side until warmed through and re-crisped. You can also reheat them in an oven or toaster oven at around 350°F (175°C) for 5-7 minutes, or until hot. Microwaving is the least ideal method as it tends to make the bread soft and a bit chewy, but it works in a pinch if you’re short on time.
Q3: My bread keeps tearing when I try to flatten or roll it. What am I doing wrong?
- A: This usually happens if the bread is not fresh enough or if it’s a drier variety. Ensure you’re using very soft, fresh sandwich bread. If it’s still tearing, try these tricks:
- Warm the bread ever so slightly (5-10 seconds in the microwave wrapped in a slightly damp paper towel) to make it more pliable.
- Apply gentle, even pressure with the rolling pin. Don’t try to flatten it too aggressively in one go.
- If a small tear occurs, try to position it on the inside of the roll or patch it with a tiny piece of another flattened bread scrap. The melted cheese often helps seal minor imperfections.
Q4: Can I bake these instead of pan-frying them?
- A: Yes, you can bake Grilled Cheese Roll Ups, though they might not get quite as uniformly crispy as pan-fried versions. To bake:
- Preheat your oven to 400°F (200°C).
- Prepare the roll-ups and brush them with melted butter as directed.
- Place them seam-side down on a baking sheet (lined with parchment paper for easy cleanup).
- Bake for 8-12 minutes, flipping them halfway through, until golden brown and the cheese is melted. Keep a close eye on them as oven times can vary. They might be slightly drier than the pan-fried version but still delicious.
Q5: What are some other cheese combinations that work well?
- A: Experimenting with cheese is part of the fun!
- Gouda and a touch of Gruyère: For a nutty, sophisticated flavor.
- Mozzarella and Parmesan: For an Italian twist, especially if you add a dab of marinara inside or serve it for dipping. Mozzarella gives great stretch, Parmesan adds salty flavor.
- Pepper Jack: For those who like a bit of spicy kick.
- Cream cheese and cheddar: A thin smear of cream cheese before adding the cheddar slice can make them extra creamy and rich.
- Remember that very hard cheeses (like aged Parmesan on its own) won’t melt well enough to be the primary cheese, but can be grated finely and added as a flavor enhancer with a good melting cheese. Stick to cheeses known for their good melting properties.
Grilled Cheese Roll Ups Recipe
Ingredients
- Bread: 8-10 slices of soft white sandwich bread (crusts removed). The softer and fresher the bread, the easier it will be to flatten and roll without tearing. Wonder Bread or similar generic white bread works exceptionally well due to its pliability. Whole wheat can be used, but ensure it’s a soft variety.
- Cheese: 8-10 slices of your favorite melting cheese. Classic choices include:
- Cheddar Cheese: Provides a sharp, tangy flavor. Medium or sharp cheddar works beautifully.
- American Cheese: The ultimate melter, offering a creamy, classic grilled cheese taste.
- Monterey Jack: Mild, buttery, and melts exceptionally well.
- Colby Jack: A delightful swirl of Colby and Monterey Jack, offering mild flavor and great meltability.
- Provolone: Offers a slightly more complex, mild, and smoky flavor with excellent stretch.
- You can also use shredded cheese, but slices tend to be neater for rolling. If using shredded, don’t overfill.
- Butter: 4-5 tablespoons of unsalted butter, softened to room temperature or melted. Salted butter can also be used; if so, you might want to omit any additional salt when seasoning. The butter is crucial for achieving that golden-brown, crispy exterior.
- Optional Seasonings (for the butter or cheese):
- Garlic Powder: 1/4 teaspoon mixed into the softened butter adds a lovely aromatic touch.
- Paprika: A pinch on the cheese before rolling can add a hint of color and smoky flavor.
- Dried Italian Herbs: A small sprinkle over the cheese can add a Mediterranean flair.
Instructions
- Prepare the Bread:
- Carefully cut off the crusts from each slice of bread using a sharp knife. Removing the crusts makes the bread much easier to flatten and roll, and results in a more tender roll-up.
- Place one slice of crustless bread on a clean, flat surface. Using a rolling pin, firmly but gently roll the bread as thinly as possible, almost like a tortilla. Aim for a thickness of about 1/16 to 1/8 inch. Roll in multiple directions to ensure it’s evenly flattened. Repeat with all slices of bread. This step is crucial; if the bread isn’t thin enough, it will be difficult to roll tightly and may unroll during cooking.
- Add the Cheese:
- Take one slice of your chosen cheese. If your cheese slices are the same size as the bread, you might want to trim them slightly so they don’t extend beyond the edges of the flattened bread once rolled. This helps prevent excessive cheese leakage during cooking.
- Place the cheese slice (or a neat line of shredded cheese) along one edge of the flattened bread, leaving a small border (about 1/4 inch) on the sides. If using optional seasonings like paprika or herbs, sprinkle them over the cheese now.
- Roll ‘Em Up:
- Starting from the edge with the cheese, tightly roll the bread up into a compact cylinder. The tighter the roll, the better it will hold its shape. The moisture from the bread and the pressure should help it seal, but if it seems to be unrolling, you can pinch the seam gently or place it seam-down while you prepare the others.
- Butter the Rolls (Two Methods):
- Method 1 (Brush with Melted Butter): Melt the butter in a small bowl. Using a pastry brush, lightly brush the entire exterior of each roll-up with melted butter. This ensures an even coating.
- Method 2 (Spread Softened Butter): If using softened butter, gently spread a thin, even layer over the entire surface of each roll-up. This can be a bit more delicate but works just as well.
- Grill to Perfection:
- Heat a large non-stick skillet, griddle, or frying pan over medium-low to medium heat. It’s important not to have the heat too high, as the bread can burn before the cheese has a chance to melt thoroughly.
- Carefully place the buttered roll-ups seam-side down in the preheated skillet. You may need to cook them in batches to avoid overcrowding the pan, which can lower the temperature and result in less crispy roll-ups.
- Cook for 2-4 minutes on the first side, or until golden brown and crispy.
- Using tongs, carefully turn the roll-ups to cook on another side. Continue to cook and turn, approximately 1-2 minutes per “side,” until all sides are golden brown and crispy, and the cheese inside is fully melted and gooey. This usually takes a total of 5-8 minutes. You’ll notice some cheese might start to ooze out – this is perfectly fine and often creates delicious, crispy cheese bits on the outside!
- Serve Immediately:
- Once cooked, remove the Grilled Cheese Roll Ups from the skillet and place them on a serving plate.
- It’s best to serve them immediately while they are hot, the bread is crispy, and the cheese is at its meltiest.
Nutrition
- Serving Size: One Normal Portion
- Calories: 350-450