


There’s something truly magical about the smell of freshly baked bread wafting through the house. For years, I admired those perfectly crusty, chewy artisan loaves from bakeries, thinking they were beyond my reach at home. Then, I stumbled upon this incredibly easy homemade artisan bread recipe, and everything changed. Let me tell you, this isn’t just any bread recipe; it’s a game-changer for anyone who dreams of effortlessly creating bakery-quality bread in their own kitchen. My family, initially skeptical of my bread-baking ambitions, was instantly converted after the first bite. The crisp, golden crust gives way to a soft, airy interior with that signature artisan chewiness. It’s become a weekend staple in our home, perfect for everything from simple toast to elegant dinner party accompaniments. The best part? It requires minimal effort, no fancy equipment, and just a handful of basic ingredients. If you’ve ever been intimidated by bread making, or simply crave delicious, homemade bread without the fuss, this recipe is your answer. Prepare to be amazed at how easy it is to bake truly exceptional artisan bread that will impress your family and friends, and fill your home with the most comforting aroma imaginable.
Ingredients: The Foundation of Flavorful Artisan Bread
The beauty of this artisan bread recipe lies not only in its simplicity but also in its reliance on just a few high-quality ingredients. Each component plays a crucial role in developing the bread’s texture, flavor, and structure. Using the right ingredients and understanding their purpose will significantly impact the final result, ensuring you achieve that perfect balance of crust and crumb that defines true artisan bread. Here’s what you’ll need to embark on your effortless bread-baking journey:
- 3 cups (384 grams) Bread Flour: Bread flour is the star of the show, providing the necessary protein content to develop gluten, the network that gives bread its structure and chewiness. Compared to all-purpose flour, bread flour contains a higher protein percentage, typically around 12-14%. This higher protein content results in a stronger gluten development, leading to a chewier and more elastic dough, perfect for artisan bread. Using bread flour is highly recommended for achieving that signature artisan texture. If you absolutely must substitute, all-purpose flour can be used, but the resulting bread may be slightly less chewy and have a softer crust.
- 1 ½ teaspoons (6 grams) Salt: Salt is not just for flavor; it plays a vital role in controlling yeast activity and strengthening gluten. It slows down the fermentation process, allowing for a more complex flavor development. Salt also tightens the gluten strands, making the dough stronger and more manageable. Use fine sea salt or kosher salt for this recipe. Avoid iodized table salt, as the iodine can sometimes impart a slightly metallic taste to baked goods. Ensure you measure the salt accurately, as too much or too little salt can negatively affect the bread’s texture and rise.
- ½ teaspoon (1.5 grams) Instant Yeast (or Active Dry Yeast): Yeast is the leavening agent that makes the bread rise. Instant yeast, also known as rapid-rise yeast, is incredibly convenient as it can be added directly to the dry ingredients without needing to be proofed in water first. Active dry yeast can also be used, but it requires proofing. If using active dry yeast, dissolve it in ¼ cup of lukewarm water with a pinch of sugar for 5-10 minutes until foamy before adding it to the dry ingredients. Make sure your yeast is fresh for optimal results. Expired yeast may not be active enough to properly leaven the bread. Store your yeast in an airtight container in a cool, dry place, or in the refrigerator for longer shelf life.
- 1 ½ cups (360 grams) Lukewarm Water (about 105-115°F or 40-46°C): Water hydrates the flour, initiating gluten development and activating the yeast. The temperature of the water is crucial, especially when using active dry yeast (for proofing). Lukewarm water (around 105-115°F or 40-46°C) is ideal for yeast activity. Water that is too hot can kill the yeast, while water that is too cold will slow down its activity. Use filtered water if your tap water has a strong chlorine taste, as this can sometimes affect the flavor of the bread. Accurately measuring the water is also important for achieving the right dough consistency.
These four simple ingredients, when combined correctly, will transform into a loaf of artisan bread that rivals anything you can buy at a bakery. The magic lies in the process, which we’ll explore in the instructions section.
Instructions: Your Step-by-Step Guide to Artisan Bread Perfection
This recipe is renowned for its ease, primarily due to its no-knead method. Forget strenuous kneading for 10-15 minutes; this technique relies on time and hydration to develop gluten naturally. By simply mixing the ingredients and allowing the dough to rest and ferment over a long period, you’ll achieve a complex flavor and delightful texture that’s characteristic of artisan bread. Follow these detailed step-by-step instructions to bake your own loaf of homemade artisan bread:
Step 1: Combine Dry Ingredients (5 minutes)
- In a large mixing bowl, preferably glass or ceramic, combine the bread flour and salt. Using a whisk, thoroughly mix the flour and salt together. This ensures the salt is evenly distributed throughout the flour, which is crucial for proper gluten development and yeast activity. Even distribution prevents pockets of concentrated salt that could inhibit yeast activity or uneven flavor in the final bread.
- Make a well in the center of the flour mixture. This well will serve as a receptacle for the wet ingredients, making it easier to incorporate them evenly with the dry ingredients.
Step 2: Add Wet Ingredients and Mix (5 minutes)
- Pour the lukewarm water into the well in the center of the dry ingredients.
- Sprinkle the instant yeast over the water. If using active dry yeast that has been proofed, pour the foamy yeast mixture into the well.
- Using a spatula or your hand, begin to mix the ingredients together. Start by gently incorporating the wet ingredients into the dry ingredients, gradually working from the center outwards. Mix until just combined. The dough will be quite shaggy and sticky at this stage, and that’s perfectly normal. Do not overmix. Overmixing at this stage is unnecessary and can actually toughen the dough. You are simply aiming to bring all the ingredients together into a cohesive, albeit rough, dough.
- Ensure there are no dry pockets of flour remaining at the bottom of the bowl. Scrape down the sides of the bowl with your spatula to make sure all the flour is incorporated.
Step 3: First Rise (12-18 hours)
- Cover the bowl tightly with plastic wrap. Ensure the plastic wrap is well-sealed to prevent the dough from drying out and to create a humid environment, which is beneficial for yeast activity. Alternatively, you can use a tight-fitting lid if your bowl has one.
- Let the dough rise at room temperature for 12-18 hours. The ideal room temperature is around 70-75°F (21-24°C). The longer rise time, also known as bulk fermentation, is crucial for developing the complex flavors and airy texture of artisan bread. During this period, the yeast will slowly ferment the dough, producing gases that create air pockets and developing the characteristic sourdough-like flavor even without using sourdough starter. The dough will roughly double or even triple in size and become bubbly on the surface.
- The rising time can vary depending on your room temperature. In warmer environments, the dough will rise faster. In cooler environments, it will take longer. You can adjust the rising time accordingly, but aim for at least 12 hours for optimal flavor development. You can even extend the first rise up to 24 hours in a cooler room if needed.
Step 4: Shape the Dough (5-10 minutes)
- After the first rise, gently deflate the dough in the bowl. No need to punch it down aggressively; simply use your spatula or hand to fold the dough over itself a few times to release some of the trapped gases.
- Lightly flour a clean work surface. Generously dust your hands with flour as well, as the dough will be sticky.
- Gently scrape the dough out of the bowl onto the floured surface.
- Shape the dough into a round or oblong loaf. To do this, gently stretch and fold the edges of the dough towards the center, rotating the dough as you go. Repeat this several times until you have a relatively smooth ball or oval shape. Avoid overworking the dough during shaping, as this can degas it and make it tougher. The goal is to gently shape it while preserving the air bubbles created during fermentation.
Step 5: Second Rise (1.5-2 hours)
- Line a medium-sized bowl with a clean kitchen towel or parchment paper. If using a towel, generously dust it with flour to prevent the dough from sticking.
- Place the shaped dough seam-side down into the prepared bowl.
- Cover the bowl loosely with plastic wrap or the edges of the towel.
- Let the dough rise for a second time for 1.5-2 hours. This second rise, also known as proofing, allows the dough to relax and rise again, resulting in a lighter and airier crumb. The dough should increase in size again, but not double this time. It should feel puffy and jiggly when gently poked.
- About 30 minutes before the end of the second rise, preheat your oven to 450°F (232°C) with a Dutch oven inside. Preheating the Dutch oven is crucial for creating a steamy environment inside the oven, which is essential for achieving a crispy crust and oven spring (the rapid expansion of the dough during the initial baking phase). Make sure your Dutch oven is oven-safe at this temperature.
Step 6: Bake the Bread (30-40 minutes)
- Carefully remove the hot Dutch oven from the oven. Use oven mitts as it will be extremely hot.
- Gently invert the dough from the bowl into the hot Dutch oven. If you used parchment paper to line the bowl, you can lift the dough out using the parchment paper and place it into the Dutch oven.
- Score the top of the dough with a sharp knife or lame (a bread scoring tool). Scoring allows the bread to expand predictably during baking and prevents it from bursting randomly. A simple slash or cross is sufficient. You can get creative with your scoring patterns if desired.
- Cover the Dutch oven with its lid and place it back in the preheated oven.
- Bake for 30 minutes with the lid on. Baking with the lid on traps steam inside the Dutch oven, creating a humid environment that promotes oven spring and a beautifully crispy crust.
- After 30 minutes, carefully remove the lid from the Dutch oven.
- Continue baking for another 10-15 minutes, or until the crust is deeply golden brown and the internal temperature reaches 200-210°F (93-99°C) when measured with an instant-read thermometer inserted into the center of the loaf. Baking without the lid during this final stage allows the crust to brown and crisp up.
- If you want an even darker crust, you can bake for a few minutes longer, but watch carefully to prevent burning.
Step 7: Cool and Enjoy (At least 1 hour)
- Carefully remove the Dutch oven from the oven and transfer the baked bread to a wire rack to cool completely. Cooling on a wire rack allows air to circulate around the bread, preventing the bottom crust from becoming soggy.
- Resist the temptation to slice into the bread immediately. Allowing the bread to cool completely, for at least 1 hour, is crucial for the internal structure to set properly and for the flavors to fully develop. Slicing into hot bread can result in a gummy texture.
- Once cooled, slice, serve, and enjoy your freshly baked homemade artisan bread!
Following these detailed instructions will guide you to baking a perfect loaf of artisan bread every time. The long rise times are key to the flavor and texture, making this seemingly simple recipe truly special.
Nutrition Facts: A Wholesome Slice of Goodness (Estimated)
While homemade artisan bread is a delightful treat, it’s also important to be mindful of its nutritional content. These are estimated values and can vary based on ingredient variations and slice size. This recipe typically yields one large loaf, which can be divided into approximately 12 servings.
Serving Size: 1 slice (approximately 1/12th of the loaf)
Calories per Serving (estimated): 180-220 calories
Approximate Nutritional Breakdown per Serving:
- Carbohydrates: 35-45 grams
- Protein: 5-7 grams
- Fat: 1-2 grams
- Fiber: 2-3 grams
- Sodium: 200-300 mg
Important Note: These are estimations and can vary. The nutritional content will depend on the specific type of flour used, the size of the slices, and other factors. Homemade bread generally contains no added preservatives or artificial ingredients, making it a potentially healthier option compared to many commercially produced breads. Enjoy in moderation as part of a balanced diet.
Preparation Time: Minimal Effort, Maximum Flavor
One of the greatest advantages of this artisan bread recipe is the minimal hands-on time required. While the total time from start to finish is long due to the rising periods, the active preparation time is surprisingly short.
- Active Prep Time: Approximately 15-20 minutes (mixing ingredients, shaping dough)
- Rise Time (First Rise): 12-18 hours
- Rise Time (Second Rise): 1.5-2 hours
- Bake Time: 30-40 minutes
- Cooling Time: At least 1 hour
Total Time (approximate): 15-22 hours (mostly inactive time)
As you can see, most of the time is spent waiting for the dough to rise. This makes it a perfect recipe for busy individuals or those new to bread baking. You can mix the dough in the evening and bake it the next day, or mix it in the morning and bake it in the evening. The long, slow fermentation process is what develops the incredible flavor and texture of this artisan bread with very little actual work on your part.
How to Serve: Endless Possibilities for Enjoyment
Freshly baked artisan bread is incredibly versatile and can be enjoyed in countless ways. Its robust flavor and satisfying texture make it a perfect accompaniment to a wide variety of meals and snacks. Here are some delicious ways to serve your homemade artisan bread:
- Simply with Butter: The most classic and arguably the most satisfying way to enjoy artisan bread is simply sliced thick and spread with good quality butter. The warm, crusty bread melting the butter is pure comfort.
- Toast for Breakfast: Slice the bread and toast it until golden brown and crispy. Top with your favorite breakfast spreads like:
- Avocado and a sprinkle of sea salt and red pepper flakes.
- Peanut butter and banana slices.
- Jam or honey.
- Cream cheese and smoked salmon.
- Poached or fried eggs.
- Sandwiches and Paninis: The sturdy texture of artisan bread makes it ideal for sandwiches. It can hold up well to fillings without becoming soggy. Use it for:
- Classic deli sandwiches with meats, cheeses, and vegetables.
- Grilled cheese sandwiches.
- Paninis with roasted vegetables, pesto, and mozzarella.
- Open-faced sandwiches with ricotta cheese and roasted tomatoes.
- Soup or Salad Accompaniment: Serve slices of artisan bread alongside hearty soups, stews, or vibrant salads. It’s perfect for dipping into broths or soaking up flavorful dressings.
- Bruschetta or Crostini: Slice the bread into ½-inch thick slices, brush with olive oil, and bake or grill until lightly toasted. Top with:
- Diced tomatoes, basil, and garlic (classic bruschetta).
- Roasted red peppers and goat cheese.
- Mushroom duxelles.
- Olive tapenade.
- Breadsticks or Croutons: Cut leftover or slightly stale artisan bread into strips or cubes. Toss with olive oil, herbs, and spices, and bake until crispy to make homemade breadsticks or croutons for salads or soups.
- Dinner Rolls: While this recipe makes a large loaf, you can adapt it to make smaller rolls by dividing the dough into smaller portions before the second rise. These make wonderful dinner rolls to serve alongside any meal.
- Charcuterie Board Staple: Include slices of artisan bread on a charcuterie or cheese board. Its neutral flavor pairs well with a variety of cheeses, meats, olives, and dips.
The possibilities are truly endless! Experiment and find your favorite ways to enjoy this versatile and delicious homemade artisan bread.
Additional Tips for Artisan Bread Success
Baking artisan bread at home is incredibly rewarding, and with these extra tips, you can elevate your baking game and consistently achieve bakery-quality results:
- Use a Kitchen Scale for Accuracy: While cup measurements are provided, using a kitchen scale to measure ingredients, especially flour and water, is highly recommended for consistent results. Baking is a science, and precise measurements are crucial for success. Gram measurements are more accurate than cup measurements, especially for flour, which can pack differently depending on how it’s scooped.
- Don’t Skip the Dutch Oven: The Dutch oven is key to creating that perfect crust and crumb in no-knead artisan bread. It traps steam during the initial baking phase, mimicking a professional steam oven. This steam prevents the crust from setting too quickly, allowing the bread to rise fully (oven spring) and develop a light, airy interior and a beautifully crispy crust. If you don’t have a Dutch oven, you can try baking on a baking stone with a pan of water in the bottom of the oven to create steam, but the results may not be quite as consistent.
- Adjust Rising Times Based on Temperature: Room temperature significantly affects yeast activity. In warmer environments, the dough will rise faster, and in cooler environments, it will rise slower. Observe your dough, not just the time. Look for the dough to approximately double or triple in size during the first rise and become puffy during the second rise. Adjust the rising times accordingly. If your kitchen is particularly cold, you can place the dough in a slightly warmer spot, like near a slightly warm (not hot) oven or on top of the refrigerator (which is often warmer).
- Experiment with Flour Types: While bread flour is recommended for optimal chewiness, you can experiment with different types of flour to vary the flavor and texture of your artisan bread. Try using a portion of whole wheat flour for a nuttier flavor and denser texture, or rye flour for a more rustic and complex flavor. Start by substituting up to 25% of the bread flour with another type of flour and adjust the hydration if needed, as different flours absorb water differently.
- Let it Cool Completely Before Slicing: Patience is key! Resist the urge to slice into your warm, fragrant bread immediately. Allowing the bread to cool completely, for at least an hour, is crucial for the internal structure to set properly. Slicing into hot bread can result in a gummy texture and can compress the crumb. Cooling allows the starches to solidify and the flavors to fully develop, resulting in a better overall eating experience.
By incorporating these tips into your baking process, you’ll be well on your way to consistently baking exceptional homemade artisan bread that will impress everyone.
FAQ: Your Artisan Bread Questions Answered
New to artisan bread baking? It’s natural to have questions. Here are answers to some frequently asked questions to help you on your bread-baking journey:
Q1: Can I use all-purpose flour instead of bread flour?
A: Yes, you can use all-purpose flour, but the texture of your bread will be slightly different. Bread flour has a higher protein content, which develops more gluten, resulting in a chewier and more structured loaf. All-purpose flour will produce a softer loaf with a slightly less pronounced crust. If using all-purpose flour, you may want to reduce the water slightly, as it tends to absorb less water than bread flour. However, for the best artisan bread texture, bread flour is highly recommended.
Q2: My dough didn’t rise much during the first rise. What went wrong?
A: Several factors can affect the first rise. The most common culprits are:
* Expired or inactive yeast: Ensure your yeast is fresh and active. Check the expiration date and store yeast properly in a cool, dry place. If using active dry yeast, proof it in lukewarm water to check its activity before adding it to the dough.
* Water temperature: If the water was too hot, it could have killed the yeast. If it was too cold, it could have slowed down yeast activity. Lukewarm water (105-115°F or 40-46°C) is ideal.
* Room temperature: If your kitchen is very cold, the dough will rise much slower. Try placing the dough in a slightly warmer spot to encourage rising. Extended rising time in a cooler environment can also work, but it will take longer.
* Salt: Too much salt can inhibit yeast activity. Ensure you measure the salt accurately.
Q3: My bread is dense and gummy. Why?
A: Dense and gummy bread can be caused by:
* Insufficient rising: Not allowing the dough to rise for long enough can result in a dense loaf. Ensure you allow both the first and second rise to proceed for the recommended times, or until the dough has properly proofed (doubled in size for the first rise, puffy for the second).
* Overmixing: While this is a no-knead recipe, overmixing in the initial stages (though less likely) or over-handling during shaping can toughen the gluten and result in a denser loaf. Mix gently until just combined.
* Baking at too low a temperature or for too short a time: Ensure your oven is preheated to the correct temperature and bake the bread for the full recommended time, or until the internal temperature reaches 200-210°F (93-99°C).
* Slicing too early: Slicing into bread before it has fully cooled can result in a gummy texture. Allow the bread to cool completely on a wire rack before slicing.
Q4: Can I make this dough ahead of time and bake it later?
A: Yes, you can retard the dough’s rise in the refrigerator to bake it later. After the first rise, gently deflate the dough, shape it, place it in a covered container or bowl, and refrigerate for up to 24 hours. When you’re ready to bake, remove the dough from the refrigerator, let it warm up at room temperature for about 30-60 minutes (or until slightly puffy), proceed with the second rise, and then bake as directed. Refrigerating the dough can actually enhance the flavor of the bread due to slower fermentation.
Q5: How should I store leftover artisan bread?
A: To keep your artisan bread fresh for as long as possible:
* Room Temperature: Store it in an airtight container or wrapped tightly in plastic wrap or a bread bag at room temperature for 2-3 days.
* Freezing: For longer storage, slice the cooled bread and freeze it in freezer-safe bags. Frozen bread can be reheated directly from frozen in a toaster or oven. Freezing is a great way to preserve leftover bread for later use.
* Reviving Stale Bread: If your bread becomes slightly stale, you can revive it by lightly sprinkling it with water and reheating it in a 350°F (175°C) oven for 5-10 minutes until warmed through and the crust is crisp again.
We hope these FAQs address your common questions about making easy homemade artisan bread. Happy baking!
Print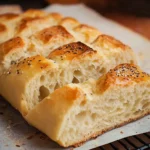
Easy Homemade Artisan Bread Recipe
Ingredients
- 3 cups (384 grams) Bread Flour: Bread flour is the star of the show, providing the necessary protein content to develop gluten, the network that gives bread its structure and chewiness. Compared to all-purpose flour, bread flour contains a higher protein percentage, typically around 12-14%. This higher protein content results in a stronger gluten development, leading to a chewier and more elastic dough, perfect for artisan bread. Using bread flour is highly recommended for achieving that signature artisan texture. If you absolutely must substitute, all-purpose flour can be used, but the resulting bread may be slightly less chewy and have a softer crust.
- 1 ½ teaspoons (6 grams) Salt: Salt is not just for flavor; it plays a vital role in controlling yeast activity and strengthening gluten. It slows down the fermentation process, allowing for a more complex flavor development. Salt also tightens the gluten strands, making the dough stronger and more manageable. Use fine sea salt or kosher salt for this recipe. Avoid iodized table salt, as the iodine can sometimes impart a slightly metallic taste to baked goods. Ensure you measure the salt accurately, as too much or too little salt can negatively affect the bread’s texture and rise.
- ½ teaspoon (1.5 grams) Instant Yeast (or Active Dry Yeast): Yeast is the leavening agent that makes the bread rise. Instant yeast, also known as rapid-rise yeast, is incredibly convenient as it can be added directly to the dry ingredients without needing to be proofed in water first. Active dry yeast can also be used, but it requires proofing. If using active dry yeast, dissolve it in ¼ cup of lukewarm water with a pinch of sugar for 5-10 minutes until foamy before adding it to the dry ingredients. Make sure your yeast is fresh for optimal results. Expired yeast may not be active enough to properly leaven the bread. Store your yeast in an airtight container in a cool, dry place, or in the refrigerator for longer shelf life.
- 1 ½ cups (360 grams) Lukewarm Water (about 105-115°F or 40-46°C): Water hydrates the flour, initiating gluten development and activating the yeast. The temperature of the water is crucial, especially when using active dry yeast (for proofing). Lukewarm water (around 105-115°F or 40-46°C) is ideal for yeast activity. Water that is too hot can kill the yeast, while water that is too cold will slow down its activity. Use filtered water if your tap water has a strong chlorine taste, as this can sometimes affect the flavor of the bread. Accurately measuring the water is also important for achieving the right dough consistency.
Instructions
Step 1: Combine Dry Ingredients (5 minutes)
- In a large mixing bowl, preferably glass or ceramic, combine the bread flour and salt. Using a whisk, thoroughly mix the flour and salt together. This ensures the salt is evenly distributed throughout the flour, which is crucial for proper gluten development and yeast activity. Even distribution prevents pockets of concentrated salt that could inhibit yeast activity or uneven flavor in the final bread.
- Make a well in the center of the flour mixture. This well will serve as a receptacle for the wet ingredients, making it easier to incorporate them evenly with the dry ingredients.
Step 2: Add Wet Ingredients and Mix (5 minutes)
- Pour the lukewarm water into the well in the center of the dry ingredients.
- Sprinkle the instant yeast over the water. If using active dry yeast that has been proofed, pour the foamy yeast mixture into the well.
- Using a spatula or your hand, begin to mix the ingredients together. Start by gently incorporating the wet ingredients into the dry ingredients, gradually working from the center outwards. Mix until just combined. The dough will be quite shaggy and sticky at this stage, and that’s perfectly normal. Do not overmix. Overmixing at this stage is unnecessary and can actually toughen the dough. You are simply aiming to bring all the ingredients together into a cohesive, albeit rough, dough.
- Ensure there are no dry pockets of flour remaining at the bottom of the bowl. Scrape down the sides of the bowl with your spatula to make sure all the flour is incorporated.
Step 3: First Rise (12-18 hours)
- Cover the bowl tightly with plastic wrap. Ensure the plastic wrap is well-sealed to prevent the dough from drying out and to create a humid environment, which is beneficial for yeast activity. Alternatively, you can use a tight-fitting lid if your bowl has one.
- Let the dough rise at room temperature for 12-18 hours. The ideal room temperature is around 70-75°F (21-24°C). The longer rise time, also known as bulk fermentation, is crucial for developing the complex flavors and airy texture of artisan bread. During this period, the yeast will slowly ferment the dough, producing gases that create air pockets and developing the characteristic sourdough-like flavor even without using sourdough starter. The dough will roughly double or even triple in size and become bubbly on the surface.
- The rising time can vary depending on your room temperature. In warmer environments, the dough will rise faster. In cooler environments, it will take longer. You can adjust the rising time accordingly, but aim for at least 12 hours for optimal flavor development. You can even extend the first rise up to 24 hours in a cooler room if needed.
Step 4: Shape the Dough (5-10 minutes)
- After the first rise, gently deflate the dough in the bowl. No need to punch it down aggressively; simply use your spatula or hand to fold the dough over itself a few times to release some of the trapped gases.
- Lightly flour a clean work surface. Generously dust your hands with flour as well, as the dough will be sticky.
- Gently scrape the dough out of the bowl onto the floured surface.
- Shape the dough into a round or oblong loaf. To do this, gently stretch and fold the edges of the dough towards the center, rotating the dough as you go. Repeat this several times until you have a relatively smooth ball or oval shape. Avoid overworking the dough during shaping, as this can degas it and make it tougher. The goal is to gently shape it while preserving the air bubbles created during fermentation.
Step 5: Second Rise (1.5-2 hours)
- Line a medium-sized bowl with a clean kitchen towel or parchment paper. If using a towel, generously dust it with flour to prevent the dough from sticking.
- Place the shaped dough seam-side down into the prepared bowl.
- Cover the bowl loosely with plastic wrap or the edges of the towel.
- Let the dough rise for a second time for 1.5-2 hours. This second rise, also known as proofing, allows the dough to relax and rise again, resulting in a lighter and airier crumb. The dough should increase in size again, but not double this time. It should feel puffy and jiggly when gently poked.
- About 30 minutes before the end of the second rise, preheat your oven to 450°F (232°C) with a Dutch oven inside. Preheating the Dutch oven is crucial for creating a steamy environment inside the oven, which is essential for achieving a crispy crust and oven spring (the rapid expansion of the dough during the initial baking phase). Make sure your Dutch oven is oven-safe at this temperature.
Step 6: Bake the Bread (30-40 minutes)
- Carefully remove the hot Dutch oven from the oven. Use oven mitts as it will be extremely hot.
- Gently invert the dough from the bowl into the hot Dutch oven. If you used parchment paper to line the bowl, you can lift the dough out using the parchment paper and place it into the Dutch oven.
- Score the top of the dough with a sharp knife or lame (a bread scoring tool). Scoring allows the bread to expand predictably during baking and prevents it from bursting randomly. A simple slash or cross is sufficient. You can get creative with your scoring patterns if desired.
- Cover the Dutch oven with its lid and place it back in the preheated oven.
- Bake for 30 minutes with the lid on. Baking with the lid on traps steam inside the Dutch oven, creating a humid environment that promotes oven spring and a beautifully crispy crust.
- After 30 minutes, carefully remove the lid from the Dutch oven.
- Continue baking for another 10-15 minutes, or until the crust is deeply golden brown and the internal temperature reaches 200-210°F (93-99°C) when measured with an instant-read thermometer inserted into the center of the loaf. Baking without the lid during this final stage allows the crust to brown and crisp up.
- If you want an even darker crust, you can bake for a few minutes longer, but watch carefully to prevent burning.
Step 7: Cool and Enjoy (At least 1 hour)
- Carefully remove the Dutch oven from the oven and transfer the baked bread to a wire rack to cool completely. Cooling on a wire rack allows air to circulate around the bread, preventing the bottom crust from becoming soggy.
- Resist the temptation to slice into the bread immediately. Allowing the bread to cool completely, for at least 1 hour, is crucial for the internal structure to set properly and for the flavors to fully develop. Slicing into hot bread can result in a gummy texture.
- Once cooled, slice, serve, and enjoy your freshly baked homemade artisan bread!
Nutrition
- Serving Size: one normal portion
- Calories: 180-220
- Sodium: 200-300 mg
- Fat: 1-2 grams
- Carbohydrates: 35-45 grams
- Fiber: 2-3 grams
- Protein: 5-7 grams


