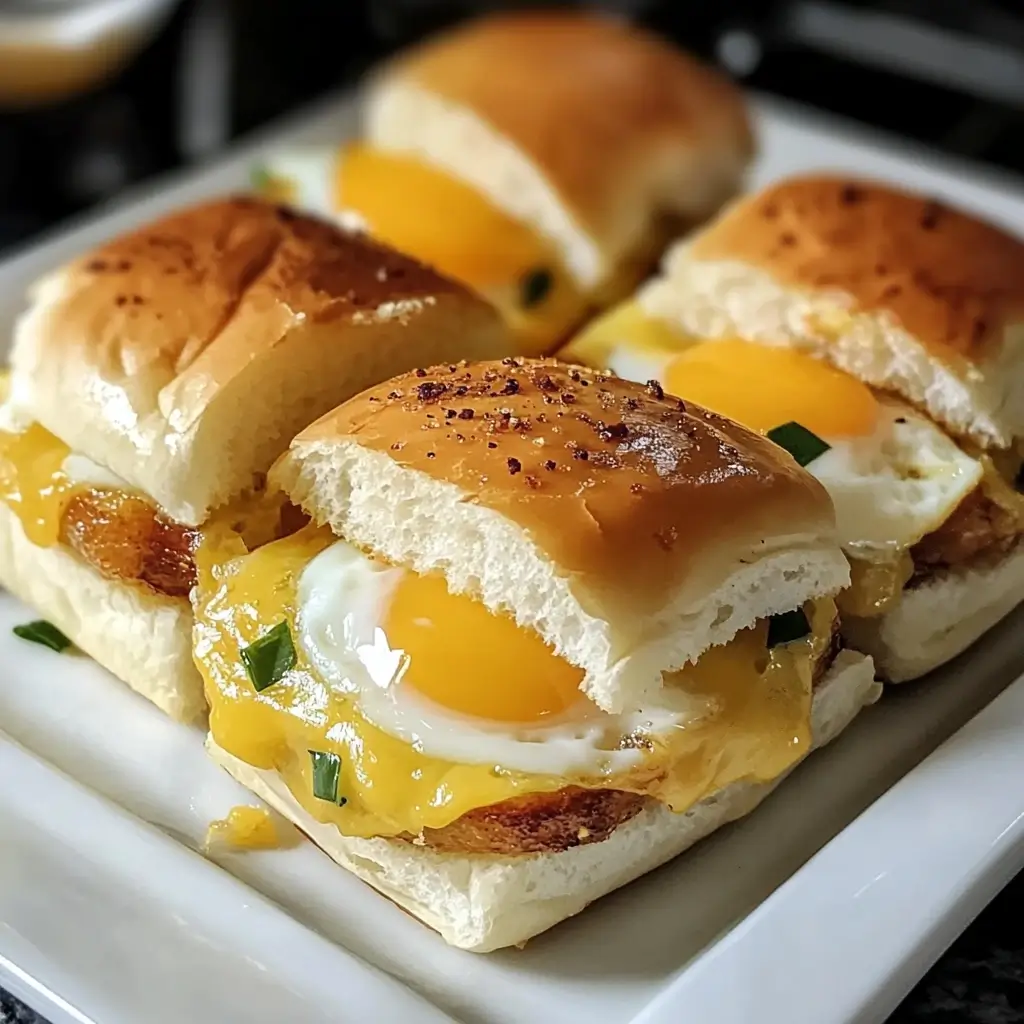
Our weekends are sacred in our household, and nothing kicks them off quite like a leisurely, delicious brunch. I’m always on the lookout for recipes that are both crowd-pleasing and relatively easy to execute, especially when feeding a hungry bunch. That’s when I stumbled upon these Easy Hawaiian Roll Breakfast Sliders, and let me tell you, they’ve become an absolute game-changer. The sweet, pillowy Hawaiian rolls, combined with savory breakfast sausage, fluffy eggs, and melty cheese – it’s a flavor explosion that’s surprisingly simple to put together. The first time I made these, my family devoured them in minutes, with requests for seconds (and thirds!) echoing around the table. The kids especially loved the handheld format, and my husband, who is a self-proclaimed breakfast connoisseur, declared them “brunch perfection.” Since then, these sliders have become a regular feature on our weekend menu, and I’ve even adapted them for potlucks and gatherings, where they are always a massive hit. If you’re searching for a breakfast or brunch recipe that’s guaranteed to impress without requiring hours in the kitchen, look no further. These Easy Hawaiian Roll Breakfast Sliders are your answer. Get ready to transform your breakfast game!
Ingredients for Easy Hawaiian Roll Breakfast Sliders
The beauty of these Hawaiian Roll Breakfast Sliders lies in their simplicity and the readily available ingredients. You don’t need to be a gourmet chef or hunt down exotic items to create this breakfast masterpiece. Here’s a breakdown of each ingredient and why it works so perfectly in this recipe:
- 1 package King’s Hawaiian Rolls: The star of the show! King’s Hawaiian Rolls are essential for this recipe. Their slightly sweet flavor and incredibly soft, fluffy texture are what make these sliders so irresistible. The slight sweetness of the rolls complements the savory breakfast fillings beautifully, creating a balanced and delightful taste profile. Using a package of rolls ensures uniformity in size and shape, making assembly a breeze and presentation consistent. While King’s Hawaiian is the classic and recommended brand for that authentic flavor and texture, you can explore other brands of sweet Hawaiian rolls if needed. Just ensure they are soft and have that signature slightly sweet taste. Look for packages that contain approximately 12 rolls, as this recipe is designed for that quantity.
- 6 pieces Colby Jack Cheese Slices: Colby Jack cheese is a fantastic choice for these sliders because it melts beautifully and has a mild, crowd-pleasing flavor that doesn’t overpower the other ingredients. The combination of Colby and Monterey Jack in this cheese provides a lovely creamy texture when melted and a subtle sharpness that adds depth to the breakfast sliders. Using slices makes layering the cheese within the sliders incredibly easy and ensures even cheese distribution throughout. If you don’t have Colby Jack on hand, you can substitute with other mild melting cheeses like Monterey Jack, cheddar cheese slices, or even provolone. For a richer flavor, consider using pepper jack cheese for a slight kick, or a blend of cheddar and mozzarella for a classic cheesy pull.
- 8 Large Eggs: Eggs are the heart of any great breakfast, and in these sliders, they provide a protein-packed, fluffy filling. Large eggs are recommended for this recipe to ensure you have enough volume to adequately fill the sliders. Eggs contribute to the overall richness and satiety of the breakfast, making it a satisfying and energizing meal to start the day. When scrambling the eggs, be mindful not to overcook them, as they will continue to cook in the oven. You want them to be soft and slightly underdone when they come off the stovetop, ensuring they remain moist and tender in the finished sliders. For extra flavor, you can whisk in a splash of milk or cream to the eggs before scrambling, or add a pinch of salt and pepper to season them perfectly.
- ⅓ cup Cheddar Cheese, Shredded: Adding shredded cheddar cheese to the scrambled eggs elevates the cheesy goodness even further. Cheddar cheese, especially a sharp cheddar, brings a bolder flavor that complements the mild Colby Jack slices and adds another layer of cheesy texture. Shredded cheese melts easily into the scrambled eggs, creating pockets of delicious, gooey cheese throughout the egg mixture. You can experiment with different types of cheddar cheese, from mild to sharp, depending on your preference. For a smoky flavor, consider using smoked cheddar. You can also use a blend of cheeses like cheddar and Monterey Jack or cheddar and mozzarella for a more complex cheese flavor profile in the eggs.
- Chives, Minced: Fresh chives add a delicate oniony flavor and a pop of fresh green color to the scrambled eggs. Chives are a subtle herb that complements the eggs and cheese without being overpowering. Their mild onion flavor enhances the savory notes of the breakfast sliders, and their bright green color adds visual appeal to the finished dish. If you don’t have fresh chives, you can substitute with finely chopped green onions or a pinch of dried chives. However, fresh herbs always provide the best flavor and visual presentation. Parsley or dill could also be considered as alternative fresh herbs, although chives are the classic choice for egg dishes.
- 8 Turkey Sausage Patties, or Pork: Breakfast sausage patties provide a savory, protein-rich component to these sliders, adding a hearty and satisfying element. Turkey sausage is a leaner option, while pork sausage offers a richer, more traditional breakfast sausage flavor. Both options work wonderfully in this recipe, so choose your preference based on your dietary needs and taste preferences. Make sure to fully cook the sausage patties before assembling the sliders. You can use pre-cooked sausage patties to save time, or cook them from raw according to package instructions. For extra flavor, consider using flavored sausage patties like maple sausage or Italian sausage for a different twist on the classic breakfast slider. You can also crumble the sausage instead of using patties for a more even distribution throughout the sliders.
- 1 tablespoon Butter, Melted: Melted butter is used to brush the tops of the Hawaiian rolls, adding richness, flavor, and promoting browning in the oven. Butter contributes to the golden brown, slightly crispy tops of the sliders, enhancing their texture and visual appeal. The fat in the butter also helps to keep the rolls moist and prevents them from drying out during baking. Unsalted butter is recommended so you can control the overall saltiness of the dish. You can substitute with olive oil or another neutral-flavored oil if you prefer, but butter provides a classic, rich flavor that complements the sweet Hawaiian rolls perfectly.
- 1 tablespoon Maple Syrup: Maple syrup, when combined with melted butter, creates a delightful sweet and savory glaze for the tops of the Hawaiian rolls. The maple syrup adds a touch of sweetness that complements the savory fillings and enhances the slightly sweet nature of the Hawaiian rolls. It also contributes to the beautiful golden-brown color and slight stickiness on the tops of the baked sliders. Pure maple syrup is recommended for the best flavor, but you can use pancake syrup in a pinch. For a slightly different flavor profile, you can experiment with honey or agave nectar instead of maple syrup, although maple syrup is the classic pairing for breakfast dishes.
Instructions: Making Your Easy Hawaiian Roll Breakfast Sliders
Creating these mouthwatering Hawaiian Roll Breakfast Sliders is surprisingly straightforward. Follow these step-by-step instructions to assemble and bake your own batch of breakfast perfection:
Step 1: Preheat Your Oven and Prepare Your Skillet
- Preheat oven to 350°F (175°C): Start by preheating your oven to 350 degrees Fahrenheit. This temperature is ideal for baking the sliders, ensuring the cheese melts beautifully and the rolls become golden brown without burning. Preheating ensures that the oven is at the correct temperature when you place the sliders inside, leading to even cooking and consistent results.
- Heat a large non-stick skillet over medium heat: While the oven is preheating, place a large non-stick skillet on your stovetop and set the heat to medium. A non-stick skillet is crucial for cooking the scrambled eggs without them sticking to the pan, making cleanup easier and ensuring the eggs are tender and fluffy. Medium heat is perfect for cooking eggs gently without browning them too quickly.
Step 2: Prepare the Hawaiian Rolls
- Keep the sliders together but slice horizontally: The key to easy slider assembly is to keep the Hawaiian rolls connected as a whole sheet. Using a serrated knife, carefully slice through the entire sheet of rolls horizontally, creating a top and bottom half. A serrated knife works best for slicing through soft bread without squashing it. Keep the rolls in one piece for easier assembly and baking.
- Place the bottom half of the buns in the casserole dish: Transfer the bottom half of the sliced Hawaiian rolls to a 9×13 inch casserole dish. The casserole dish provides a stable and contained baking vessel for the sliders, ensuring they bake evenly and are easy to transfer to and from the oven. Make sure the bottom halves of the rolls are evenly distributed in the dish, creating a base for the fillings.
Step 3: Layer the Cheese
- Add the 6 slices of cheese to the buns: Evenly distribute the Colby Jack cheese slices over the bottom half of the Hawaiian rolls in the casserole dish. Arrange them to cover as much of the roll surface as possible. The cheese slices will create a delicious melted layer underneath the breakfast fillings, adding flavor and helping to hold the sliders together.
- Set aside while preparing the eggs: Once the cheese is layered, set the casserole dish aside while you prepare the scrambled eggs. This allows you to focus on cooking the eggs to perfection without worrying about the rolls getting cold.
Step 4: Scramble the Eggs
- In a large bowl, crack the eggs and scramble: In a large bowl, crack the 8 large eggs. Use a whisk to vigorously scramble the eggs until the yolks and whites are fully combined and slightly frothy. Whisking incorporates air into the eggs, making them fluffier when cooked.
- Spray the skillet with cooking spray: Lightly spray the preheated non-stick skillet with cooking spray. Cooking spray further prevents the eggs from sticking to the pan and reduces the need for excess oil or butter, keeping the eggs light and healthy.
- Add the scrambled eggs and cook, stirring continuously: Pour the scrambled eggs into the prepared skillet. Using a spatula, continuously stir the eggs as they cook over medium heat. Stirring ensures even cooking and prevents the eggs from sticking and browning too quickly.
- Be careful not to overcook the eggs: Cook the eggs until they are just set but still slightly moist and underdone. They will continue to cook in the oven, so it’s important to remove them from the heat while they are still slightly soft to prevent them from becoming dry and rubbery. The goal is to achieve soft, fluffy scrambled eggs.
- Remove from heat and stir in chives and cheddar cheese: Once the eggs are cooked to the desired consistency, remove the skillet from the heat. Immediately stir in the minced chives and shredded cheddar cheese. The residual heat from the eggs will melt the cheddar cheese and gently wilt the chives, releasing their flavors and incorporating them evenly into the egg mixture. Stir until the cheese is melted and the chives are evenly distributed.
Step 5: Assemble the Sliders
- Add the turkey sausage patties to the cheese layer: Arrange the cooked turkey sausage patties on top of the cheese slices layered on the Hawaiian rolls. Distribute the sausage patties evenly, ensuring each slider will have a portion of sausage. You can place them whole or cut them in half to fit neatly on the rolls.
- Spoon the cooked scrambled eggs over the sausage patties: Spoon the cheesy scrambled egg mixture evenly over the sausage patties, covering them completely. Distribute the eggs to fill all the sliders and create a generous layer of egg filling.
- Add the top of Hawaiian rolls back on top: Carefully place the top half of the Hawaiian rolls back on top of the egg and sausage layer, creating the slider sandwiches. Align the top halves with the bottom halves, pressing down gently to secure them.
Step 6: Prepare the Butter-Maple Glaze and Bake
- Brush the tops of the rolls with the melted butter and maple syrup mixture: In a small bowl, combine the melted butter and maple syrup. Whisk together until well combined. Using a pastry brush, generously brush the butter-maple mixture over the tops of the Hawaiian rolls. Ensure even coverage to promote browning and flavor.
- If you do not have a brush, drizzle and spread: If you don’t have a pastry brush, you can drizzle the butter-maple mixture over the tops of the rolls and use the back of a spoon to spread it evenly.
- Wrap with aluminum foil: Cover the casserole dish tightly with aluminum foil. Foil helps to trap moisture and steam during the initial baking, ensuring the sliders remain soft and the cheese melts perfectly without the tops browning too quickly.
- Bake in preheated oven for 10 minutes, then uncover: Place the foil-covered casserole dish in the preheated oven and bake for 10 minutes. After 10 minutes, carefully remove the foil.
- Bake for an additional 10 minutes or until golden brown and cheese is melted: Return the uncovered casserole dish to the oven and bake for an additional 10 minutes, or until the tops of the Hawaiian rolls are golden brown and the cheese is fully melted and bubbly. Keep an eye on the sliders during the final baking stage to prevent the tops from burning.
- Serve immediately and enjoy! Once baked to golden perfection, remove the sliders from the oven. Let them cool slightly for a minute or two before serving. Use a serrated knife to cut along the pre-cut lines of the Hawaiian rolls to separate the individual sliders. Serve warm and enjoy these delectable Easy Hawaiian Roll Breakfast Sliders!
Nutrition Facts (Estimated)
(Per Slider, approximate values)
- Servings: 12 sliders
- Calories: Approximately 250-300 calories per slider (This is an estimate and can vary based on specific ingredient brands and sausage type used. For a more precise calculation, use a nutrition calculator with the specific brands and quantities of ingredients used).
These breakfast sliders offer a good balance of protein, carbohydrates, and fats, making them a satisfying and energizing breakfast or brunch option. They provide protein from the eggs and sausage, carbohydrates from the Hawaiian rolls, and healthy fats from the cheese and butter. Keep in mind that these are estimates and actual nutritional values may vary.
Preparation Time
- Prep Time: 10 minutes
- Cook Time: 20 minutes
- Total Time: 30 minutes
These Easy Hawaiian Roll Breakfast Sliders are truly a weekender’s dream! With just 10 minutes of prep time and 20 minutes of baking, you can have a delicious and impressive breakfast or brunch ready in just half an hour. This quick preparation time makes them perfect for busy mornings or when you need to whip up a crowd-pleasing meal without spending hours in the kitchen.
How to Serve Your Breakfast Sliders
These versatile breakfast sliders are perfect for a variety of occasions. Here are some serving suggestions to make the most of your delicious creation:
- Classic Brunch Staple: Serve these sliders as the centerpiece of your weekend brunch spread. Pair them with fresh fruit salad, yogurt parfaits, or a side of crispy hash browns for a complete and satisfying brunch meal.
- Family Breakfast: Perfect for a special family breakfast, especially on holidays or birthdays. Their handheld nature makes them kid-friendly and fun to eat. Serve with orange juice, milk, or hot chocolate for a complete breakfast feast.
- Potlucks and Gatherings: These sliders are an excellent dish to bring to potlucks, brunch parties, or casual gatherings. They are easy to transport, serve a crowd, and are always a hit. Their grab-and-go format makes them ideal for buffet-style setups.
- Game Day Appetizer: While technically breakfast sliders, they can also work as a fun and savory appetizer for game day gatherings. Their cheesy, savory flavors are crowd-pleasing and perfect for sharing while watching sports.
- Make-Ahead Breakfast: You can assemble the sliders ahead of time (up to a day before) and store them covered in the refrigerator. Bake them fresh in the morning for a quick and easy breakfast option. This is a great time-saver for busy weekdays or when hosting guests.
- Serve with Dipping Sauces: Enhance the flavor profile by offering a variety of dipping sauces alongside the sliders. Consider options like:
- Ketchup: A classic and always popular choice.
- Hot Sauce: For those who like a little heat.
- Sriracha Mayo: A creamy and spicy dipping sauce.
- Maple Syrup: For an extra touch of sweetness.
- Hollandaise Sauce: For a more decadent brunch option.
Additional Tips for Perfect Breakfast Sliders
To ensure your Easy Hawaiian Roll Breakfast Sliders are absolutely perfect every time, here are five helpful tips:
- Don’t Overcook the Eggs: As mentioned in the instructions, it’s crucial not to overcook the scrambled eggs on the stovetop. They will continue to cook in the oven, so aim for slightly underdone, soft scrambled eggs. Overcooked eggs will become dry and rubbery in the finished sliders.
- Customize Your Cheese: While Colby Jack is recommended, feel free to experiment with different cheeses to suit your taste. Pepper Jack adds a spicy kick, Monterey Jack is a milder alternative, and a blend of cheddar and mozzarella provides a classic cheesy pull. You can even use different cheeses in layers for a more complex flavor.
- Spice it Up: If you enjoy a bit of spice, add a pinch of red pepper flakes to the scrambled eggs or use spicy sausage patties. You can also incorporate diced jalapenos or a dash of hot sauce into the egg mixture for an extra layer of heat.
- Make-Ahead Magic: Assemble the sliders completely up to the point of baking, then cover tightly with foil and refrigerate for up to 24 hours. When ready to bake, simply preheat the oven and bake as directed, adding a few extra minutes to the baking time if starting from cold. This is a lifesaver for busy mornings or when prepping for a brunch party.
- Toast the Buns (Optional): For extra texture, you can lightly toast the bottom halves of the Hawaiian rolls in the oven for a few minutes before adding the fillings. This creates a slightly crispier base that holds up well to the moist fillings. Be careful not to over-toast them, as they can become too hard.
Frequently Asked Questions (FAQ)
Here are some frequently asked questions about making Hawaiian Roll Breakfast Sliders:
Q1: Can I use a different type of sausage?
A: Absolutely! While turkey sausage is suggested for a leaner option, you can use pork sausage, Italian sausage, or even vegetarian sausage patties. Consider the flavor profile of the sausage and choose one that complements the other ingredients. For example, maple sausage adds a touch of sweetness, while Italian sausage brings a savory, herby flavor.
Q2: Can I make these sliders vegetarian?
A: Yes, easily! Simply omit the sausage and add extra vegetables to the scrambled eggs, such as diced bell peppers, onions, mushrooms, or spinach. You can also use vegetarian sausage patties or meatless breakfast crumbles for a heartier vegetarian option.
Q3: Can I freeze these breakfast sliders?
A: While it’s best to enjoy these sliders fresh, you can freeze them for future enjoyment. Assemble and bake the sliders as directed, then let them cool completely. Wrap each slider individually in plastic wrap and then place them in a freezer-safe bag or container. Freeze for up to 1-2 months. To reheat, thaw overnight in the refrigerator and then bake in a 350°F oven for 10-15 minutes, or until heated through.
Q4: My Hawaiian rolls are getting too brown on top, what should I do?
A: If the tops of your Hawaiian rolls are browning too quickly while baking, you can gently tent the casserole dish with aluminum foil. This will protect the tops from further browning while allowing the cheese to continue melting and the sliders to heat through.
Q5: Can I add other toppings or fillings to these sliders?
A: Absolutely, get creative! You can add various toppings and fillings to customize your breakfast sliders. Some delicious additions include:
* Diced bell peppers or onions sautéed and added to the scrambled eggs.
* Cooked bacon or ham crumbled and layered with the sausage.
* Sliced avocado added after baking for a creamy topping.
* Everything bagel seasoning sprinkled on top before baking for extra flavor and texture.
* A drizzle of hollandaise sauce after baking for a more indulgent brunch option.
Don’t be afraid to experiment and make these Easy Hawaiian Roll Breakfast Sliders your own! Enjoy!
Print
Easy Hawaiian Roll Breakfast Sliders Recipe
Ingredients
- 1 package King’s Hawaiian Rolls: The star of the show! King’s Hawaiian Rolls are essential for this recipe. Their slightly sweet flavor and incredibly soft, fluffy texture are what make these sliders so irresistible. The slight sweetness of the rolls complements the savory breakfast fillings beautifully, creating a balanced and delightful taste profile. Using a package of rolls ensures uniformity in size and shape, making assembly a breeze and presentation consistent. While King’s Hawaiian is the classic and recommended brand for that authentic flavor and texture, you can explore other brands of sweet Hawaiian rolls if needed. Just ensure they are soft and have that signature slightly sweet taste. Look for packages that contain approximately 12 rolls, as this recipe is designed for that quantity.
- 6 pieces Colby Jack Cheese Slices: Colby Jack cheese is a fantastic choice for these sliders because it melts beautifully and has a mild, crowd-pleasing flavor that doesn’t overpower the other ingredients. The combination of Colby and Monterey Jack in this cheese provides a lovely creamy texture when melted and a subtle sharpness that adds depth to the breakfast sliders. Using slices makes layering the cheese within the sliders incredibly easy and ensures even cheese distribution throughout. If you don’t have Colby Jack on hand, you can substitute with other mild melting cheeses like Monterey Jack, cheddar cheese slices, or even provolone. For a richer flavor, consider using pepper jack cheese for a slight kick, or a blend of cheddar and mozzarella for a classic cheesy pull.
- 8 Large Eggs: Eggs are the heart of any great breakfast, and in these sliders, they provide a protein-packed, fluffy filling. Large eggs are recommended for this recipe to ensure you have enough volume to adequately fill the sliders. Eggs contribute to the overall richness and satiety of the breakfast, making it a satisfying and energizing meal to start the day. When scrambling the eggs, be mindful not to overcook them, as they will continue to cook in the oven. You want them to be soft and slightly underdone when they come off the stovetop, ensuring they remain moist and tender in the finished sliders. For extra flavor, you can whisk in a splash of milk or cream to the eggs before scrambling, or add a pinch of salt and pepper to season them perfectly.
- ⅓ cup Cheddar Cheese, Shredded: Adding shredded cheddar cheese to the scrambled eggs elevates the cheesy goodness even further. Cheddar cheese, especially a sharp cheddar, brings a bolder flavor that complements the mild Colby Jack slices and adds another layer of cheesy texture. Shredded cheese melts easily into the scrambled eggs, creating pockets of delicious, gooey cheese throughout the egg mixture. You can experiment with different types of cheddar cheese, from mild to sharp, depending on your preference. For a smoky flavor, consider using smoked cheddar. You can also use a blend of cheeses like cheddar and Monterey Jack or cheddar and mozzarella for a more complex cheese flavor profile in the eggs.
- Chives, Minced: Fresh chives add a delicate oniony flavor and a pop of fresh green color to the scrambled eggs. Chives are a subtle herb that complements the eggs and cheese without being overpowering. Their mild onion flavor enhances the savory notes of the breakfast sliders, and their bright green color adds visual appeal to the finished dish. If you don’t have fresh chives, you can substitute with finely chopped green onions or a pinch of dried chives. However, fresh herbs always provide the best flavor and visual presentation. Parsley or dill could also be considered as alternative fresh herbs, although chives are the classic choice for egg dishes.
- 8 Turkey Sausage Patties, or Pork: Breakfast sausage patties provide a savory, protein-rich component to these sliders, adding a hearty and satisfying element. Turkey sausage is a leaner option, while pork sausage offers a richer, more traditional breakfast sausage flavor. Both options work wonderfully in this recipe, so choose your preference based on your dietary needs and taste preferences. Make sure to fully cook the sausage patties before assembling the sliders. You can use pre-cooked sausage patties to save time, or cook them from raw according to package instructions. For extra flavor, consider using flavored sausage patties like maple sausage or Italian sausage for a different twist on the classic breakfast slider. You can also crumble the sausage instead of using patties for a more even distribution throughout the sliders.
- 1 tablespoon Butter, Melted: Melted butter is used to brush the tops of the Hawaiian rolls, adding richness, flavor, and promoting browning in the oven. Butter contributes to the golden brown, slightly crispy tops of the sliders, enhancing their texture and visual appeal. The fat in the butter also helps to keep the rolls moist and prevents them from drying out during baking. Unsalted butter is recommended so you can control the overall saltiness of the dish. You can substitute with olive oil or another neutral-flavored oil if you prefer, but butter provides a classic, rich flavor that complements the sweet Hawaiian rolls perfectly.
- 1 tablespoon Maple Syrup: Maple syrup, when combined with melted butter, creates a delightful sweet and savory glaze for the tops of the Hawaiian rolls. The maple syrup adds a touch of sweetness that complements the savory fillings and enhances the slightly sweet nature of the Hawaiian rolls. It also contributes to the beautiful golden-brown color and slight stickiness on the tops of the baked sliders. Pure maple syrup is recommended for the best flavor, but you can use pancake syrup in a pinch. For a slightly different flavor profile, you can experiment with honey or agave nectar instead of maple syrup, although maple syrup is the classic pairing for breakfast dishes.
Instructions
Step 1: Preheat Your Oven and Prepare Your Skillet
- Preheat oven to 350°F (175°C): Start by preheating your oven to 350 degrees Fahrenheit. This temperature is ideal for baking the sliders, ensuring the cheese melts beautifully and the rolls become golden brown without burning. Preheating ensures that the oven is at the correct temperature when you place the sliders inside, leading to even cooking and consistent results.
- Heat a large non-stick skillet over medium heat: While the oven is preheating, place a large non-stick skillet on your stovetop and set the heat to medium. A non-stick skillet is crucial for cooking the scrambled eggs without them sticking to the pan, making cleanup easier and ensuring the eggs are tender and fluffy. Medium heat is perfect for cooking eggs gently without browning them too quickly.
Step 2: Prepare the Hawaiian Rolls
- Keep the sliders together but slice horizontally: The key to easy slider assembly is to keep the Hawaiian rolls connected as a whole sheet. Using a serrated knife, carefully slice through the entire sheet of rolls horizontally, creating a top and bottom half. A serrated knife works best for slicing through soft bread without squashing it. Keep the rolls in one piece for easier assembly and baking.
- Place the bottom half of the buns in the casserole dish: Transfer the bottom half of the sliced Hawaiian rolls to a 9×13 inch casserole dish. The casserole dish provides a stable and contained baking vessel for the sliders, ensuring they bake evenly and are easy to transfer to and from the oven. Make sure the bottom halves of the rolls are evenly distributed in the dish, creating a base for the fillings.
Step 3: Layer the Cheese
- Add the 6 slices of cheese to the buns: Evenly distribute the Colby Jack cheese slices over the bottom half of the Hawaiian rolls in the casserole dish. Arrange them to cover as much of the roll surface as possible. The cheese slices will create a delicious melted layer underneath the breakfast fillings, adding flavor and helping to hold the sliders together.
- Set aside while preparing the eggs: Once the cheese is layered, set the casserole dish aside while you prepare the scrambled eggs. This allows you to focus on cooking the eggs to perfection without worrying about the rolls getting cold.
Step 4: Scramble the Eggs
- In a large bowl, crack the eggs and scramble: In a large bowl, crack the 8 large eggs. Use a whisk to vigorously scramble the eggs until the yolks and whites are fully combined and slightly frothy. Whisking incorporates air into the eggs, making them fluffier when cooked.
- Spray the skillet with cooking spray: Lightly spray the preheated non-stick skillet with cooking spray. Cooking spray further prevents the eggs from sticking to the pan and reduces the need for excess oil or butter, keeping the eggs light and healthy.
- Add the scrambled eggs and cook, stirring continuously: Pour the scrambled eggs into the prepared skillet. Using a spatula, continuously stir the eggs as they cook over medium heat. Stirring ensures even cooking and prevents the eggs from sticking and browning too quickly.
- Be careful not to overcook the eggs: Cook the eggs until they are just set but still slightly moist and underdone. They will continue to cook in the oven, so it’s important to remove them from the heat while they are still slightly soft to prevent them from becoming dry and rubbery. The goal is to achieve soft, fluffy scrambled eggs.
- Remove from heat and stir in chives and cheddar cheese: Once the eggs are cooked to the desired consistency, remove the skillet from the heat. Immediately stir in the minced chives and shredded cheddar cheese. The residual heat from the eggs will melt the cheddar cheese and gently wilt the chives, releasing their flavors and incorporating them evenly into the egg mixture. Stir until the cheese is melted and the chives are evenly distributed.
Step 5: Assemble the Sliders
- Add the turkey sausage patties to the cheese layer: Arrange the cooked turkey sausage patties on top of the cheese slices layered on the Hawaiian rolls. Distribute the sausage patties evenly, ensuring each slider will have a portion of sausage. You can place them whole or cut them in half to fit neatly on the rolls.
- Spoon the cooked scrambled eggs over the sausage patties: Spoon the cheesy scrambled egg mixture evenly over the sausage patties, covering them completely. Distribute the eggs to fill all the sliders and create a generous layer of egg filling.
- Add the top of Hawaiian rolls back on top: Carefully place the top half of the Hawaiian rolls back on top of the egg and sausage layer, creating the slider sandwiches. Align the top halves with the bottom halves, pressing down gently to secure them.
Step 6: Prepare the Butter-Maple Glaze and Bake
- Brush the tops of the rolls with the melted butter and maple syrup mixture: In a small bowl, combine the melted butter and maple syrup. Whisk together until well combined. Using a pastry brush, generously brush the butter-maple mixture over the tops of the Hawaiian rolls. Ensure even coverage to promote browning and flavor.
- If you do not have a brush, drizzle and spread: If you don’t have a pastry brush, you can drizzle the butter-maple mixture over the tops of the rolls and use the back of a spoon to spread it evenly.
- Wrap with aluminum foil: Cover the casserole dish tightly with aluminum foil. Foil helps to trap moisture and steam during the initial baking, ensuring the sliders remain soft and the cheese melts perfectly without the tops browning too quickly.
- Bake in preheated oven for 10 minutes, then uncover: Place the foil-covered casserole dish in the preheated oven and bake for 10 minutes. After 10 minutes, carefully remove the foil.
- Bake for an additional 10 minutes or until golden brown and cheese is melted: Return the uncovered casserole dish to the oven and bake for an additional 10 minutes, or until the tops of the Hawaiian rolls are golden brown and the cheese is fully melted and bubbly. Keep an eye on the sliders during the final baking stage to prevent the tops from burning.
- Serve immediately and enjoy! Once baked to golden perfection, remove the sliders from the oven. Let them cool slightly for a minute or two before serving. Use a serrated knife to cut along the pre-cut lines of the Hawaiian rolls to separate the individual sliders. Serve warm and enjoy these delectable Easy Hawaiian Roll Breakfast Sliders!
Nutrition
- Serving Size: One Normal Portion
- Calories: 250-300