


Every Easter, our family table transforms into a vibrant canvas of spring colors and delectable treats. But amidst the pastel candies and chocolate bunnies, there’s one dessert that consistently steals the show – the Easter Egg Cheesecake. This isn’t just any cheesecake; it’s a creamy, dreamy confection that embodies the joy and renewal of the season, playfully adorned with the whimsical charm of Easter eggs. Last year, I decided to elevate our Easter dessert game and bake this masterpiece. From the moment it emerged from the oven, golden and fragrant, I knew it was something special. The aroma alone was enough to draw everyone into the kitchen, and the first bite… oh, the first bite! The smooth, tangy cheesecake filling, perfectly balanced with a hint of vanilla, melted in our mouths. The buttery graham cracker crust provided a delightful textural contrast, and the scattered Easter eggs added a festive touch that delighted both the eyes and the palate. Even my usually picky nephew declared it the “best cheesecake ever!” It was an instant hit, disappearing faster than the Easter Bunny himself. This Easter Egg Cheesecake isn’t just a dessert; it’s a memory in the making, a sweet centerpiece for your springtime celebrations. Let me guide you through creating this show-stopping dessert that will undoubtedly become a cherished tradition in your own home.
Ingredients: The Building Blocks of Easter Bliss
Crafting the perfect Easter Egg Cheesecake begins with selecting high-quality ingredients. Each component plays a vital role in achieving the desired texture and flavor profile. Here’s a detailed breakdown of what you’ll need:
For the Graham Cracker Crust:
- 1 ½ cups Graham Cracker Crumbs (approximately 12 full graham crackers): The foundation of our cheesecake, graham cracker crumbs provide a slightly sweet and buttery base. Opt for whole graham crackers and crush them yourself for the freshest flavor. Pre-crushed crumbs can sometimes be drier and less flavorful.
- 6 tablespoons Unsalted Butter, melted: Butter is the binding agent and flavor enhancer for the crust. Unsalted butter allows you to control the overall saltiness of the recipe. Ensure it’s fully melted and cooled slightly before mixing with the crumbs.
- ¼ cup Granulated Sugar: A touch of sugar adds sweetness to the crust, complementing the creamy cheesecake filling. You can adjust this slightly if you prefer a less sweet crust.
For the Creamy Cheesecake Filling:
- 3 (8-ounce) packages Cream Cheese, full-fat, softened to room temperature: The star of the show! Full-fat cream cheese is crucial for achieving the rich, decadent texture that defines a classic cheesecake. Room temperature cream cheese is essential for smooth mixing and preventing lumps in your batter. Low-fat or non-fat cream cheese will not yield the same results.
- 1 ¾ cups Granulated Sugar: Sugar sweetens the cheesecake and contributes to its creamy texture. The amount is carefully balanced to complement the tanginess of the cream cheese.
- 4 Large Eggs, room temperature: Eggs provide structure and richness to the cheesecake. Room temperature eggs emulsify more easily into the batter, resulting in a smoother texture.
- 1 cup Sour Cream, full-fat, room temperature: Sour cream adds tanginess and moisture to the cheesecake, balancing the sweetness and richness. Full-fat sour cream is recommended for the best flavor and texture.
- 2 teaspoons Vanilla Extract: Pure vanilla extract enhances the overall flavor profile, adding warmth and depth. Avoid imitation vanilla extract, which can taste artificial.
- Pinch of Salt: Salt balances the sweetness and enhances the other flavors in the cheesecake.
For the Easter Egg Decoration:
- Assorted Easter Eggs (Chocolate, Candy-Coated, Mini Eggs, etc.): This is where the Easter magic comes in! Choose your favorite types of Easter eggs. Chocolate eggs, candy-coated eggs, and mini eggs all work beautifully. Consider a variety of colors and sizes for visual appeal. You can use commercially available Easter eggs or even make your own chocolate eggs for a truly homemade touch.
- Optional: Whipped Cream, Fresh Berries, or Chocolate Shavings: These are optional additions for further enhancing the presentation and flavor. Whipped cream adds extra richness, fresh berries provide a burst of freshness and color, and chocolate shavings complement the chocolate eggs beautifully.
Ingredient Quality Matters:
Remember, the quality of your ingredients directly impacts the final taste of your Easter Egg Cheesecake. Using high-quality cream cheese, pure vanilla extract, and fresh graham crackers will make a noticeable difference. Don’t skimp on these key ingredients for the best possible results.
Instructions: Step-by-Step to Cheesecake Perfection
Creating this Easter Egg Cheesecake is easier than you might think! Follow these detailed instructions to bake a dessert that will impress your family and friends.
Step 1: Prepare the Graham Cracker Crust (Approx. 15 minutes)
- Preheat Oven and Prepare Pan: Preheat your oven to 350°F (175°C). Lightly grease a 9-inch springform pan. This type of pan is essential for easily removing the cheesecake after baking without damaging it.
- Crush Graham Crackers: If using whole graham crackers, place them in a food processor and pulse until you have fine crumbs. Alternatively, place them in a zip-top bag and crush them with a rolling pin.
- Combine Crust Ingredients: In a medium bowl, combine the graham cracker crumbs, melted butter, and granulated sugar. Mix well until the crumbs are evenly moistened and resemble damp sand.
- Press Crust into Pan: Press the crumb mixture firmly and evenly into the bottom of the prepared springform pan. You can use the bottom of a measuring cup or a flat-bottomed glass to help press the crumbs into a smooth, even layer. For a slightly higher crust edge, you can also press some of the mixture slightly up the sides of the pan.
- Pre-bake Crust: Bake the crust in the preheated oven for 8-10 minutes, or until lightly golden brown and fragrant. Pre-baking helps set the crust and prevents it from becoming soggy.
- Cool Crust: Remove the pre-baked crust from the oven and let it cool completely while you prepare the cheesecake filling. This is crucial for preventing the crust from melting the butter in the filling.
Step 2: Make the Creamy Cheesecake Filling (Approx. 20 minutes)
- Beat Cream Cheese and Sugar: In a large bowl or the bowl of a stand mixer fitted with the paddle attachment, beat the softened cream cheese on medium speed until smooth and creamy. Gradually add the granulated sugar and continue beating until light and fluffy. Scrape down the sides of the bowl as needed to ensure everything is evenly incorporated. Properly creaming the cream cheese and sugar is key to a smooth and lump-free cheesecake.
- Incorporate Eggs One at a Time: Beat in the eggs one at a time, incorporating each egg fully before adding the next. Beat on low speed after each addition to prevent overmixing, which can lead to cracks in the cheesecake.
- Add Sour Cream, Vanilla, and Salt: Stir in the sour cream, vanilla extract, and salt. Mix until just combined and smooth. Be careful not to overmix at this stage. Overmixing can incorporate too much air into the batter, which can also contribute to cracking.
Step 3: Assemble and Bake the Cheesecake (Approx. 1 hour 15 minutes)
- Pour Filling into Crust: Pour the cheesecake filling over the cooled graham cracker crust in the springform pan. Smooth the top of the filling with a spatula to ensure an even surface.
- Bake in Water Bath (Recommended for Best Texture): For the creamiest, crack-free cheesecake, bake it in a water bath. Wrap the bottom of the springform pan tightly with heavy-duty aluminum foil to prevent water from seeping in. Place the wrapped pan inside a larger roasting pan. Pour hot water into the roasting pan until it reaches about halfway up the sides of the springform pan.
- Bake Cheesecake: Carefully place the roasting pan with the cheesecake and water bath in the preheated oven. Bake for 60-75 minutes, or until the cheesecake is set around the edges but still slightly jiggly in the center. The center should move slightly when you gently shake the pan, but it shouldn’t be liquid.
- Turn Off Oven and Let Cool Gradually: Once the cheesecake is baked, turn off the oven and leave the oven door slightly ajar. Let the cheesecake cool in the oven for 1 hour. This gradual cooling process helps prevent cracking.
- Remove from Oven and Water Bath: Carefully remove the cheesecake from the oven and the water bath. Let it cool completely on a wire rack at room temperature.
- Chill Cheesecake: Once cooled to room temperature, cover the cheesecake loosely with plastic wrap and refrigerate for at least 6 hours, or preferably overnight. Chilling allows the cheesecake to fully set and develop its flavor.
Step 4: Decorate with Easter Eggs (Just Before Serving)
- Remove Cheesecake from Pan: Run a thin knife or spatula around the edge of the cheesecake to loosen it from the springform pan. Carefully release the springform pan sides and remove them.
- Arrange Easter Eggs: Just before serving, arrange the assorted Easter eggs on top of the cheesecake. Get creative with your arrangement! You can create a random scattering, a decorative border, or even a more intricate design.
- Optional Garnishes: If desired, add whipped cream rosettes, fresh berries, or chocolate shavings around the Easter eggs for extra flair.
Step 5: Serve and Enjoy!
Slice and serve your beautiful Easter Egg Cheesecake. Prepare for rave reviews!
Nutrition Facts: A Delicious Indulgence (per serving)
Please note that these are approximate nutritional values and can vary based on specific ingredients and serving size. This is an estimated guideline for a standard slice of Easter Egg Cheesecake (assuming 12 servings per 9-inch cheesecake).
- Serving Size: 1 slice (approximately 1/12th of the cheesecake)
- Calories: Approximately 450-550 calories per serving
- Fat: 30-40g
- Saturated Fat: 20-25g
- Cholesterol: 150-200mg
- Sodium: 200-250mg
- Carbohydrates: 30-40g
- Sugar: 25-35g
- Protein: 8-10g
Important Disclaimer: This nutritional information is an estimate only. For precise nutritional values, you can use online nutrition calculators and input the exact brands and quantities of ingredients you use. Cheesecake is a dessert intended for occasional indulgence, and moderation is always recommended as part of a balanced diet.
Preparation Time: Plan Ahead for Easter Delight
Making Easter Egg Cheesecake involves several stages, so it’s best to plan ahead. Here’s a breakdown of the approximate time required:
- Prep Time: 30-40 minutes (includes crust preparation, filling preparation, and assembly)
- Bake Time: 60-75 minutes
- Cooling Time (in oven): 1 hour
- Cooling Time (room temperature): 1-2 hours
- Chilling Time (refrigerator): Minimum 6 hours, ideally overnight
Total Time (excluding chilling): Approximately 3-4 hours
Recommendation: Start making your Easter Egg Cheesecake the day before you plan to serve it. This allows ample time for chilling and ensures the best flavor and texture. The active preparation time is relatively short, making it a manageable dessert to create even amidst busy Easter preparations.
How to Serve: Elevating the Easter Cheesecake Experience
Serving your Easter Egg Cheesecake is just as important as baking it! Here are some delightful ways to present and enjoy this springtime dessert:
- Chilled Perfection: Cheesecake is best served chilled. Remove it from the refrigerator about 15-20 minutes before serving to allow it to soften slightly and enhance the flavors.
- Classic Slices: Cut the cheesecake into neat slices using a sharp knife. For cleaner slices, dip the knife in hot water and wipe it clean between each cut.
- Whipped Cream and Berries: A dollop of freshly whipped cream and a scattering of fresh berries (strawberries, raspberries, blueberries) are classic and delicious accompaniments. They add lightness, freshness, and visual appeal.
- Chocolate Sauce Drizzle: A warm chocolate sauce drizzle complements the cheesecake beautifully and enhances the chocolate Easter egg theme.
- Fruit Compote or Coulis: A homemade fruit compote or coulis (raspberry, strawberry, or mixed berry) provides a tangy and flavorful contrast to the rich cheesecake.
- Coffee or Tea Pairing: Serve alongside a cup of freshly brewed coffee or tea. The slight bitterness of coffee or tea balances the sweetness of the cheesecake perfectly.
- Easter Brunch or Dessert Table Centerpiece: Make the Easter Egg Cheesecake the star of your Easter brunch or dessert table. Its festive appearance and delicious taste will impress your guests.
Serving Suggestions for Easter Theme:
- Pastel Plates: Serve on pastel-colored plates to enhance the Easter theme.
- Spring Flowers Garnish: Garnish the serving platter with fresh spring flowers (edible flowers if placing directly on the plate, otherwise, arrange around the platter).
- Easter-Themed Napkins and Tablecloth: Use Easter-themed napkins and tablecloth to create a cohesive and festive presentation.
Additional Tips for Cheesecake Success
Baking a perfect cheesecake can be a rewarding experience. Here are five essential tips to ensure your Easter Egg Cheesecake is a resounding success:
- Room Temperature Ingredients are Key: Using softened cream cheese, room temperature eggs, and room temperature sour cream is crucial for a smooth and lump-free cheesecake batter. Room temperature ingredients emulsify more easily, creating a homogenous mixture and preventing overmixing. Take your ingredients out of the refrigerator at least 1-2 hours before you start baking.
- Don’t Overmix the Batter: Overmixing the cheesecake batter can incorporate too much air, which can lead to cracks on the surface during baking. Mix the batter until just combined and smooth. Once the eggs are added, mix on low speed and only until incorporated.
- Bake in a Water Bath (Recommended): A water bath provides gentle, even heat during baking, preventing the cheesecake from drying out and cracking. The steam from the water bath also contributes to a creamy texture. While optional, a water bath significantly improves the texture and appearance of your cheesecake.
- Cool Gradually to Prevent Cracking: Sudden temperature changes can cause cheesecakes to crack. The gradual cooling process in the oven (with the door ajar) and then at room temperature helps prevent thermal shock and cracking. Patience is key during the cooling process.
- Chill Thoroughly Before Serving: Chilling the cheesecake for at least 6 hours, or preferably overnight, is essential for it to fully set and develop its flavor. Chilling also makes it easier to slice and serve. Resist the urge to cut into it too soon!
FAQ: Your Easter Egg Cheesecake Questions Answered
Here are five frequently asked questions about making Easter Egg Cheesecake, to help you bake with confidence:
Q1: Can I make this cheesecake ahead of time?
A: Absolutely! In fact, it’s highly recommended. Easter Egg Cheesecake is best made at least one day in advance. It needs ample time to chill and set in the refrigerator. You can bake the cheesecake up to 2-3 days ahead of time and store it, covered, in the refrigerator. Decorate with Easter eggs just before serving for the freshest look.
Q2: Can I freeze Easter Egg Cheesecake?
A: Yes, you can freeze cheesecake. For best results, freeze it without the Easter egg decorations. Wrap the cooled cheesecake tightly in plastic wrap, then in aluminum foil. Freeze for up to 2-3 months. Thaw overnight in the refrigerator before decorating and serving.
Q3: My cheesecake cracked! What did I do wrong?
A: Cheesecake cracking can be caused by several factors, including overmixing the batter, baking at too high a temperature, or sudden temperature changes. Review the tips above for preventing cracks (don’t overmix, water bath, gradual cooling). Even if your cheesecake cracks slightly, it will still taste delicious! You can also easily hide minor cracks with whipped cream or Easter egg decorations.
Q4: Can I use a different type of crust?
A: Yes, you can customize the crust. Digestive biscuits, shortbread cookies, or even chocolate cookie crumbs can be used instead of graham crackers. Adjust the sugar in the crust recipe accordingly depending on the sweetness of your chosen cookie.
Q5: What if I don’t have a springform pan? Can I still make this cheesecake?
A: While a springform pan is highly recommended for easy removal, you can still make cheesecake without one, but it’s more challenging to remove cleanly. You can use a regular cake pan, but you’ll need to line it thoroughly with parchment paper, leaving an overhang to help lift the cheesecake out after chilling. Alternatively, consider making individual cheesecakes in ramekins or muffin tins if you don’t have a springform pan.
Enjoy baking and sharing this delightful Easter Egg Cheesecake! It’s a guaranteed crowd-pleaser that will add a touch of springtime sweetness to your holiday celebrations.
Print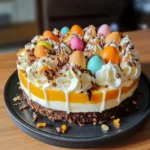
Easter Egg Cheesecake Recipe
Ingredients
For the Graham Cracker Crust:
- 1 ½ cups Graham Cracker Crumbs (approximately 12 full graham crackers): The foundation of our cheesecake, graham cracker crumbs provide a slightly sweet and buttery base. Opt for whole graham crackers and crush them yourself for the freshest flavor. Pre-crushed crumbs can sometimes be drier and less flavorful.
- 6 tablespoons Unsalted Butter, melted: Butter is the binding agent and flavor enhancer for the crust. Unsalted butter allows you to control the overall saltiness of the recipe. Ensure it’s fully melted and cooled slightly before mixing with the crumbs.
- ¼ cup Granulated Sugar: A touch of sugar adds sweetness to the crust, complementing the creamy cheesecake filling. You can adjust this slightly if you prefer a less sweet crust.
For the Creamy Cheesecake Filling:
- 3 (8-ounce) packages Cream Cheese, full-fat, softened to room temperature: The star of the show! Full-fat cream cheese is crucial for achieving the rich, decadent texture that defines a classic cheesecake. Room temperature cream cheese is essential for smooth mixing and preventing lumps in your batter. Low-fat or non-fat cream cheese will not yield the same results.
- 1 ¾ cups Granulated Sugar: Sugar sweetens the cheesecake and contributes to its creamy texture. The amount is carefully balanced to complement the tanginess of the cream cheese.
- 4 Large Eggs, room temperature: Eggs provide structure and richness to the cheesecake. Room temperature eggs emulsify more easily into the batter, resulting in a smoother texture.
- 1 cup Sour Cream, full-fat, room temperature: Sour cream adds tanginess and moisture to the cheesecake, balancing the sweetness and richness. Full-fat sour cream is recommended for the best flavor and texture.
- 2 teaspoons Vanilla Extract: Pure vanilla extract enhances the overall flavor profile, adding warmth and depth. Avoid imitation vanilla extract, which can taste artificial.
- Pinch of Salt: Salt balances the sweetness and enhances the other flavors in the cheesecake.
For the Easter Egg Decoration:
- Assorted Easter Eggs (Chocolate, Candy-Coated, Mini Eggs, etc.): This is where the Easter magic comes in! Choose your favorite types of Easter eggs. Chocolate eggs, candy-coated eggs, and mini eggs all work beautifully. Consider a variety of colors and sizes for visual appeal. You can use commercially available Easter eggs or even make your own chocolate eggs for a truly homemade touch.
- Optional: Whipped Cream, Fresh Berries, or Chocolate Shavings: These are optional additions for further enhancing the presentation and flavor. Whipped cream adds extra richness, fresh berries provide a burst of freshness and color, and chocolate shavings complement the chocolate eggs beautifully.
Instructions
Step 1: Prepare the Graham Cracker Crust (Approx. 15 minutes)
- Preheat Oven and Prepare Pan: Preheat your oven to 350°F (175°C). Lightly grease a 9-inch springform pan. This type of pan is essential for easily removing the cheesecake after baking without damaging it.
- Crush Graham Crackers: If using whole graham crackers, place them in a food processor and pulse until you have fine crumbs. Alternatively, place them in a zip-top bag and crush them with a rolling pin.
- Combine Crust Ingredients: In a medium bowl, combine the graham cracker crumbs, melted butter, and granulated sugar. Mix well until the crumbs are evenly moistened and resemble damp sand.
- Press Crust into Pan: Press the crumb mixture firmly and evenly into the bottom of the prepared springform pan. You can use the bottom of a measuring cup or a flat-bottomed glass to help press the crumbs into a smooth, even layer. For a slightly higher crust edge, you can also press some of the mixture slightly up the sides of the pan.
- Pre-bake Crust: Bake the crust in the preheated oven for 8-10 minutes, or until lightly golden brown and fragrant. Pre-baking helps set the crust and prevents it from becoming soggy.
- Cool Crust: Remove the pre-baked crust from the oven and let it cool completely while you prepare the cheesecake filling. This is crucial for preventing the crust from melting the butter in the filling.
Step 2: Make the Creamy Cheesecake Filling (Approx. 20 minutes)
- Beat Cream Cheese and Sugar: In a large bowl or the bowl of a stand mixer fitted with the paddle attachment, beat the softened cream cheese on medium speed until smooth and creamy. Gradually add the granulated sugar and continue beating until light and fluffy. Scrape down the sides of the bowl as needed to ensure everything is evenly incorporated. Properly creaming the cream cheese and sugar is key to a smooth and lump-free cheesecake.
- Incorporate Eggs One at a Time: Beat in the eggs one at a time, incorporating each egg fully before adding the next. Beat on low speed after each addition to prevent overmixing, which can lead to cracks in the cheesecake.
- Add Sour Cream, Vanilla, and Salt: Stir in the sour cream, vanilla extract, and salt. Mix until just combined and smooth. Be careful not to overmix at this stage. Overmixing can incorporate too much air into the batter, which can also contribute to cracking.
Step 3: Assemble and Bake the Cheesecake (Approx. 1 hour 15 minutes)
- Pour Filling into Crust: Pour the cheesecake filling over the cooled graham cracker crust in the springform pan. Smooth the top of the filling with a spatula to ensure an even surface.
- Bake in Water Bath (Recommended for Best Texture): For the creamiest, crack-free cheesecake, bake it in a water bath. Wrap the bottom of the springform pan tightly with heavy-duty aluminum foil to prevent water from seeping in. Place the wrapped pan inside a larger roasting pan. Pour hot water into the roasting pan until it reaches about halfway up the sides of the springform pan.
- Bake Cheesecake: Carefully place the roasting pan with the cheesecake and water bath in the preheated oven. Bake for 60-75 minutes, or until the cheesecake is set around the edges but still slightly jiggly in the center. The center should move slightly when you gently shake the pan, but it shouldn’t be liquid.
- Turn Off Oven and Let Cool Gradually: Once the cheesecake is baked, turn off the oven and leave the oven door slightly ajar. Let the cheesecake cool in the oven for 1 hour. This gradual cooling process helps prevent cracking.
- Remove from Oven and Water Bath: Carefully remove the cheesecake from the oven and the water bath. Let it cool completely on a wire rack at room temperature.
- Chill Cheesecake: Once cooled to room temperature, cover the cheesecake loosely with plastic wrap and refrigerate for at least 6 hours, or preferably overnight. Chilling allows the cheesecake to fully set and develop its flavor.
Step 4: Decorate with Easter Eggs (Just Before Serving)
- Remove Cheesecake from Pan: Run a thin knife or spatula around the edge of the cheesecake to loosen it from the springform pan. Carefully release the springform pan sides and remove them.
- Arrange Easter Eggs: Just before serving, arrange the assorted Easter eggs on top of the cheesecake. Get creative with your arrangement! You can create a random scattering, a decorative border, or even a more intricate design.
- Optional Garnishes: If desired, add whipped cream rosettes, fresh berries, or chocolate shavings around the Easter eggs for extra flair.
Step 5: Serve and Enjoy!
Slice and serve your beautiful Easter Egg Cheesecake. Prepare for rave reviews!
Nutrition
- Serving Size: one normal portion
- Calories: 450-550
- Sugar: 25-35g
- Sodium: 200-250mg
- Fat: 30-40g
- Saturated Fat: 20-25g
- Carbohydrates: 30-40g
- Protein: 8-10g
- Cholesterol: 150-200mg