The first time I pulled a batch of this Crispy Breaded Chicken from my air fryer, the aroma alone had my family flocking to the kitchen. I’d been chasing that perfect, guilt-free crunch – the kind you usually only get from deep-frying – and let me tell you, this recipe absolutely nails it. The chicken was unbelievably juicy on the inside, encased in a shatteringly crisp, golden-brown crust that sang with flavor. My kids, usually picky eaters, devoured their portions and asked for seconds, declaring it “better than chicken nuggets” (high praise indeed!). Even my skeptical husband, who often eyes “healthy” alternatives with suspicion, was an instant convert. It’s become a weekly staple in our house, not just because it’s delicious, but because it’s so incredibly easy to make with minimal cleanup. This recipe isn’t just about eating healthier; it’s about enjoying incredibly satisfying food that brings everyone to the table with a smile.
The Ultimate Crispy Breaded Chicken in the Air Fryer: Your New Family Favorite
Welcome to the definitive guide to achieving a flawlessly crispy, incredibly flavorful, and wonderfully juicy breaded chicken breast, all thanks to the magic of your air fryer. If you’ve been searching for a healthier alternative to traditional fried chicken without sacrificing that coveted crunch and taste, you’ve landed in the right place. This recipe is meticulously designed to deliver restaurant-quality results from the comfort of your own kitchen, using simple ingredients and straightforward steps. We’ll cover everything from selecting the right chicken to the secrets of the perfect breading, and even how to serve it up for maximum enjoyment. Prepare to be amazed by how easy it is to create a dish that’s both a crowd-pleaser and a weeknight warrior. Say goodbye to greasy pans and hello to golden perfection!
Ingredients for Crispy Air Fryer Breaded Chicken
Achieving the perfect balance of crispy coating and juicy chicken starts with the right ingredients. Here’s what you’ll need to serve approximately 4 people:
- For the Chicken:
- 2 large boneless, skinless chicken breasts (about 1.5 lbs or 680g total), pounded to ½-inch thickness and halved crosswise to make 4 cutlets
- 1 teaspoon salt (or to taste)
- ½ teaspoon black pepper (or to taste)
- For the Breading Station:
- Dish 1 (Flour Dredge):
- ½ cup (60g) all-purpose flour
- 1 teaspoon smoked paprika (sweet paprika can be substituted)
- ½ teaspoon garlic powder
- ½ teaspoon onion powder
- Dish 2 (Egg Wash):
- 2 large eggs
- 1 tablespoon water or milk
- Dish 3 (Breadcrumb Coating):
- 1 ½ cups (90g) Panko breadcrumbs (these are key for extra crispiness)
- ½ teaspoon dried Italian seasoning (optional, but adds nice flavor)
- ¼ teaspoon salt
- Pinch of cayenne pepper (optional, for a little kick)
- Dish 1 (Flour Dredge):
- For Air Frying:
- Olive oil spray or avocado oil spray (high smoke point preferred)
Why these ingredients?
- Chicken Breasts: Pounding them to an even thickness ensures they cook uniformly, preventing dry edges and undercooked centers. Halving them makes for manageable portions and quicker cooking.
- Salt and Pepper (on chicken): Seasoning the chicken directly before breading ensures the meat itself is flavorful, not just the coating.
- All-Purpose Flour: Provides a dry surface for the egg wash to cling to, which in turn helps the breadcrumbs adhere perfectly. The added spices in the flour begin the layering of flavor.
- Smoked Paprika, Garlic Powder, Onion Powder: These are classic flavor enhancers that complement chicken beautifully. Smoked paprika adds a subtle, delicious smokiness.
- Eggs & Water/Milk: The protein in the egg acts as a binder, creating a sticky surface for the breadcrumbs. A little liquid thins it slightly for easier coating.
- Panko Breadcrumbs: These Japanese-style breadcrumbs are larger and flakier than traditional breadcrumbs. They absorb less oil and create a much crispier, lighter texture when air fried.
- Italian Seasoning & Cayenne: Adds an extra dimension of herby flavor and a touch of warmth to the crust.
- Oil Spray: Essential for air frying. A light mist of oil helps the breadcrumbs turn golden brown and achieve that desirable fried-like crispiness. Without it, the breading can be dry and pale.
Step-by-Step Instructions for Perfect Air Fryer Crispy Chicken
Follow these instructions carefully for breaded chicken that’s crispy on the outside and tender and juicy on the inside.
- Prepare the Chicken:
- If your chicken breasts are very thick, place them one at a time between two sheets of plastic wrap or inside a large zip-top bag. Using a meat mallet, rolling pin, or even a heavy pan, gently pound the chicken to an even thickness of about ½ inch. This is crucial for even cooking.
- Pat the chicken breasts dry with paper towels. This helps the flour adhere better.
- Season both sides of the chicken cutlets generously with the 1 teaspoon of salt and ½ teaspoon of black pepper. Set aside.
- Set Up Your Breading Station:
- You’ll need three shallow dishes or plates large enough to fit a chicken cutlet.
- Dish 1 (Flour): In the first dish, whisk together the all-purpose flour, smoked paprika, garlic powder, and onion powder until well combined.
- Dish 2 (Egg): In the second dish, crack the eggs and add the tablespoon of water or milk. Whisk vigorously until the yolks and whites are fully combined and slightly frothy.
- Dish 3 (Panko): In the third dish, combine the Panko breadcrumbs, Italian seasoning (if using), ¼ teaspoon salt, and pinch of cayenne pepper (if using). Mix well.
- Arrange the dishes in an assembly line: Chicken -> Flour Mixture -> Egg Wash -> Panko Mixture -> Clean Plate (for breaded chicken).
- Bread the Chicken:
- Working with one chicken cutlet at a time, dredge it in the seasoned flour mixture, ensuring it’s fully coated on all sides. Gently shake off any excess flour.
- Next, dip the flour-coated chicken into the egg wash, allowing any excess egg to drip off. Make sure the entire surface is moistened.
- Finally, transfer the egg-washed chicken to the Panko breadcrumb mixture. Press the Panko firmly onto all sides of the chicken to ensure a thick, even coating. This pressing action is key for a crust that stays put.
- Place the breaded chicken cutlet onto the clean plate. Repeat with the remaining chicken cutlets.
- Preheat the Air Fryer:
- Preheat your air fryer to 380°F (193°C) for at least 5 minutes. Preheating is essential for achieving a crispy crust quickly. If your air fryer doesn’t have a preheat function, simply run it empty at the target temperature for 5 minutes.
- Air Fry the Chicken:
- Lightly spray the air fryer basket with olive oil or avocado oil spray. This prevents sticking and helps with browning.
- Carefully arrange the breaded chicken cutlets in a single layer in the air fryer basket. Do not overcrowd the basket; air needs to circulate around each piece for maximum crispiness. Cook in batches if necessary.
- Lightly spray the tops of the chicken cutlets with more oil spray. This is crucial for that golden, crispy “fried” finish.
- Air fry at 380°F (193°C) for 6-8 minutes.
- After 6-8 minutes, carefully flip the chicken cutlets using tongs. Spray the newly exposed side lightly with oil spray.
- Continue to air fry for another 6-8 minutes, or until the chicken is golden brown, crispy, and cooked through. The internal temperature should reach 165°F (74°C) when checked with a meat thermometer inserted into the thickest part of the chicken. Cooking time will vary depending on the thickness of your chicken and your specific air fryer model.
- Rest and Serve:
- Once cooked, carefully remove the chicken from the air fryer and transfer it to a wire rack for a few minutes. Resting allows the juices to redistribute, ensuring a more tender and flavorful result, and helps maintain crispiness by preventing steam from making the bottom soggy.
- Serve hot and enjoy your incredibly crispy breaded chicken!
Nutrition Facts (Estimated)
- Servings: 4 (assuming each person eats one cutlet)
- Calories per serving: Approximately 380-450 calories
Disclaimer: Nutritional information is an estimate and can vary depending on the exact size of the chicken breasts, specific brands of ingredients used, and the amount of oil absorbed during cooking (which is minimal in air frying). For precise nutritional data, it’s best to use a nutrition calculator with your specific ingredients and quantities.
This calorie range makes it a significantly lighter option compared to deep-fried chicken, which can easily pack 600-800 calories or more per serving, largely due to the absorbed oil. The air fryer allows us to achieve that satisfying crunch with a fraction of the fat.
Preparation and Cooking Time
- Preparation Time: 15-20 minutes (includes pounding chicken, setting up breading station, and breading)
- Preheating Time: 5 minutes
- Cook Time: 12-16 minutes (per batch, if cooking in multiple batches)
- Total Time: Approximately 32-41 minutes (for one batch)
This quick turnaround makes it an excellent choice for busy weeknights when you want a satisfying, home-cooked meal without spending hours in the kitchen.
How to Serve Your Crispy Air Fryer Chicken
The beauty of this crispy breaded chicken lies in its versatility. It can be the star of many different meals. Here are some delicious ways to serve it:
- Classic Comfort Meal:
- Serve alongside creamy mashed potatoes (try garlic mashed potatoes for extra flavor!).
- Pair with a side of steamed green beans tossed with a little butter and lemon zest, or roasted broccoli/asparagus.
- A dollop of country gravy on the side for dipping or drizzling.
- Lighter Fare:
- Slice the chicken and serve it atop a fresh garden salad with your favorite vinaigrette. Think mixed greens, cherry tomatoes, cucumbers, and carrots.
- Create a chicken Caesar salad by tossing romaine lettuce with Caesar dressing, Parmesan cheese, croutons (optional), and the sliced crispy chicken.
- Serve with a side of quinoa salad or a vibrant Mediterranean couscous salad.
- Sandwiches and Wraps:
- Make the ultimate crispy chicken sandwich: Layer a cutlet on a toasted brioche bun with lettuce, tomato, pickles, and your favorite sauce (mayonnaise, spicy aioli, or honey mustard).
- Slice the chicken and use it as a filling for wraps with shredded lettuce, diced tomatoes, cheese, and ranch dressing.
- Kid-Friendly Options:
- Serve with a side of air fryer French fries or sweet potato fries for a healthier take on a fast-food favorite.
- Offer a variety of dipping sauces like ketchup, honey mustard, BBQ sauce, or ranch dressing.
- Italian Inspired:
- Top the cooked crispy chicken with a spoonful of marinara sauce and a slice of mozzarella cheese. Return to the air fryer for 1-2 minutes, or until the cheese is melted and bubbly, for a quick Chicken Parmesan-style dish. Serve with spaghetti.
- Global Flavors:
- Serve with a side of Japanese curry sauce and rice for a Katsu-style meal.
- Pair with a spicy Sriracha mayo or a sweet chili sauce for an Asian-inspired kick.
No matter how you choose to serve it, this chicken is sure to impress!
Additional Tips for Crispy Chicken Perfection
Unlock the full potential of your air fryer and this recipe with these expert tips:
- Don’t Overcrowd the Basket: This is perhaps the most crucial tip for air frying anything, especially breaded items. Overcrowding traps steam and prevents the hot air from circulating properly around each piece of chicken. This leads to soggy spots instead of all-over crispiness. Cook in batches if your air fryer isn’t large enough to hold all the chicken in a single layer with space between pieces. It’s worth the extra few minutes!
- Pound for Evenness & Tenderness: Pounding the chicken breasts to an even ½-inch thickness serves two purposes. Firstly, it ensures the chicken cooks evenly, so you don’t have parts that are dry and overcooked while others are still pink. Secondly, the pounding action helps to tenderize the meat, resulting in a more enjoyable texture.
- Panko is Your Crispy Best Friend: While regular breadcrumbs will work, Panko breadcrumbs are specifically designed to be lighter, airier, and create a much crispier coating. They absorb less oil and provide that signature crunch we’re aiming for. For the ultimate crispy texture, Panko is non-negotiable. You can often find them in the Asian foods aisle or alongside other breadcrumbs.
- Season Every Layer, Liberally: Flavor isn’t just about the chicken itself; it’s about building layers of taste. Season the chicken directly, then season the flour, and finally, season the Panko breadcrumbs. This ensures every bite is packed with flavor, from the inside out. Don’t be shy with the salt, pepper, paprika, and garlic/onion powders – they make a big difference.
- The Magic of Oil Spray (and Preheating!): Preheating your air fryer is like preheating an oven; it gets the cooking environment to the right temperature so the chicken starts crisping up immediately. Then, a light but thorough spritz of oil spray on the breaded chicken before and during cooking is what helps the Panko turn that beautiful golden brown and achieve maximum crispiness. It mimics the effect of deep frying without soaking the chicken in oil. Use a high smoke point oil like avocado, grapeseed, or a light olive oil spray.
By keeping these tips in mind, you’ll elevate your air fryer chicken game from good to absolutely sensational.
Frequently Asked Questions (FAQ) About Air Fryer Crispy Breaded Chicken
Here are answers to some common questions you might have about making this delicious dish:
- Q: Can I use frozen chicken breasts for this recipe?
A: It’s highly recommended to use thawed chicken breasts. If you try to bread and air fry frozen chicken, the breading may not adhere properly, and the chicken will likely cook unevenly. The outside could burn before the inside is cooked through, and excess moisture from the thawing process during cooking can result in a soggy crust. For best results, thaw chicken breasts completely in the refrigerator before starting. - Q: How do I make the chicken spicier?A: There are several ways to add more heat!
- Increase the amount of cayenne pepper in the Panko breadcrumb mixture.
- Add a pinch of red pepper flakes to the Panko.
- Mix a teaspoon or two of your favorite hot sauce (like Sriracha or Frank’s RedHot) into the egg wash.
- Add a pinch of chipotle powder to the flour mixture for a smoky heat.
Adjust the spice level to your preference.
- Q: Can I use regular breadcrumbs instead of Panko?
A: Yes, you can use regular fine breadcrumbs, but the texture will be different. Panko breadcrumbs are much lighter and flakier, which results in a significantly crispier and crunchier coating. Regular breadcrumbs will produce a denser, more traditional breaded coating. If crispiness is your top priority, Panko is definitely the way to go. - Q: How do I store and reheat leftover crispy chicken?
A: Store leftover cooked chicken in an airtight container in the refrigerator for up to 3-4 days. To reheat and maintain crispiness, the air fryer is your best bet! Preheat the air fryer to 350-375°F (175-190°C) and reheat the chicken for 3-5 minutes, or until warmed through and crispy again. Avoid reheating in the microwave, as this will make the breading soft and soggy. - Q: My breading isn’t sticking well. What am I doing wrong?A: Several factors can cause breading issues:
- Wet Chicken: Ensure you pat the chicken thoroughly dry with paper towels before dredging in flour. Moisture prevents the flour from sticking.
- Skipping Flour: The flour dredge is essential as it gives the egg wash something to grip.
- Excess Egg: Allow excess egg to drip off before moving to the breadcrumbs. Too much egg can make the breading slide off.
- Not Pressing Panko: Make sure to firmly press the Panko breadcrumbs onto the chicken. This helps them adhere securely.
- Overcrowding: If pieces are too close, steam can loosen the breading.
By following these tips and the detailed recipe, you’re well on your way to making the crispiest, most flavorful breaded chicken you’ve ever had from an air fryer. It’s a game-changer for quick, healthy, and delicious meals! Enjoy!
Print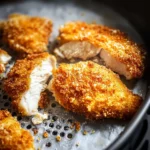
Crispy Air Fryer Breaded Chicken Recipe
Ingredients
- For the Chicken:
- 2 large boneless, skinless chicken breasts (about 1.5 lbs or 680g total), pounded to ½-inch thickness and halved crosswise to make 4 cutlets
- 1 teaspoon salt (or to taste)
- ½ teaspoon black pepper (or to taste)
- For the Breading Station:
- Dish 1 (Flour Dredge):
- ½ cup (60g) all-purpose flour
- 1 teaspoon smoked paprika (sweet paprika can be substituted)
- ½ teaspoon garlic powder
- ½ teaspoon onion powder
- Dish 2 (Egg Wash):
- 2 large eggs
- 1 tablespoon water or milk
- Dish 3 (Breadcrumb Coating):
- 1 ½ cups (90g) Panko breadcrumbs (these are key for extra crispiness)
- ½ teaspoon dried Italian seasoning (optional, but adds nice flavor)
- ¼ teaspoon salt
- Pinch of cayenne pepper (optional, for a little kick)
- Dish 1 (Flour Dredge):
- For Air Frying:
- Olive oil spray or avocado oil spray (high smoke point preferred)
Instructions
- Prepare the Chicken:
- If your chicken breasts are very thick, place them one at a time between two sheets of plastic wrap or inside a large zip-top bag. Using a meat mallet, rolling pin, or even a heavy pan, gently pound the chicken to an even thickness of about ½ inch. This is crucial for even cooking.
- Pat the chicken breasts dry with paper towels. This helps the flour adhere better.
- Season both sides of the chicken cutlets generously with the 1 teaspoon of salt and ½ teaspoon of black pepper. Set aside.
- Set Up Your Breading Station:
- You’ll need three shallow dishes or plates large enough to fit a chicken cutlet.
- Dish 1 (Flour): In the first dish, whisk together the all-purpose flour, smoked paprika, garlic powder, and onion powder until well combined.
- Dish 2 (Egg): In the second dish, crack the eggs and add the tablespoon of water or milk. Whisk vigorously until the yolks and whites are fully combined and slightly frothy.
- Dish 3 (Panko): In the third dish, combine the Panko breadcrumbs, Italian seasoning (if using), ¼ teaspoon salt, and pinch of cayenne pepper (if using). Mix well.
- Arrange the dishes in an assembly line: Chicken -> Flour Mixture -> Egg Wash -> Panko Mixture -> Clean Plate (for breaded chicken).
- Bread the Chicken:
- Working with one chicken cutlet at a time, dredge it in the seasoned flour mixture, ensuring it’s fully coated on all sides. Gently shake off any excess flour.
- Next, dip the flour-coated chicken into the egg wash, allowing any excess egg to drip off. Make sure the entire surface is moistened.
- Finally, transfer the egg-washed chicken to the Panko breadcrumb mixture. Press the Panko firmly onto all sides of the chicken to ensure a thick, even coating. This pressing action is key for a crust that stays put.
- Place the breaded chicken cutlet onto the clean plate. Repeat with the remaining chicken cutlets.
- Preheat the Air Fryer:
- Preheat your air fryer to 380°F (193°C) for at least 5 minutes. Preheating is essential for achieving a crispy crust quickly. If your air fryer doesn’t have a preheat function, simply run it empty at the target temperature for 5 minutes.
- Air Fry the Chicken:
- Lightly spray the air fryer basket with olive oil or avocado oil spray. This prevents sticking and helps with browning.
- Carefully arrange the breaded chicken cutlets in a single layer in the air fryer basket. Do not overcrowd the basket; air needs to circulate around each piece for maximum crispiness. Cook in batches if necessary.
- Lightly spray the tops of the chicken cutlets with more oil spray. This is crucial for that golden, crispy “fried” finish.
- Air fry at 380°F (193°C) for 6-8 minutes.
- After 6-8 minutes, carefully flip the chicken cutlets using tongs. Spray the newly exposed side lightly with oil spray.
- Continue to air fry for another 6-8 minutes, or until the chicken is golden brown, crispy, and cooked through. The internal temperature should reach 165°F (74°C) when checked with a meat thermometer inserted into the thickest part of the chicken. Cooking time will vary depending on the thickness of your chicken and your specific air fryer model.
- Rest and Serve:
- Once cooked, carefully remove the chicken from the air fryer and transfer it to a wire rack for a few minutes. Resting allows the juices to redistribute, ensuring a more tender and flavorful result, and helps maintain crispiness by preventing steam from making the bottom soggy.
- Serve hot and enjoy your incredibly crispy breaded chicken!
Nutrition
- Serving Size: One Normal Portion
- Calories: 380-450