


Okay, let’s dive into a dessert that’s the culinary equivalent of a standing ovation – Crème Brûlée Cheesecake Cupcakes! The first time I made these, I was a little intimidated. Cheesecake can be finicky, and crème brûlée? That torched sugar top seemed like something best left to restaurant chefs. But let me tell you, the moment my family took their first bite, any apprehension melted away. The creamy, tangy cheesecake base, richer than usual thanks to a nod to custard techniques, combined with that shatteringly crisp, caramelized sugar crust… it was pure magic. My kids, usually picky, were begging for seconds before they’d even finished their first. My husband, a man of few words when it comes to sweets, simply closed his eyes and smiled. These cupcakes have since become my go-to for special occasions, potlucks, or just when we need a little bit of extraordinary in our week. They look incredibly impressive, yet the process is surprisingly manageable. Get ready to wow yourself and everyone you share them with!
The Ultimate Crème Brûlée Cheesecake Cupcakes: A Decadent Duo
This recipe brings together the best of two worlds: the rich, tangy creaminess of cheesecake and the sophisticated, crackly-topped sweetness of crème brûlée, all in a perfectly portioned cupcake. It’s a showstopper dessert that’s guaranteed to impress.
Ingredients: Crafting Your Masterpiece
To achieve the perfect balance of flavors and textures, quality ingredients are key. Here’s what you’ll need:
For the Graham Cracker Crust:
- 1 ½ cups (about 150g) graham cracker crumbs (from about 10-12 full graham crackers)
- ¼ cup (50g) granulated sugar
- 6 tablespoons (85g) unsalted butter, melted
For the Cheesecake Filling:
- 16 ounces (452g) full-fat cream cheese, softened to room temperature (two 8-ounce blocks)
- 1 cup (200g) granulated sugar
- 2 large eggs, room temperature
- 2 large egg yolks, room temperature (these add richness, key for the crème brûlée feel)
- ¼ cup (60ml) heavy cream, room temperature
- 1 tablespoon all-purpose flour (helps prevent cracking)
- 1 teaspoon pure vanilla extract
- Pinch of salt
For the Crème Brûlée Topping:
- ½ cup (100g) granulated sugar (or superfine/caster sugar for easier caramelization), approximately
Equipment Needed:
- Standard 12-cup muffin tin
- Paper cupcake liners
- Food processor (optional, for graham cracker crumbs)
- Electric mixer (stand or handheld)
- Rubber spatula
- Small bowls for ingredients
- Measuring cups and spoons
- Kitchen torch
Instructions: Your Path to Crème Brûlée Cheesecake Bliss
Follow these steps carefully for cupcake perfection. Remember, baking is a science, and precision often leads to the best results!
Phase 1: Preparing the Perfect Crust
- Preheat & Prep: Preheat your oven to 325°F (160°C). Line a 12-cup standard muffin tin with paper cupcake liners. This recipe might yield slightly more or less depending on how full you make them, so having a couple of extra liners on standby is a good idea.
- Make the Crumbs: If you’re not using pre-made graham cracker crumbs, place your graham crackers into a food processor and pulse until they form fine crumbs. Alternatively, place them in a zip-top bag and crush them with a rolling pin. Measure out 1 ½ cups of crumbs.
- Combine Crust Ingredients: In a small bowl, combine the graham cracker crumbs, ¼ cup of granulated sugar, and the melted unsalted butter. Stir with a fork until the mixture is well combined and resembles wet sand.
- Press into Liners: Distribute the crumb mixture evenly among the prepared cupcake liners. Use the bottom of a small glass or a tablespoon measure to press the crumbs down firmly into an even layer at the bottom of each liner. This firm packing is crucial for a crust that holds together.
- Pre-Bake the Crust: Bake the crusts for 5-7 minutes, just until set and fragrant. Remove from the oven and set aside to cool slightly while you prepare the cheesecake filling. Do not turn off the oven.
Phase 2: Crafting the Creamy Cheesecake Filling
- Beat Cream Cheese: In the bowl of a stand mixer fitted with the paddle attachment, or in a large bowl using a handheld electric mixer, beat the softened cream cheese on medium speed until completely smooth and free of lumps. This step is vital – scrape down the sides and bottom of the bowl frequently to ensure there are no hidden lumps. Room temperature cream cheese is essential for this. If it’s too cold, it won’t blend smoothly.
- Add Sugar: Gradually add the 1 cup of granulated sugar to the cream cheese, beating on medium-low speed until just combined and smooth. Again, scrape down the bowl. Overbeating at this stage can incorporate too much air, leading to cracks later.
- Incorporate Eggs and Yolks: Add the room temperature large eggs and egg yolks one at a time, beating on low speed until just incorporated after each addition. Do not overmix! Overmixing eggs is a primary cause of cheesecake cracking and a tough texture. The mixture should look homogenous.
- Add Wet Ingredients & Flour: Gently stir in the room temperature heavy cream, pure vanilla extract, all-purpose flour, and pinch of salt on low speed until just combined. The flour helps to bind the cheesecake and can reduce the risk of cracking. Scrape the bowl one last time to ensure everything is evenly mixed, but be careful not to overdo it. The batter should be thick, smooth, and luscious.
Phase 3: Assembling and Baking the Cheesecakes
- Fill the Liners: Carefully divide the cheesecake batter evenly among the cupcake liners, filling each one almost to the top (about ¾ to ⅞ full). The cheesecakes won’t rise dramatically like regular cupcakes.
- Bake the Cheesecakes: Place the muffin tin into the preheated 325°F (160°C) oven. Bake for 18-22 minutes. The cheesecakes are done when the edges are set, but the centers still have a slight wobble – they shouldn’t be liquid, but not entirely firm either. They will continue to cook and set as they cool. Overbaking will result in a dry, crumbly texture and potential cracks.
- Cool Down Gradually: Once baked, turn off the oven, prop the oven door open slightly with a wooden spoon, and let the cheesecakes cool in the oven for 30 minutes. This gradual cooling process helps prevent cracking.
- Cool to Room Temperature: After 30 minutes in the turned-off oven, carefully remove the muffin tin and let the cheesecakes cool completely on a wire rack at room temperature (about 1-2 hours).
Phase 4: Chilling – The Key to Texture
- Refrigerate: Once the cheesecakes have cooled to room temperature, cover the muffin tin loosely with plastic wrap (try not to let the plastic touch the tops of the cheesecakes) and transfer to the refrigerator. Chill for at least 4 hours, but preferably overnight. This chilling period is crucial for the cheesecake to fully set and for the flavors to meld. Do not rush this step!
Phase 5: The Crème Brûlée Magic – Torching!
- Prepare for Torching: Just before you plan to serve, remove the chilled cheesecakes from the refrigerator. If there’s any condensation on top, gently blot it with a paper towel.
- Sugar Coating: Sprinkle about 1 to 1 ½ teaspoons of granulated sugar (superfine sugar works best as it melts and caramelizes more evenly) over the top of each cheesecake, creating a thin, even layer. Ensure the entire surface is covered.
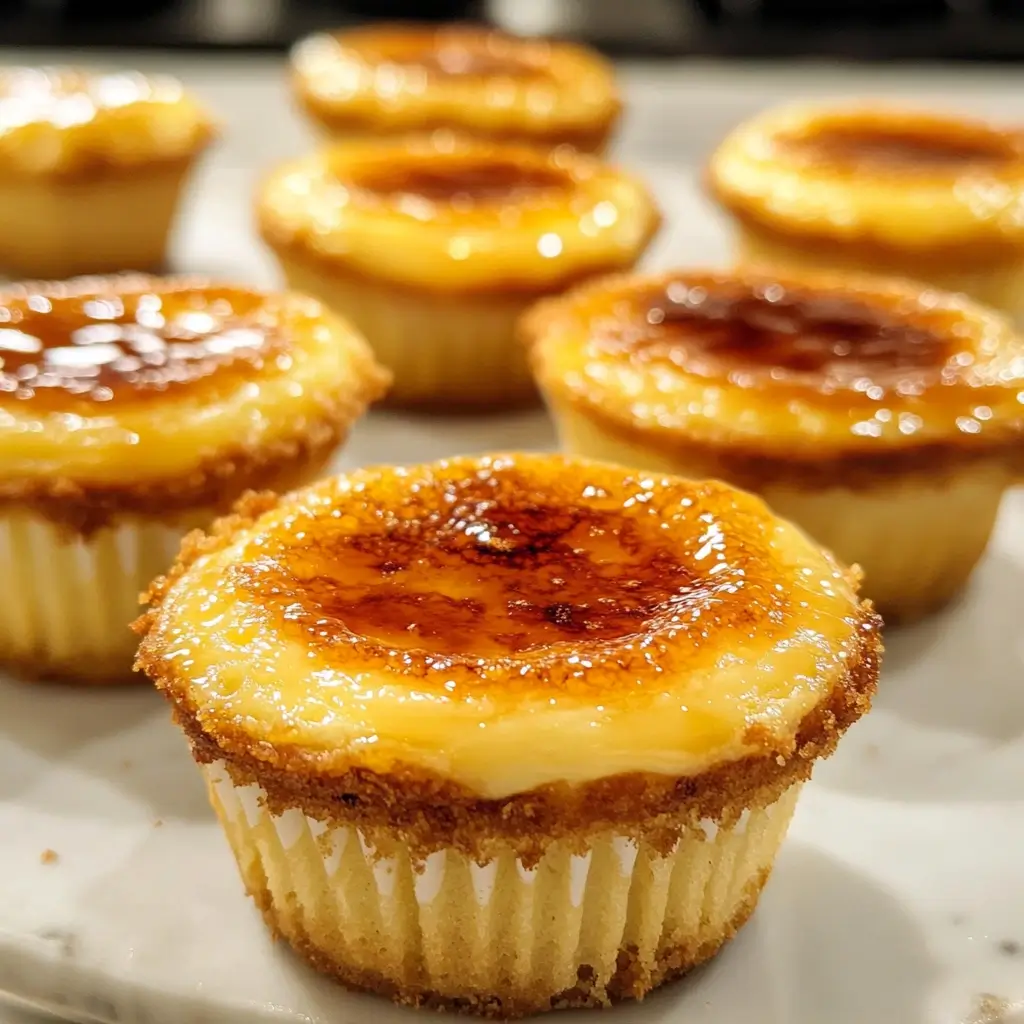
- Torch the Sugar: Using a kitchen torch, hold the flame a few inches away from the sugar. Move the torch continuously and slowly over the surface until the sugar melts, bubbles, and then caramelizes into a beautiful amber-brown, brittle crust. Be careful not to burn the sugar; you’re looking for a deep golden brown. If you don’t have a kitchen torch, see the FAQ section for an alternative (though a torch yields the best results).
- Rest Briefly: Let the caramelized sugar cool and harden for a minute or two before serving. This is when that signature “crack” develops.
Nutrition Facts
- Servings: 12 cupcakes
- Calories per serving: Approximately 350-400 calories (This is an estimate and can vary based on specific ingredient brands and exact serving sizes.)
Disclaimer: The nutritional information provided is an estimate and should not be considered a substitute for a professional nutritionist’s analysis.
Preparation Time
- Active Preparation Time: 30-40 minutes (includes making crust, filling, and assembling)
- Baking Time: 18-22 minutes
- Cooling Time (in oven): 30 minutes
- Cooling Time (room temperature): 1-2 hours
- Chilling Time (refrigerator): At least 4 hours, preferably overnight (8+ hours)
- Torching Time: 5-10 minutes (just before serving)
- Total Time (excluding overnight chill): Approximately 2.5 – 3.5 hours
- Total Time (including overnight chill): Approximately 10.5 – 11.5 hours
How to Serve Your Crème Brûlée Cheesecake Cupcakes
These cupcakes are a statement on their own, but here are some ideas to elevate the experience:
- Simply Elegant: Serve them as is, allowing the contrast between the creamy cheesecake and the crisp brûléed top to shine. The crackle of the sugar as a spoon breaks through is part of the joy!
- Fresh Berry Garnish:
- A single raspberry or a few blueberries on top or alongside can add a touch of color and a tart counterpoint.
- A small fan of sliced strawberries looks beautiful.
- A Dusting of Powdered Sugar: If you opt for a berry garnish, a very light dusting of powdered sugar around the plate (not on the brûléed top, as it will absorb moisture) can look pretty.
- With a Dollop of Cream:
- A small dollop of freshly whipped, lightly sweetened cream can add another layer of richness.
- Consider a stabilized whipped cream if preparing slightly ahead.
- Sauce Drizzle:
- A delicate drizzle of raspberry coulis or salted caramel sauce around the cupcake on the plate can complement the flavors.
- Coffee or Tea Pairing: These cupcakes are divine with a cup of freshly brewed coffee, espresso, or a contrasting black tea like Earl Grey.
- Dessert Wine: For an adult gathering, a small glass of a sweet dessert wine, like a Sauternes or a late-harvest Riesling, would be an exquisite pairing.
- Individual Presentation: Serve each cupcake on its own small dessert plate with a dessert fork or spoon.
- Important Note: Always torch the sugar just before serving. The caramelized sugar will absorb moisture from the cheesecake over time and lose its crispness.
Additional Tips for Crème Brûlée Cheesecake Cupcake Perfection
- Room Temperature is King: This cannot be stressed enough for cheesecake. Ensure your cream cheese, eggs, and heavy cream are all at room temperature. This helps them blend smoothly, preventing lumps and reducing the need for overmixing, which can lead to cracks. Take them out of the fridge at least 1-2 hours before you begin.
- Don’t Overmix the Batter: Especially after adding the eggs, mix only until the ingredients are just combined. Overmixing incorporates too much air, which can cause the cheesecakes to puff up excessively during baking and then collapse or crack as they cool. A gentle hand is key.
- The Art of the Torch: If you’re new to using a kitchen torch, practice on a spoonful of sugar on a fireproof surface first. Keep the flame moving constantly to avoid burning one spot. You’re looking for an even, amber caramelization. Superfine (caster) sugar often caramelizes more easily and evenly than regular granulated sugar.
- Water Bath (Optional for Cupcakes, But Good to Know): While not strictly necessary for cupcakes like it is for a full-sized cheesecake (due to their smaller size and shorter baking time), if you’re prone to cheesecake cracking, you could place the muffin tin in a larger baking pan and add about an inch of hot water around it. This creates a steamy environment. However, the gradual cooling in the turned-off oven method usually suffices for cupcakes. Baking at a moderate temperature like 325°F also helps.
- Patience with Chilling: The chilling process is non-negotiable for cheesecake. It allows the structure to set fully, resulting in that dense, creamy texture we all love. It also allows the flavors to meld and deepen. Attempting to torch or serve them too early will result in a soft, possibly runny, mess.
FAQ: Your Crème Brûlée Cheesecake Cupcake Questions Answered
Q1: I don’t have a kitchen torch. Can I still make the brûlée topping?
A: Yes, you can use your oven’s broiler, but it’s trickier and the results might be less even. Place the sugared cheesecakes (ensure they are very cold) on a baking sheet. Position the oven rack so the tops of the cheesecakes are about 2-4 inches from the broiler element. Turn the broiler on high and watch them constantly. They can go from caramelized to burnt in seconds. Rotate the pan as needed for even browning. A torch offers much more control and better results.
Q2: Can I make these Crème Brûlée Cheesecake Cupcakes ahead of time?
A: Absolutely! You can bake and chill the cheesecakes up to 2-3 days in advance. Keep them covered in the refrigerator. However, do not add and torch the sugar topping until just before you plan to serve them. The caramelized sugar will absorb moisture from the cheesecake and become soft and weepy if done too far ahead.
Q3: My cheesecakes cracked! What did I do wrong?
A: Cracking can happen for several reasons:
* Overmixing: Too much air incorporated, especially after adding eggs.
* Ingredients too cold: Cream cheese wasn’t fully softened, leading to lumps and overbeating.
* Overbaking: Even a few extra minutes can dry them out.
* Cooling too quickly: Drastic temperature changes can cause cracks. The gradual cooling in the oven helps prevent this.
Don’t worry too much if they crack – the brûléed sugar topping will hide most imperfections, and they’ll still taste delicious!
Q4: How should I store leftover Crème Brûlée Cheesecake Cupcakes?
A: Leftovers (if any!) should be stored in an airtight container in the refrigerator. They are best consumed within 3-4 days. Note that the brûléed topping will likely soften and liquefy in the fridge over time. For best texture, it’s ideal to only torch the number of cupcakes you plan to eat immediately.
Q5: Can I add other flavorings to the cheesecake batter?
A: Certainly! While the classic vanilla is perfect for the crème brûlée profile, you could experiment. Consider adding a teaspoon of lemon zest for a brighter note, or a tablespoon of a complementary liqueur like Grand Marnier or Amaretto (reduce heavy cream slightly if adding liquid). You could also try a different crust, like Oreo crumbs for a chocolate contrast, though graham cracker is traditional for pairing with the crème brûlée flavor.

Crème Brûlée Cheesecake Cupcake Recipe
Ingredients
For the Graham Cracker Crust:
- 1 ½ cups (about 150g) graham cracker crumbs (from about 10–12 full graham crackers)
- ¼ cup (50g) granulated sugar
- 6 tablespoons (85g) unsalted butter, melted
For the Cheesecake Filling:
- 16 ounces (452g) full-fat cream cheese, softened to room temperature (two 8-ounce blocks)
- 1 cup (200g) granulated sugar
- 2 large eggs, room temperature
- 2 large egg yolks, room temperature (these add richness, key for the crème brûlée feel)
- ¼ cup (60ml) heavy cream, room temperature
- 1 tablespoon all-purpose flour (helps prevent cracking)
- 1 teaspoon pure vanilla extract
- Pinch of salt
For the Crème Brûlée Topping:
- ½ cup (100g) granulated sugar (or superfine/caster sugar for easier caramelization), approximately
Instructions
Phase 1: Preparing the Perfect Crust
- Preheat & Prep: Preheat your oven to 325°F (160°C). Line a 12-cup standard muffin tin with paper cupcake liners. This recipe might yield slightly more or less depending on how full you make them, so having a couple of extra liners on standby is a good idea.
- Make the Crumbs: If you’re not using pre-made graham cracker crumbs, place your graham crackers into a food processor and pulse until they form fine crumbs. Alternatively, place them in a zip-top bag and crush them with a rolling pin. Measure out 1 ½ cups of crumbs.
- Combine Crust Ingredients: In a small bowl, combine the graham cracker crumbs, ¼ cup of granulated sugar, and the melted unsalted butter. Stir with a fork until the mixture is well combined and resembles wet sand.
- Press into Liners: Distribute the crumb mixture evenly among the prepared cupcake liners. Use the bottom of a small glass or a tablespoon measure to press the crumbs down firmly into an even layer at the bottom of each liner. This firm packing is crucial for a crust that holds together.
- Pre-Bake the Crust: Bake the crusts for 5-7 minutes, just until set and fragrant. Remove from the oven and set aside to cool slightly while you prepare the cheesecake filling. Do not turn off the oven.
Phase 2: Crafting the Creamy Cheesecake Filling
- Beat Cream Cheese: In the bowl of a stand mixer fitted with the paddle attachment, or in a large bowl using a handheld electric mixer, beat the softened cream cheese on medium speed until completely smooth and free of lumps. This step is vital – scrape down the sides and bottom of the bowl frequently to ensure there are no hidden lumps. Room temperature cream cheese is essential for this. If it’s too cold, it won’t blend smoothly.
- Add Sugar: Gradually add the 1 cup of granulated sugar to the cream cheese, beating on medium-low speed until just combined and smooth. Again, scrape down the bowl. Overbeating at this stage can incorporate too much air, leading to cracks later.
- Incorporate Eggs and Yolks: Add the room temperature large eggs and egg yolks one at a time, beating on low speed until just incorporated after each addition. Do not overmix! Overmixing eggs is a primary cause of cheesecake cracking and a tough texture. The mixture should look homogenous.
- Add Wet Ingredients & Flour: Gently stir in the room temperature heavy cream, pure vanilla extract, all-purpose flour, and pinch of salt on low speed until just combined. The flour helps to bind the cheesecake and can reduce the risk of cracking. Scrape the bowl one last time to ensure everything is evenly mixed, but be careful not to overdo it. The batter should be thick, smooth, and luscious.
Phase 3: Assembling and Baking the Cheesecakes
- Fill the Liners: Carefully divide the cheesecake batter evenly among the cupcake liners, filling each one almost to the top (about ¾ to ⅞ full). The cheesecakes won’t rise dramatically like regular cupcakes.
- Bake the Cheesecakes: Place the muffin tin into the preheated 325°F (160°C) oven. Bake for 18-22 minutes. The cheesecakes are done when the edges are set, but the centers still have a slight wobble – they shouldn’t be liquid, but not entirely firm either. They will continue to cook and set as they cool. Overbaking will result in a dry, crumbly texture and potential cracks.
- Cool Down Gradually: Once baked, turn off the oven, prop the oven door open slightly with a wooden spoon, and let the cheesecakes cool in the oven for 30 minutes. This gradual cooling process helps prevent cracking.
- Cool to Room Temperature: After 30 minutes in the turned-off oven, carefully remove the muffin tin and let the cheesecakes cool completely on a wire rack at room temperature (about 1-2 hours).
Phase 4: Chilling – The Key to Texture
- Refrigerate: Once the cheesecakes have cooled to room temperature, cover the muffin tin loosely with plastic wrap (try not to let the plastic touch the tops of the cheesecakes) and transfer to the refrigerator. Chill for at least 4 hours, but preferably overnight. This chilling period is crucial for the cheesecake to fully set and for the flavors to meld. Do not rush this step!
Phase 5: The Crème Brûlée Magic – Torching!
- Prepare for Torching: Just before you plan to serve, remove the chilled cheesecakes from the refrigerator. If there’s any condensation on top, gently blot it with a paper towel.
- Sugar Coating: Sprinkle about 1 to 1 ½ teaspoons of granulated sugar (superfine sugar works best as it melts and caramelizes more evenly) over the top of each cheesecake, creating a thin, even layer. Ensure the entire surface is covered.
- Torch the Sugar: Using a kitchen torch, hold the flame a few inches away from the sugar. Move the torch continuously and slowly over the surface until the sugar melts, bubbles, and then caramelizes into a beautiful amber-brown, brittle crust. Be careful not to burn the sugar; you’re looking for a deep golden brown. If you don’t have a kitchen torch, see the FAQ section for an alternative (though a torch yields the best results).
- Rest Briefly: Let the caramelized sugar cool and harden for a minute or two before serving. This is when that signature “crack” develops.
Nutrition
- Serving Size: One Normal Portion
- Calories: 350-400


