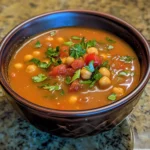
This Chickpea Curry with Coconut Milk has become an absolute lifesaver in our household. I remember the first time I whipped it up; it was one of those hectic Tuesday evenings where everyone was famished, and I needed something quick, nutritious, and satisfying. I’d bookmarked a few chickpea curry recipes, and decided to meld them into something uniquely ours. The aroma alone, as the ginger, garlic, and spices started to sizzle, drew my partner out of his office and the kids away from their screens. When it was finally served over fluffy basmati rice, the silence around the dinner table was golden – everyone was too busy devouring their bowls. My eldest, usually a picky eater, even asked for seconds! Since then, it’s been on regular rotation. It’s incredibly forgiving, easy to adapt with whatever veggies we have on hand, and the creamy, fragrant sauce is just pure comfort. It’s proof that wholesome, plant-based meals can be incredibly delicious and appeal to the whole family, making healthy eating a joy rather than a chore.
Why You’ll Fall in Love with This Chickpea Curry
Beyond its incredible taste, there are so many reasons why this Chickpea Curry with Coconut Milk will become a staple in your kitchen:
- Effortlessly Delicious: This recipe packs a punch of authentic Indian-inspired flavors without requiring a culinary degree. The combination of aromatic spices, creamy coconut milk, and hearty chickpeas creates a symphony of taste that’s both complex and comforting.
- Quick and Easy: Perfect for busy weeknights! From prep to plate, you can have this delightful curry ready in under 40 minutes. Minimal fuss, maximum flavor.
- Budget-Friendly: Chickpeas are an incredibly affordable source of protein and fiber, making this dish kind to your wallet as well as your taste buds.
- Dietary-Friendly: Naturally vegan, gluten-free, and dairy-free, this curry caters to a wide range of dietary needs and preferences without compromising on taste or texture.
- Nutrient-Packed: Loaded with plant-based protein from chickpeas, healthy fats from coconut milk, and a plethora of vitamins and minerals from the spices and aromatics, it’s a meal you can feel good about serving.
- Versatile: Easily customizable! Add your favorite vegetables like spinach, sweet potatoes, or cauliflower. Adjust the spice level to your liking. Serve it with rice, naan, quinoa, or even just a spoon!
- Meal-Prep Champion: This curry tastes even better the next day as the flavors meld together, making it ideal for meal prepping. Cook a big batch on Sunday and enjoy delicious lunches or quick dinners throughout the week.
Ingredients for Creamy Coconut Chickpea Curry
Here’s what you’ll need to gather for this flavor-packed curry. Precise measurements ensure a perfectly balanced dish every time.
- Oil: 2 tablespoons coconut oil (or vegetable oil, avocado oil)
- Aromatics:
- 1 large yellow onion, finely chopped
- 4-5 cloves garlic, minced
- 1-inch piece of fresh ginger, grated (about 1 tablespoon)
- 1 green chili (like jalapeño or serrano), finely chopped (optional, adjust to your spice preference, deseed for less heat)
- Spices:
- 1 ½ teaspoons ground cumin
- 1 ½ teaspoons ground coriander
- 1 teaspoon turmeric powder
- ½ teaspoon smoked paprika (or regular paprika)
- ¼ – ½ teaspoon cayenne pepper or red chili powder (optional, for extra heat)
- 1 teaspoon garam masala (to be added at the end)
- Tomatoes:
- 1 can (14.5 ounces / 400g) diced tomatoes, undrained
- 1 tablespoon tomato paste (optional, for deeper flavor)
- Chickpeas:
- 2 cans (15 ounces / 425g each) chickpeas (garbanzo beans), rinsed and drained
- Coconut Milk:
- 1 can (13.5 ounces / 400ml) full-fat coconut milk (shake well before opening)
- Liquid & Sweetener:
- ½ cup vegetable broth or water (if needed, to adjust consistency)
- 1 teaspoon coconut sugar or maple syrup (optional, to balance acidity)
- Finishing Touches:
- Juice of ½ lime or lemon
- Fresh cilantro, chopped (for garnish)
- Salt and freshly ground black pepper to taste
Step-by-Step Instructions to Make the Perfect Chickpea Curry
Follow these simple steps to create a truly memorable and delicious chickpea curry.
- Prepare the Aromatics: Start by prepping all your ingredients. Finely chop the onion, mince the garlic, grate the ginger, and chop the chili if using. This mise en place will make the cooking process smooth and stress-free.
- Sauté Aromatics: Heat the coconut oil in a large pot, Dutch oven, or deep skillet over medium heat. Once the oil is shimmering, add the chopped onion and sauté for 5-7 minutes, or until softened and translucent, stirring occasionally.
- Add Ginger, Garlic, and Chili: Add the minced garlic, grated ginger, and chopped green chili (if using) to the pot. Cook for another 1-2 minutes, stirring constantly, until fragrant. Be careful not to burn the garlic, as this can make it bitter.
- Bloom the Spices: Add the ground cumin, ground coriander, turmeric powder, smoked paprika, and cayenne pepper (if using) to the pot. Stir continuously and cook for about 1-2 minutes. This step, known as “blooming,” toasts the spices and releases their essential oils, significantly deepening their flavor. The mixture will become very fragrant.
- Incorporate Tomatoes: Stir in the tomato paste (if using) and cook for another minute. Then, add the can of diced tomatoes (undrained). Stir well, scraping up any browned bits from the bottom of the pot – this is where a lot of flavor lies! Bring the mixture to a gentle simmer and cook for 5 minutes, allowing the tomato flavor to develop and meld with the spices.
- Add Chickpeas and Coconut Milk: Pour in the rinsed and drained chickpeas and the full-fat coconut milk. Stir everything together thoroughly to combine. If you’re using coconut sugar or maple syrup, add it now to balance the acidity of the tomatoes.
- Simmer the Curry: Bring the curry to a gentle simmer. Once simmering, reduce the heat to low, cover the pot, and let it cook for 15-20 minutes. This allows the chickpeas to absorb the flavors and the sauce to thicken slightly. Stir occasionally to prevent sticking. If the curry becomes too thick for your liking, you can add a splash of vegetable broth or water to reach your desired consistency.
- Final Seasoning and Flavors: After simmering, remove the curry from the heat. Stir in the garam masala. This spice blend is best added at the end of cooking to preserve its delicate aroma and flavor.
- Taste and Adjust: Taste the curry and adjust seasonings as needed. Add salt and freshly ground black pepper to your preference. Stir in the fresh lime or lemon juice – this brightens up all the flavors wonderfully.
- Rest and Serve: Let the curry rest for 5-10 minutes before serving. This allows the flavors to meld even further. Garnish generously with fresh chopped cilantro.
Nutrition Facts
- Servings: This recipe generously serves 4-6 people.
- Calories per serving (approximate): Around 350-450 calories per serving, depending on the exact ingredients used (especially the fat content of the coconut milk) and serving size. This estimate does not include accompaniments like rice or naan.
- Note: This is an estimate. Actual nutritional values can vary based on specific brands of ingredients and exact measurements.
This chickpea curry is a powerhouse of nutrients:
- Protein: Chickpeas are an excellent source of plant-based protein.
- Fiber: High in dietary fiber, promoting digestive health and satiety.
- Healthy Fats: From coconut milk (primarily saturated, but also medium-chain triglycerides which are metabolized differently).
- Vitamins & Minerals: Rich in iron, folate, manganese, and antioxidants from the spices and vegetables.
Preparation and Cook Time
- Preparation Time: 10-15 minutes (chopping vegetables, measuring spices)
- Cook Time: 25-30 minutes
- Total Time: Approximately 35-45 minutes
This makes it an ideal candidate for a quick, healthy, and satisfying meal any night of the week.
How to Serve This Delicious Chickpea Curry
This versatile chickpea curry can be served in numerous delightful ways. Here are some popular and delicious options:
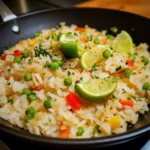
- Classic Pairing with Rice:
- Basmati Rice: The long, fragrant grains of basmati rice are a perfect canvas for the creamy curry.
- Jasmine Rice: Another aromatic option that pairs beautifully.
- Brown Rice: For a healthier, fiber-rich alternative with a nuttier flavor.
- Coconut Rice: Cooking rice with some coconut milk and a pinch of salt elevates the coconut flavor profile even further.
- With Indian Breads:
- Naan Bread: Soft, pillowy naan (plain, garlic, or butter) is ideal for scooping up every last bit of the delicious sauce.
- Roti/Chapati: Whole wheat flatbreads offer a wholesome way to enjoy the curry.
- Paratha: Flaky, layered flatbreads add a rich texture.
- Alternative Grains:
- Quinoa: A protein-packed, gluten-free grain that works well.
- Couscous: Quick-cooking and light, it absorbs the sauce beautifully.
- Millet or Bulgur: Other nutritious whole grain options.
- Low-Carb Options:
- Cauliflower Rice: A fantastic low-carb alternative to traditional rice.
- Zucchini Noodles (Zoodles): Light and healthy, perfect for a lighter meal.
- Steamed Greens: Serve over a bed of steamed spinach, kale, or collard greens.
- Garnishes and Toppings (to enhance flavor and texture):
- Fresh Cilantro: A must-have for its bright, fresh flavor.
- A Squeeze of Lime/Lemon Juice: Adds a crucial zing that brightens all the flavors.
- Plain Yogurt or Coconut Yogurt: A dollop can add extra creaminess and a cooling contrast, especially if your curry is spicy.
- Chopped Red Onion or Pickled Onions: For a sharp, tangy bite.
- Toasted Nuts or Seeds: Sliced almonds, cashews, or pumpkin seeds for a delightful crunch.
- A Drizzle of Coconut Cream: For extra richness and visual appeal.
- Mango Chutney or Raita: Classic Indian accompaniments that complement the curry wonderfully.
No matter how you choose to serve it, this chickpea curry is sure to be a hit!
Additional Tips for the Best Chickpea Curry
Elevate your chickpea curry from great to absolutely sensational with these expert tips:
- Embrace Full-Fat Coconut Milk: While light coconut milk can be used to reduce calories, full-fat coconut milk is key to achieving that incredibly creamy, rich, and luscious sauce. The difference in texture and flavor is significant. Shake the can well before opening, as the cream often separates from the water. If it’s very separated, scoop out the thick cream first and add it with the watery part.
- Don’t Skip Blooming the Spices: Sautéing your ground spices in oil (after the onions, garlic, and ginger) for a minute or two before adding wet ingredients is crucial. This process, called “blooming” or “tempering” (tadka), awakens the essential oils in the spices, intensifying their aroma and flavor. It makes a world of difference compared to just stirring them into the liquid.
- Fresh is Best for Aromatics: Whenever possible, use fresh ginger and garlic. The pre-minced jarred varieties can have a slightly different, often more acidic, flavor. Grating fresh ginger and mincing fresh garlic will provide a brighter, more potent aromatic base for your curry. The vibrant zing of fresh ginger, in particular, is irreplaceable.
- Taste and Adjust Seasoning at the End: This is perhaps the most important tip for any cooking. Your palate is unique, and ingredients (like canned tomatoes) can vary in acidity or saltiness. After the curry has simmered and the flavors have melded, taste it. Does it need more salt to enhance the flavors? A bit more garam masala for warmth? A touch more lime juice for brightness? Maybe a tiny pinch of sugar to balance acidity if your tomatoes were particularly tart? Adjust until it tastes perfect to you.
- Allow for Resting Time: If you have the patience, let the curry rest for 10-15 minutes off the heat before serving. Even better, make it a few hours ahead or the day before. Like many stews and curries, the flavors continue to develop and meld as it sits, resulting in an even more delicious and cohesive dish. Reheat gently before serving.
Frequently Asked Questions (FAQ)
Here are answers to some common questions about making this chickpea curry:
- Q: Can I use dried chickpeas instead of canned?
- A: Absolutely! Using dried chickpeas is more economical and some say results in better texture. You’ll need to soak them overnight (or use a quick-soak method) and then cook them until tender before adding them to the curry. About 1 cup of dried chickpeas will yield roughly 3 cups of cooked chickpeas, equivalent to about two 15-ounce cans. Simply substitute the cooked dried chickpeas for the canned ones in Step 6. Remember to cook them thoroughly; they should be easily mashed between your fingers.
- Q: Is this chickpea curry very spicy? How can I adjust the heat?
- A: As written, with ½ teaspoon of cayenne pepper and one green chili, the curry has a mild to medium warmth. To adjust:
- For Milder Curry: Omit the cayenne pepper and the green chili entirely, or ensure the green chili is deseeded and deveined, as that’s where most of its heat resides. You can also use a milder chili like a poblano (though it has a different flavor profile).
- For Spicier Curry: Increase the amount of cayenne pepper or red chili powder. Use a spicier chili like a bird’s eye chili, or leave the seeds in your jalapeño/serrano. You can also add a pinch of red pepper flakes at the end.
- A: As written, with ½ teaspoon of cayenne pepper and one green chili, the curry has a mild to medium warmth. To adjust:
- Q: Can I add vegetables to this curry? If so, which ones and when?
- A: Yes, this curry is wonderfully adaptable to vegetables!
- Hearty Veggies: Add diced potatoes, sweet potatoes, carrots, or cauliflower florets along with the diced tomatoes (Step 5) as they need more time to cook. You might need to add a little extra liquid (broth or water) to ensure they cook through.
- Quicker-Cooking Veggies: Add bell peppers (any color), zucchini, or green beans about 10 minutes before the end of the simmering time.
- Leafy Greens: Stir in fresh spinach, kale (chopped), or Swiss chard during the last 5 minutes of cooking, or even after you turn off the heat. They will wilt down quickly.
- A: Yes, this curry is wonderfully adaptable to vegetables!
- Q: How long can I store leftover chickpea curry, and can I freeze it?
- A: Leftover chickpea curry stores very well!
- Refrigeration: Cool the curry completely, then transfer it to an airtight container. It will keep in the refrigerator for 3-4 days. The flavors often improve overnight!
- Freezing: Yes, this curry freezes beautifully. Cool completely, then transfer to freezer-safe containers or heavy-duty freezer bags. It can be frozen for up to 2-3 months. Thaw overnight in the refrigerator and reheat gently on the stovetop or in the microwave. You might need to add a splash of water or coconut milk when reheating if it has thickened too much. The texture of chickpeas holds up well to freezing.
- A: Leftover chickpea curry stores very well!
- Q: I don’t have all the individual spices. Can I use a pre-made curry powder instead?
- A: Yes, you can. If you don’t have individual spices like cumin, coriander, and turmeric, you can substitute with a good quality curry powder. Start with about 2-3 teaspoons of curry powder in Step 4 (where the individual spices are added) and taste after simmering. You might need to add more depending on the strength and flavor profile of your curry powder. Still try to add the garam masala at the end, as it provides a distinct aromatic finish that most general curry powders don’t replicate in the same way. Keep in mind that curry powders vary widely in their composition, so the final flavor will be different but still delicious.
This Chickpea Curry with Coconut Milk is more than just a recipe; it’s a warm, comforting embrace in a bowl. It’s a testament to how simple, wholesome ingredients can transform into something truly magical with a little bit of spice and love. Whether you’re a seasoned curry connoisseur or new to the world of Indian-inspired flavors, I encourage you to give this dish a try. It’s a crowd-pleaser that’s bound to become a cherished favorite in your home, just as it has in mine. Enjoy the process, savor the aromas, and delight in every creamy, flavorful spoonful!
Print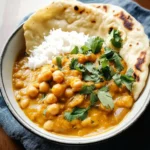
Chickpea Curry with Coconut Milk Recipe
Ingredients
- Oil: 2 tablespoons coconut oil (or vegetable oil, avocado oil)
- Aromatics:
- 1 large yellow onion, finely chopped
- 4–5 cloves garlic, minced
- 1-inch piece of fresh ginger, grated (about 1 tablespoon)
- 1 green chili (like jalapeño or serrano), finely chopped (optional, adjust to your spice preference, deseed for less heat)
- Spices:
- 1 ½ teaspoons ground cumin
- 1 ½ teaspoons ground coriander
- 1 teaspoon turmeric powder
- ½ teaspoon smoked paprika (or regular paprika)
- ¼ – ½ teaspoon cayenne pepper or red chili powder (optional, for extra heat)
- 1 teaspoon garam masala (to be added at the end)
- Tomatoes:
- 1 can (14.5 ounces / 400g) diced tomatoes, undrained
- 1 tablespoon tomato paste (optional, for deeper flavor)
- Chickpeas:
- 2 cans (15 ounces / 425g each) chickpeas (garbanzo beans), rinsed and drained
- Coconut Milk:
- 1 can (13.5 ounces / 400ml) full-fat coconut milk (shake well before opening)
- Liquid & Sweetener:
- ½ cup vegetable broth or water (if needed, to adjust consistency)
- 1 teaspoon coconut sugar or maple syrup (optional, to balance acidity)
- Finishing Touches:
- Juice of ½ lime or lemon
- Fresh cilantro, chopped (for garnish)
- Salt and freshly ground black pepper to taste
Instructions
- Prepare the Aromatics: Start by prepping all your ingredients. Finely chop the onion, mince the garlic, grate the ginger, and chop the chili if using. This mise en place will make the cooking process smooth and stress-free.
- Sauté Aromatics: Heat the coconut oil in a large pot, Dutch oven, or deep skillet over medium heat. Once the oil is shimmering, add the chopped onion and sauté for 5-7 minutes, or until softened and translucent, stirring occasionally.
- Add Ginger, Garlic, and Chili: Add the minced garlic, grated ginger, and chopped green chili (if using) to the pot. Cook for another 1-2 minutes, stirring constantly, until fragrant. Be careful not to burn the garlic, as this can make it bitter.
- Bloom the Spices: Add the ground cumin, ground coriander, turmeric powder, smoked paprika, and cayenne pepper (if using) to the pot. Stir continuously and cook for about 1-2 minutes. This step, known as “blooming,” toasts the spices and releases their essential oils, significantly deepening their flavor. The mixture will become very fragrant.
- Incorporate Tomatoes: Stir in the tomato paste (if using) and cook for another minute. Then, add the can of diced tomatoes (undrained). Stir well, scraping up any browned bits from the bottom of the pot – this is where a lot of flavor lies! Bring the mixture to a gentle simmer and cook for 5 minutes, allowing the tomato flavor to develop and meld with the spices.
- Add Chickpeas and Coconut Milk: Pour in the rinsed and drained chickpeas and the full-fat coconut milk. Stir everything together thoroughly to combine. If you’re using coconut sugar or maple syrup, add it now to balance the acidity of the tomatoes.
- Simmer the Curry: Bring the curry to a gentle simmer. Once simmering, reduce the heat to low, cover the pot, and let it cook for 15-20 minutes. This allows the chickpeas to absorb the flavors and the sauce to thicken slightly. Stir occasionally to prevent sticking. If the curry becomes too thick for your liking, you can add a splash of vegetable broth or water to reach your desired consistency.
- Final Seasoning and Flavors: After simmering, remove the curry from the heat. Stir in the garam masala. This spice blend is best added at the end of cooking to preserve its delicate aroma and flavor.
- Taste and Adjust: Taste the curry and adjust seasonings as needed. Add salt and freshly ground black pepper to your preference. Stir in the fresh lime or lemon juice – this brightens up all the flavors wonderfully.
- Rest and Serve: Let the curry rest for 5-10 minutes before serving. This allows the flavors to meld even further. Garnish generously with fresh chopped cilantro.
Nutrition
- Serving Size: One Normal Portion
- Calories: 350-450