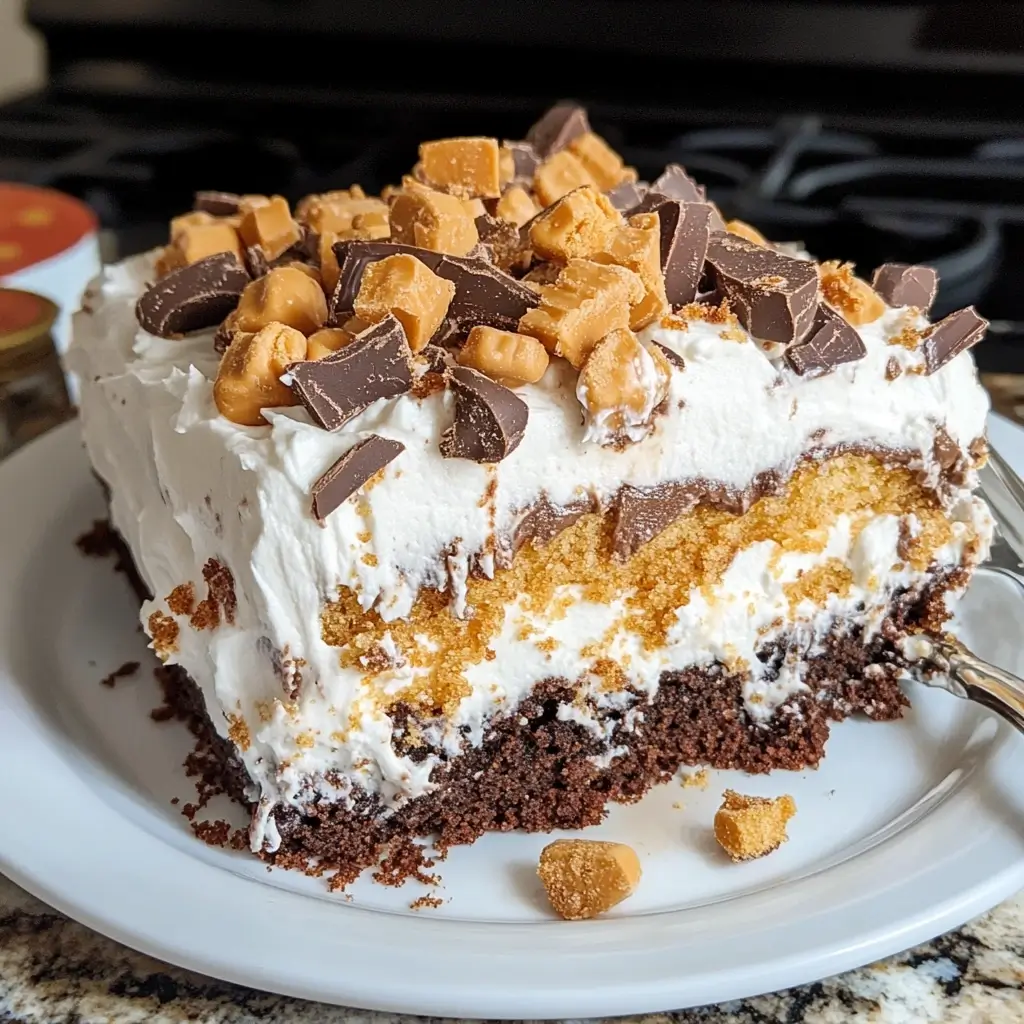

Let me tell you a story about a cake. Not just any cake, but the cake that has become a legend in my family gatherings – the Butterfinger Poke Cake. The first time I made this, I was looking for something easy yet impressive for a potluck. Frankly, baking isn’t always my forte, and the thought of complicated frosting and intricate decorations often sends shivers down my spine. But this recipe? This was different. It promised simplicity without sacrificing flavor, and boy, did it deliver! The moment I took it out of the oven, the aroma of chocolate filled the kitchen, a promising prelude to the deliciousness to come. Then came the fun part – poking holes and drowning the cake in a river of luscious caramel sauce. The anticipation was palpable as it chilled in the fridge, and when I finally served it, the reaction was nothing short of phenomenal. My family, usually a quiet bunch when it comes to desserts, erupted in praises. “This is the best cake ever!” my nephew exclaimed, his face smeared with Cool Whip and Butterfinger crumbs. My sister, a self-proclaimed dessert connoisseur, declared it “utterly divine.” And my usually reserved father? He went back for seconds, and then thirds! From that day on, the Butterfinger Poke Cake became a staple at every family event. It’s the cake that disappears in minutes, leaving behind only happy smiles and requests for the recipe. If you’re looking for a dessert that is ridiculously easy to make, unbelievably delicious, and guaranteed to be a crowd-pleaser, look no further. This Butterfinger Poke Cake is your answer. Get ready to experience a symphony of textures and flavors – the moist chocolate cake, the gooey caramel, the creamy Cool Whip, and the iconic crunch of Butterfingers – all in one glorious bite.
Ingredients: The Simple Components of Butterfinger Poke Cake Magic
This recipe boasts a surprisingly short and straightforward ingredient list, which is part of its charm. Each component plays a crucial role in creating the final masterpiece, working together to deliver that signature Butterfinger Poke Cake experience. Here’s a detailed look at what you’ll need to gather:
- 1 box Devil’s food cake mix: The foundation of our delightful dessert, a Devil’s food cake mix provides that rich, deep chocolate flavor that perfectly complements the sweetness of the caramel and the peanut butter notes of the Butterfingers. Using a cake mix simplifies the baking process immensely, making this recipe incredibly accessible even for novice bakers. Look for a standard size box, typically around 15-18 ounces. You can use your favorite brand, but ensure it’s Devil’s Food for the authentic flavor profile. If you’re feeling adventurous, you could even try a different chocolate cake mix, but Devil’s Food truly is the classic choice for this recipe. The moistness and slight bitterness of Devil’s Food cake balance the overall sweetness beautifully.
- 1 1/4 cup water: Water is essential for hydrating the cake mix and activating the leavening agents, resulting in a moist and fluffy cake. Use cool or room temperature water as specified in the cake mix instructions. The precise amount of water is crucial for achieving the correct cake batter consistency, so measure accurately for the best results.
- 1/2 cup vegetable oil: Vegetable oil contributes to the moistness and tenderness of the cake. It adds richness and ensures the cake doesn’t dry out during baking. You can use any neutral-flavored vegetable oil, such as canola oil, soybean oil, or corn oil. Avoid using strongly flavored oils like olive oil, as they might alter the taste of the cake. The oil helps create a soft crumb and keeps the cake delightfully moist even after being chilled.
- 2 eggs: Eggs are another vital ingredient in the cake mix. They bind the ingredients together, provide structure, and add richness and moisture. Use large eggs for this recipe, as specified in most standard cake mix instructions. Eggs also contribute to the cake’s rise and overall texture. Make sure your eggs are fresh for optimal baking results.
- 1/2 cup mini Butterfingers crushed, divided: The star of the show! Butterfingers bring that iconic “crispety, crunchety” texture and unique peanut butter and candy corn flavor that makes this cake so special. Mini Butterfingers are recommended for ease of crushing and even distribution throughout the cake and as a topping. You’ll need to crush them into smaller pieces. A food processor makes quick work of this, or you can place them in a zip-top bag and crush them with a rolling pin or mallet. Remember to divide the crushed Butterfingers, using half for mixing into the cake batter and the other half for topping the finished cake. This ensures Butterfinger flavor and texture both inside and out.
- 16 oz. Cool Whip: Cool Whip provides a light, airy, and creamy topping that perfectly complements the rich chocolate cake and gooey caramel. Its subtle sweetness balances the intensity of the other flavors. You’ll need a 16-ounce container, which is the standard size for Cool Whip. Make sure it’s thawed in the refrigerator before spreading it on the cake for the smoothest texture. While homemade whipped cream is delicious, Cool Whip is often preferred in poke cakes for its stability and slightly less rich profile, allowing the other flavors to shine through.
- 12.25 oz. caramel ice cream topping like Smuckers: The gooey, decadent caramel sauce is what truly transforms this cake into a poke cake masterpiece. A caramel ice cream topping, like Smucker’s, is perfect because it’s already the right consistency and flavor profile. You’ll need a 12.25-ounce jar, which is a standard size for these toppings. You can use other brands of caramel ice cream topping, but ensure it’s a smooth, pourable sauce. The caramel seeps into the holes of the cake, creating pockets of gooey sweetness in every bite and infusing the cake with a rich caramel flavor.
- 14 oz. sweetened condensed milk: Sweetened condensed milk is the secret ingredient that elevates the caramel sauce to another level of richness and gooeyness. It adds a creamy texture and enhances the caramel flavor, making it even more decadent and irresistible. You’ll need a 14-ounce can of sweetened condensed milk. Do not confuse it with evaporated milk, as they are not interchangeable. Sweetened condensed milk is much thicker and sweeter, crucial for achieving the desired texture and flavor of the caramel sauce.
Instructions: Step-by-Step Guide to Butterfinger Poke Cake Perfection
Creating this Butterfinger Poke Cake is surprisingly simple, even for beginner bakers. The ease of preparation is part of its appeal, making it a go-to dessert for busy weeknights or last-minute gatherings. Follow these detailed, step-by-step instructions to bake your own slice of heaven:
- Preheat oven to 350°F (175°C): Start by preheating your oven to 350 degrees Fahrenheit. This ensures the oven is at the correct temperature when you place the cake in, allowing it to bake evenly and properly. Accurate oven temperature is crucial for successful baking.
- Spray 9×13 inch pan with cooking spray, set aside: Prepare a 9×13 inch baking pan by spraying it generously with cooking spray. This prevents the cake from sticking to the pan and makes for easy removal after baking. Ensure you spray all sides and corners of the pan. You can also lightly grease and flour the pan if you prefer, especially if you’re concerned about sticking. Set the prepared pan aside while you prepare the cake batter.
- Make cake mix according to package directions and bake in pan: Prepare the Devil’s Food cake mix according to the instructions on the box. Typically, this involves combining the cake mix with water, vegetable oil, and eggs in a mixing bowl. Follow the specific measurements and mixing times provided on your cake mix box for the best results. Mix until just combined, being careful not to overmix, as this can lead to a tough cake. Pour the batter into the prepared 9×13 inch pan, spreading it evenly. Bake in the preheated oven for the time indicated on the cake mix box, usually around 30-35 minutes. To check for doneness, insert a wooden skewer or toothpick into the center of the cake. If it comes out clean or with only a few moist crumbs attached, the cake is done. If it comes out with wet batter, bake for a few more minutes and check again.
- Let cool completely: Once the cake is baked, remove it from the oven and let it cool completely in the pan. This is a crucial step. Do not attempt to poke holes or pour the caramel sauce onto a warm cake. Cooling allows the cake to set and firm up, making it easier to handle and ensuring the caramel sauce soaks in properly without making the cake soggy. Let it cool on a wire rack for at least an hour, or until it’s completely cool to the touch.
- Use the back of a wooden spoon and make holes in rows on the top of the cake: Once the cake is completely cooled, it’s time to create the “poke” effect. Use the back of a wooden spoon (or a similar utensil with a rounded end, like a chopstick or the handle of a spatula) to poke holes all over the top of the cake. Arrange the holes in rows, spacing them about an inch or two apart. Make sure the holes go almost all the way to the bottom of the cake, but not completely through. The holes should be wide enough to allow the caramel sauce to seep in effectively. The number of holes doesn’t need to be precise, but aim for a generous amount to ensure the caramel is distributed throughout the cake.
- In small mixing bowl combine the caramel sauce and the sweetened condensed milk: While the cake is cooling, prepare the luscious caramel sauce. In a small mixing bowl, combine the caramel ice cream topping and the sweetened condensed milk. Stir them together until they are well combined and smooth. The sweetened condensed milk will make the caramel sauce richer, creamier, and more decadent. This simple mixture is the key to the gooey center of the poke cake.
- Pour over the top of the cake, making sure it gets in the holes: Slowly and evenly pour the caramel mixture over the top of the cooled cake. Make sure to pour it in a way that allows the caramel to seep into all the holes you poked. You can use a spatula or spoon to gently guide the caramel into the holes if needed. Don’t worry if some caramel spills over the top surface of the cake; it will all contribute to the overall flavor and gooeyness. The goal is to saturate the cake with the caramel sauce, creating those delightful pockets of caramel in every bite.
- Crush Butterfingers and sprinkle half of them on top of the caramel mixture: Crush the Butterfinger candy bars into smaller pieces. You can use a food processor for quick crushing, or place them in a zip-top bag and crush them with a rolling pin or mallet. Don’t crush them too finely; you want some texture and recognizable Butterfinger pieces. Sprinkle half of the crushed Butterfingers evenly over the top of the caramel-soaked cake. This layer of Butterfingers will sink slightly into the caramel and become part of the gooey center, adding flavor and texture.
- Spread the Cool Whip on top like frosting: Once the caramel and Butterfingers are on, it’s time to add the Cool Whip topping. Spread the thawed Cool Whip evenly over the top of the cake, like frosting. Create a smooth, even layer that covers the entire surface of the cake. The Cool Whip provides a light and creamy contrast to the rich chocolate and caramel.
- Sprinkle with remaining Butterfingers: Finally, sprinkle the remaining crushed Butterfingers over the top of the Cool Whip. This final layer of Butterfingers adds a visual appeal and reinforces that signature “crispety, crunchety” Butterfinger flavor and texture to every slice. Gently press the Butterfinger pieces into the Cool Whip slightly to help them adhere.
- Chill for at least 2 hours (Optional but Recommended): While you can serve the cake immediately, chilling it in the refrigerator for at least 2 hours (or even overnight) is highly recommended. Chilling allows the flavors to meld together beautifully, the caramel to set slightly, and the cake to become even more moist and delicious. Cover the cake loosely with plastic wrap or foil before refrigerating. Serving it chilled also enhances the refreshing quality of the Cool Whip and makes it perfect for warm weather.
Nutrition Facts: Indulge Responsibly (Estimates)
While Butterfinger Poke Cake is undeniably a decadent treat, understanding its nutritional profile can help you enjoy it in moderation as part of a balanced diet. Please note that these are estimated values and can vary based on specific brands and ingredient variations.
- Servings: 12 servings (based on a 9×13 inch cake cut into 12 equal pieces)
- Calories per serving (estimated): Approximately 450-550 calories per serving.
Important Notes:
- These calorie estimates are based on standard ingredients and may vary depending on the specific brands used and portion sizes.
- This cake is relatively high in sugar and fat due to the cake mix, caramel sauce, sweetened condensed milk, Cool Whip, and candy bars.
- It’s best to enjoy Butterfinger Poke Cake as an occasional treat rather than an everyday dessert.
- To reduce calories slightly, you could consider using a light or reduced-fat Cool Whip, but this may slightly alter the texture.
For more precise nutritional information, you can use online recipe analyzers or calculate the nutritional values based on the specific brands and ingredients you use. Remember, enjoying desserts in moderation is key to maintaining a healthy lifestyle.
Preparation Time: Quick Dessert Gratification
One of the biggest advantages of Butterfinger Poke Cake is its incredibly short preparation time. Perfect for when you need a show-stopping dessert but are short on time.
- Prep Time: 8 minutes (This includes the time to mix the cake batter, crush Butterfingers, and prepare the caramel sauce.)
- Bake Time: Approximately 30-35 minutes (This is based on standard Devil’s Food cake mix baking times. Always refer to your specific cake mix box instructions.)
- Cooling Time: 1-2 hours (Essential for the cake to cool completely before poking holes and adding the caramel.)
- Chilling Time (Optional but Recommended): Minimum 2 hours (or overnight for best results) to allow flavors to meld and cake to set.
- Total Time (excluding chilling): Approximately 40-45 minutes
As you can see, the active hands-on time is minimal, making this a fantastic recipe for busy individuals or for those who prefer quick and easy dessert options. The majority of the time is spent baking and cooling, which requires minimal effort on your part.
How to Serve Butterfinger Poke Cake: Presentation and Pairings
Butterfinger Poke Cake is delicious on its own, but here are some ideas to elevate your serving experience and make it even more special:
- Classic Slices: The most straightforward and always satisfying way to serve is simply cutting the cake into squares or rectangles. This is perfect for casual gatherings and potlucks.
- Dust with Extra Butterfinger Crumbs: For an extra visual appeal and a boost of Butterfinger flavor, sprinkle a few extra crushed Butterfingers on top of each slice just before serving.
- Drizzle with Extra Caramel Sauce: If you want to amplify the caramel gooeyness, lightly drizzle a bit more caramel sauce over each slice right before serving. This is especially decadent if you warm the caramel sauce slightly.
- Add a Scoop of Vanilla Ice Cream: Pairing a scoop of vanilla ice cream or even peanut butter ice cream alongside a slice of Butterfinger Poke Cake creates a delightful contrast of temperatures and textures. The cold ice cream complements the rich, gooey cake beautifully.
- Garnish with Chocolate Shavings: For a touch of elegance, sprinkle some chocolate shavings or mini chocolate chips over the Cool Whip topping. This adds a visual contrast and enhances the chocolate notes of the cake.
- Fresh Berries: A few fresh berries, like raspberries or strawberries, can add a pop of color and a touch of freshness to balance the richness of the cake. They also provide a slight tartness that complements the sweetness.
- Serve with Coffee or Milk: Butterfinger Poke Cake pairs perfectly with a cup of hot coffee or a glass of cold milk. The coffee cuts through the sweetness, while milk provides a creamy and comforting accompaniment.
- Presentation on a Platter: For a more formal presentation, arrange slices of the cake on a decorative platter. You can garnish the platter with fresh berries or extra Butterfinger pieces for a visually appealing dessert centerpiece.
Additional Tips for Butterfinger Poke Cake Success
To ensure your Butterfinger Poke Cake turns out perfectly every time, here are five helpful tips and tricks:
- Don’t Overbake the Cake: Overbaking can lead to a dry cake, which won’t absorb the caramel sauce as well. Bake the cake until a toothpick inserted into the center comes out clean or with just a few moist crumbs. Err on the side of slightly underbaked rather than overbaked for maximum moistness.
- Poke Holes Generously and Evenly: Don’t be shy with the holes! Make sure to poke plenty of holes across the entire surface of the cake, spaced evenly apart. This ensures the caramel sauce is distributed throughout and every bite is gooey and flavorful.
- Warm the Caramel Sauce (Optional): For easier pouring and better absorption, you can slightly warm the caramel sauce and sweetened condensed milk mixture in the microwave for about 30 seconds, stirring occasionally. This will make it more fluid and easier to pour into the holes. Be careful not to overheat it.
- Chill Thoroughly Before Serving: Chilling the cake for at least 2 hours is highly recommended. This allows the caramel sauce to set slightly, the flavors to meld together, and the cake to become even more moist and delicious. It also makes the cake easier to slice and serve neatly.
- Customize with Different Candy Bars (Variations): While Butterfingers are classic, you can experiment with other candy bars for different flavor profiles. Consider using Heath bars, Reese’s Peanut Butter Cups (chopped), or even Snickers for variations. Just ensure the candy bar you choose has a good texture and flavor that complements chocolate and caramel.
FAQ: Your Butterfinger Poke Cake Questions Answered (Ingredients)
Got questions about the ingredients in Butterfinger Poke Cake? Here are answers to some frequently asked questions:
Q1: Can I use a different type of cake mix instead of Devil’s Food?
A: Yes, you can substitute with other chocolate cake mixes like dark chocolate, chocolate fudge, or even milk chocolate. However, Devil’s Food cake is the classic choice for its rich, slightly bitter chocolate flavor that balances the sweetness of the caramel and Butterfingers. Other chocolate cake mixes will still work well, but the flavor profile might be slightly different. You could even use a yellow cake mix for a less intensely chocolatey version, but the classic pairing is Devil’s Food.
Q2: Can I use homemade caramel sauce instead of store-bought ice cream topping?
A: Absolutely! Homemade caramel sauce will elevate the flavor even further. Ensure your homemade caramel sauce is smooth and pourable. You might need to adjust the consistency slightly, ensuring it’s not too thick to seep into the holes properly. Using high-quality homemade caramel will definitely enhance the overall taste of the cake.
Q3: Can I use regular Butterfingers instead of mini Butterfingers?
A: Yes, you can use regular-sized Butterfingers. You’ll just need to chop them into smaller pieces instead of crushing mini Butterfingers. Mini Butterfingers are simply more convenient for crushing and even distribution. If using regular Butterfingers, make sure to chop them into pieces that are small enough to sprinkle evenly over the cake and into the batter (if you choose to mix some into the batter).
Q4: Can I substitute the Cool Whip with homemade whipped cream?
A: While homemade whipped cream is delicious, Cool Whip is often preferred for poke cakes because of its stability and slightly less rich texture. Homemade whipped cream tends to be softer and might weep slightly over time, especially if the cake is not served immediately. If you prefer homemade whipped cream, make sure to stabilize it properly (using gelatin or cornstarch) to prevent it from becoming watery. Cool Whip also holds its shape better and is less prone to melting at room temperature.
Q5: Can I use evaporated milk instead of sweetened condensed milk?
A: No, evaporated milk is not a suitable substitute for sweetened condensed milk in this recipe. They are very different products. Sweetened condensed milk is thick, sweet, and has a high sugar content, which is crucial for creating the rich, gooey caramel sauce. Evaporated milk is unsweetened and has a thinner consistency. Using evaporated milk will result in a much thinner and less sweet caramel sauce, significantly altering the flavor and texture of the poke cake. Ensure you use sweetened condensed milk for the intended result.
Print
Butterfinger Poke Cake Recipe
Ingredients
- 1 box Devil’s food cake mix: The foundation of our delightful dessert, a Devil’s food cake mix provides that rich, deep chocolate flavor that perfectly complements the sweetness of the caramel and the peanut butter notes of the Butterfingers. Using a cake mix simplifies the baking process immensely, making this recipe incredibly accessible even for novice bakers. Look for a standard size box, typically around 15-18 ounces. You can use your favorite brand, but ensure it’s Devil’s Food for the authentic flavor profile. If you’re feeling adventurous, you could even try a different chocolate cake mix, but Devil’s Food truly is the classic choice for this recipe. The moistness and slight bitterness of Devil’s Food cake balance the overall sweetness beautifully.
- 1 1/4 cup water: Water is essential for hydrating the cake mix and activating the leavening agents, resulting in a moist and fluffy cake. Use cool or room temperature water as specified in the cake mix instructions. The precise amount of water is crucial for achieving the correct cake batter consistency, so measure accurately for the best results.
- 1/2 cup vegetable oil: Vegetable oil contributes to the moistness and tenderness of the cake. It adds richness and ensures the cake doesn’t dry out during baking. You can use any neutral-flavored vegetable oil, such as canola oil, soybean oil, or corn oil. Avoid using strongly flavored oils like olive oil, as they might alter the taste of the cake. The oil helps create a soft crumb and keeps the cake delightfully moist even after being chilled.
- 2 eggs: Eggs are another vital ingredient in the cake mix. They bind the ingredients together, provide structure, and add richness and moisture. Use large eggs for this recipe, as specified in most standard cake mix instructions. Eggs also contribute to the cake’s rise and overall texture. Make sure your eggs are fresh for optimal baking results.
- 1/2 cup mini Butterfingers crushed, divided: The star of the show! Butterfingers bring that iconic “crispety, crunchety” texture and unique peanut butter and candy corn flavor that makes this cake so special. Mini Butterfingers are recommended for ease of crushing and even distribution throughout the cake and as a topping. You’ll need to crush them into smaller pieces. A food processor makes quick work of this, or you can place them in a zip-top bag and crush them with a rolling pin or mallet. Remember to divide the crushed Butterfingers, using half for mixing into the cake batter and the other half for topping the finished cake. This ensures Butterfinger flavor and texture both inside and out.
- 16 oz. Cool Whip: Cool Whip provides a light, airy, and creamy topping that perfectly complements the rich chocolate cake and gooey caramel. Its subtle sweetness balances the intensity of the other flavors. You’ll need a 16-ounce container, which is the standard size for Cool Whip. Make sure it’s thawed in the refrigerator before spreading it on the cake for the smoothest texture. While homemade whipped cream is delicious, Cool Whip is often preferred in poke cakes for its stability and slightly less rich profile, allowing the other flavors to shine through.
- 12.25 oz. caramel ice cream topping like Smuckers: The gooey, decadent caramel sauce is what truly transforms this cake into a poke cake masterpiece. A caramel ice cream topping, like Smucker’s, is perfect because it’s already the right consistency and flavor profile. You’ll need a 12.25-ounce jar, which is a standard size for these toppings. You can use other brands of caramel ice cream topping, but ensure it’s a smooth, pourable sauce. The caramel seeps into the holes of the cake, creating pockets of gooey sweetness in every bite and infusing the cake with a rich caramel flavor.
- 14 oz. sweetened condensed milk: Sweetened condensed milk is the secret ingredient that elevates the caramel sauce to another level of richness and gooeyness. It adds a creamy texture and enhances the caramel flavor, making it even more decadent and irresistible. You’ll need a 14-ounce can of sweetened condensed milk. Do not confuse it with evaporated milk, as they are not interchangeable. Sweetened condensed milk is much thicker and sweeter, crucial for achieving the desired texture and flavor of the caramel sauce.
Instructions
- Preheat oven to 350°F (175°C): Start by preheating your oven to 350 degrees Fahrenheit. This ensures the oven is at the correct temperature when you place the cake in, allowing it to bake evenly and properly. Accurate oven temperature is crucial for successful baking.
- Spray 9×13 inch pan with cooking spray, set aside: Prepare a 9×13 inch baking pan by spraying it generously with cooking spray. This prevents the cake from sticking to the pan and makes for easy removal after baking. Ensure you spray all sides and corners of the pan. You can also lightly grease and flour the pan if you prefer, especially if you’re concerned about sticking. Set the prepared pan aside while you prepare the cake batter.
- Make cake mix according to package directions and bake in pan: Prepare the Devil’s Food cake mix according to the instructions on the box. Typically, this involves combining the cake mix with water, vegetable oil, and eggs in a mixing bowl. Follow the specific measurements and mixing times provided on your cake mix box for the best results. Mix until just combined, being careful not to overmix, as this can lead to a tough cake. Pour the batter into the prepared 9×13 inch pan, spreading it evenly. Bake in the preheated oven for the time indicated on the cake mix box, usually around 30-35 minutes. To check for doneness, insert a wooden skewer or toothpick into the center of the cake. If it comes out clean or with only a few moist crumbs attached, the cake is done. If it comes out with wet batter, bake for a few more minutes and check again.
- Let cool completely: Once the cake is baked, remove it from the oven and let it cool completely in the pan. This is a crucial step. Do not attempt to poke holes or pour the caramel sauce onto a warm cake. Cooling allows the cake to set and firm up, making it easier to handle and ensuring the caramel sauce soaks in properly without making the cake soggy. Let it cool on a wire rack for at least an hour, or until it’s completely cool to the touch.
- Use the back of a wooden spoon and make holes in rows on the top of the cake: Once the cake is completely cooled, it’s time to create the “poke” effect. Use the back of a wooden spoon (or a similar utensil with a rounded end, like a chopstick or the handle of a spatula) to poke holes all over the top of the cake. Arrange the holes in rows, spacing them about an inch or two apart. Make sure the holes go almost all the way to the bottom of the cake, but not completely through. The holes should be wide enough to allow the caramel sauce to seep in effectively. The number of holes doesn’t need to be precise, but aim for a generous amount to ensure the caramel is distributed throughout the cake.
- In small mixing bowl combine the caramel sauce and the sweetened condensed milk: While the cake is cooling, prepare the luscious caramel sauce. In a small mixing bowl, combine the caramel ice cream topping and the sweetened condensed milk. Stir them together until they are well combined and smooth. The sweetened condensed milk will make the caramel sauce richer, creamier, and more decadent. This simple mixture is the key to the gooey center of the poke cake.
- Pour over the top of the cake, making sure it gets in the holes: Slowly and evenly pour the caramel mixture over the top of the cooled cake. Make sure to pour it in a way that allows the caramel to seep into all the holes you poked. You can use a spatula or spoon to gently guide the caramel into the holes if needed. Don’t worry if some caramel spills over the top surface of the cake; it will all contribute to the overall flavor and gooeyness. The goal is to saturate the cake with the caramel sauce, creating those delightful pockets of caramel in every bite.
- Crush Butterfingers and sprinkle half of them on top of the caramel mixture: Crush the Butterfinger candy bars into smaller pieces. You can use a food processor for quick crushing, or place them in a zip-top bag and crush them with a rolling pin or mallet. Don’t crush them too finely; you want some texture and recognizable Butterfinger pieces. Sprinkle half of the crushed Butterfingers evenly over the top of the caramel-soaked cake. This layer of Butterfingers will sink slightly into the caramel and become part of the gooey center, adding flavor and texture.
- Spread the Cool Whip on top like frosting: Once the caramel and Butterfingers are on, it’s time to add the Cool Whip topping. Spread the thawed Cool Whip evenly over the top of the cake, like frosting. Create a smooth, even layer that covers the entire surface of the cake. The Cool Whip provides a light and creamy contrast to the rich chocolate and caramel.
- Sprinkle with remaining Butterfingers: Finally, sprinkle the remaining crushed Butterfingers over the top of the Cool Whip. This final layer of Butterfingers adds a visual appeal and reinforces that signature “crispety, crunchety” Butterfinger flavor and texture to every slice. Gently press the Butterfinger pieces into the Cool Whip slightly to help them adhere.
- Chill for at least 2 hours (Optional but Recommended): While you can serve the cake immediately, chilling it in the refrigerator for at least 2 hours (or even overnight) is highly recommended. Chilling allows the flavors to meld together beautifully, the caramel to set slightly, and the cake to become even more moist and delicious. Cover the cake loosely with plastic wrap or foil before refrigerating. Serving it chilled also enhances the refreshing quality of the Cool Whip and makes it perfect for warm weather.
Nutrition
- Serving Size: One Normal Portion
- Calories: 450-550