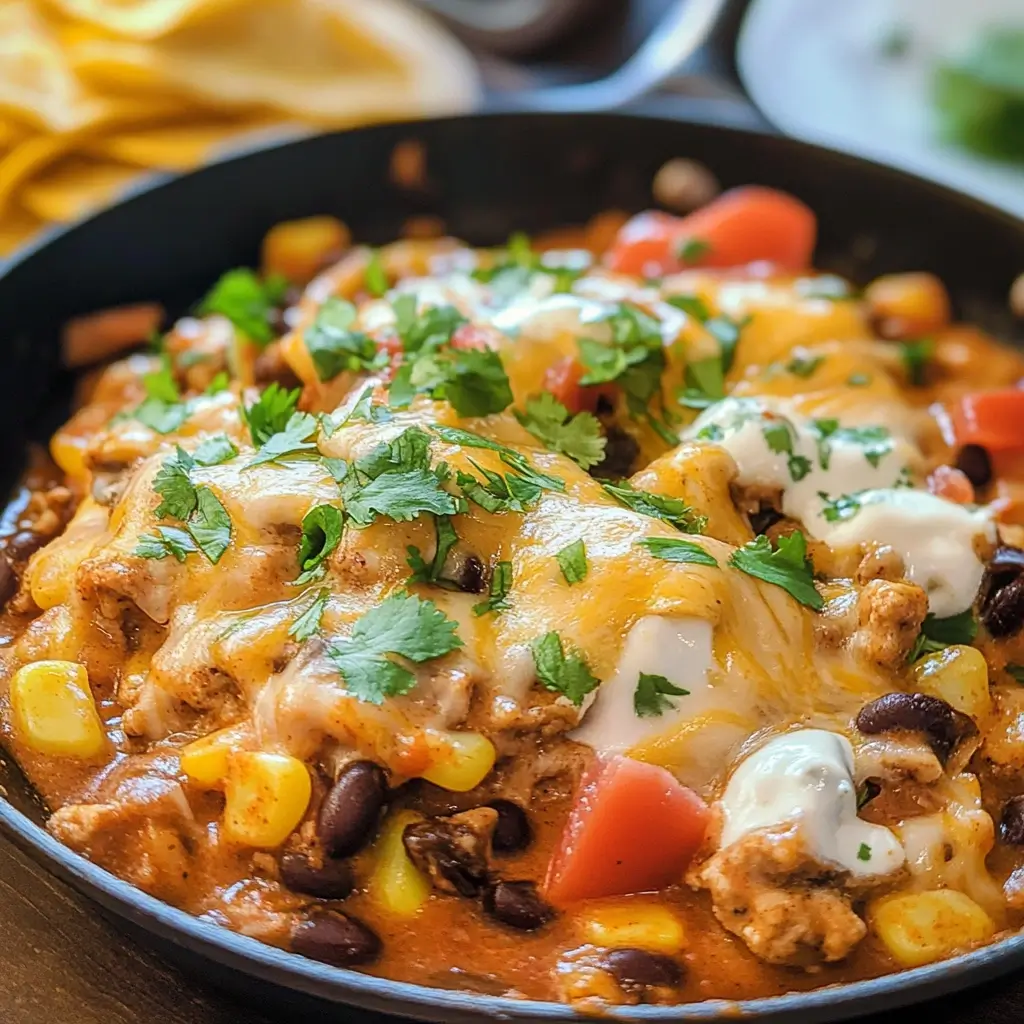
There are nights when the mere thought of cooking dinner feels like climbing a mountain. Juggling work deadlines, kids’ activities, and the general chaos of life often leaves little energy for complex meals. Yet, the desire for something satisfying, flavorful, and comforting remains strong. That’s precisely where this incredible Burrito Skillet recipe swooped in and saved my sanity on more than one occasion. I stumbled upon the concept while desperately searching for quick one-pan meals, and after a bit of tweaking, this version became an absolute staple in our house. The first time I made it, the aroma alone drew everyone to the kitchen. My kids, usually picky about mixed dishes, devoured it without complaint, happily scooping it up with tortilla chips. My partner appreciated the hearty flavors and the fact that it wasn’t just another boring weeknight meal. For me? The magic lies in its simplicity, the minimal cleanup (hooray for one skillet!), and its sheer adaptability. It delivers all the satisfying flavors of a loaded burrito – savory meat, zesty spices, hearty beans and corn, gooey cheese – but without the fuss of rolling or wrapping. It’s become our go-to for busy Tuesdays, casual Friday nights, and even potlucks. It’s more than just a recipe; it’s a delicious solution to the weeknight dinner dilemma, guaranteed to bring smiles (and silence, while everyone’s eating!) to the table.
Burrito Skillet Ingredients
Creating the perfect Burrito Skillet relies on a harmonious blend of textures and flavors. While adaptable, this specific combination is designed for maximum taste and ease. We’ve carefully chosen each component to contribute to the overall satisfying experience, reminiscent of your favorite loaded burrito, but served conveniently in a single pan.
Here’s what you’ll need to gather:
- Ground Beef: 1 lb (450g) lean ground beef (85/15 or 90/10 recommended to minimize excess grease, but feel free to use what you have. Ground turkey, chicken, or even crumbled plant-based meat are excellent substitutes – see FAQ for more details). The savory foundation of the dish.
- Onion: 1 medium yellow or white onion, finely chopped (about 1 cup). Provides an essential aromatic base.
- Bell Pepper: 1 medium bell pepper (any color – red, green, yellow, or orange all work beautifully, or use a mix!), seeded and chopped (about 1 cup). Adds sweetness, color, and a slight crunch.
- Garlic: 3-4 cloves garlic, minced (about 1 tablespoon). For that pungent, aromatic kick that elevates any savory dish. Don’t skimp here!
- Jalapeño (Optional): 1 small jalapeño, finely minced (seeds removed for less heat, keep some in for more). Adds a fresh, bright heat. Omit if you prefer a milder dish.
- Taco Seasoning: 1 packet (about 1 oz or 2-3 tablespoons) store-bought taco seasoning OR homemade blend (see Tip #2 for a DIY recipe). The heart of the burrito flavor profile. Choose mild, medium, or hot based on your preference.
- Canned Diced Tomatoes: 1 can (14.5 oz / 411g) petite diced tomatoes, undrained. Fire-roasted tomatoes add a lovely smoky depth if available. The liquid helps create the sauce base.
- Canned Black Beans: 1 can (15 oz / 425g) black beans, rinsed and drained. Adds essential fiber, protein, and that classic burrito texture.
- Canned Corn: 1 can (15 oz / 425g) whole kernel corn, drained (or about 1 ½ cups frozen corn, thawed). Provides bursts of sweetness and texture.
- Beef or Chicken Broth: ½ cup (120ml) low-sodium beef or chicken broth (or water). Helps to deglaze the pan, thin the sauce slightly, and cook the ingredients evenly.
- Cooked Rice: 2 cups cooked rice (white, brown, or even quinoa work well). Using pre-cooked or leftover rice makes this dish incredibly fast. If using instant rice, adjust liquid and cooking time according to package directions, adding it later in the process.
- Shredded Cheese: 1.5 – 2 cups shredded cheese (Cheddar, Monterey Jack, Colby Jack, or a Mexican blend). For that essential gooey, cheesy topping. Freshly shredded melts best!
- Olive Oil or Cooking Oil: 1 tablespoon. For sautéing the vegetables and browning the meat.
- Salt and Black Pepper: To taste. Remember that taco seasoning and broth contain salt, so taste before adding extra.
- Optional Toppings (for serving): Sour cream or Greek yogurt, chopped fresh cilantro, sliced avocado or guacamole, salsa or pico de gallo, crushed tortilla chips, shredded lettuce, lime wedges, sliced green onions, pickled red onions, hot sauce.
Ingredient Notes & Considerations:
Choosing quality ingredients will significantly impact the final flavor. Opt for fresh vegetables whenever possible. Rinsing canned beans removes excess sodium and starchy liquid, leading to a cleaner taste and texture. Using low-sodium broth allows you better control over the final saltiness of the dish. The type of rice can subtly change the texture; brown rice offers more fiber and a chewier bite, while white rice is softer. Don’t be afraid to experiment with these core components based on your preferences and what you have on hand.
Instructions
Follow these simple steps to create your delicious, crowd-pleasing Burrito Skillet. The process is straightforward and designed for minimal fuss, maximizing flavor in one pan.
- Prepare the Pan & Sauté Aromatics: Place a large, oven-safe skillet (at least 12 inches, cast iron works wonderfully) over medium-high heat. Add the olive oil. Once the oil shimmers, add the chopped onion and bell pepper. Sauté for 4-5 minutes, stirring occasionally, until the vegetables begin to soften and the onion becomes translucent.
- Add Garlic & Jalapeño: Stir in the minced garlic and optional minced jalapeño. Cook for about 1 minute more, stirring constantly, until fragrant. Be careful not to burn the garlic.
- Brown the Ground Beef: Add the ground beef to the skillet. Break it apart with a spoon or spatula. Cook, stirring occasionally, until the beef is fully browned and no longer pink (about 5-7 minutes).
- Drain Excess Grease: Carefully tilt the skillet and spoon out any excess grease accumulated from the beef. This prevents the final dish from being too oily. If using very lean beef, you may be able to skip this step.
- Season Generously: Sprinkle the taco seasoning evenly over the beef and vegetable mixture. Stir well to coat everything thoroughly. Cook for another minute, allowing the spices to toast slightly and become fragrant – this step, known as “blooming” the spices, deepens their flavor.
- Incorporate Liquids and Canned Goods: Pour in the undrained diced tomatoes and the beef or chicken broth. Stir well, scraping up any browned bits stuck to the bottom of the skillet (this is called deglazing and adds lots of flavor!). Add the rinsed and drained black beans and the drained corn. Stir everything together until well combined.
- Simmer and Meld Flavors: Bring the mixture to a gentle simmer. Reduce the heat to medium-low, cover the skillet (if you have a lid; if not, don’t worry, it will still work, you might just need a splash more broth if it gets too dry), and let it simmer for 8-10 minutes. This allows the flavors to meld together beautifully and the sauce to thicken slightly. Stir occasionally.
- Stir in the Rice: Remove the lid. Add the 2 cups of pre-cooked rice to the skillet. Stir gently until the rice is evenly incorporated into the meat and vegetable mixture and heated through. Taste and season with salt and black pepper if needed. Remember the cheese will add some saltiness too.
- Cheese it Up!: Sprinkle the shredded cheese evenly over the top of the skillet mixture.
- Melt the Cheese: You have two options here:
- Stovetop Method: Reduce the heat to low, cover the skillet again, and let it cook for another 3-5 minutes, or until the cheese is completely melted and gooey.
- Broiler Method (for a bubbly, golden top): If using an oven-safe skillet, preheat your oven’s broiler. Place the skillet under the broiler (keeping a close eye on it!) for 1-3 minutes, or until the cheese is melted, bubbly, and slightly golden brown in spots. Caution: The skillet handle will be extremely hot!
- Rest and Serve: Remove the skillet from the heat (or oven). Let it rest for a couple of minutes before serving. Garnish generously with your favorite toppings (see “How to Serve”).
Nutrition Facts
Understanding the nutritional profile can be helpful for meal planning and dietary awareness. Please note that these values are estimates and can vary significantly based on the specific ingredients used (e.g., fat content of ground beef, type of cheese, sodium levels in canned goods and broth, portion sizes).
- Servings: This recipe typically yields 4 to 6 hearty servings.
- Calories Per Serving (Estimated): Approximately 450-600 calories per serving (assuming 6 servings and standard ingredients like 85/15 ground beef, regular cheese, and white rice).
Breakdown Consideration:
This Burrito Skillet offers a good balance of macronutrients. The ground beef and black beans provide substantial protein. The beans, corn, and bell peppers contribute dietary fiber. Carbohydrates come primarily from the rice, corn, and beans. Fat content will vary based on the ground beef leanness and the amount/type of cheese used. Using lean ground turkey or chicken, plenty of vegetables, and controlling the cheese portion can adjust the nutritional profile to fit specific dietary goals. Always consult a registered dietitian or use a reliable nutritional calculator with your exact ingredients for precise information.
**Preparation Time**
One of the key advantages of this Burrito Skillet is its efficiency, making it ideal for busy schedules.
- Prep Time: Approximately 15 minutes (includes chopping vegetables, mincing garlic, opening cans, measuring ingredients). This can be reduced further by using pre-chopped vegetables or prepping ingredients ahead of time.
- Cook Time: Approximately 25-30 minutes (includes sautéing, browning meat, simmering, and melting cheese).
- Total Time: Approximately 40-45 minutes from start to finish.
This relatively short total time makes it a genuinely achievable weeknight dinner option, delivering complex flavors without hours spent in the kitchen.
**How to Serve**
The beauty of the Burrito Skillet lies not only in its taste but also in its versatility at serving time. Let everyone customize their own bowl or plate! Here are some delicious ways to serve and garnish your creation:
- Directly from the Skillet: Place the hot skillet (on a heat-proof trivet!) right in the center of the table for a rustic, family-style meal. Provide serving spoons and let everyone dig in.
- Individual Bowls: Spoon generous portions into individual bowls. This allows for easy topping customization.
- With Tortilla Chips: Serve with a big bowl of sturdy tortilla chips for scooping. It eats like a hearty, warm dip – perfect for casual gatherings or game nights.
- Wrapped in Tortillas: Offer warm flour or corn tortillas on the side. Guests can spoon the skillet mixture into the tortillas to create soft tacos or mini burritos.
- Lettuce Wraps: For a lighter, lower-carb option, serve the mixture in crisp lettuce cups (butter lettuce, romaine, or iceberg work well).
- Over Extra Rice or Quinoa: If you want to stretch the meal further or prefer a more distinct grain base, serve the skillet mixture spooned over a bed of fluffy white rice, brown rice, cilantro-lime rice, or quinoa.
Essential Toppings Bar: Set out small bowls of various toppings so everyone can personalize their serving. Consider these popular choices:
- Cool & Creamy:
- Sour Cream
- Plain Greek Yogurt (a healthier alternative)
- Avocado slices or Guacamole
- Fresh & Zesty:
- Chopped Fresh Cilantro (a must for many!)
- Salsa (mild, medium, or hot)
- Pico de Gallo (fresh chopped tomatoes, onion, cilantro, lime)
- Lime Wedges (a squeeze of fresh lime juice brightens everything)
- Sliced Green Onions or Chives
- Crunch & Texture:
- Crushed Tortilla Chips (adds great texture when sprinkled on top)
- Shredded Lettuce (adds freshness and crunch)
- Heat & Tang:
- Pickled Red Onions (adds a tangy bite)
- Sliced Pickled or Fresh Jalapeños
- Your favorite Hot Sauce
Mixing and matching toppings is part of the fun! Encourage experimentation to find the perfect flavor combination.
**Additional Tips**
Elevate your Burrito Skillet game and tailor it perfectly to your needs with these handy tips:
- Meal Prep Master: This recipe is fantastic for meal prepping! Cook the entire skillet mixture (steps 1-8), omitting the cheese topping. Let it cool completely, then portion it into airtight containers. Store in the refrigerator for up to 4 days. When ready to eat, reheat individual portions gently on the stovetop or in the microwave, then top with freshly shredded cheese and melt as desired (or just add cold shredded cheese). Pack toppings separately.
- DIY Taco Seasoning: Control the flavor and sodium by making your own taco seasoning. Mix: 1 tbsp chili powder, 1.5 tsp cumin, 1 tsp paprika (smoked paprika adds great depth), ½ tsp garlic powder, ½ tsp onion powder, ¼ tsp dried oregano, ¼ tsp salt, ⅛ tsp black pepper, and a pinch of cayenne pepper (optional, for heat). This makes roughly the equivalent of one store-bought packet. Adjust spices to your taste.
- Veggie Boost: Feel free to add more vegetables! Sauté diced zucchini or mushrooms along with the onions and peppers. Stir in a cup of frozen peas or some chopped spinach towards the end of the simmering time (spinach will wilt down quickly). This increases the nutritional value and stretches the meal further.
- Grain Variations: While rice is classic, don’t hesitate to swap it out. Cooked quinoa adds extra protein and a slightly nutty flavor. Cooked farro or barley offers a chewier, heartier texture. For a lower-carb version, omit the rice entirely and serve over cauliflower rice or enjoy it as is with lettuce wraps (see “How to Serve”).
- Spice Level Control: Tailor the heat to your audience. For a mild version, omit the jalapeño entirely and use a mild taco seasoning. For medium heat, use the jalapeño (seeds removed) and standard taco seasoning. For a spicier kick, keep some or all of the jalapeño seeds, use a hot taco seasoning, add a pinch of cayenne pepper or red pepper flakes along with the taco seasoning, or serve with plenty of hot sauce on the side.
**FAQ (Frequently Asked Questions)**
Here are answers to some common questions about making this Burrito Skillet:
- Q: Can I make this Burrito Skillet vegetarian or vegan?
- A: Absolutely! To make it vegetarian, simply omit the ground beef and double the amount of black beans, or add a can of pinto beans or lentils. You could also use a plant-based ground meat substitute – cook it according to package directions, usually browning it similarly to ground beef. Use vegetable broth instead of beef/chicken broth. For a vegan version, follow the vegetarian modifications and use a vegan shredded cheese alternative or omit the cheese altogether and top generously with avocado or guacamole for creaminess. Ensure your taco seasoning is vegan-friendly.
- Q: Can I use ground turkey or chicken instead of beef?
- A: Yes, definitely. Ground turkey or ground chicken are excellent leaner alternatives. Cook them just like the ground beef, breaking them apart and cooking until no longer pink. Because they are leaner, you likely won’t need to drain any grease. You might find adding a touch more seasoning or a splash of Worcestershire sauce (check for dietary restrictions if needed) helps deepen the flavor, as turkey and chicken are milder than beef. Use chicken broth for the liquid component if using poultry.
- Q: How do I store and reheat leftovers?
- A: Leftovers are fantastic! Once cooled, store the Burrito Skillet in an airtight container in the refrigerator for up to 3-4 days. Reheat gently in a saucepan over medium-low heat, adding a splash of broth or water if it seems dry, until heated through. Alternatively, reheat individual portions in the microwave. The cheese may not be as perfectly melted upon reheating, but it will still be delicious. Store toppings separately and add them fresh after reheating.
- Q: Can I freeze the Burrito Skillet?
- A: Yes, this dish freezes reasonably well, especially if you freeze it before adding the cheese topping. Cook the mixture through step 8 (adding the rice). Let it cool completely. Transfer to freezer-safe airtight containers or heavy-duty freezer bags, removing as much air as possible. Freeze for up to 2-3 months. Thaw overnight in the refrigerator before reheating gently on the stovetop or in the microwave. Once heated, top with fresh cheese and melt as desired. Note that the texture of the rice might be slightly softer after freezing and thawing.
- Q: I don’t have cooked rice on hand. Can I cook rice directly in the skillet?
- A: You can adapt the recipe for uncooked rice, but it requires adjustments. For standard long-grain white rice, you would typically need a 1:2 ratio of rice to liquid (so for 1 cup of uncooked rice, you’d need about 2 cups of liquid). After adding the beans, tomatoes, and broth (you’ll need to increase the broth significantly, likely adding an extra 1.5 cups or more), bring it to a boil, stir in 1 cup of uncooked white rice, reduce heat to low, cover tightly, and simmer for 15-20 minutes, or until the liquid is absorbed and the rice is tender. Check periodically and add more hot broth if needed. This changes the dynamic to more of a “dirty rice” style. Using instant rice is simpler: follow the package instructions, usually stirring it in towards the very end with the appropriate amount of liquid and letting it sit covered for 5-10 minutes off the heat. Using pre-cooked rice as written in the main recipe is generally the quickest and most foolproof method for this specific dish.

Burrito Skillet Recipe
Ingredients
- Ground Beef: 1 lb (450g) lean ground beef (85/15 or 90/10 recommended to minimize excess grease, but feel free to use what you have. Ground turkey, chicken, or even crumbled plant-based meat are excellent substitutes – see FAQ for more details). The savory foundation of the dish.
- Onion: 1 medium yellow or white onion, finely chopped (about 1 cup). Provides an essential aromatic base.
- Bell Pepper: 1 medium bell pepper (any color – red, green, yellow, or orange all work beautifully, or use a mix!), seeded and chopped (about 1 cup). Adds sweetness, color, and a slight crunch.
- Garlic: 3-4 cloves garlic, minced (about 1 tablespoon). For that pungent, aromatic kick that elevates any savory dish. Don’t skimp here!
- Jalapeño (Optional): 1 small jalapeño, finely minced (seeds removed for less heat, keep some in for more). Adds a fresh, bright heat. Omit if you prefer a milder dish.
- Taco Seasoning: 1 packet (about 1 oz or 2-3 tablespoons) store-bought taco seasoning OR homemade blend (see Tip #2 for a DIY recipe). The heart of the burrito flavor profile. Choose mild, medium, or hot based on your preference.
- Canned Diced Tomatoes: 1 can (14.5 oz / 411g) petite diced tomatoes, undrained. Fire-roasted tomatoes add a lovely smoky depth if available. The liquid helps create the sauce base.
- Canned Black Beans: 1 can (15 oz / 425g) black beans, rinsed and drained. Adds essential fiber, protein, and that classic burrito texture.
- Canned Corn: 1 can (15 oz / 425g) whole kernel corn, drained (or about 1 ½ cups frozen corn, thawed). Provides bursts of sweetness and texture.
- Beef or Chicken Broth: ½ cup (120ml) low-sodium beef or chicken broth (or water). Helps to deglaze the pan, thin the sauce slightly, and cook the ingredients evenly.
- Cooked Rice: 2 cups cooked rice (white, brown, or even quinoa work well). Using pre-cooked or leftover rice makes this dish incredibly fast. If using instant rice, adjust liquid and cooking time according to package directions, adding it later in the process.
- Shredded Cheese: 1.5 – 2 cups shredded cheese (Cheddar, Monterey Jack, Colby Jack, or a Mexican blend). For that essential gooey, cheesy topping. Freshly shredded melts best!
- Olive Oil or Cooking Oil: 1 tablespoon. For sautéing the vegetables and browning the meat.
- Salt and Black Pepper: To taste. Remember that taco seasoning and broth contain salt, so taste before adding extra.
- Optional Toppings (for serving): Sour cream or Greek yogurt, chopped fresh cilantro, sliced avocado or guacamole, salsa or pico de gallo, crushed tortilla chips, shredded lettuce, lime wedges, sliced green onions, pickled red onions, hot sauce.
Instructions
- Prepare the Pan & Sauté Aromatics: Place a large, oven-safe skillet (at least 12 inches, cast iron works wonderfully) over medium-high heat. Add the olive oil. Once the oil shimmers, add the chopped onion and bell pepper. Sauté for 4-5 minutes, stirring occasionally, until the vegetables begin to soften and the onion becomes translucent.
- Add Garlic & Jalapeño: Stir in the minced garlic and optional minced jalapeño. Cook for about 1 minute more, stirring constantly, until fragrant. Be careful not to burn the garlic.
- Brown the Ground Beef: Add the ground beef to the skillet. Break it apart with a spoon or spatula. Cook, stirring occasionally, until the beef is fully browned and no longer pink (about 5-7 minutes).
- Drain Excess Grease: Carefully tilt the skillet and spoon out any excess grease accumulated from the beef. This prevents the final dish from being too oily. If using very lean beef, you may be able to skip this step.
- Season Generously: Sprinkle the taco seasoning evenly over the beef and vegetable mixture. Stir well to coat everything thoroughly. Cook for another minute, allowing the spices to toast slightly and become fragrant – this step, known as “blooming” the spices, deepens their flavor.
- Incorporate Liquids and Canned Goods: Pour in the undrained diced tomatoes and the beef or chicken broth. Stir well, scraping up any browned bits stuck to the bottom of the skillet (this is called deglazing and adds lots of flavor!). Add the rinsed and drained black beans and the drained corn. Stir everything together until well combined.
- Simmer and Meld Flavors: Bring the mixture to a gentle simmer. Reduce the heat to medium-low, cover the skillet (if you have a lid; if not, don’t worry, it will still work, you might just need a splash more broth if it gets too dry), and let it simmer for 8-10 minutes. This allows the flavors to meld together beautifully and the sauce to thicken slightly. Stir occasionally.
- Stir in the Rice: Remove the lid. Add the 2 cups of pre-cooked rice to the skillet. Stir gently until the rice is evenly incorporated into the meat and vegetable mixture and heated through. Taste and season with salt and black pepper if needed. Remember the cheese will add some saltiness too.
- Cheese it Up!: Sprinkle the shredded cheese evenly over the top of the skillet mixture.
- Melt the Cheese: You have two options here:
- Stovetop Method: Reduce the heat to low, cover the skillet again, and let it cook for another 3-5 minutes, or until the cheese is completely melted and gooey.
- Broiler Method (for a bubbly, golden top): If using an oven-safe skillet, preheat your oven’s broiler. Place the skillet under the broiler (keeping a close eye on it!) for 1-3 minutes, or until the cheese is melted, bubbly, and slightly golden brown in spots. Caution: The skillet handle will be extremely hot!
- Rest and Serve: Remove the skillet from the heat (or oven). Let it rest for a couple of minutes before serving. Garnish generously with your favorite toppings (see “How to Serve”).
Nutrition
- Serving Size: one normal portion
- Calories: 450-600