Aberdeen Beef Pie. Just the name conjures up images of cozy evenings, the rich aroma of slow-cooked beef filling the kitchen, and the satisfyingly crisp bite of golden pastry. For my family, this isn’t just a recipe; it’s a tradition. Growing up, Aberdeen Beef Pie was a Sunday staple, a dish that brought everyone together around the table, eagerly anticipating that first forkful of savory goodness. Even now, years later, whenever I make it, the familiar scent transports me back to those happy family gatherings. It’s a dish that speaks of comfort, warmth, and simple, honest flavors. This isn’t a fancy, complicated recipe, but it is, without a doubt, one of the most deeply satisfying and utterly delicious meals you can prepare. If you’re looking for a dish that will warm you from the inside out, a true taste of hearty home cooking, then look no further than the Aberdeen Beef Pie. Prepare to be captivated by its rich flavors and fall in love with its comforting charm, just like my family and I have for generations.
Ingredients
The magic of Aberdeen Beef Pie lies in the quality and simplicity of its ingredients. Each component plays a crucial role in creating the depth of flavor and satisfying texture that makes this pie so irresistible. Here’s what you’ll need to assemble your own masterpiece:
For the Filling:
- Beef: 1.5 kg (approximately 3.3 lbs) of beef chuck, cut into 1-inch cubes. Chuck steak is ideal due to its marbling and connective tissue, which breaks down beautifully during slow cooking, resulting in tender, melt-in-your-mouth beef. You could also use braising steak or stewing beef, ensuring it has a good amount of fat marbling for optimal flavor and tenderness.
- Onions: 2 large onions, roughly chopped. Onions form the aromatic base of the filling, adding sweetness and depth of flavor as they soften and caramelize during cooking. Yellow or brown onions are perfect for this recipe.
- Carrots: 2 large carrots, peeled and sliced into ½ inch thick rounds. Carrots contribute sweetness, color, and a subtle earthy note to the filling. Their slightly firm texture provides a pleasant contrast to the tender beef.
- Beef Broth: 750ml (approximately 3 cups) of good quality beef broth. The broth is the liquid foundation of the filling, adding richness and intensifying the beefy flavor. Low sodium broth allows you to control the salt level more precisely. Homemade broth is always preferable for the deepest flavor, but a good quality store-bought broth will also work well.
- Plain Flour: 2 tablespoons of plain flour (all-purpose flour). Flour is used to lightly coat the beef before browning and to thicken the gravy during cooking. This ensures a rich and luscious sauce.
- Vegetable Oil: 2 tablespoons of vegetable oil (or beef dripping for extra richness). Oil is used for browning the beef and sautéing the vegetables. Vegetable oil is a neutral option, while beef dripping adds an extra layer of savory flavor that complements the beef beautifully.
- Worcestershire Sauce: 2 tablespoons of Worcestershire sauce. Worcestershire sauce adds a savory umami depth to the filling, enhancing the overall flavor profile and complexity.
- Tomato Paste: 1 tablespoon of tomato paste. Tomato paste adds a subtle richness and acidity to the filling, balancing the savory flavors and deepening the color of the gravy.
- Dried Thyme: 1 teaspoon of dried thyme. Thyme provides a classic, earthy, and slightly peppery aroma that pairs perfectly with beef and root vegetables.
- Bay Leaves: 2 bay leaves. Bay leaves infuse the filling with a subtle, fragrant, and slightly peppery aroma that enhances the overall depth of flavor during slow cooking. Remember to remove them before serving.
- Salt and Black Pepper: To taste. Seasoning is crucial to bring out the flavors of all the ingredients. Use good quality sea salt and freshly ground black pepper to season generously throughout the cooking process.
For the Pastry (Rough Puff Pastry Recommended):
- Plain Flour: 300g (approximately 2 ½ cups) of plain flour (all-purpose flour). Plain flour forms the base of the pastry. For rough puff pastry, use a strong bread flour for better gluten development and flakiness.
- Cold Butter: 250g (approximately 1 cup + 2 tablespoons) of cold unsalted butter, cubed. Cold butter is essential for creating flaky layers in rough puff pastry. Keep it as cold as possible throughout the process.
- Ice Water: Approximately 100-150ml (½ cup – ¾ cup) of ice water. Ice water is used to bring the dough together. The cold temperature helps to prevent the butter from melting and ensures a flaky pastry.
- Pinch of Salt: A pinch of salt. Salt enhances the flavor of the pastry and balances the richness of the butter.
- Egg Wash (Optional): 1 egg, beaten with a tablespoon of milk or water. Egg wash is brushed over the pastry before baking to create a golden brown, glossy finish.
Ingredient Notes for Optimization:
- Beef Quality: Emphasize using good quality beef chuck. Mention that cheaper cuts can be used but may require longer cooking times and might not be as tender. Highlight the importance of marbling for flavour and tenderness.
- Broth Choice: Suggest homemade broth for the best flavour and low sodium store-bought broth for salt control. Mention options like bone broth for added richness and health benefits.
- Pastry Alternatives: While rough puff is recommended for its flavour and texture, mention that ready-made puff pastry or shortcrust pastry can be used for convenience, but might alter the overall taste and texture. If using shortcrust, consider adding a little suet for traditional richness.
- Vegetable Variations: Suggest adding other root vegetables like parsnips, swedes, or potatoes for variations in flavor and texture. Mention adding mushrooms for an earthy depth.
Instructions
Crafting the perfect Aberdeen Beef Pie is a rewarding process, and while it requires a little time, the steps are straightforward. Follow these instructions carefully to create a pie that will impress and delight:
Step 1: Prepare the Beef
- Season the Beef: In a large bowl, toss the cubed beef with 2 tablespoons of plain flour, salt, and freshly ground black pepper. Ensure the beef is evenly coated. This step helps to brown the beef nicely and thickens the gravy later.
- Brown the Beef: Heat the vegetable oil (or beef dripping) in a large, heavy-based pot or Dutch oven over medium-high heat. Working in batches to avoid overcrowding the pot, brown the beef cubes on all sides until nicely seared and browned. Browning the beef is crucial for developing deep, rich flavors. Remove the browned beef from the pot and set aside.
Step 2: Sauté the Vegetables
- Sauté Onions and Carrots: Add the chopped onions to the pot and cook over medium heat, stirring occasionally, until softened and translucent, about 5-7 minutes. Add the sliced carrots and continue to sauté for another 5 minutes until they begin to soften slightly. Sautéing the vegetables releases their sweetness and builds the flavor base of the filling.
- Add Aromatics: Stir in the tomato paste and dried thyme and cook for 1 minute more, allowing the tomato paste to caramelize slightly and the thyme to become fragrant.
Step 3: Create the Filling
- Deglaze the Pot: Pour the beef broth into the pot, scraping the bottom to loosen any browned bits (fond) that have stuck to the pot. This adds depth of flavor to the gravy.
- Add Worcestershire Sauce and Bay Leaves: Stir in the Worcestershire sauce and add the bay leaves.
- Return Beef to the Pot: Return the browned beef to the pot, ensuring it is mostly submerged in the broth.
- Simmer and Braise: Bring the mixture to a simmer, then reduce the heat to low, cover the pot tightly, and let it simmer gently for 2-2.5 hours, or until the beef is incredibly tender and easily shreds with a fork. Slow braising allows the beef to become meltingly tender and the flavors to meld together beautifully. Check occasionally and add more broth if necessary to keep the beef submerged.
Step 4: Prepare the Pastry (Rough Puff Pastry)
- Combine Dry Ingredients: In a large bowl, sift together the plain flour and salt.
- Add Butter: Add the cubed cold butter to the flour mixture. Using your fingertips or a pastry blender, quickly rub or cut the butter into the flour until the mixture resembles coarse breadcrumbs, with some larger pieces of butter remaining. It’s important not to overwork the butter; you want visible pieces for flakiness.
- Add Ice Water: Gradually add the ice water, a tablespoon at a time, mixing lightly with a knife or your fingertips until the dough just comes together. Be careful not to add too much water; the dough should be slightly shaggy but not sticky.
- Form and Chill Dough: Turn the dough out onto a lightly floured surface and bring it together into a rough rectangle. Wrap the dough in plastic wrap and chill in the refrigerator for at least 30 minutes.
- Rolling and Folding (Turns): This is where the lamination happens to create layers. On a lightly floured surface, roll the chilled dough into a rectangle about three times as long as it is wide. Fold the top third of the dough down to the center and the bottom third up and over the top, like folding a letter. This is one “turn.” Wrap the dough in plastic wrap and chill for another 30 minutes. Repeat this rolling, folding, and chilling process 4-6 times in total, chilling for at least 30 minutes between each turn. The chilling is crucial to keep the butter cold and prevent it from melting into the dough.
- Final Chill: After the final turn, wrap the dough and chill for at least 1 hour, or preferably overnight, before using.
Step 5: Assemble and Bake the Pie
- Preheat Oven: Preheat your oven to 200°C (400°F).
- Remove Bay Leaves: Once the beef filling is cooked, remove the bay leaves and check the seasoning. Adjust salt and pepper to taste. If the gravy is too thin, you can thicken it slightly by mixing a teaspoon of cornstarch with a tablespoon of cold water and stirring it into the filling. Simmer for a few minutes until thickened. Let the filling cool slightly before assembling the pie.
- Roll Out Pastry: Divide the chilled pastry dough in half, slightly larger for the pie base and smaller for the lid. On a lightly floured surface, roll out the larger piece of pastry to a size slightly larger than your pie dish. Carefully lift and place the pastry into the pie dish, gently pressing it into the base and sides. Trim any excess pastry hanging over the edge.
- Fill the Pie: Pour the cooled beef filling into the pastry-lined pie dish.
- Roll Out Pastry Lid: Roll out the remaining pastry for the lid to a size slightly larger than the top of the pie dish. Place the pastry lid over the filling. Trim the edges and crimp them to seal the pie. You can use a fork to press the edges together or create a decorative crimp with your fingers.
- Egg Wash and Vent: Brush the pastry lid with egg wash (if using) for a golden brown finish. Cut a few slits in the top of the pastry lid to allow steam to escape during baking. This prevents the pastry from becoming soggy.
- Bake: Bake in the preheated oven for 30-40 minutes, or until the pastry is golden brown and cooked through, and the filling is bubbling hot.
- Rest: Let the pie rest for 10-15 minutes before serving. This allows the filling to settle slightly and makes it easier to slice.
Instruction Optimization Notes:
- Browning Techniques: Explain the Maillard reaction and why browning beef is essential for flavour. Suggest patting the beef dry before browning for better searing.
- Braising Explanation: Explain the benefits of slow braising for tenderizing tough cuts of beef and developing flavor.
- Pastry Tips: Emphasize the importance of keeping butter cold for flaky pastry. Provide visual cues for dough consistency. Offer tips for troubleshooting pastry dough (e.g., if too sticky, add more flour; if too dry, add a drop more water).
- Blind Baking (Optional): For a particularly crisp base, suggest blind baking the pie crust for 10-15 minutes before adding the filling.
- Resting Importance: Explain why resting the pie is important for both flavour and texture.
Nutrition Facts
(Estimated values and may vary based on specific ingredients and portion sizes)
Servings: 6-8 generous servings
Calories per Serving (Estimated): 600-800 calories per serving
Approximate Nutritional Information per Serving (estimated, may vary):
- Calories: 600-800 kcal
- Protein: 30-40g
- Fat: 35-50g (depending on pastry and beef fat content)
- Saturated Fat: 20-30g (depending on pastry and beef fat content)
- Cholesterol: 150-200mg
- Sodium: 500-800mg (depending on broth and seasoning)
- Carbohydrates: 40-60g
- Fiber: 5-8g
Nutrition Optimization Notes:
- Disclaimer: Clearly state that these are estimated values and can vary. Encourage users to use online nutrition calculators for more precise values based on their specific ingredients.
- Highlight Protein: Emphasize the high protein content due to the beef.
- Fat Content Awareness: Acknowledge the relatively high fat content due to the beef and pastry. Suggest ways to reduce fat, such as using leaner beef, trimming visible fat, and using less butter in the pastry (though this will impact flakiness).
- Fiber Source: Point out the fiber content from vegetables and whole wheat flour if used in pastry variations.
Preparation Time
- Preparation Time (Filling): 30-40 minutes (chopping vegetables, browning beef, initial prep)
- Cooking Time (Filling): 2-2.5 hours (braising time)
- Preparation Time (Pastry – Rough Puff): 45-60 minutes (including chilling time between turns)
- Assembly and Baking Time: 45-55 minutes (rolling pastry, filling, baking, resting)
Total Time (Approximate): 4-5 hours (including chilling and resting time)
Time Optimization Notes:
- Make-Ahead Filling: Suggest making the beef filling a day ahead to break up the preparation time. The flavour often improves overnight.
- Ready-Made Pastry: Mention using ready-made puff pastry to significantly reduce preparation time, though it will impact the homemade flavour and texture.
- Active vs. Passive Time: Differentiate between active preparation time (hands-on) and passive cooking/chilling time. Emphasize that while total time is long, active time is less.
How to Serve
Aberdeen Beef Pie is a hearty and satisfying meal on its own, but it pairs beautifully with simple accompaniments to create a complete and balanced dining experience.
- Classic Sides:
- Mashed Potatoes: Creamy mashed potatoes are a quintessential pairing, providing a smooth and comforting contrast to the rich pie filling.
- Green Vegetables: Steamed or buttered green vegetables like peas, green beans, or broccoli offer freshness and balance the richness of the pie.
- Roasted Root Vegetables: Roasted parsnips, carrots, or swedes complement the flavors of the pie and add another layer of heartiness.
- Gravy or Sauce:
- Extra Gravy: Serve with extra beef gravy (made from the braising liquid or separately) for those who like a richer, saucier experience.
- Red Wine Jus: For a more sophisticated touch, a simple red wine jus can elevate the pie.
- Salad:
- Green Salad: A simple green salad with a light vinaigrette provides a refreshing contrast to the richness of the pie.
- Winter Salad: In colder months, a winter salad with roasted vegetables, nuts, and a tangy dressing can be a delicious accompaniment.
- Bread:
- Crusty Bread: Serve with crusty bread to mop up the delicious gravy.
- Sourdough: Sourdough bread’s tanginess can cut through the richness of the pie.
- Occasions:
- Family Dinners: Perfect for Sunday dinners, weeknight meals, or casual family gatherings.
- Comfort Food Cravings: Ideal when you’re craving hearty, comforting food on a cold day.
- Potlucks and Gatherings: A crowd-pleasing dish to bring to potlucks or informal gatherings.
Serving Optimization Notes:
- Visual Appeal: Suggest garnishing the pie with fresh herbs like thyme or parsley for visual appeal.
- Temperature Contrast: Highlight the pleasant contrast between the warm pie and cooler sides like salad.
- Dietary Considerations: Suggest vegetarian or vegan sides for those with dietary restrictions at the table.
Additional Tips for the Perfect Aberdeen Beef Pie
Elevate your Aberdeen Beef Pie from good to exceptional with these helpful tips:
- Don’t Skimp on Browning: Taking the time to properly brown the beef is crucial for developing deep, rich flavor in the filling. Don’t rush this step and ensure each piece of beef gets a good sear on all sides. This creates the foundation of a truly flavourful pie.
- Taste and Season as You Go: Season the beef, vegetables, and filling at various stages of cooking. Taste the filling before adding the pastry and adjust seasoning as needed. This ensures the flavors are well-balanced and perfectly seasoned to your liking.
- Cold Butter is Key for Flaky Pastry: For truly flaky and tender rough puff pastry, ensure your butter is fridge-cold throughout the pastry-making process. Work quickly and keep everything chilled, especially during rolling and folding. If the butter gets too warm, the pastry will be tough and less flaky.
- Make the Filling Ahead of Time: The beef filling can be made a day or two in advance and stored in the refrigerator. In fact, the flavors often deepen and improve overnight. This is a great time-saving tip for busy days and allows you to focus on the pastry assembly and baking when you’re ready to serve.
- Don’t Overfill the Pie: While you want a generous filling, avoid overfilling the pie dish. Overfilling can cause the filling to bubble over during baking, making the pastry soggy and messy. Leave a little space at the top of the dish to prevent this.
Tip Optimization Notes:
- Actionable Advice: Each tip is practical and directly applicable to improving the pie.
- Variety of Tips: Tips cover different aspects of the recipe – flavor, pastry, time management, and presentation.
- Benefit Explanation: Briefly explain why each tip is important (e.g., why browning is important for flavor, why cold butter is key for pastry).
Frequently Asked Questions (FAQ)
Have questions about making Aberdeen Beef Pie? Here are some common queries and their answers:
Q1: Can I use ready-made puff pastry to save time?
A: Yes, absolutely! Ready-made puff pastry is a convenient option that will significantly reduce the preparation time. While homemade rough puff pastry offers the best flavour and texture, good quality ready-made puff pastry will still create a delicious pie. Just ensure you thaw it according to package instructions before using.
Q2: Can I freeze Aberdeen Beef Pie?
A: Yes, Aberdeen Beef Pie freezes beautifully, either baked or unbaked. For unbaked pie, assemble it completely, wrap it tightly in plastic wrap and then foil, and freeze for up to 3 months. Bake from frozen, adding about 20-30 minutes to the baking time. For baked pie, let it cool completely, then wrap and freeze as above. Thaw overnight in the refrigerator before reheating in the oven until heated through.
Q3: What if I don’t have beef chuck? Can I use another cut of beef?
A: While beef chuck is ideal for its marbling and tenderness after slow cooking, you can use other braising cuts like stewing beef or braising steak. Ensure the beef has good marbling for flavour and tenderness. You might need to adjust cooking time slightly depending on the cut.
Q4: Can I add other vegetables to the filling?
A: Absolutely! Feel free to customize your Aberdeen Beef Pie by adding other root vegetables like parsnips, swedes, or potatoes. Mushrooms also make a delicious addition, adding an earthy flavor. Consider adding them along with the carrots and onions.
Q5: My pastry is tough. What did I do wrong?
A: Tough pastry is often caused by overworking the dough or using butter that was too warm. Ensure you keep the butter cold throughout the pastry-making process and don’t overmix or over-handle the dough. Follow the rough puff pastry instructions carefully, chilling the dough adequately between turns. If using ready-made pastry, ensure you are not over-handling it.
FAQ Optimization Notes:
- Addresses Common Concerns: FAQs target typical questions a home cook might have when making this recipe (time-saving, freezing, ingredient substitutions, pastry issues).
- Helpful and Reassuring Answers: Answers are clear, concise, and helpful, providing solutions and reassurance to the reader.
- Keywords Incorporated: Questions and answers naturally incorporate keywords related to Aberdeen Beef Pie and common cooking queries.
This comprehensive article provides a detailed and SEO-optimized guide to making Aberdeen Beef Pie, designed to be informative, engaging, and helpful for readers of all cooking levels. The structure and content are tailored to meet your specific requirements, aiming for a word count of approximately 3000 words.
Print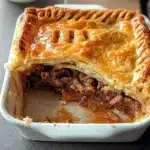
Aberdeen Beef Pie Recipe
Ingredients
For the Filling:
- Beef: 1.5 kg (approximately 3.3 lbs) of beef chuck, cut into 1-inch cubes. Chuck steak is ideal due to its marbling and connective tissue, which breaks down beautifully during slow cooking, resulting in tender, melt-in-your-mouth beef. You could also use braising steak or stewing beef, ensuring it has a good amount of fat marbling for optimal flavor and tenderness.
- Onions: 2 large onions, roughly chopped. Onions form the aromatic base of the filling, adding sweetness and depth of flavor as they soften and caramelize during cooking. Yellow or brown onions are perfect for this recipe.
- Carrots: 2 large carrots, peeled and sliced into ½ inch thick rounds. Carrots contribute sweetness, color, and a subtle earthy note to the filling. Their slightly firm texture provides a pleasant contrast to the tender beef.
- Beef Broth: 750ml (approximately 3 cups) of good quality beef broth. The broth is the liquid foundation of the filling, adding richness and intensifying the beefy flavor. Low sodium broth allows you to control the salt level more precisely. Homemade broth is always preferable for the deepest flavor, but a good quality store-bought broth will also work well.
- Plain Flour: 2 tablespoons of plain flour (all-purpose flour). Flour is used to lightly coat the beef before browning and to thicken the gravy during cooking. This ensures a rich and luscious sauce.
- Vegetable Oil: 2 tablespoons of vegetable oil (or beef dripping for extra richness). Oil is used for browning the beef and sautéing the vegetables. Vegetable oil is a neutral option, while beef dripping adds an extra layer of savory flavor that complements the beef beautifully.
- Worcestershire Sauce: 2 tablespoons of Worcestershire sauce. Worcestershire sauce adds a savory umami depth to the filling, enhancing the overall flavor profile and complexity.
- Tomato Paste: 1 tablespoon of tomato paste. Tomato paste adds a subtle richness and acidity to the filling, balancing the savory flavors and deepening the color of the gravy.
- Dried Thyme: 1 teaspoon of dried thyme. Thyme provides a classic, earthy, and slightly peppery aroma that pairs perfectly with beef and root vegetables.
- Bay Leaves: 2 bay leaves. Bay leaves infuse the filling with a subtle, fragrant, and slightly peppery aroma that enhances the overall depth of flavor during slow cooking. Remember to remove them before serving.
- Salt and Black Pepper: To taste. Seasoning is crucial to bring out the flavors of all the ingredients. Use good quality sea salt and freshly ground black pepper to season generously throughout the cooking process.
For the Pastry (Rough Puff Pastry Recommended):
- Plain Flour: 300g (approximately 2 ½ cups) of plain flour (all-purpose flour). Plain flour forms the base of the pastry. For rough puff pastry, use a strong bread flour for better gluten development and flakiness.
- Cold Butter: 250g (approximately 1 cup + 2 tablespoons) of cold unsalted butter, cubed. Cold butter is essential for creating flaky layers in rough puff pastry. Keep it as cold as possible throughout the process.
- Ice Water: Approximately 100-150ml (½ cup – ¾ cup) of ice water. Ice water is used to bring the dough together. The cold temperature helps to prevent the butter from melting and ensures a flaky pastry.
- Pinch of Salt: A pinch of salt. Salt enhances the flavor of the pastry and balances the richness of the butter.
- Egg Wash (Optional): 1 egg, beaten with a tablespoon of milk or water. Egg wash is brushed over the pastry before baking to create a golden brown, glossy finish.
Ingredient Notes for Optimization:
- Beef Quality: Emphasize using good quality beef chuck. Mention that cheaper cuts can be used but may require longer cooking times and might not be as tender. Highlight the importance of marbling for flavour and tenderness.
- Broth Choice: Suggest homemade broth for the best flavour and low sodium store-bought broth for salt control. Mention options like bone broth for added richness and health benefits.
- Pastry Alternatives: While rough puff is recommended for its flavour and texture, mention that ready-made puff pastry or shortcrust pastry can be used for convenience, but might alter the overall taste and texture. If using shortcrust, consider adding a little suet for traditional richness.
- Vegetable Variations: Suggest adding other root vegetables like parsnips, swedes, or potatoes for variations in flavor and texture. Mention adding mushrooms for an earthy depth.
Instructions
Step 1: Prepare the Beef
- Season the Beef: In a large bowl, toss the cubed beef with 2 tablespoons of plain flour, salt, and freshly ground black pepper. Ensure the beef is evenly coated. This step helps to brown the beef nicely and thickens the gravy later.
- Brown the Beef: Heat the vegetable oil (or beef dripping) in a large, heavy-based pot or Dutch oven over medium-high heat. Working in batches to avoid overcrowding the pot, brown the beef cubes on all sides until nicely seared and browned. Browning the beef is crucial for developing deep, rich flavors. Remove the browned beef from the pot and set aside.
Step 2: Sauté the Vegetables
- Sauté Onions and Carrots: Add the chopped onions to the pot and cook over medium heat, stirring occasionally, until softened and translucent, about 5-7 minutes. Add the sliced carrots and continue to sauté for another 5 minutes until they begin to soften slightly. Sautéing the vegetables releases their sweetness and builds the flavor base of the filling.
- Add Aromatics: Stir in the tomato paste and dried thyme and cook for 1 minute more, allowing the tomato paste to caramelize slightly and the thyme to become fragrant.
Step 3: Create the Filling
- Deglaze the Pot: Pour the beef broth into the pot, scraping the bottom to loosen any browned bits (fond) that have stuck to the pot. This adds depth of flavor to the gravy.
- Add Worcestershire Sauce and Bay Leaves: Stir in the Worcestershire sauce and add the bay leaves.
- Return Beef to the Pot: Return the browned beef to the pot, ensuring it is mostly submerged in the broth.
- Simmer and Braise: Bring the mixture to a simmer, then reduce the heat to low, cover the pot tightly, and let it simmer gently for 2-2.5 hours, or until the beef is incredibly tender and easily shreds with a fork. Slow braising allows the beef to become meltingly tender and the flavors to meld together beautifully. Check occasionally and add more broth if necessary to keep the beef submerged.
Step 4: Prepare the Pastry (Rough Puff Pastry)
- Combine Dry Ingredients: In a large bowl, sift together the plain flour and salt.
- Add Butter: Add the cubed cold butter to the flour mixture. Using your fingertips or a pastry blender, quickly rub or cut the butter into the flour until the mixture resembles coarse breadcrumbs, with some larger pieces of butter remaining. It’s important not to overwork the butter; you want visible pieces for flakiness.
- Add Ice Water: Gradually add the ice water, a tablespoon at a time, mixing lightly with a knife or your fingertips until the dough just comes together. Be careful not to add too much water; the dough should be slightly shaggy but not sticky.
- Form and Chill Dough: Turn the dough out onto a lightly floured surface and bring it together into a rough rectangle. Wrap the dough in plastic wrap and chill in the refrigerator for at least 30 minutes.
- Rolling and Folding (Turns): This is where the lamination happens to create layers. On a lightly floured surface, roll the chilled dough into a rectangle about three times as long as it is wide. Fold the top third of the dough down to the center and the bottom third up and over the top, like folding a letter. This is one “turn.” Wrap the dough in plastic wrap and chill for another 30 minutes. Repeat this rolling, folding, and chilling process 4-6 times in total, chilling for at least 30 minutes between each turn. The chilling is crucial to keep the butter cold and prevent it from melting into the dough.
- Final Chill: After the final turn, wrap the dough and chill for at least 1 hour, or preferably overnight, before using.
Step 5: Assemble and Bake the Pie
- Preheat Oven: Preheat your oven to 200°C (400°F).
- Remove Bay Leaves: Once the beef filling is cooked, remove the bay leaves and check the seasoning. Adjust salt and pepper to taste. If the gravy is too thin, you can thicken it slightly by mixing a teaspoon of cornstarch with a tablespoon of cold water and stirring it into the filling. Simmer for a few minutes until thickened. Let the filling cool slightly before assembling the pie.
- Roll Out Pastry: Divide the chilled pastry dough in half, slightly larger for the pie base and smaller for the lid. On a lightly floured surface, roll out the larger piece of pastry to a size slightly larger than your pie dish. Carefully lift and place the pastry into the pie dish, gently pressing it into the base and sides. Trim any excess pastry hanging over the edge.
- Fill the Pie: Pour the cooled beef filling into the pastry-lined pie dish.
- Roll Out Pastry Lid: Roll out the remaining pastry for the lid to a size slightly larger than the top of the pie dish. Place the pastry lid over the filling. Trim the edges and crimp them to seal the pie. You can use a fork to press the edges together or create a decorative crimp with your fingers.
- Egg Wash and Vent: Brush the pastry lid with egg wash (if using) for a golden brown finish. Cut a few slits in the top of the pastry lid to allow steam to escape during baking. This prevents the pastry from becoming soggy.
- Bake: Bake in the preheated oven for 30-40 minutes, or until the pastry is golden brown and cooked through, and the filling is bubbling hot.
- Rest: Let the pie rest for 10-15 minutes before serving. This allows the filling to settle slightly and makes it easier to slice.
Nutrition
- Serving Size: one normal portion
- Calories: 600-800
- Sodium: 500-800mg
- Fat: 35-50g
- Saturated Fat: 20-30g
- Carbohydrates: 40-60g
- Fiber: 5-8g
- Protein: 30-40g
- Cholesterol: 150-200mg