


There are certain recipes that become part of your family’s story, the ones requested for birthday dinners and lazy Saturday lunches alike. For us, these Zucchini Corn Quesadillas are exactly that. It all started one summer when our garden exploded with more zucchini than any reasonable family could consume. In a desperate attempt to avoid yet another loaf of zucchini bread, I decided to shred some into a quesadilla filling. I added a can of sweet corn for a pop of sweetness and texture, some classic Mexican spices, and a generous amount of Monterey Jack cheese. The result was nothing short of a revelation. The kids, who would normally turn their noses up at a pile of sautéed zucchini, devoured them. The slightly sweet, savory filling, encased in a crispy, golden tortilla with gooey, melted cheese, was an instant hit. Now, it’s our go-to “clean out the fridge” meal, a reliable crowd-pleaser, and a wonderfully sneaky way to get a serving of vegetables onto everyone’s plate. It’s a recipe that feels both wholesome and indulgent, proving that simple ingredients can create something truly spectacular.
The Ultimate Zucchini Corn Quesadillas
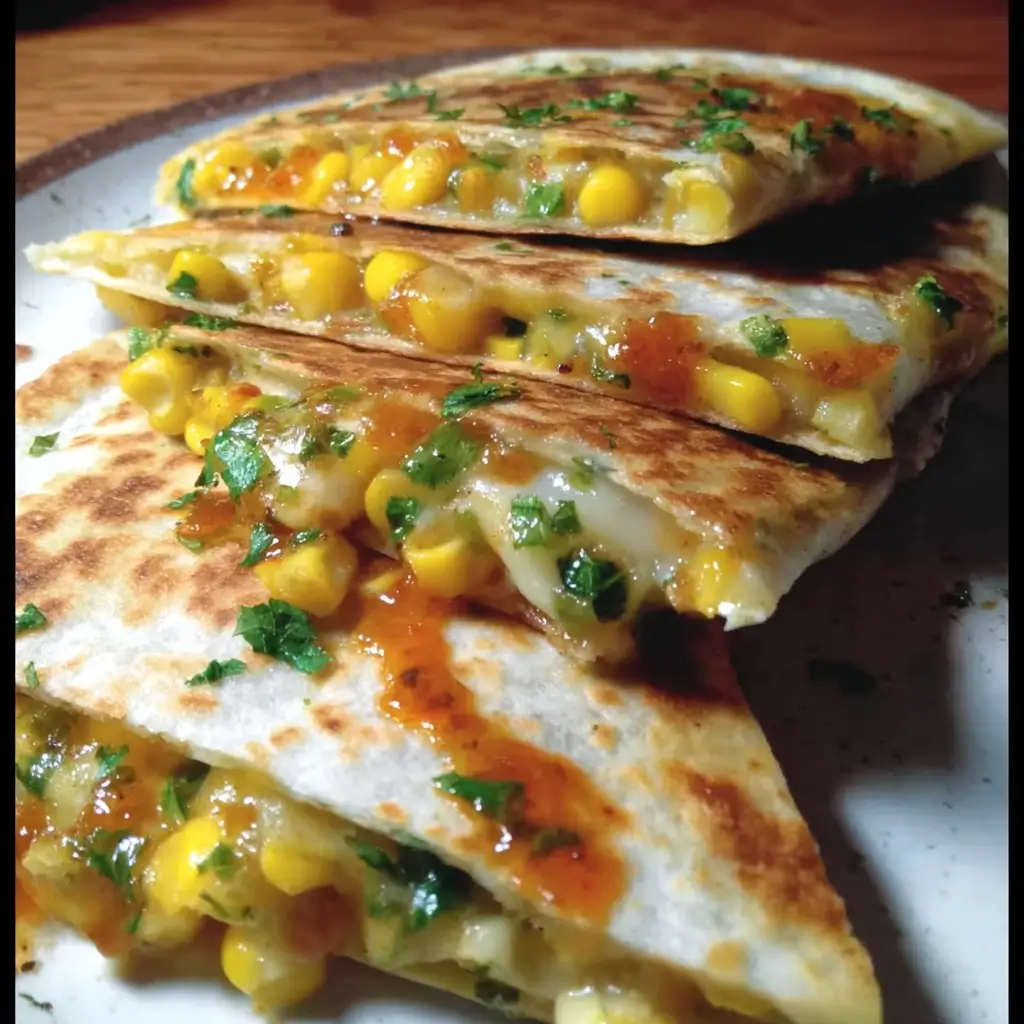
This recipe transforms humble summer vegetables into a mouthwatering, cheesy delight. The key is to properly prepare the zucchini to avoid a soggy filling, resulting in a perfectly crisp tortilla and a rich, flavorful center.
Ingredients
- For the Filling:
- 2 tablespoons olive oil
- 1 medium yellow onion, finely chopped
- 2 cloves garlic, minced
- 2 medium zucchinis (about 1.5 lbs or 680g total), grated
- 1 (15-ounce) can sweet corn, drained, or 1 ½ cups fresh/frozen corn kernels
- 1 teaspoon ground cumin
- ½ teaspoon chili powder
- ¼ teaspoon smoked paprika (optional, for a smoky depth)
- ½ teaspoon dried oregano
- ½ teaspoon salt (or to taste)
- ¼ teaspoon black pepper (or to taste)
- 2 tablespoons chopped fresh cilantro
- 1 tablespoon lime juice, freshly squeezed
- For Assembly:
- 8 large (10-inch) flour tortillas
- 3 cups shredded Monterey Jack cheese (or a blend of Monterey Jack and Cheddar, or Oaxaca cheese)
- 2-3 tablespoons butter or neutral oil, for cooking
Instructions
Step 1: Prepare the Zucchini (The Most Crucial Step!)
- Wash and trim the ends of the zucchinis. Using the large holes of a box grater, shred the zucchini into a large bowl.
- Sprinkle the shredded zucchini with about ½ teaspoon of salt and toss to combine. Let it sit for 10-15 minutes. You will see a significant amount of water bead up and pool at the bottom of the bowl.
- Transfer the salted zucchini to a clean kitchen towel, cheesecloth, or a few layers of heavy-duty paper towels. Gather the ends and twist, squeezing as much liquid out as you possibly can over the sink. This step is non-negotiable for preventing soggy quesadillas. You should be able to extract at least ½ to ¾ cup of water. Set the squeezed zucchini aside.
Step 2: Cook the Vegetable Filling
- Place a large skillet or sauté pan over medium heat and add the 2 tablespoons of olive oil.
- Once the oil is shimmering, add the finely chopped yellow onion and cook, stirring occasionally, until it becomes soft and translucent, about 5-7 minutes.
- Add the minced garlic and cook for another minute until fragrant, being careful not to let it burn.
- Add the squeezed, shredded zucchini to the skillet. Cook, stirring frequently, for 3-4 minutes to cook off any remaining moisture and soften it further.
- Stir in the drained corn, ground cumin, chili powder, smoked paprika (if using), and dried oregano. Continue to cook for another 2-3 minutes, allowing the spices to toast and become fragrant.
- Remove the skillet from the heat. Season the mixture with salt and black pepper to your liking. Stir in the chopped fresh cilantro and the fresh lime juice to brighten up the flavors. Your filling is now ready.
Step 3: Assemble and Cook the Quesadillas
- Wipe out the skillet you used for the filling or use a separate large non-stick skillet, griddle, or comal. Place it over medium heat.
- Lightly butter one side of a tortilla or add about a teaspoon of butter/oil to the hot pan. Place the tortilla in the pan, buttered-side down.
- Working quickly, sprinkle about ¼ cup of shredded cheese over the entire surface of the tortilla.
- Spoon about ½ cup of the zucchini and corn filling evenly over one half of the tortilla.
- Sprinkle another ¼ cup of cheese on top of the filling. The cheese on both sides acts as a “glue” to hold the quesadilla together.
- Using a spatula, carefully fold the empty half of the tortilla over the filled half to create a half-moon shape. Gently press down.
- Cook for 2-4 minutes per side, until the tortilla is golden brown and crispy and the cheese is completely melted and gooey. You can peek by lifting an edge with your spatula.
- Slide the cooked quesadilla onto a cutting board and let it rest for a minute before cutting. This helps the filling set.
- Repeat the process with the remaining tortillas, filling, and cheese, adding more butter or oil to the pan as needed between quesadillas.
- Cut each quesadilla into 2 or 3 wedges and serve immediately.
Nutrition Facts
- Servings: 4 (makes 8 half-quesadillas, serving 2 halves per person)
- Calories per serving: Approximately 650-750 kcal
Disclaimer: The nutritional information provided is an estimate and can vary based on the specific ingredients, brands, and portion sizes used.
Preparation Time
- Prep Time: 20 minutes (includes grating and squeezing the zucchini)
- Cook Time: 25 minutes (includes cooking the filling and assembling/cooking the quesadillas)
- Total Time: 45 minutes
How to Serve Your Zucchini Corn Quesadillas
The beauty of quesadillas lies in their versatility and the fun of dressing them up. Think of the quesadilla as the main event and the accompaniments as the supporting cast that makes the meal complete. Here are some fantastic ways to serve them:
Classic Dips and Salsas
A great dip is non-negotiable for the ultimate quesadilla experience. Offer a variety so everyone can customize their bites.
- Sour Cream or Mexican Crema: Provides a cool, creamy contrast to the warm, spiced filling. Crema is slightly thinner and less tangy than American sour cream.
- Guacamole: A rich and creamy guacamole adds healthy fats and a burst of fresh flavor.
- Pico de Gallo: This fresh, chunky salsa made from diced tomatoes, onions, cilantro, and jalapeño offers a vibrant, acidic crunch that cuts through the richness of the cheese.
- Salsa Verde: A tangy and bright salsa made from tomatillos, it pairs beautifully with the sweetness of the corn.
- Chipotle Aioli or Crema: For a smoky and spicy kick, mix a little adobo sauce from a can of chipotles in adobo with sour cream, crema, or mayonnaise.
- Restaurant-Style Red Salsa: A smooth, puréed red salsa is perfect for classic dipping.
Hearty Side Dishes
Turn your quesadillas into a full, satisfying meal with these simple and delicious sides.
- Cilantro Lime Rice: Fluffy white or brown rice seasoned with fresh cilantro and a generous squeeze of lime juice. It’s a perfect, simple base to accompany the meal.
- Seasoned Black Beans: A simple bowl of black beans, warmed and seasoned with a pinch of cumin and garlic powder, adds extra protein and fiber.
- Mexican Street Corn Salad (Esquites): If you can’t get enough corn, this off-the-cob salad with cotija cheese, lime, and chili powder is a flavor explosion.
- Simple Green Salad: A light salad with a citrusy vinaigrette can provide a refreshing contrast to the cheesy quesadilla. Think mixed greens, sliced avocado, and cherry tomatoes.
- Refried Beans: A classic side that is always a winner, perfect for scooping up with a corner of your quesadilla.
Finishing Touches and Garnishes
Sprinkle these on top of the quesadillas or serve them in small bowls on the side for a final flourish of flavor and texture.
- Fresh Cilantro: A handful of roughly chopped fresh cilantro adds a bright, herbaceous note.
- Sliced Jalapeños or Pickled Onions: For those who like it spicy or tangy.
- Crumbled Cotija Cheese: This salty, crumbly Mexican cheese adds a wonderful finishing touch.
- A Wedge of Lime: Always serve with extra lime wedges for squeezing over the top just before eating. The acidity wakes up all the flavors.
Additional Tips for Perfect Quesadillas
After making these countless times, I’ve learned a few tricks that elevate them from good to absolutely unforgettable.
- The Squeeze is Everything: I cannot overstate this. If you skip squeezing the water out of the zucchini, your filling will be watery. This moisture will turn to steam inside the tortilla, preventing it from getting crispy and resulting in a disappointingly soggy quesadilla. Take the extra 10 minutes to salt and squeeze—it’s the single most important secret to success.
- Master Your Cheese Strategy: The cheese does more than just add flavor; it’s the glue that binds the quesadilla. Use a good melting cheese like Monterey Jack, low-moisture mozzarella, or authentic Oaxacan cheese (quesillo), which melts beautifully. A blend of Monterey Jack for meltiness and a medium cheddar for flavor is also fantastic. Always shred your own cheese from a block if possible. Pre-shredded cheeses are often coated in starches that prevent them from melting as smoothly.
- Control Your Heat: The ideal temperature for cooking quesadillas is medium. If the heat is too high, the tortilla will burn before the cheese has a chance to melt completely. If the heat is too low, the tortilla will dry out and become tough rather than crispy. A steady medium heat allows the tortilla to slowly toast to a perfect golden brown while the cheesy filling becomes molten.
- Don’t Overstuff: It’s tempting to load your quesadilla with as much filling as possible, but resist the urge! Overstuffing is a primary cause of blowouts, where the filling oozes out the sides and makes a mess in the pan. A thin, even layer of filling ensures that the quesadilla cooks evenly and stays intact, making it easy to flip and eat. A good ratio is key.
- Make the Filling Ahead of Time: This recipe is fantastic for meal prep. You can prepare the zucchini and corn filling up to 3 days in advance and store it in an airtight container in the refrigerator. When you’re ready to eat, all you have to do is assemble and cook the quesadillas, turning this into a lightning-fast 10-minute meal for a busy weeknight. The flavors in the filling often meld and become even better overnight.
Frequently Asked Questions (FAQ)
Q1: Can I make these quesadillas vegan?
A: Absolutely! This recipe is very easy to adapt for a vegan diet. Simply use a high-quality vegan cheese that you know melts well; many almond or cashew-based “mozzarella” or “cheddar” style shreds work great. When cooking the quesadillas, use a vegan butter substitute or olive oil in the pan instead of dairy butter. The filling is already naturally vegan, so the swaps are minimal.
Q2: How do I add protein to this recipe?
A: This is a great base for adding extra protein. You can easily mix in about 1 to 1 ½ cups of a cooked protein source into the vegetable filling at the end of its cooking time. Some excellent options include:
- Shredded Chicken: Leftover rotisserie chicken is perfect for this.
- Black Beans: For a plant-based protein boost, add a can of rinsed and drained black beans.
- Cooked Ground Beef or Turkey: Seasoned with taco spices.
- Sautéed Shrimp: Roughly chop cooked shrimp and fold them into the mixture.
Q3: What’s the best way to store and reheat leftover quesadillas?
A: For best results, store leftover quesadillas in an airtight container or wrapped in foil in the refrigerator for up to 3 days. The microwave is not your friend for reheating; it will make the tortillas soft and chewy. The best methods for restoring that crispy texture are:
- Skillet: Reheat in a dry, non-stick skillet over medium-low heat for 2-3 minutes per side.
- Oven/Toaster Oven: Place on a baking sheet in an oven preheated to 375°F (190°C) for about 8-10 minutes, flipping halfway through.
- Air Fryer: Reheat at 350°F (175°C) for 3-5 minutes until heated through and crispy.
Q4: Can I use frozen corn instead of canned or fresh?
A: Yes, frozen corn works perfectly. There’s no need to thaw it first. Simply add the frozen corn kernels directly to the skillet along with the zucchini. The heat from the pan will thaw and cook it quickly. You may need to cook the filling for an extra minute or two to ensure any excess moisture from the frozen corn has evaporated before assembling the quesadillas.
Q5: My quesadillas are still coming out a bit soggy. What else can I do?
A: If you’ve already mastered the zucchini-squeezing step and they’re still not as crisp as you’d like, there are two likely culprits. First, check your filling-to-tortilla ratio. If you’re using too much filling, the moisture content will be too high. Try using a little less. Second, ensure your pan is fully preheated to medium heat before you add the quesadilla. Placing it in a cold or lukewarm pan allows the tortilla to absorb oil and moisture before it has a chance to form a crisp crust. A hot-enough pan will instantly start to sear and toast the exterior.
Print
Zucchini Corn Quesadillas Recipe
Ingredients
- For the Filling:
- 2 tablespoons olive oil
- 1 medium yellow onion, finely chopped
- 2 cloves garlic, minced
- 2 medium zucchinis (about 1.5 lbs or 680g total), grated
- 1 (15-ounce) can sweet corn, drained, or 1 ½ cups fresh/frozen corn kernels
- 1 teaspoon ground cumin
- ½ teaspoon chili powder
- ¼ teaspoon smoked paprika (optional, for a smoky depth)
- ½ teaspoon dried oregano
- ½ teaspoon salt (or to taste)
- ¼ teaspoon black pepper (or to taste)
- 2 tablespoons chopped fresh cilantro
- 1 tablespoon lime juice, freshly squeezed
- For Assembly:
- 8 large (10-inch) flour tortillas
- 3 cups shredded Monterey Jack cheese (or a blend of Monterey Jack and Cheddar, or Oaxaca cheese)
- 2–3 tablespoons butter or neutral oil, for cooking
Instructions
Step 1: Prepare the Zucchini (The Most Crucial Step!)
- Wash and trim the ends of the zucchinis. Using the large holes of a box grater, shred the zucchini into a large bowl.
- Sprinkle the shredded zucchini with about ½ teaspoon of salt and toss to combine. Let it sit for 10-15 minutes. You will see a significant amount of water bead up and pool at the bottom of the bowl.
- Transfer the salted zucchini to a clean kitchen towel, cheesecloth, or a few layers of heavy-duty paper towels. Gather the ends and twist, squeezing as much liquid out as you possibly can over the sink. This step is non-negotiable for preventing soggy quesadillas. You should be able to extract at least ½ to ¾ cup of water. Set the squeezed zucchini aside.
Step 2: Cook the Vegetable Filling
- Place a large skillet or sauté pan over medium heat and add the 2 tablespoons of olive oil.
- Once the oil is shimmering, add the finely chopped yellow onion and cook, stirring occasionally, until it becomes soft and translucent, about 5-7 minutes.
- Add the minced garlic and cook for another minute until fragrant, being careful not to let it burn.
- Add the squeezed, shredded zucchini to the skillet. Cook, stirring frequently, for 3-4 minutes to cook off any remaining moisture and soften it further.
- Stir in the drained corn, ground cumin, chili powder, smoked paprika (if using), and dried oregano. Continue to cook for another 2-3 minutes, allowing the spices to toast and become fragrant.
- Remove the skillet from the heat. Season the mixture with salt and black pepper to your liking. Stir in the chopped fresh cilantro and the fresh lime juice to brighten up the flavors. Your filling is now ready.
Step 3: Assemble and Cook the Quesadillas
- Wipe out the skillet you used for the filling or use a separate large non-stick skillet, griddle, or comal. Place it over medium heat.
- Lightly butter one side of a tortilla or add about a teaspoon of butter/oil to the hot pan. Place the tortilla in the pan, buttered-side down.
- Working quickly, sprinkle about ¼ cup of shredded cheese over the entire surface of the tortilla.
- Spoon about ½ cup of the zucchini and corn filling evenly over one half of the tortilla.
- Sprinkle another ¼ cup of cheese on top of the filling. The cheese on both sides acts as a “glue” to hold the quesadilla together.
- Using a spatula, carefully fold the empty half of the tortilla over the filled half to create a half-moon shape. Gently press down.
- Cook for 2-4 minutes per side, until the tortilla is golden brown and crispy and the cheese is completely melted and gooey. You can peek by lifting an edge with your spatula.
- Slide the cooked quesadilla onto a cutting board and let it rest for a minute before cutting. This helps the filling set.
- Repeat the process with the remaining tortillas, filling, and cheese, adding more butter or oil to the pan as needed between quesadillas.
- Cut each quesadilla into 2 or 3 wedges and serve immediately.
Nutrition
- Serving Size: One Normal Portion
- Calories: 650-750


