


Of all the treats that grace our table during the spooky season, none bring a bigger smile to my family’s faces than these White Chocolate Mummy Truffles. The first time I made them, my kids were hovering around the kitchen, their eyes wide with anticipation. The process itself became a cherished memory—the whir of the food processor crushing the Oreos, the slightly messy fun of rolling the truffle balls, and the final, magical step of drizzling the white chocolate “bandages.” When I finally presented the finished plate, complete with their goofy candy eyes peeking out, the room erupted in delighted gasps. They’re not just a dessert; they’re an activity, a centerpiece, and the most delicious little monster you’ll ever eat. They’ve become our non-negotiable Halloween tradition, the first recipe requested when October rolls around, and the treat that disappears from the party platter faster than a ghost in the night. They are deceptively easy, wonderfully rich, and guaranteed to be the star of your Halloween festivities.
What Are White Chocolate Mummy Truffles?
At their heart, White Chocolate Mummy Truffles are a spooktacular twist on the classic, no-bake Oreo truffle. The core is a rich, decadent, and incredibly simple mixture of finely crushed chocolate sandwich cookies (like Oreos) and softened cream cheese. This combination creates a dense, fudgy, cake-like ball that’s pure bliss.
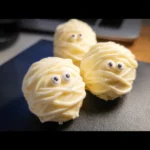
What transforms them from a simple truffle into a Halloween masterpiece is the two-part white chocolate coating. First, the truffle balls are fully submerged in a smooth, melted white chocolate bath to create a solid white canvas. Then, after the base coat sets, more white chocolate is artfully drizzled back and forth over the top to mimic the look of ancient mummy wrappings. The final, crucial touch is a pair of candy eyeballs, which are nestled into the chocolate “bandages,” giving each truffle a unique and adorable personality. They are the perfect blend of creepy, cute, and completely delicious.
Why You Will Absolutely Love This Recipe
Beyond being a feast for the eyes and the taste buds, there are so many reasons why this recipe will become a permanent fixture in your autumn baking rotation.
- Incredibly Easy & No-Bake: This is a major selling point! You don’t need to turn on your oven or have any advanced baking skills. If you can run a food processor and melt chocolate in the microwave, you can make these truffles. It’s a fantastic beginner-friendly recipe that delivers impressive results with minimal effort.
- A Perfect Kid-Friendly Activity: Looking for a way to keep the little ones entertained and involved in Halloween preparations? This is it. Kids love helping with every step, from crushing the cookies and rolling the balls to the best part—placing the candy eyes and bringing their little mummies to life.
- The Ultimate Halloween Party Food: These truffles are a showstopper. Placed on a platter, they become an instant centerpiece for any Halloween party, school event, or festive gathering. They are perfectly portioned, easy for guests to grab, and always spark conversations and compliments.
- Make-Ahead Convenience: Party planning can be stressful, but these truffles are designed to make your life easier. You can prepare them a day or two in advance and keep them in the fridge, so on the day of your event, you just have to pull them out and serve.
- Deliciously Indulgent: Let’s not forget the most important part—the taste! The deep, dark chocolate flavor of the Oreo filling paired with the sweet, creamy vanilla notes of the white chocolate shell is a match made in dessert heaven. The texture is just as divine, with a soft, fudgy interior and a satisfyingly crisp outer shell.
Complete Recipe: White Chocolate Mummy Truffles
This recipe yields approximately 30-36 truffles, depending on the size you roll them.
Ingredients
- For the Truffle Filling:
- 1 (14.3 oz / 405g) package of regular Oreo cookies (do not use Double Stuf)
- 8 oz (226g) full-fat block cream cheese, softened to room temperature
- For the White Chocolate Coating and Decoration:
- 24 oz (680g) high-quality white chocolate, chopped (or white chocolate melting wafers)
- 1 tablespoon coconut oil or vegetable shortening (optional, but recommended for a smoother coating)
- 1 package of small candy eyeballs
A Closer Look at the Key Ingredients
The magic of this recipe lies in its simplicity, but the quality of your ingredients can elevate the final product from good to unforgettable.
- Oreo Cookies: It’s crucial to use regular Oreos, not Double Stuf or Mega Stuf. The extra creme filling in those varieties will throw off the ratio of cookie-to-creme, making your truffle filling too greasy and soft to hold its shape properly. You’ll be using the entire cookie—wafer and filling.
- Cream Cheese: Opt for full-fat, block-style cream cheese. The kind that comes in a tub is often whipped and contains more water, which can result in a runny filling. Allowing the cream cheese to soften to room temperature is the most important step; cold cream cheese won’t blend smoothly and will leave you with lumps in your truffles.
- White Chocolate: This is the star of the show, so quality matters!
- Best Choice (Melting Wafers): Brands like Ghirardelli or Guittard make white melting wafers specifically designed for candy making. They melt smoothly, set up firmly with a nice snap, and don’t require tempering. This is the easiest and most foolproof option.
- Good Choice (White Chocolate Baking Bars): A high-quality white chocolate baking bar (often found in the baking aisle) will also work well. You’ll need to chop it finely for even melting.
- Use with Caution (White Chocolate Chips): Standard white chocolate chips often contain stabilizers to help them hold their shape during baking. These stabilizers can make them resist melting smoothly, resulting in a thick, goopy consistency. If you must use chips, be sure to add the coconut oil or shortening to help thin them out.
Essential Equipment
- Food Processor: The fastest and easiest way to get the Oreos to a fine, sand-like crumb.
- Large Mixing Bowl: For combining the cookie crumbs and cream cheese.
- Baking Sheets: You’ll need one or two large baking sheets lined with parchment paper.
- Parchment Paper: Absolutely essential! This prevents the truffles from sticking at every stage—chilling, dipping, and setting.
- Small Cookie Scoop (1-Tablespoon size): This helps ensure all your truffles are a uniform size and shape.
- Microwave-Safe Bowls: For melting the white chocolate.
- Dipping Tools: A fork, a chocolate dipping tool, or even two toothpicks work well for dipping the truffles.
- Piping Bag or a Ziplock Bag: For creating the fine, drizzled mummy “bandages.”
Step-by-Step Instructions
Follow these detailed steps to create your own spooky and delicious mummy truffles.
Step 1: Make the Truffle Filling
- Crush the Cookies: Place the entire package of Oreo cookies (wafers and filling) into the bowl of a food processor. Pulse until they are broken down into very fine crumbs, resembling damp sand. If you don’t have a food processor, you can place the cookies in a large, sealed ziplock bag and crush them with a rolling pin or mallet—just make sure to get the crumbs as fine as possible.
- Combine with Cream Cheese: Transfer the fine cookie crumbs to a large mixing bowl. Add the softened block of cream cheese. Using a sturdy spatula or your hands, mix until the ingredients are thoroughly combined and a large, cohesive ball of “dough” forms. There should be no white streaks of cream cheese remaining.
Step 2: Chill and Shape the Truffles
- Scoop and Roll: Line a large baking sheet with parchment paper. Using a small cookie scoop (about 1 tablespoon), portion out the filling. Roll each portion between your palms to form a smooth, round ball. Place the balls on the prepared baking sheet.
- First Chill: Place the baking sheet with the truffle balls into the freezer for at least 30 minutes, or into the refrigerator for at least 1 hour. This step is critical! The truffles must be firm and cold before dipping. If they are too soft, they will fall apart in the warm chocolate.
Step 3: Melt the White Chocolate for the Base Coat
- Prepare the Chocolate: Place about 16 oz (450g) of the chopped white chocolate or melting wafers into a deep, microwave-safe bowl. Reserve the remaining 8 oz for the mummy drizzle later.
- Melt Carefully: Microwave the chocolate in 30-second intervals, stirring well after each interval. It’s important to stir even if the chocolate doesn’t look fully melted, as the residual heat will continue the melting process. Continue until the chocolate is almost completely melted, then stir until it is entirely smooth. Be very careful not to overheat the chocolate, as it can burn or “seize” (become thick and grainy). If the chocolate seems too thick for dipping, stir in the coconut oil or vegetable shortening until smooth.
Step 4: Dip the Truffles
- Set Up Your Station: Take the chilled truffle balls out of the freezer. Have your melted white chocolate, dipping tools, and a second parchment-lined baking sheet ready.
- Dip and Coat: Drop one truffle ball at a time into the melted white chocolate. Use a fork to roll it around until it is completely coated. Lift the truffle out with the fork and gently tap the fork against the side of the bowl to allow any excess chocolate to drip off.
- Transfer and Set: Carefully slide the coated truffle off the fork and onto the clean, parchment-lined baking sheet. While the chocolate is still wet, immediately place two candy eyeballs onto the truffle.
- Repeat: Continue this process with the remaining truffles. Work quickly so the truffles stay cold and the chocolate doesn’t begin to set in the bowl.
- Second Chill: Once all the truffles are dipped and have their eyes, place the baking sheet in the refrigerator for about 15-20 minutes, or until the white chocolate shell is completely firm to the touch.
Step 5: Create the Mummy Wraps
- Melt the Remaining Chocolate: Melt the reserved 8 oz (225g) of white chocolate in a separate small bowl using the same microwave method.
- Prepare for Drizzling: Transfer the melted chocolate into a small piping bag with a tiny round tip, or into a small ziplock bag. If using a ziplock bag, simply snip a very small piece off one corner.
- Drizzle the “Bandages”: Take the firm, set truffles out of the refrigerator. Swiftly drizzle the melted white chocolate back and forth over the top of each truffle, creating thin lines that resemble mummy bandages. Be sure to leave the eyes visible!
- Final Chill: Return the finished mummy truffles to the refrigerator for a final 10-15 minutes to allow the “bandages” to set completely.
Nutrition Facts
- Servings: 32 truffles
- Calories per serving: Approximately 155 kcal
Disclaimer: The nutritional information provided is an estimate and can vary based on the specific brands of ingredients used.
Preparation Time
- Active Time: 45 minutes
- Chilling Time: 1 hour 30 minutes (minimum total)
- Total Time: Approximately 2 hours 15 minutes
How to Serve Your Mummy Truffles
These adorable treats deserve a presentation that’s just as fun. Here are a few ideas:
- On a Spooky Platter:
- Arrange the mummy truffles on a dark-colored or Halloween-themed platter.
- Scatter candy corn, gummy worms, and plastic spiders around them to create a festive and creepy scene.
- Place them alongside other Halloween treats like “Witch Finger” pretzels or monster-themed cookies.
- As Individual Party Favors:
- Place one or two truffles in a small, clear cellophane bag.
- Tie the bag shut with a festive orange, black, or purple ribbon.
- Attach a small, handwritten tag that says “Happy Halloween!” for a personal touch. These make wonderful, edible favors for party guests to take home.
- Part of a Dessert Charcuterie Board:
- Create a Halloween-themed dessert board by placing a small bowl of the mummy truffles in the center.
- Surround them with an assortment of other goodies: different types of cookies, dark chocolate squares, orange and black candies, caramel corn, apple slices with caramel dip, and mini cupcakes.
- With a Themed Beverage:
- Serve the truffles alongside a “Witches’ Brew” punch (green punch with dry ice for a smoky effect).
- Pair them with a rich hot chocolate bar where guests can add their own spooky sprinkles and marshmallows.
5 Additional Tips for Truffle Perfection
- The Chill is Non-Negotiable: I cannot stress this enough. Chilling the truffle balls until they are firm is the single most important step for success. It prevents them from melting or disintegrating in the warm chocolate and makes the dipping process a thousand times easier. Don’t rush this step!
- Master the Dipping Temperature: The ideal temperature for your melted white chocolate is lukewarm. If it’s too hot, it will melt the truffles on contact. If it’s too cool, it will be too thick and goopy, creating a heavy, lumpy coating. Let the chocolate cool slightly after melting before you begin dipping.
- Work in Batches: If you’re making a large quantity, don’t take all the truffle balls out of the freezer at once. Work in small batches of 5-6 at a time, keeping the rest in the freezer. This ensures they all stay perfectly chilled right up until the moment they are dipped.
- Achieve the Perfect Drizzle: For the mummy “bandages,” the consistency of the drizzling chocolate is key. It should be fluid enough to create fine lines but not so hot and runny that it pools at the bottom. A good test is to drizzle a bit onto your parchment paper first to see how it flows.
- Don’t Fear the Fork: A regular dinner fork is one of the best tools for dipping. It allows the maximum amount of excess chocolate to drip off through the tines, giving you a clean, even coating without a thick “foot” of chocolate at the base of your truffle.
Frequently Asked Questions (FAQ)
1. Can I use low-fat or reduced-fat cream cheese?
It is highly recommended to use full-fat, block-style cream cheese. Low-fat versions contain more water and have a softer consistency, which can lead to a truffle filling that is too soft and sticky to roll and hold its shape properly.
2. I don’t have a food processor. What’s the best alternative?
If you don’t have a food processor, the next best method is to place the Oreos in a heavy-duty, sealed plastic bag (like a Ziploc freezer bag). Lay it flat and use a rolling pin, a mallet, or even a heavy can to crush the cookies until they are a very fine powder. It takes a bit more effort, but works just as well!
3. Where can I find the candy eyeballs?
Candy eyeballs have become very popular and are usually easy to find, especially around Halloween. Check the baking or seasonal aisle of your local grocery store, a craft store like Michaels or Jo-Ann, or a party supply store. They are also widely available online from retailers like Amazon.
4. Can I make these White Chocolate Mummy Truffles ahead of time?
Absolutely! These are a perfect make-ahead dessert. You can store the finished truffles in an airtight container in the refrigerator for up to one week. You can also freeze them for up to two months. If freezing, place them in a single layer in a freezer-safe container, with parchment paper between layers to prevent sticking. Let them thaw in the refrigerator for a few hours before serving.
5. My white chocolate seized up and got thick and grainy! What went wrong?
White chocolate is notoriously sensitive. Seizing usually happens for one of two reasons: overheating or contact with water. Even a tiny droplet of water can cause the entire batch to seize. Always use a completely dry bowl and utensils. To prevent overheating, use short bursts of power in the microwave and stir frequently. If it does seize, you can sometimes save it by vigorously stirring in a teaspoon of vegetable oil or shortening, but it may not be smooth enough for a perfect coating.
White Chocolate Mummy Truffles Recipe
Ingredients
- For the Truffle Filling:
- 1 (14.3 oz / 405g) package of regular Oreo cookies (do not use Double Stuf)
- 8 oz (226g) full-fat block cream cheese, softened to room temperature
- For the White Chocolate Coating and Decoration:
- 24 oz (680g) high-quality white chocolate, chopped (or white chocolate melting wafers)
- 1 tablespoon coconut oil or vegetable shortening (optional, but recommended for a smoother coating)
- 1 package of small candy eyeballs
Instructions
Step 1: Make the Truffle Filling
- Crush the Cookies: Place the entire package of Oreo cookies (wafers and filling) into the bowl of a food processor. Pulse until they are broken down into very fine crumbs, resembling damp sand. If you don’t have a food processor, you can place the cookies in a large, sealed ziplock bag and crush them with a rolling pin or mallet—just make sure to get the crumbs as fine as possible.
- Combine with Cream Cheese: Transfer the fine cookie crumbs to a large mixing bowl. Add the softened block of cream cheese. Using a sturdy spatula or your hands, mix until the ingredients are thoroughly combined and a large, cohesive ball of “dough” forms. There should be no white streaks of cream cheese remaining.
Step 2: Chill and Shape the Truffles
- Scoop and Roll: Line a large baking sheet with parchment paper. Using a small cookie scoop (about 1 tablespoon), portion out the filling. Roll each portion between your palms to form a smooth, round ball. Place the balls on the prepared baking sheet.
- First Chill: Place the baking sheet with the truffle balls into the freezer for at least 30 minutes, or into the refrigerator for at least 1 hour. This step is critical! The truffles must be firm and cold before dipping. If they are too soft, they will fall apart in the warm chocolate.
Step 3: Melt the White Chocolate for the Base Coat
- Prepare the Chocolate: Place about 16 oz (450g) of the chopped white chocolate or melting wafers into a deep, microwave-safe bowl. Reserve the remaining 8 oz for the mummy drizzle later.
- Melt Carefully: Microwave the chocolate in 30-second intervals, stirring well after each interval. It’s important to stir even if the chocolate doesn’t look fully melted, as the residual heat will continue the melting process. Continue until the chocolate is almost completely melted, then stir until it is entirely smooth. Be very careful not to overheat the chocolate, as it can burn or “seize” (become thick and grainy). If the chocolate seems too thick for dipping, stir in the coconut oil or vegetable shortening until smooth.
Step 4: Dip the Truffles
- Set Up Your Station: Take the chilled truffle balls out of the freezer. Have your melted white chocolate, dipping tools, and a second parchment-lined baking sheet ready.
- Dip and Coat: Drop one truffle ball at a time into the melted white chocolate. Use a fork to roll it around until it is completely coated. Lift the truffle out with the fork and gently tap the fork against the side of the bowl to allow any excess chocolate to drip off.
- Transfer and Set: Carefully slide the coated truffle off the fork and onto the clean, parchment-lined baking sheet. While the chocolate is still wet, immediately place two candy eyeballs onto the truffle.
- Repeat: Continue this process with the remaining truffles. Work quickly so the truffles stay cold and the chocolate doesn’t begin to set in the bowl.
- Second Chill: Once all the truffles are dipped and have their eyes, place the baking sheet in the refrigerator for about 15-20 minutes, or until the white chocolate shell is completely firm to the touch.
Step 5: Create the Mummy Wraps
- Melt the Remaining Chocolate: Melt the reserved 8 oz (225g) of white chocolate in a separate small bowl using the same microwave method.
- Prepare for Drizzling: Transfer the melted chocolate into a small piping bag with a tiny round tip, or into a small ziplock bag. If using a ziplock bag, simply snip a very small piece off one corner.
- Drizzle the “Bandages”: Take the firm, set truffles out of the refrigerator. Swiftly drizzle the melted white chocolate back and forth over the top of each truffle, creating thin lines that resemble mummy bandages. Be sure to leave the eyes visible!
- Final Chill: Return the finished mummy truffles to the refrigerator for a final 10-15 minutes to allow the “bandages” to set completely.
Nutrition
- Serving Size: One Normal Portion
- Calories: 155


