


I still remember the first time I decided to tackle homemade vegetarian sushi. It seemed like a monumental, almost mystical, culinary art form reserved for highly trained chefs. I imagined rice sticking to everything, lopsided rolls falling apart, and a general sense of kitchen chaos. My family was skeptical, picturing a deconstructed “sushi bowl” rather than the elegant rolls I promised. But an afternoon of patient practice, vibrant-colored vegetables, and the satisfying feeling of slicing that first perfect roll changed everything. The look of surprise and delight on their faces when they tasted the fresh, flavorful, and beautifully crafted sushi was priceless. It wasn’t just a meal; it was an experience. Now, “sushi night” is a beloved ritual in our house—a fun, interactive, and incredibly delicious way to spend time together. This recipe isn’t just about food; it’s about creating memories and proving that you, too, can master the art of beautiful, restaurant-quality vegetarian sushi right in your own kitchen.
The Ultimate Guide to Homemade Vegetarian Sushi
Welcome to your comprehensive masterclass on creating the most delicious, fresh, and beautiful vegetarian sushi. For many, sushi is synonymous with raw fish, but the world of sushi is vast, and its plant-based variations are arguably some of the most creative, flavorful, and satisfying. The combination of perfectly seasoned rice, crisp and creamy vegetables, and the savory umami of nori seaweed is a culinary trifecta.
This guide is designed to be your trusted companion, demystifying the process from start to finish. We will break down every single step, from achieving the perfect sticky-yet-fluffy sushi rice (the true heart of any good sushi) to mastering the rolling technique that yields tight, professional-looking maki rolls. Forget expensive restaurant bills and limited vegetarian options. With this recipe, you are the chef, and the possibilities for fillings are limited only by your imagination.
Why You’ll Fall in Love with This Vegetarian Sushi Recipe
Before we dive into the nitty-gritty of rice washing and vegetable chopping, let’s talk about why this journey is so worthwhile.
- Incredibly Fresh and Flavorful: There is simply no comparison to the taste of sushi made with ingredients you’ve just prepared. The vegetables are at their peak crispness, the avocado is perfectly creamy, and the rice is warm and seasoned to perfection.
- Completely Customizable: This is the best part. You are in total control. Love spice? Add sriracha mayo. Adore creamy textures? Double up on the avocado or add cream cheese. Want more crunch? Use tempura-fried vegetables. You can cater to every palate and dietary need, creating a truly personal sushi experience.
- A Healthy and Wholesome Meal: Packed with vegetables, carbohydrates for energy, and vitamins, vegetarian sushi is a light yet satisfying meal. It’s naturally low in fat and can easily be made gluten-free by using tamari instead of soy sauce.
- Surprisingly Cost-Effective: A single sushi-making session at home can yield a feast of rolls for a fraction of the price of a restaurant meal. The initial investment in a bamboo mat and quality rice vinegar pays for itself very quickly.
- A Fun and Engaging Activity: Making sushi is an art. It’s a mindful, hands-on process that’s incredibly rewarding. It’s a fantastic date night activity, a fun project with kids (who love choosing their own fillings), or a great way to impress guests at a dinner party.
The Essential Ingredients for Perfect Veggie Sushi
The quality of your sushi is directly tied to the quality of your ingredients. Sourcing the right components is the first and most crucial step. Here’s your detailed shopping list.
For the Perfect Sushi Rice (Shari)
- 2 cups (400g) Japanese Short-Grain Rice: This is non-negotiable. Look for rice specifically labeled “sushi rice.” Brands like Nishiki, Kokuho Rose, or Tamanishiki are excellent. Its high starch content is what gives it the characteristic sticky texture needed to hold the rolls together. Do not substitute with long-grain rice like Basmati or Jasmine; it will not work.
- 2 ½ cups (590ml) Cold Water: For cooking the rice.
- ½ cup (120ml) Unseasoned Rice Vinegar: This provides the signature tangy flavor of sushi rice. Ensure it’s “unseasoned,” as we will be adding our own sugar and salt.
- 3 tablespoons Granulated Sugar: Balances the acidity of the vinegar.
- 1 teaspoon Salt: Enhances all the flavors.
For the Classic Vegetable Fillings
This combination provides a wonderful balance of creamy, crunchy, and fresh flavors.
- 1 large, firm-but-ripe Avocado: Sliced into ¼-inch thick strips.
- 1 medium Cucumber: A Japanese or English cucumber works best as they have fewer seeds. Cut into long, thin matchsticks (julienned).
- 2 medium Carrots: Peeled and cut into long, thin matchsticks (julienned).
- 1 block (8oz / 225g) Extra-Firm Tofu (Optional, for protein): Pressed, sliced into long strips, and pan-fried until golden.
- 4-5 sheets of Nori (Seaweed): These are the dark green wrappers for your sushi. You can find them in the international aisle of most supermarkets.
For Serving and Garnish
- High-Quality Soy Sauce or Tamari (for gluten-free): For dipping.
- Pickled Ginger (Gari): To cleanse the palate between different bites.
- Wasabi Paste: For a sharp, spicy kick.
- Toasted Sesame Seeds (black and/or white): For sprinkling on top for texture and flavor.
- Spicy Mayo (Optional): Mix ½ cup mayonnaise (or vegan mayo) with 1-2 tablespoons of sriracha, depending on your heat preference.
Essential Equipment for Your Sushi-Making Journey
While you don’t need a professional kitchen, a few key tools will make the process infinitely easier and more successful.
- Rice Cooker or a Heavy-Bottomed Pot with a Tight-Fitting Lid: A rice cooker provides foolproof, consistent results. If using a pot, a heavy bottom prevents scorching.
- Large, Non-Metallic Bowl (Hangiri): A traditional wooden sushi oke (hangiri) is ideal because it absorbs excess moisture, but any wide, shallow bowl made of wood, glass, or plastic will work. Avoid metal bowls, as they can react with the rice vinegar and affect the taste.
- Rice Paddle (Shamoji): A plastic or wooden paddle is used to “cut” and fold the rice with the vinegar seasoning. Using a spoon can mash the delicate grains.
- Bamboo Sushi Mat (Makisu): This is the essential tool for rolling tight, even sushi rolls. It’s inexpensive and indispensable. It’s helpful to wrap it in plastic wrap for easy cleanup.
- A Very Sharp Knife: A long, sharp knife (a yanagiba is traditional, but a sharp chef’s knife works) is crucial for slicing the finished rolls cleanly without squishing them.
Step-by-Step Instructions: Crafting Your Sushi Masterpiece
Follow these steps carefully, and you’ll be on your way to sushi perfection. The process is broken down into four main stages: making the rice, preparing the fillings, rolling, and slicing.
H3: Step 1: Create Flawless Sushi Rice
This is the foundation of your sushi. Do not rush this process.
- Wash the Rice: Place the 2 cups of sushi rice in a large bowl. Cover with cold water, and use your hands to gently swirl and massage the rice. The water will become milky and cloudy. Pour out the starchy water carefully, holding the rice back with your hand. Repeat this process 4-5 times, or until the water runs mostly clear. This step is critical for removing excess surface starch and preventing gummy, pasty rice.
- Drain and Rest: Drain the rice thoroughly in a fine-mesh sieve. Let the rice sit and drain for at least 30 minutes. This allows the grains to absorb some of the residual moisture, ensuring they cook more evenly.
- Cook the Rice:
- In a Rice Cooker: Combine the drained rice and 2 ½ cups of cold water in the rice cooker. Turn it on and let it work its magic.
- On the Stovetop: Combine the drained rice and 2 ½ cups of cold water in a heavy-bottomed pot. Bring to a boil over medium-high heat. Once boiling, immediately reduce the heat to the lowest possible setting, cover with a tight-fitting lid, and let it simmer for 15 minutes. Do not lift the lid during this time.
- Let it Steam: Once the rice has cooked (the rice cooker will switch to “warm” or the 15 minutes on the stove are up), turn off the heat and let the rice sit, covered and undisturbed, for another 10-15 minutes. This allows the rice to finish steaming and absorb the remaining moisture, creating a fluffy texture.
- Prepare the Sushi Vinegar (Suzushi): While the rice is resting, combine the ½ cup of rice vinegar, 3 tablespoons of sugar, and 1 teaspoon of salt in a small saucepan. Warm over low heat, stirring constantly, just until the sugar and salt have completely dissolved. Do not let it boil. Remove from heat and set aside to cool slightly.
- Season the Rice: Transfer the hot, steamed rice to your large, non-metallic bowl (hangiri). Drizzle the prepared sushi vinegar evenly over the surface of the rice. Using your rice paddle, gently “cut” and “fold” the rice with slicing motions at a 45-degree angle. The goal is to coat every grain with the vinegar mixture without mashing or smashing the rice. As you fold, you can use a fan (or a piece of cardboard) to cool the rice down quickly. This gives the rice its characteristic sheen and helps it absorb the seasoning properly. Continue until the rice is no longer steaming and has cooled to about room temperature. Cover the bowl with a damp cloth to prevent the rice from drying out while you prepare the other ingredients.
H3: Step 2: Prepare Your Vibrant Vegetable Fillings
While the rice is cooling, it’s time to prep your fillings. The key is uniform, neat cuts.
- Wash and Dry: Thoroughly wash and pat dry all your vegetables.
- Julienne the Hard Veggies: Peel the carrots. Using your sharp knife, carefully cut the cucumber and carrots into long, thin matchsticks, about 3-4 inches long. The goal is to have pieces that can run the length of your nori sheet.
- Slice the Avocado: Cut the avocado in half, remove the pit, and peel it. Place it cut-side down and slice it lengthwise into uniform strips about ¼-inch thick.
- Prepare the Tofu (if using): If you haven’t already, press the tofu to remove excess water. Cut it into long, ¼-inch thick strips. Heat a small amount of oil in a skillet over medium-high heat and pan-fry the tofu strips until they are golden brown and slightly crisp on all sides. You can season them with a dash of soy sauce in the pan for the last minute of cooking.
- Organize Your Station: Set up a clean workspace. Arrange all your prepared fillings on a plate or cutting board for easy access. This is your mise en place.
H3: Step 3: The Art of Rolling the Sushi (Maki Style)
This is the fun part! Take a deep breath. Your first roll might not be perfect, but you’ll get the hang of it quickly.
- Set Up Your Rolling Station: Place your bamboo mat (makisu) on a clean, flat surface. Many people find it helpful to wrap the mat in plastic wrap for zero cleanup. Place a sheet of nori on the mat, shiny side down. The rougher texture of the non-shiny side helps the rice adhere better.
- Prepare Your Hands: Have a small bowl of water nearby. This is “tezu,” or hand-dipping water. Dip your fingers in the water to prevent the super-sticky rice from clinging to your hands. Keep your hands damp, but not dripping wet.
- Spread the Rice: Take a handful of the seasoned, cooled sushi rice (about ¾ to 1 cup) and place it on the nori. Gently spread the rice over the surface of the nori, leaving a 1-inch border at the top edge (the edge furthest from you). This empty space is what will seal your roll. Spread the rice into an even, thin layer. Don’t press down too hard, or you’ll mash the grains. You should be able to see hints of the dark nori through the rice.
- Arrange the Fillings: About one-third of the way up from the bottom edge of the rice, arrange your fillings in a horizontal line. Don’t overfill! This is the most common mistake for beginners. A few strips of each vegetable are plenty. For example, lay down two strips of cucumber, two of carrot, and two slices of avocado.
- The Roll: This is the moment of truth.
- Lift the edge of the bamboo mat closest to you, using your thumbs.
- Use your fingertips to hold the fillings in place as you begin to roll the mat up and away from you.
- Tuck the edge of the nori over the fillings, creating a tight core. This initial tuck is the most important step.
- Once the fillings are encased, pull the mat forward slightly to tighten the roll.
- Continue rolling the mat away from you, applying gentle, even pressure with your hands to form a compact cylinder.
- When you reach the 1-inch border of nori you left, dab a tiny bit of water along the edge to help it seal like an envelope.
- Finish the roll and give it one final, gentle squeeze inside the mat to ensure it’s firm and round.
- Remove the completed roll from the mat and set it aside, seam-side down.
- Repeat: Continue the process with the remaining nori sheets and fillings until you have a beautiful lineup of sushi rolls.
H3: Step 4: Slicing and Perfecting Your Rolls
A poorly sliced roll can ruin all your hard work. A sharp knife is your best friend here.
- Wet the Knife: Dip the tip of your very sharp knife into your bowl of water and let the water run down the length of the blade. A wet blade will glide through the sticky rice and nori without tearing or squishing.
- Slice with Confidence: Place a roll on your cutting board. First, slice the roll exactly in half using a single, long, downward stroke. Don’t saw back and forth.
- Finish Slicing: Line up the two halves side-by-side and slice them into 3 or 4 even pieces each, for a total of 6 or 8 pieces per roll. Wipe and re-wet your knife blade between cuts as needed to keep it clean and non-sticky.
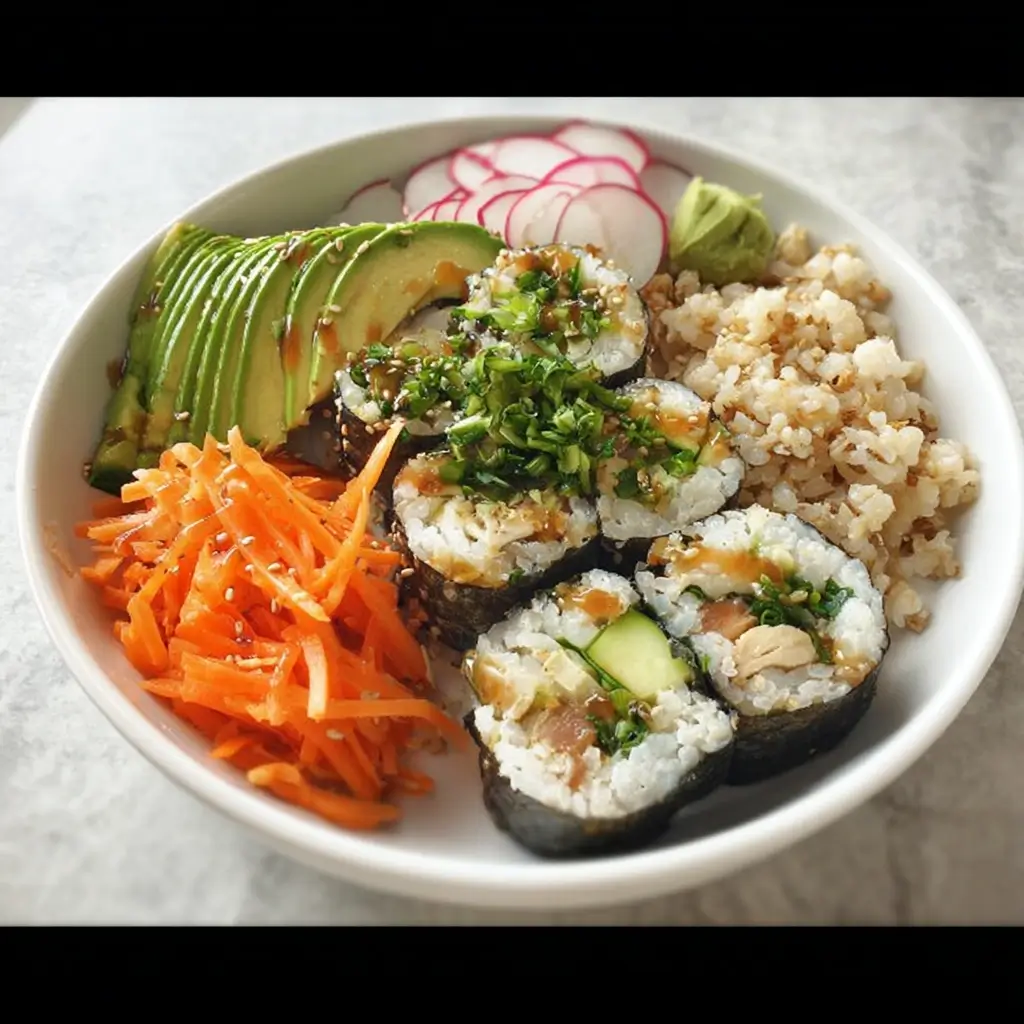
- Arrange and Serve: Beautifully arrange your cut sushi pieces on a platter, sprinkle with toasted sesame seeds, and serve immediately.
Nutrition Facts
- Servings: This recipe makes 4-5 full maki rolls, yielding about 32-40 pieces of sushi. This serves 3-4 people as a main course or 5-6 as an appetizer.
- Calories per serving (approx. 8 pieces): Approximately 350-450 kcal. This is an estimate and will vary based on the exact amount of rice and fillings used, and whether you include optional ingredients like tofu or spicy mayo.
Preparation & Cooking Time
- Preparation Time: 45 minutes (includes washing/resting rice and chopping vegetables)
- Cooking Time: 20 minutes (for cooking the rice)
- Assembly Time: 20-30 minutes
- Total Time: Approximately 1 hour 30 minutes (much of this is passive time while the rice cooks and cools)
How to Serve Your Vegetarian Sushi for the Ultimate Experience
Presentation is key to the sushi experience. It elevates the meal from simply food to an event.
- The Classic Platter:
- Arrange the different types of rolls artfully on a large platter, a simple wooden board, or a slate tile.
- Create small, separate piles of pickled ginger (gari) and wasabi on the platter.
- Provide small, individual dishes for each person to pour their soy sauce or tamari into.
- Deconstructed Bowl for Leftovers:
- Don’t worry if a roll doesn’t turn out perfectly! Simply chop up the roll and serve it in a bowl over a bed of leftover sushi rice.
- Drizzle with spicy mayo and sprinkle with sesame seeds for a delicious “deconstructed sushi bowl.”
- Perfect Pairings:
- Miso Soup: A small bowl of warm, savory miso soup is the classic and perfect starter.
- Edamame: A bowl of steamed and salted edamame complements the sushi wonderfully.
- Seaweed Salad (Goma Wakame): This adds another fresh, oceanic flavor to the meal.
- Drinks: Green tea (hot or iced), a crisp lager-style Japanese beer (like Sapporo or Asahi), or a dry, chilled sake are all excellent beverage choices.
5 Pro Tips for Restaurant-Quality Vegetarian Sushi
- Rice Temperature is Key: Do not try to roll with hot rice. It will make the nori tough and difficult to roll. The rice should be cooled to room temperature or just slightly warm. This is the perfect temperature for flavor and texture.
- Don’t Overfill the Roll: This is the cardinal sin of beginner sushi makers. It makes the roll impossible to close and causes it to burst open. Be conservative with your fillings; less is truly more. A thin line of 2-3 ingredients is perfect.
- The “Tuck and Squeeze”: The most critical part of rolling is the initial tuck of the nori over the fillings. Once you’ve tucked it, give the roll a firm but gentle squeeze inside the mat to compact the center before you continue rolling. This prevents a loose, hollow core.
- Wrap Your Bamboo Mat: Before you begin, wrap your makisu in a layer of plastic cling film. This prevents rice from getting stuck in the crevices of the bamboo, making cleanup incredibly easy and keeping your mat pristine for years to come.
- Use a Sharp, Wet Knife: We can’t stress this enough. A dull knife will crush your beautiful roll. A sharp, long knife allows for a single, clean slice. Wiping and wetting the blade between each cut prevents rice from sticking and ensures every piece is picture-perfect.
Frequently Asked Questions (FAQ)
1. Q: Why is my sushi rice so mushy/gummy?
A: This is almost always due to one of two things: not washing the rice enough, or adding too much water. You must wash the rice until the water runs clear to remove the excess surface starch. Also, be precise with your rice-to-water ratio. If you’ve done both of these things, make sure you aren’t mashing the rice when you mix in the vinegar; use a gentle “cutting” motion.
2. Q: My sushi roll is falling apart. What did I do wrong?
A: This can happen for a few reasons. The most common is overfilling, which prevents the nori from sealing properly. Another reason could be that your roll wasn’t tight enough; remember to give it a good squeeze in the mat after the initial tuck. Finally, make sure you spread the rice all the way to the side edges of the nori, but leave that 1-inch border at the top to seal the roll shut.
3. Q: Can I make vegetarian sushi ahead of time?
A: Sushi is best enjoyed fresh, within a few hours of making it. The rice starts to harden and dry out in the refrigerator, and the nori can become soggy from the moisture in the fillings. If you must prepare ahead, make the individual components (cook the rice, prep the veggies) and store them separately. Assemble and roll the sushi just before you plan to serve it for the best possible texture and flavor.
4. Q: What other vegetable fillings can I use?
A: The sky is the limit! This is where you can get creative. Try roasted sweet potato strips, blanched asparagus, bell pepper strips (red, yellow, or orange for color), shiitake mushrooms sautéed in soy sauce, steamed spinach (squeezed very dry), or even fruits like mango for a sweet and savory combination. For extra crunch, you can make vegetable tempura (like sweet potato or broccoli) and use it as a filling.
5. Q: How can I make this recipe vegan and/or gluten-free?
A: This recipe is very easy to adapt! To make it 100% vegan, simply ensure you use a vegan mayonnaise for the optional spicy mayo, and if you’re adding a creamy element, use a vegan cream cheese. To make it gluten-free, the only substitution required is to use tamari instead of soy sauce for dipping, as traditional soy sauce contains wheat. All other core ingredients (rice, nori, vegetables, rice vinegar) are naturally gluten-free.

Vegetarian Sushi Recipe
Ingredients
For the Perfect Sushi Rice (Shari)
- 2 cups (400g) Japanese Short-Grain Rice: This is non-negotiable. Look for rice specifically labeled “sushi rice.” Brands like Nishiki, Kokuho Rose, or Tamanishiki are excellent. Its high starch content is what gives it the characteristic sticky texture needed to hold the rolls together. Do not substitute with long-grain rice like Basmati or Jasmine; it will not work.
- 2 ½ cups (590ml) Cold Water: For cooking the rice.
- ½ cup (120ml) Unseasoned Rice Vinegar: This provides the signature tangy flavor of sushi rice. Ensure it’s “unseasoned,” as we will be adding our own sugar and salt.
- 3 tablespoons Granulated Sugar: Balances the acidity of the vinegar.
- 1 teaspoon Salt: Enhances all the flavors.
For the Classic Vegetable Fillings
This combination provides a wonderful balance of creamy, crunchy, and fresh flavors.
- 1 large, firm-but-ripe Avocado: Sliced into ¼-inch thick strips.
- 1 medium Cucumber: A Japanese or English cucumber works best as they have fewer seeds. Cut into long, thin matchsticks (julienned).
- 2 medium Carrots: Peeled and cut into long, thin matchsticks (julienned).
- 1 block (8oz / 225g) Extra-Firm Tofu (Optional, for protein): Pressed, sliced into long strips, and pan-fried until golden.
- 4–5 sheets of Nori (Seaweed): These are the dark green wrappers for your sushi. You can find them in the international aisle of most supermarkets.
For Serving and Garnish
- High-Quality Soy Sauce or Tamari (for gluten-free): For dipping.
- Pickled Ginger (Gari): To cleanse the palate between different bites.
- Wasabi Paste: For a sharp, spicy kick.
- Toasted Sesame Seeds (black and/or white): For sprinkling on top for texture and flavor.
- Spicy Mayo (Optional): Mix ½ cup mayonnaise (or vegan mayo) with 1-2 tablespoons of sriracha, depending on your heat preference.
Instructions
H3: Step 1: Create Flawless Sushi Rice
This is the foundation of your sushi. Do not rush this process.
- Wash the Rice: Place the 2 cups of sushi rice in a large bowl. Cover with cold water, and use your hands to gently swirl and massage the rice. The water will become milky and cloudy. Pour out the starchy water carefully, holding the rice back with your hand. Repeat this process 4-5 times, or until the water runs mostly clear. This step is critical for removing excess surface starch and preventing gummy, pasty rice.
- Drain and Rest: Drain the rice thoroughly in a fine-mesh sieve. Let the rice sit and drain for at least 30 minutes. This allows the grains to absorb some of the residual moisture, ensuring they cook more evenly.
- Cook the Rice:
- In a Rice Cooker: Combine the drained rice and 2 ½ cups of cold water in the rice cooker. Turn it on and let it work its magic.
- On the Stovetop: Combine the drained rice and 2 ½ cups of cold water in a heavy-bottomed pot. Bring to a boil over medium-high heat. Once boiling, immediately reduce the heat to the lowest possible setting, cover with a tight-fitting lid, and let it simmer for 15 minutes. Do not lift the lid during this time.
- Let it Steam: Once the rice has cooked (the rice cooker will switch to “warm” or the 15 minutes on the stove are up), turn off the heat and let the rice sit, covered and undisturbed, for another 10-15 minutes. This allows the rice to finish steaming and absorb the remaining moisture, creating a fluffy texture.
- Prepare the Sushi Vinegar (Suzushi): While the rice is resting, combine the ½ cup of rice vinegar, 3 tablespoons of sugar, and 1 teaspoon of salt in a small saucepan. Warm over low heat, stirring constantly, just until the sugar and salt have completely dissolved. Do not let it boil. Remove from heat and set aside to cool slightly.
- Season the Rice: Transfer the hot, steamed rice to your large, non-metallic bowl (hangiri). Drizzle the prepared sushi vinegar evenly over the surface of the rice. Using your rice paddle, gently “cut” and “fold” the rice with slicing motions at a 45-degree angle. The goal is to coat every grain with the vinegar mixture without mashing or smashing the rice. As you fold, you can use a fan (or a piece of cardboard) to cool the rice down quickly. This gives the rice its characteristic sheen and helps it absorb the seasoning properly. Continue until the rice is no longer steaming and has cooled to about room temperature. Cover the bowl with a damp cloth to prevent the rice from drying out while you prepare the other ingredients.
H3: Step 2: Prepare Your Vibrant Vegetable Fillings
While the rice is cooling, it’s time to prep your fillings. The key is uniform, neat cuts.
- Wash and Dry: Thoroughly wash and pat dry all your vegetables.
- Julienne the Hard Veggies: Peel the carrots. Using your sharp knife, carefully cut the cucumber and carrots into long, thin matchsticks, about 3-4 inches long. The goal is to have pieces that can run the length of your nori sheet.
- Slice the Avocado: Cut the avocado in half, remove the pit, and peel it. Place it cut-side down and slice it lengthwise into uniform strips about ¼-inch thick.
- Prepare the Tofu (if using): If you haven’t already, press the tofu to remove excess water. Cut it into long, ¼-inch thick strips. Heat a small amount of oil in a skillet over medium-high heat and pan-fry the tofu strips until they are golden brown and slightly crisp on all sides. You can season them with a dash of soy sauce in the pan for the last minute of cooking.
- Organize Your Station: Set up a clean workspace. Arrange all your prepared fillings on a plate or cutting board for easy access. This is your mise en place.
H3: Step 3: The Art of Rolling the Sushi (Maki Style)
This is the fun part! Take a deep breath. Your first roll might not be perfect, but you’ll get the hang of it quickly.
- Set Up Your Rolling Station: Place your bamboo mat (makisu) on a clean, flat surface. Many people find it helpful to wrap the mat in plastic wrap for zero cleanup. Place a sheet of nori on the mat, shiny side down. The rougher texture of the non-shiny side helps the rice adhere better.
- Prepare Your Hands: Have a small bowl of water nearby. This is “tezu,” or hand-dipping water. Dip your fingers in the water to prevent the super-sticky rice from clinging to your hands. Keep your hands damp, but not dripping wet.
- Spread the Rice: Take a handful of the seasoned, cooled sushi rice (about ¾ to 1 cup) and place it on the nori. Gently spread the rice over the surface of the nori, leaving a 1-inch border at the top edge (the edge furthest from you). This empty space is what will seal your roll. Spread the rice into an even, thin layer. Don’t press down too hard, or you’ll mash the grains. You should be able to see hints of the dark nori through the rice.
- Arrange the Fillings: About one-third of the way up from the bottom edge of the rice, arrange your fillings in a horizontal line. Don’t overfill! This is the most common mistake for beginners. A few strips of each vegetable are plenty. For example, lay down two strips of cucumber, two of carrot, and two slices of avocado.
- The Roll: This is the moment of truth.
- Lift the edge of the bamboo mat closest to you, using your thumbs.
- Use your fingertips to hold the fillings in place as you begin to roll the mat up and away from you.
- Tuck the edge of the nori over the fillings, creating a tight core. This initial tuck is the most important step.
- Once the fillings are encased, pull the mat forward slightly to tighten the roll.
- Continue rolling the mat away from you, applying gentle, even pressure with your hands to form a compact cylinder.
- When you reach the 1-inch border of nori you left, dab a tiny bit of water along the edge to help it seal like an envelope.
- Finish the roll and give it one final, gentle squeeze inside the mat to ensure it’s firm and round.
- Remove the completed roll from the mat and set it aside, seam-side down.
- Repeat: Continue the process with the remaining nori sheets and fillings until you have a beautiful lineup of sushi rolls.
H3: Step 4: Slicing and Perfecting Your Rolls
A poorly sliced roll can ruin all your hard work. A sharp knife is your best friend here.
- Wet the Knife: Dip the tip of your very sharp knife into your bowl of water and let the water run down the length of the blade. A wet blade will glide through the sticky rice and nori without tearing or squishing.
- Slice with Confidence: Place a roll on your cutting board. First, slice the roll exactly in half using a single, long, downward stroke. Don’t saw back and forth.
- Finish Slicing: Line up the two halves side-by-side and slice them into 3 or 4 even pieces each, for a total of 6 or 8 pieces per roll. Wipe and re-wet your knife blade between cuts as needed to keep it clean and non-sticky.
- Arrange and Serve: Beautifully arrange your cut sushi pieces on a platter, sprinkle with toasted sesame seeds, and serve immediately.
Nutrition
- Serving Size: One Normal Portion
- Calories: 350-450 kcal


