


Okay, let’s dive into the sizzling, spicy, and utterly satisfying world of Dakgalbi! This isn’t just a recipe for me; it’s a culinary hug, a dish that has single-handedly rescued many a weeknight dinner dilemma and has been the star of countless weekend gatherings. The first time I made Dakgalbi for my family, the aroma alone had everyone migrating to the kitchen, peering over my shoulder with eager anticipation. The vibrant red of the gochujang, the colorful medley of vegetables, and the tender chicken all simmering together in a large pan – it was a feast for the eyes before it even hit the taste buds. And when it did? Silence. The good kind. The kind where everyone is too busy savoring each spicy, savory, slightly sweet mouthful to speak. My kids, who can be picky eaters, surprisingly loved the customizable spice level (I tone it down a bit for them) and the fun of adding cheese at the end, watching it melt into gooey perfection. The communal aspect of cooking and serving it right from the pan on the table makes it an experience, not just a meal. It’s become a requested favorite, and the “Dakgalbi fried rice” made with the leftovers (if there are any!) is legendary in our household. This recipe is my tried-and-true version, optimized for both incredible flavor and ease of making at home.
Dakgalbi: The Ultimate Spicy Korean Chicken Stir-Fry Adventure
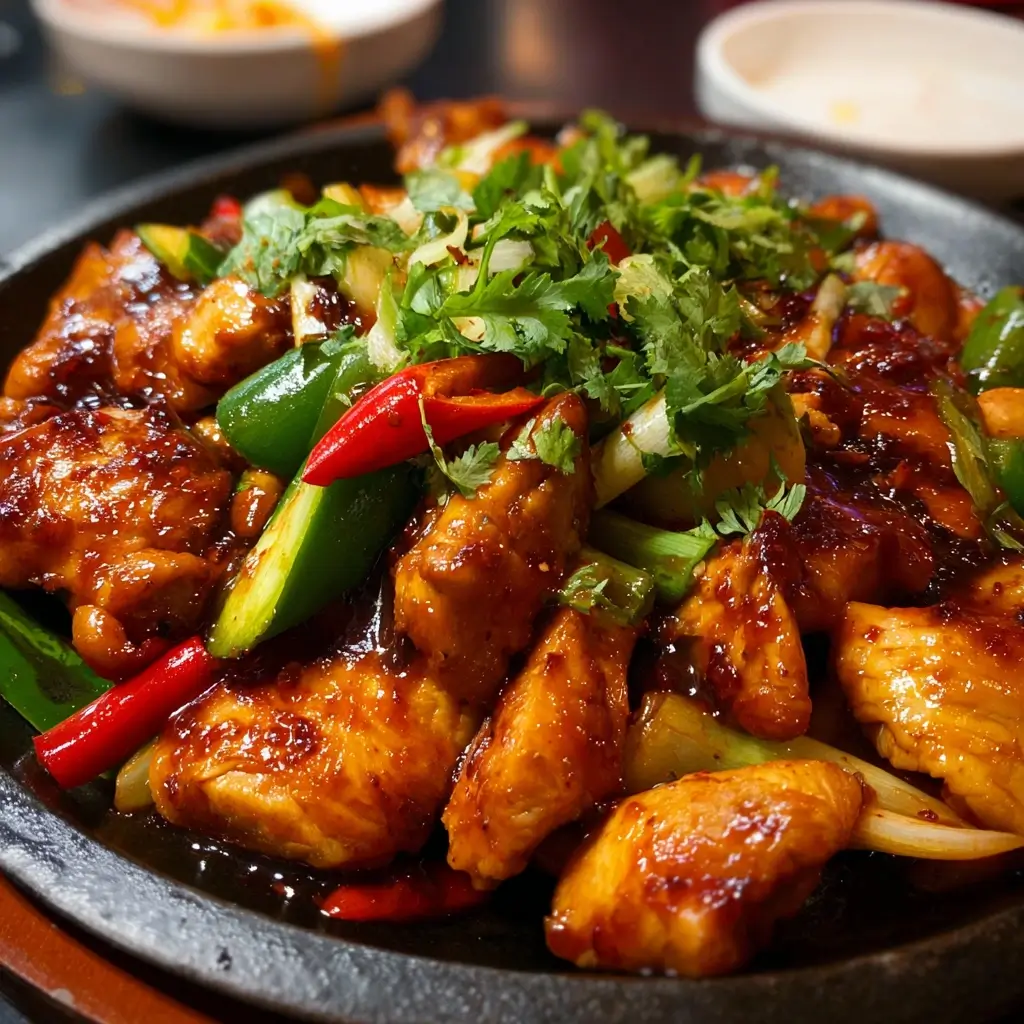
Dakgalbi (닭갈비) is a beloved South Korean dish that traditionally involves stir-frying marinated diced chicken in a gochujang-based sauce with an assortment of vegetables like sweet potatoes, cabbage, perilla leaves, scallions, and onions, often along with tteok (rice cakes). Originating from Chuncheon, Gangwon Province, it’s a dish celebrated for its robust flavors, customizable heat, and the communal joy of cooking it together, often on a large tabletop grill. While restaurant versions are fantastic, creating this masterpiece at home is surprisingly straightforward and incredibly rewarding. This comprehensive guide will walk you through everything you need to know to create an authentic and delicious Dakgalbi experience that will transport your taste buds straight to Korea.
Understanding the Key Ingredients: The Heart of Dakgalbi Flavor
Before we jump into the recipe, let’s talk about the star players. The quality and type of ingredients you use will significantly impact the final taste of your Dakgalbi.
- Chicken Thighs: This is non-negotiable for the best Dakgalbi. Chicken thighs are more flavorful, tender, and forgiving than chicken breasts, which can dry out easily in this type of stir-fry. Boneless, skinless thighs are the easiest to work with. The fat content in thighs also adds to the richness of the dish.
- Gochujang (Korean Chili Paste): The backbone of the marinade. Gochujang is a fermented Korean condiment made from chili powder, glutinous rice, fermented soybeans, and salt. It’s spicy, savory, and slightly sweet. Brands vary in spice level and sweetness, so you might need to adjust other seasonings accordingly. Look for it in Korean or Asian supermarkets.
- Gochugaru (Korean Chili Flakes): This adds another layer of spiciness and a vibrant red color. There are two main types: coarse (for kimchi) and fine (for stews and sauces). For Dakgalbi, either works, but fine gochugaru will incorporate more smoothly into the marinade. It offers a different kind of heat than gochujang – cleaner and brighter.
- Soy Sauce: Provides a salty, umami depth. Use regular Korean soy sauce (jin ganjang) or an all-purpose soy sauce.
- Mirin or Rice Wine (Cheongju/Soju): Adds a touch of sweetness and helps to tenderize the chicken and remove any gamey smell. Mirin is sweeter; if using rice wine like cheongju or soju, you might want to add a bit more sugar.
- Sesame Oil: Toasted sesame oil is used for its nutty aroma and flavor. It’s usually added towards the end of cooking or in the marinade.
- Garlic and Ginger: Aromatic powerhouses that are essential in many Korean dishes. Freshly minced is always best.
- Sugar or Corn Syrup (Mulyeot): Balances the spiciness and saltiness. Korean corn syrup (mulyeot) also gives the sauce a lovely sheen, but regular sugar, brown sugar, or even honey can be used.
- Cabbage: Regular green cabbage is typically used. It wilts down beautifully, absorbing the sauce and adding a slight sweetness and crunch.
- Sweet Potato (Goguma): Korean sweet potatoes (bam goguma) are preferred for their dense, chestnut-like texture and subtle sweetness that complements the spicy sauce. If you can’t find them, Japanese sweet potatoes (Satsuma-imo) are a good substitute. Orange sweet potatoes can be used but will be much softer and sweeter.
- Onion & Scallions: Standard aromatics that add sweetness and pungency.
- Perilla Leaves (Kkaennip): These have a unique, anise-like, minty flavor that is iconic in Dakgalbi. If you can find them, they elevate the dish significantly. If not, you can omit them or add a different fresh herb like Thai basil for a different (but still interesting) twist, though it won’t be traditional.
- Tteok (Korean Rice Cakes): Cylindrical rice cakes (tteokbokki tteok) are commonly added. They become chewy and soak up the delicious sauce. If using frozen, soak them in warm water first to soften.
- Optional Add-ins:
- Cheese: Mozzarella cheese is a popular modern addition, melted over the top at the end. The creamy, mild cheese contrasts wonderfully with the spicy chicken.
- Noodles: Ramen noodles, udon noodles, or even sweet potato starch noodles (dangmyeon) can be added towards the end of cooking.
- Other Vegetables: Mushrooms (king oyster, shiitake), carrots, or bell peppers can also be included.
The Ultimate Dakgalbi Recipe: Ingredients List
This recipe serves 4-6 people, depending on appetite and side dishes.
For the Chicken & Marinade:
- 1.5 lbs (approx. 680g) boneless, skinless chicken thighs, cut into 1.5-inch pieces
- 1/3 cup (80ml) gochujang (Korean chili paste)
- 2-3 tablespoons gochugaru (Korean chili flakes – adjust to your spice preference)
- 3 tablespoons soy sauce
- 2 tablespoons mirin (or Korean rice wine/soju + 1 tsp sugar)
- 2 tablespoons sugar (or Korean corn syrup/oligodang)
- 1 tablespoon toasted sesame oil
- 4-5 cloves garlic, minced (about 1.5 tablespoons)
- 1 teaspoon fresh ginger, minced
- 1/2 teaspoon black pepper
For the Stir-Fry:
- 1 tablespoon cooking oil (vegetable, canola, or grapeseed)
- 1 large Korean sweet potato (or Japanese sweet potato), peeled and sliced into 1/4-inch thick half-moons (about 1.5-2 cups)
- 1/2 medium head of green cabbage, cored and roughly chopped (about 4-5 cups)
- 1 large yellow onion, sliced
- 4-5 scallions, cut into 2-inch lengths (separate white/light green parts from dark green parts)
- 1 cup tteok (Korean rice cakes), soaked in warm water for 20-30 minutes if hard or frozen, then drained
- 10-15 perilla leaves (kkaennip), roughly chopped or torn (optional but highly recommended)
- Optional: 1 cup shredded mozzarella cheese (for finishing)
- Optional: Cooked short-grain rice, extra sesame oil, gim (seaweed) strips, and kimchi for fried rice at the end.
Step-by-Step Instructions for Perfect Dakgalbi
Follow these instructions carefully for a Dakgalbi that rivals your favorite Korean restaurant.
1. Marinate the Chicken:
* In a large bowl, combine all the marinade ingredients: gochujang, gochugaru, soy sauce, mirin, sugar, sesame oil, minced garlic, minced ginger, and black pepper. Mix well until a smooth paste forms.
* Add the cut chicken thigh pieces to the marinade. Using your hands (preferably gloved, as gochujang can stain) or a spoon, toss the chicken thoroughly to ensure every piece is well-coated.
* Cover the bowl and let the chicken marinate in the refrigerator for at least 30 minutes. For deeper flavor, marinate for 2-4 hours, or even overnight.
2. Prepare the Vegetables and Rice Cakes:
* While the chicken is marinating, prepare all your vegetables: peel and slice the sweet potato, chop the cabbage, slice the onion, and cut the scallions. Keep the tougher white/light green parts of the scallions separate from the tender dark green tops.
* If using tteok (rice cakes), ensure they are softened by soaking in warm water and then drained. If they are fresh and soft, you can skip the soaking.
3. Cooking the Dakgalbi:
* Use a large, wide, heavy-bottomed pan or skillet (a 12-inch cast iron skillet, a large non-stick frying pan, or an electric skillet works well). Dakgalbi is traditionally cooked in a large pan that allows ingredients to spread out.
* Heat 1 tablespoon of cooking oil in the pan over medium-high heat.
* Add the marinated chicken to the hot pan in a single layer, if possible. Cook for 3-4 minutes per side, until it starts to brown and char slightly. Don’t move it around too much initially to allow for good caramelization.
* Add the sliced sweet potatoes and the white/light green parts of the scallions. Stir everything together and cook for about 5-7 minutes, stirring occasionally, until the sweet potatoes begin to soften. The chicken will continue to cook.
* Add the chopped cabbage and sliced onions to the pan. It might seem like a lot of cabbage, but it will wilt down significantly. Stir well to combine with the chicken and sauce. Cook for another 5-8 minutes, stirring frequently, until the cabbage is tender-crisp and the chicken is cooked through. If the mixture looks too dry, you can add a tablespoon or two of water or chicken broth.
* Add the drained tteok (rice cakes) and the dark green parts of the scallions. Stir and cook for another 3-5 minutes, or until the rice cakes are soft and chewy and have absorbed some of the sauce.
* If using perilla leaves, stir them in during the last minute of cooking. They wilt quickly and add a wonderful aroma.
4. Optional Cheese Finish:
* If adding cheese, reduce the heat to low. Make a space in the center of the pan or sprinkle the mozzarella cheese evenly over the top of the Dakgalbi.
* Cover the pan with a lid (or foil if your pan doesn’t have one) and let it cook for 2-3 minutes, or until the cheese is completely melted and gooey.
5. The Grand Finale: Dakgalbi Fried Rice (Bokkeumbap)
* This is an essential part of the Dakgalbi experience! Once most of the chicken and vegetables have been eaten, leave some of the leftover sauce and a few small bits of chicken/vegetables in the pan.
* Add 1-2 cups of cooked short-grain rice to the pan.
* Drizzle with a little extra sesame oil.
* Add some chopped kimchi (squeeze out excess liquid) and crumbled gim (seaweed snacks) or shredded nori.
* Using a spatula or sturdy spoon, mix everything vigorously, scraping up any browned bits from the bottom of the pan. Flatten the rice mixture into a pancake shape.
* Cook for a few minutes until the bottom is slightly crispy. Some like to crack an egg into it as well.
* Serve the fried rice straight from the pan.
Nutrition Facts
- Servings: 4-6
- Calories per serving (approximate): 550-750 kcal (This is a rough estimate and can vary significantly based on exact ingredient amounts, portion size, and optional add-ins like cheese and noodles. The fried rice at the end will also add calories.)
The dish is a good source of protein from the chicken. The vegetables contribute fiber, vitamins, and minerals. However, due to the gochujang and soy sauce, it can be high in sodium. The sugar content also contributes to the calorie count.
Preparation & Cooking Time
- Marinating Time: 30 minutes (minimum) to overnight (recommended for best flavor)
- Preparation Time (Chopping & Soaking): 20-25 minutes
- Cooking Time: 25-35 minutes
- Total Active Time (excluding marinating): Approximately 45-60 minutes
How to Serve Dakgalbi Like a Pro
Dakgalbi is more than just food; it’s an event! Here’s how to make the most of serving it:
- Family Style, Straight from the Pan:
- The most traditional and fun way to serve Dakgalbi is directly from the large pan or skillet it was cooked in. Place the pan in the center of the table (on a trivet to protect your table!).
- Provide everyone with chopsticks or forks to pick out their favorite bits.
- Lettuce Wraps (Ssam):
- Serve with fresh lettuce leaves (like red leaf, green leaf, or butter lettuce) and perilla leaves for wrapping.
- Diners can take a piece of chicken, some vegetables, and a bit of rice (if serving separately initially) and wrap it in a lettuce leaf.
- A dollop of ssamjang (Korean dipping sauce) can also be added to the wrap.
- Essential Korean Side Dishes (Banchan):
- Kimchi: A must-have with almost any Korean meal.
- Pickled Radish (Danmuji or Chicken-mu): The tangy, crunchy pickled radish cubes often served with Korean fried chicken are a perfect palate cleanser for spicy Dakgalbi.
- Steamed White Rice: Serve bowls of short-grain white rice on the side, especially if you’re not planning to make fried rice with the leftovers immediately.
- Simple Salads: A light green salad with a sesame dressing or a simple cucumber salad can offer a refreshing contrast.
- The Fried Rice Ritual:
- As mentioned in the instructions, finishing with bokkeumbap (fried rice) made with the leftover sauce and remnants in the pan is crucial. Don’t skip this! It’s often considered the best part of the meal.
- Drinks:
- Soju or Makgeolli (Korean Rice Wine): Traditional alcoholic pairings.
- Beer: A cold lager pairs excellently with the spicy flavors.
- Barley Tea (Boricha) or Corn Tea (Oksusu-cha): Common non-alcoholic Korean beverages that are refreshing.
Mastering Your Dakgalbi: 5 Additional Tips for Perfection
- Don’t Overcrowd the Pan: If your pan isn’t large enough, cook the Dakgalbi in batches. Overcrowding will steam the ingredients instead of stir-frying and browning them, resulting in a less flavorful dish. A wide, flat cooking surface is key.
- Adjust Spice Level Carefully: Gochujang and gochugaru brands vary in heat. Start with the lower amount of gochugaru suggested in the recipe if you’re sensitive to spice. You can always add more, but you can’t easily take it away. A little extra sugar can also help balance intense heat.
- Sweet Potato is Key (the right kind!): While orange sweet potatoes will work in a pinch, Korean (bam goguma) or Japanese sweet potatoes (Satsuma-imo) hold their shape much better and have a denser, less watery texture that is ideal for Dakgalbi. They absorb the sauce without becoming mushy.
- Embrace the Char: Don’t be afraid to let the chicken and vegetables get a little bit of char. Those slightly caramelized, crispy bits add a fantastic depth of flavor. This is easier to achieve with a cast iron skillet or a good quality heavy-bottomed pan.
- Perilla Power: If you can find fresh perilla leaves (kkaennip), use them! Their unique, slightly minty, anise-like flavor is truly distinctive and takes the authenticity of your Dakgalbi to the next level. Add them towards the very end of cooking to preserve their aroma.
Dakgalbi FAQs: Your Questions Answered
Q1: Can I make Dakgalbi less spicy?
A: Absolutely! The primary sources of heat are gochujang and gochugaru. You can reduce the amount of gochugaru significantly (even down to 1 teaspoon for mild color and flavor) and choose a milder gochujang brand (some are labeled “mild”). You can also increase the sugar or corn syrup slightly to balance the heat. Adding cheese at the end also helps to mellow the spiciness.
Q2: Can I use chicken breast instead of thighs?
A: While chicken thighs are highly recommended for their flavor and moisture, you can use chicken breast. If you do, be careful not to overcook it, as it can dry out quickly. Cut the breast into slightly larger pieces and consider adding it a bit later in the cooking process, or marinate it for a longer period to help keep it tender. Adding a little extra oil to the pan might also help.
Q3: What if I can’t find perilla leaves (kkaennip)?
A: Perilla leaves have a very unique flavor that’s hard to replicate. If you can’t find them, you can simply omit them. The Dakgalbi will still be delicious. Some people suggest a mix of mint and basil as a distant alternative, but it will change the flavor profile. Alternatively, adding more fresh scallions or even some chopped cilantro (if you enjoy it) at the end can add a touch of freshness.
Q4: Can I prepare Dakgalbi ahead of time?
A: Yes, to some extent. You can marinate the chicken for up to 24 hours in advance – in fact, it will taste even better. You can also chop all the vegetables and store them in airtight containers in the refrigerator a day ahead. However, it’s best to cook the Dakgalbi just before serving for the best texture and flavor. Reheated Dakgalbi is still tasty, but the vegetables might become softer.
Q5: What’s the best type of pan to use for Dakgalbi?
A: A large, wide, and relatively shallow pan with a heavy bottom is ideal. This allows the ingredients to have good contact with the heat source for proper stir-frying and caramelization.
* Cast Iron Skillet (12-inch or larger): Excellent for heat retention and even cooking, helping to achieve a nice char.
* Large Non-Stick Wok or Stir-Fry Pan: Good for preventing sticking, especially with the sugary sauce.
* Electric Skillet: A great option as you can control the temperature precisely and often serve directly from it at the table.
Avoid using pans that are too small or have very high sides like a deep stockpot, as this will lead to steaming rather than frying.
This Dakgalbi recipe is more than just a set of instructions; it’s an invitation to explore the vibrant and exciting flavors of Korean cuisine in your own kitchen. The process is fun, the aroma is intoxicating, and the result is a truly memorable meal. Whether you’re a seasoned Korean food enthusiast or a curious newcomer, I encourage you to gather your ingredients, fire up your stove, and embark on this delicious Dakgalbi adventure. Enjoy the sizzle, the spice, and the shared joy of a fantastic home-cooked meal!
Print
Ultimate Spicy Korean Chicken Stir-Fry Recipe
Ingredients
For the Chicken & Marinade:
- 1.5 lbs (approx. 680g) boneless, skinless chicken thighs, cut into 1.5-inch pieces
- 1/3 cup (80ml) gochujang (Korean chili paste)
- 2–3 tablespoons gochugaru (Korean chili flakes – adjust to your spice preference)
- 3 tablespoons soy sauce
- 2 tablespoons mirin (or Korean rice wine/soju + 1 tsp sugar)
- 2 tablespoons sugar (or Korean corn syrup/oligodang)
- 1 tablespoon toasted sesame oil
- 4–5 cloves garlic, minced (about 1.5 tablespoons)
- 1 teaspoon fresh ginger, minced
- 1/2 teaspoon black pepper
For the Stir-Fry:
- 1 tablespoon cooking oil (vegetable, canola, or grapeseed)
- 1 large Korean sweet potato (or Japanese sweet potato), peeled and sliced into 1/4-inch thick half-moons (about 1.5–2 cups)
- 1/2 medium head of green cabbage, cored and roughly chopped (about 4–5 cups)
- 1 large yellow onion, sliced
- 4–5 scallions, cut into 2-inch lengths (separate white/light green parts from dark green parts)
- 1 cup tteok (Korean rice cakes), soaked in warm water for 20-30 minutes if hard or frozen, then drained
- 10–15 perilla leaves (kkaennip), roughly chopped or torn (optional but highly recommended)
- Optional: 1 cup shredded mozzarella cheese (for finishing)
- Optional: Cooked short-grain rice, extra sesame oil, gim (seaweed) strips, and kimchi for fried rice at the end.
Instructions
1. Marinate the Chicken:
* In a large bowl, combine all the marinade ingredients: gochujang, gochugaru, soy sauce, mirin, sugar, sesame oil, minced garlic, minced ginger, and black pepper. Mix well until a smooth paste forms.
* Add the cut chicken thigh pieces to the marinade. Using your hands (preferably gloved, as gochujang can stain) or a spoon, toss the chicken thoroughly to ensure every piece is well-coated.
* Cover the bowl and let the chicken marinate in the refrigerator for at least 30 minutes. For deeper flavor, marinate for 2-4 hours, or even overnight.
2. Prepare the Vegetables and Rice Cakes:
* While the chicken is marinating, prepare all your vegetables: peel and slice the sweet potato, chop the cabbage, slice the onion, and cut the scallions. Keep the tougher white/light green parts of the scallions separate from the tender dark green tops.
* If using tteok (rice cakes), ensure they are softened by soaking in warm water and then drained. If they are fresh and soft, you can skip the soaking.
3. Cooking the Dakgalbi:
* Use a large, wide, heavy-bottomed pan or skillet (a 12-inch cast iron skillet, a large non-stick frying pan, or an electric skillet works well). Dakgalbi is traditionally cooked in a large pan that allows ingredients to spread out.
* Heat 1 tablespoon of cooking oil in the pan over medium-high heat.
* Add the marinated chicken to the hot pan in a single layer, if possible. Cook for 3-4 minutes per side, until it starts to brown and char slightly. Don’t move it around too much initially to allow for good caramelization.
* Add the sliced sweet potatoes and the white/light green parts of the scallions. Stir everything together and cook for about 5-7 minutes, stirring occasionally, until the sweet potatoes begin to soften. The chicken will continue to cook.
* Add the chopped cabbage and sliced onions to the pan. It might seem like a lot of cabbage, but it will wilt down significantly. Stir well to combine with the chicken and sauce. Cook for another 5-8 minutes, stirring frequently, until the cabbage is tender-crisp and the chicken is cooked through. If the mixture looks too dry, you can add a tablespoon or two of water or chicken broth.
* Add the drained tteok (rice cakes) and the dark green parts of the scallions. Stir and cook for another 3-5 minutes, or until the rice cakes are soft and chewy and have absorbed some of the sauce.
* If using perilla leaves, stir them in during the last minute of cooking. They wilt quickly and add a wonderful aroma.
4. Optional Cheese Finish:
* If adding cheese, reduce the heat to low. Make a space in the center of the pan or sprinkle the mozzarella cheese evenly over the top of the Dakgalbi.
* Cover the pan with a lid (or foil if your pan doesn’t have one) and let it cook for 2-3 minutes, or until the cheese is completely melted and gooey.
5. The Grand Finale: Dakgalbi Fried Rice (Bokkeumbap)
* This is an essential part of the Dakgalbi experience! Once most of the chicken and vegetables have been eaten, leave some of the leftover sauce and a few small bits of chicken/vegetables in the pan.
* Add 1-2 cups of cooked short-grain rice to the pan.
* Drizzle with a little extra sesame oil.
* Add some chopped kimchi (squeeze out excess liquid) and crumbled gim (seaweed snacks) or shredded nori.
* Using a spatula or sturdy spoon, mix everything vigorously, scraping up any browned bits from the bottom of the pan. Flatten the rice mixture into a pancake shape.
* Cook for a few minutes until the bottom is slightly crispy. Some like to crack an egg into it as well.
* Serve the fried rice straight from the pan.
Nutrition
- Serving Size: One Normal Portion
- Calories: 550-750 kcal


