


Okay, let’s dive into crafting the ultimate gluten-free peach cobbler experience! This recipe isn’t just a dessert; it’s a warm hug, a reminder of sunny days, and a testament to how incredibly delicious gluten-free baking can be. I remember the first time I served this at a family gathering. My cousin, who has celiac disease, almost teared up. She hadn’t enjoyed a “real” cobbler in years, and the look of pure joy on her face as she savored that first spoonful – the tender, juicy peaches mingling with the sweet, slightly crisp, buttery topping – was priceless. Even the gluten-eaters in the family were clamoring for seconds, completely oblivious to its gluten-free nature until I told them. That’s the magic of this recipe: it’s universally beloved, easy to whip up, and delivers that classic, comforting cobbler experience without compromise. It has since become a staple in our home, especially during peach season, filling the kitchen with an irresistible aroma that signals pure, unadulterated happiness. This isn’t just a gluten-free peach cobbler; it’s the gluten-free peach cobbler you’ll make time and time again.
Ingredients: Crafting Your Gluten-Free Masterpiece
The beauty of this recipe lies in its simplicity and the quality of its components. Using ripe, flavorful peaches is key, as is a good quality gluten-free all-purpose flour blend.
For the Luscious Peach Filling:
- Peaches: 6-8 medium ripe peaches (about 6 cups sliced). You can use fresh or frozen (see tips for frozen). If using fresh, you can peel them or leave the skin on for a more rustic texture.
- Granulated Sugar: 1/2 cup (adjust to 1/4 cup if peaches are very sweet, or up to 3/4 cup if tart). Brown sugar can also be used for a deeper molasses flavor.
- Gluten-Free All-Purpose Flour or Cornstarch/Arrowroot Starch: 2 tablespoons (this acts as a thickener for the peach juices). Cornstarch or arrowroot starch will yield a slightly clearer, glossier filling.
- Lemon Juice: 1 tablespoon, freshly squeezed (brightens the flavor and prevents browning).
- Ground Cinnamon: 1 teaspoon (or to taste).
- Ground Nutmeg: 1/4 teaspoon (optional, but adds a lovely warmth).
- Vanilla Extract: 1 teaspoon (enhances all the other flavors).
- Butter: 2 tablespoons, cut into small pieces (to dot over the filling before adding the topping).
For the Tender Gluten-Free Cobbler Topping:
- Gluten-Free All-Purpose Flour Blend: 1 1/2 cups (ensure your blend contains xanthan gum, or add 1/2 teaspoon separately if it doesn’t). My preferred blends usually include a mix of rice flour, potato starch, and tapioca starch.
- Granulated Sugar: 1/2 cup (plus 1-2 tablespoons for sprinkling on top, optional).
- Baking Powder: 2 teaspoons (ensure it’s gluten-free and fresh for optimal rise).
- Salt: 1/2 teaspoon.
- Unsalted Butter: 6 tablespoons (3/4 stick), cold and cut into small cubes. For a dairy-free version, use a good quality plant-based butter stick.
- Milk: 3/4 cup (whole milk, 2%, or a dairy-free alternative like unsweetened almond, soy, or oat milk). Buttermilk (or a dairy-free buttermilk made with plant milk and 3/4 tsp lemon juice or apple cider vinegar, let sit for 5 minutes) can also be used for extra tang and tenderness.
- Large Egg: 1 (optional, but adds richness and structure to the topping). For an egg-free version, you can omit it or use a flax egg (1 tbsp ground flaxseed + 3 tbsp water, let sit for 5-10 minutes).
- Vanilla Extract: 1 teaspoon.
Instructions: Step-by-Step to Cobbler Perfection
Follow these steps carefully for a gluten-free peach cobbler that will have everyone asking for the recipe! The process is straightforward, focusing on bringing out the best in each ingredient.
1. Prepare for Baking:
* Preheat your oven to 375°F (190°C).
* Lightly grease a 9×13 inch baking dish or a similar 2.5 to 3-quart capacity casserole dish. Glass or ceramic dishes work beautifully as they conduct heat evenly.
2. Prepare the Peaches:
* If using fresh peaches, wash them thoroughly. You can peel them by blanching (dropping them in boiling water for 30-60 seconds, then into an ice bath – the skins will slip right off) or use a vegetable peeler. Alternatively, leave the skins on for a more rustic texture and added fiber.
* Slice the peaches into 1/2 to 3/4-inch thick slices. Discard the pits.
* If using frozen peaches, there’s no need to thaw them completely. You might need to add a few extra minutes to the baking time.
3. Make the Peach Filling:
* In a large bowl, gently combine the sliced peaches, granulated sugar (adjust to your peaches’ sweetness), gluten-free flour (or cornstarch/arrowroot), lemon juice, cinnamon, nutmeg (if using), and vanilla extract.
* Toss everything together until the peaches are evenly coated. The sugar will start to draw out the juices, creating a lovely syrup.
* Pour the peach mixture into your prepared baking dish, spreading it out evenly.
* Dot the top of the peach filling with the 2 tablespoons of butter cut into small pieces. This adds a little extra richness as it melts into the fruit.
4. Create the Gluten-Free Cobbler Topping:
* In a medium-sized mixing bowl, whisk together the gluten-free all-purpose flour blend, 1/2 cup granulated sugar, baking powder, and salt. Whisking ensures the leavening agents are well distributed, which is crucial for a light topping.
* Add the cold, cubed butter to the dry ingredients. Using your fingertips, a pastry blender, or a food processor on pulse mode, cut the butter into the flour mixture until it resembles coarse crumbs or small peas. Work quickly to keep the butter cold; this helps create a tender, slightly flaky topping.
* In a separate small bowl or measuring cup, whisk together the milk, egg (if using), and 1 teaspoon vanilla extract.
* Pour the wet ingredients into the dry ingredients. Stir gently with a fork or spatula until just combined. Be careful not to overmix! Overmixing can lead to a tough topping, even with gluten-free flour. The batter will be thick, more like a drop biscuit dough than a pourable batter.
5. Assemble the Cobbler:
* Drop spoonfuls of the cobbler topping batter evenly over the peach filling. You can aim for a rustic, somewhat patchy look; the topping will spread a bit as it bakes. It doesn’t need to cover the fruit completely – those bubbling peach juices peeking through are part of the charm!
* If desired, sprinkle the top of the batter with an additional 1-2 tablespoons of granulated sugar (or coarse sugar like turbinado) for a little extra sparkle and crunch.
6. Bake to Golden Perfection:
* Place the baking dish in the preheated oven.
* Bake for 40-50 minutes, or until the topping is golden brown and cooked through, and the peach filling is bubbling thickly around the edges. If the topping starts to brown too quickly, you can loosely tent the dish with aluminum foil for the last 10-15 minutes of baking.
* To check if the topping is done, insert a toothpick into the center of one of the biscuit portions; it should come out clean or with a few moist crumbs attached.
7. Cool and Serve:
* Once baked, carefully remove the cobbler from the oven and place it on a wire rack.
* Let the cobbler cool for at least 20-30 minutes before serving. This is an important step! It allows the fruit filling to thicken further and prevents you from burning your mouth on molten-hot peaches. The flavors also meld and develop as it cools slightly.
Nutrition Facts
- Servings: This recipe typically yields 8-10 servings, depending on portion size.
- Calories per serving (approximate): Around 350-450 calories. This is an estimate and can vary based on the exact ingredients used (sweetness of peaches, type of gluten-free flour, dairy vs. non-dairy options, etc.).
It’s important to remember that this is a dessert, best enjoyed in moderation as part of a balanced diet. The use of fresh fruit provides vitamins and fiber, making it a more wholesome treat compared to some other confections.
Preparation Time
Understanding the time commitment helps in planning this delightful dessert.
- Active Preparation Time: 25-30 minutes (includes peeling and slicing peaches, mixing filling and topping). If using pre-sliced frozen peaches, this can be reduced to 15-20 minutes.
- Baking Time: 40-50 minutes.
- Cooling Time: At least 20-30 minutes (recommended).
- Total Time: Approximately 1 hour 25 minutes to 1 hour 50 minutes from start to when it’s ready to serve warm.
This makes it a feasible dessert for a weeknight treat if you plan accordingly, and certainly perfect for weekend gatherings or special occasions.
How to Serve: Elevating Your Cobbler Experience
Peach cobbler is delightful on its own, but a few accompaniments can take it to the next level of deliciousness. Here are some serving suggestions:
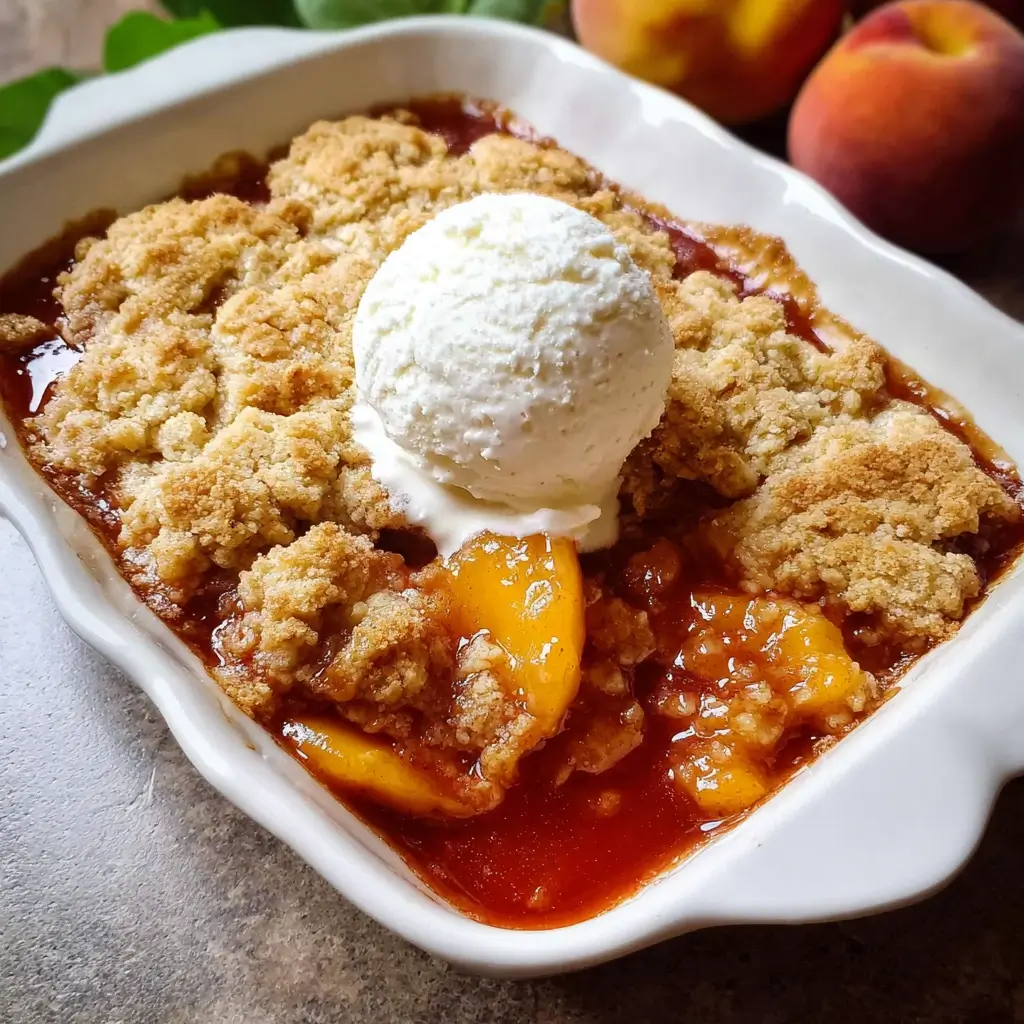
- The Classic:
- Serve warm, straight from the oven (after the crucial cooling period!), with a generous scoop of vanilla bean ice cream. The contrast of the warm, fruity cobbler with the cold, creamy ice cream is a match made in heaven.
- Creamy Complements:
- A dollop of freshly whipped cream (sweetened or unsweetened) adds a light, airy touch. For a dairy-free option, use coconut whipped cream.
- A drizzle of heavy cream or half-and-half poured over a warm serving creates a wonderfully rich experience.
- Clotted cream or a thick crème fraîche can offer a sophisticated, tangy counterpoint.
- Yogurt Pairings:
- For a slightly healthier or breakfast-for-dessert vibe, serve with a spoonful of plain Greek yogurt or vanilla-flavored yogurt. The tanginess complements the sweet peaches beautifully.
- Garnishes for Flair:
- A light dusting of powdered sugar just before serving adds an elegant touch.
- A sprinkle of ground cinnamon or nutmeg can enhance the warm spice notes.
- A fresh mint sprig adds a pop of color and a hint of freshness.
- Serving Vessels:
- Dish it out into individual bowls for a rustic, comforting feel.
- For a more elegant presentation at dinner parties, consider baking and serving in individual ramekins (adjust baking time accordingly, likely shorter).
- Temperature Considerations:
- Warm: This is the most popular way to enjoy cobbler, allowing the aromas to fully bloom and the textures to be at their best.
- Room Temperature: Still delicious, especially if you prefer the flavors to be less intense or if ice cream isn’t on hand.
- Cold (from the fridge): Some people enjoy leftover cobbler cold the next day! The topping will be denser, but the flavors can be quite refreshing.
No matter how you choose to serve it, this gluten-free peach cobbler is sure to be a crowd-pleaser.
Additional Tips for Cobbler Success (5 Tips)
Mastering any recipe often comes down to a few key insights. Here are five additional tips to ensure your gluten-free peach cobbler is consistently spectacular:
- Peach Perfection is Paramount: The quality of your peaches significantly impacts the final dish.
- Fresh Peaches: Use ripe but firm peaches. Overripe peaches can become mushy, while underripe ones lack flavor and sweetness. Freestone peaches are easier to pit and slice than clingstone varieties.
- Frozen Peaches: If using frozen peaches, do not thaw them completely before mixing with other filling ingredients. This helps prevent them from becoming overly watery. You may need to add an extra 5-10 minutes to the baking time to ensure they cook through.
- Canned Peaches: While fresh or frozen are preferred for best flavor and texture, you can use canned peaches in a pinch. Drain them very well and opt for peaches packed in juice rather than heavy syrup. You may also want to reduce the added sugar in the filling.
- Gluten-Free Flour Finesse: The right gluten-free flour blend is crucial.
- Choose a Quality Blend: Opt for a reputable brand of gluten-free all-purpose flour that is designed for baking. Blends containing a mix of flours (like rice, sorghum, tapioca starch, potato starch) tend to yield better texture.
- Xanthan Gum is Key: Most good GF all-purpose blends already contain xanthan gum (or another binder like guar gum). If yours doesn’t, you must add it – usually 1/2 teaspoon per cup of flour for biscuits/cakes. Without it, your topping will likely be crumbly and won’t hold together.
- Don’t Overmix the Topping: This is a golden rule in baking, especially relevant for gluten-free recipes.
- Once you add the wet ingredients to the dry ingredients for the topping, mix only until just combined. A few streaks of flour are okay. Overmixing develops the proteins (even non-gluten ones) and can result in a tough, dense, or gummy topping rather than a light and tender one.
- Customize Your Spices and Sweetness: Don’t be afraid to tweak the flavors to your liking.
- Spice Variations: While cinnamon and nutmeg are classic, consider adding a pinch of ground ginger, cardamom, or allspice to the peach filling for a different flavor profile. A touch of almond extract in the topping can also be lovely with peaches.
- Sweetness Control: Taste your peaches! If they are exceptionally sweet, reduce the sugar in the filling. If they are tart, you might need a bit more. The recipe provides a guideline, but adjust based on your fruit and preference.
- The Magic of Resting: Allowing the cobbler to rest after baking is essential.
- Thickening: The hot, bubbly fruit filling needs time to cool and thicken. If you cut into it immediately, it will be very runny. Resting for at least 20-30 minutes (or even longer) allows the starches to set up properly.
- Flavor Development: Flavors continue to meld and deepen as the cobbler cools slightly.
- Safety: Molten fruit filling is incredibly hot and can cause serious burns. Patience pays off!
FAQ Section: Your Gluten-Free Cobbler Queries Answered
Here are answers to some frequently asked questions about making this delicious gluten-free peach cobbler:
Q1: Can I make this peach cobbler dairy-free as well as gluten-free?
A: Absolutely! This recipe is easily adaptable for a dairy-free diet.
* For the Butter: Replace the dairy butter in both the filling and the topping with a good quality plant-based butter substitute that comes in stick form (these tend to perform better in baking than tub margarines). Ensure it’s cold when cutting it into the topping. Coconut oil (solid, cold, and cubed) can also work for the topping, though it will impart a slight coconut flavor.
* For the Milk: Substitute the dairy milk in the topping with an unsweetened plant-based milk like almond milk, soy milk, oat milk, or cashew milk. Full-fat canned coconut milk (the thick part) can also be used for a richer topping.
Q2: My gluten-free topping turned out gummy or too dense. What did I do wrong?
A: This is a common concern with gluten-free baking, but usually has a few culprits:
* Overmixing: As mentioned in the tips, overmixing the topping batter is the most likely cause. Mix only until the ingredients are just combined.
* Flour Type: The specific gluten-free flour blend can make a big difference. Some blends are heavier than others. Ensure your blend contains xanthan gum or that you’ve added it.
* Liquid Ratio: Too much liquid can make the topping gummy. Measure your milk accurately.
* Baking Powder: Ensure your baking powder is fresh and gluten-free. Old baking powder won’t provide enough lift, leading to a denser result.
* Oven Temperature: An oven that’s not hot enough can prevent the topping from setting and rising properly. Use an oven thermometer to verify your oven’s temperature.
Q3: How should I store leftover gluten-free peach cobbler, and how long does it last?
A:
* Storage: Once the cobbler has cooled completely to room temperature, cover it tightly with plastic wrap or aluminum foil, or transfer it to an airtight container. Store it in the refrigerator.
* Duration: Leftover peach cobbler will keep well in the refrigerator for 3-4 days. The topping may soften slightly over time as it absorbs moisture from the fruit, but it will still be delicious.
* Reheating: You can reheat individual portions in the microwave for 30-60 seconds, or until warmed through. For a crispier topping, reheat in an oven preheated to 350°F (175°C) for 10-15 minutes, or until warm. An air fryer can also work well for reheating and crisping the topping.
Q4: Can I use other fruits besides peaches in this gluten-free cobbler recipe?
A: Yes, this cobbler recipe is quite versatile!
* Berries: A mix of berries (blueberries, raspberries, blackberries) works wonderfully. You might need slightly less sugar if your berries are very sweet, and potentially a bit more thickener (flour/starch) if they are very juicy.
* Apples or Pears: Sliced apples or pears make a fantastic fall cobbler. You might want to pre-cook them slightly (sauté with a bit of butter and spices) to ensure they are tender, or slice them thinly. Adjust spices accordingly (e.g., more cinnamon, perhaps some cloves for apples).
* Cherries: Pitted cherries are another excellent option.
* Combinations: Feel free to combine fruits, like peach and blueberry, or apple and cranberry. Adjust sugar and thickener as needed based on the fruit’s natural sweetness and juiciness.
Q5: My peaches aren’t very ripe or flavorful. Can I still make good cobbler?
A: While perfectly ripe peaches are ideal, you can still make a delicious cobbler with less-than-perfect fruit with a few adjustments:
* Sugar: You’ll likely need to increase the sugar in the filling to compensate for the lack of natural sweetness. Taste a slice of peach and adjust accordingly.
* Flavor Boosters: Increase the amount of vanilla extract and spices (cinnamon, nutmeg) to enhance the overall flavor. A little extra lemon juice can also help brighten things up.
* Maceration Time: After tossing the peaches with sugar and other filling ingredients, let them sit (macerate) at room temperature for 30-60 minutes before assembling the cobbler. This helps draw out their juices and allows the flavors to meld and intensify.
* Consider Roasting: For very firm, underripe peaches, you could even consider lightly roasting them for 10-15 minutes before adding them to the filling to help soften them and concentrate their sugars.
Enjoy making and sharing this “Best Gluten Free Peach Cobbler”! It’s a recipe born from a love of simple, good food that everyone can enjoy.
Print
The Best Gluten Free Peach Cobbler Recipe
Ingredients
For the Luscious Peach Filling:
- Peaches: 6-8 medium ripe peaches (about 6 cups sliced). You can use fresh or frozen (see tips for frozen). If using fresh, you can peel them or leave the skin on for a more rustic texture.
- Granulated Sugar: 1/2 cup (adjust to 1/4 cup if peaches are very sweet, or up to 3/4 cup if tart). Brown sugar can also be used for a deeper molasses flavor.
- Gluten-Free All-Purpose Flour or Cornstarch/Arrowroot Starch: 2 tablespoons (this acts as a thickener for the peach juices). Cornstarch or arrowroot starch will yield a slightly clearer, glossier filling.
- Lemon Juice: 1 tablespoon, freshly squeezed (brightens the flavor and prevents browning).
- Ground Cinnamon: 1 teaspoon (or to taste).
- Ground Nutmeg: 1/4 teaspoon (optional, but adds a lovely warmth).
- Vanilla Extract: 1 teaspoon (enhances all the other flavors).
- Butter: 2 tablespoons, cut into small pieces (to dot over the filling before adding the topping).
For the Tender Gluten-Free Cobbler Topping:
- Gluten-Free All-Purpose Flour Blend: 1 1/2 cups (ensure your blend contains xanthan gum, or add 1/2 teaspoon separately if it doesn’t). My preferred blends usually include a mix of rice flour, potato starch, and tapioca starch.
- Granulated Sugar: 1/2 cup (plus 1-2 tablespoons for sprinkling on top, optional).
- Baking Powder: 2 teaspoons (ensure it’s gluten-free and fresh for optimal rise).
- Salt: 1/2 teaspoon.
- Unsalted Butter: 6 tablespoons (3/4 stick), cold and cut into small cubes. For a dairy-free version, use a good quality plant-based butter stick.
- Milk: 3/4 cup (whole milk, 2%, or a dairy-free alternative like unsweetened almond, soy, or oat milk). Buttermilk (or a dairy-free buttermilk made with plant milk and 3/4 tsp lemon juice or apple cider vinegar, let sit for 5 minutes) can also be used for extra tang and tenderness.
- Large Egg: 1 (optional, but adds richness and structure to the topping). For an egg-free version, you can omit it or use a flax egg (1 tbsp ground flaxseed + 3 tbsp water, let sit for 5-10 minutes).
- Vanilla Extract: 1 teaspoon.
Instructions
For the Luscious Peach Filling:
- Peaches: 6-8 medium ripe peaches (about 6 cups sliced). You can use fresh or frozen (see tips for frozen). If using fresh, you can peel them or leave the skin on for a more rustic texture.
- Granulated Sugar: 1/2 cup (adjust to 1/4 cup if peaches are very sweet, or up to 3/4 cup if tart). Brown sugar can also be used for a deeper molasses flavor.
- Gluten-Free All-Purpose Flour or Cornstarch/Arrowroot Starch: 2 tablespoons (this acts as a thickener for the peach juices). Cornstarch or arrowroot starch will yield a slightly clearer, glossier filling.
- Lemon Juice: 1 tablespoon, freshly squeezed (brightens the flavor and prevents browning).
- Ground Cinnamon: 1 teaspoon (or to taste).
- Ground Nutmeg: 1/4 teaspoon (optional, but adds a lovely warmth).
- Vanilla Extract: 1 teaspoon (enhances all the other flavors).
- Butter: 2 tablespoons, cut into small pieces (to dot over the filling before adding the topping).
For the Tender Gluten-Free Cobbler Topping:
- Gluten-Free All-Purpose Flour Blend: 1 1/2 cups (ensure your blend contains xanthan gum, or add 1/2 teaspoon separately if it doesn’t). My preferred blends usually include a mix of rice flour, potato starch, and tapioca starch.
- Granulated Sugar: 1/2 cup (plus 1-2 tablespoons for sprinkling on top, optional).
- Baking Powder: 2 teaspoons (ensure it’s gluten-free and fresh for optimal rise).
- Salt: 1/2 teaspoon.
- Unsalted Butter: 6 tablespoons (3/4 stick), cold and cut into small cubes. For a dairy-free version, use a good quality plant-based butter stick.
- Milk: 3/4 cup (whole milk, 2%, or a dairy-free alternative like unsweetened almond, soy, or oat milk). Buttermilk (or a dairy-free buttermilk made with plant milk and 3/4 tsp lemon juice or apple cider vinegar, let sit for 5 minutes) can also be used for extra tang and tenderness.
- Large Egg: 1 (optional, but adds richness and structure to the topping). For an egg-free version, you can omit it or use a flax egg (1 tbsp ground flaxseed + 3 tbsp water, let sit for 5-10 minutes).
- Vanilla Extract: 1 teaspoon.
Nutrition
- Serving Size: One Normal Portion
- Calories: 350-450


