

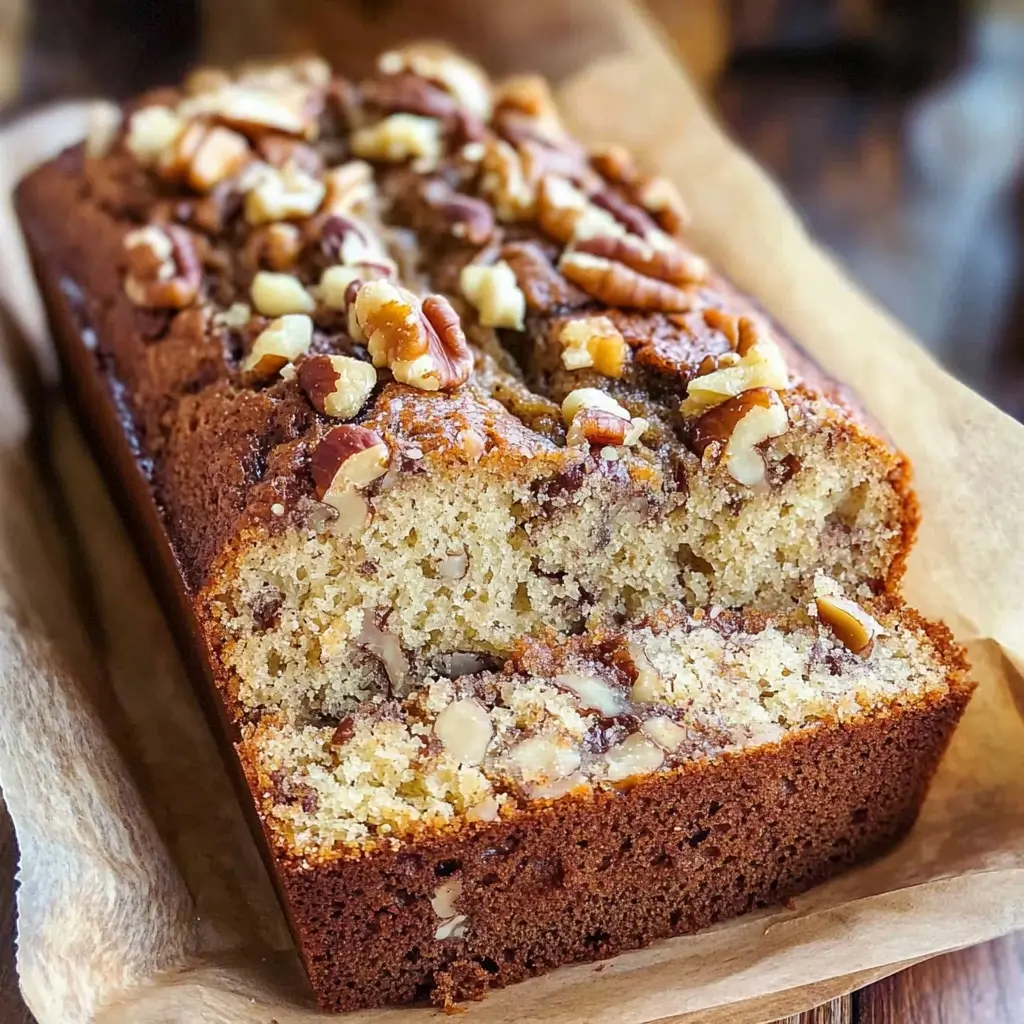

The scent of freshly baked banana nut bread wafting through the house is, for me, pure, unadulterated comfort. It’s a recipe I’ve tweaked and perfected over the years, and this “Super Moist Banana Nut Bread” is the undisputed champion in our household. My kids’ eyes light up when they see those overripe bananas on the counter, knowing what’s to come. My husband, usually a man of few words when it comes to sweets, can devour half a loaf in one sitting if left unsupervised. It’s the kind of bake that’s perfect for a lazy Sunday morning, a thoughtful gift for a neighbor, or a comforting treat on a gloomy day. The secret lies in a few key ingredients and techniques that guarantee a tender crumb and an explosion of banana-nutty flavor in every bite. This isn’t just a recipe; it’s a warm hug in food form, and I’m thrilled to share it with you.
The Anatomy of Perfection: Super Moist Banana Nut Bread Ingredients
To achieve that coveted “super moist” texture and rich flavor, the right combination and quality of ingredients are paramount. Here’s what you’ll need to create this masterpiece in your own kitchen:
- For the Bread:
- Ripe Bananas: 3-4 large, very ripe bananas (about 1 ½ to 2 cups mashed). The riper, the sweeter and more flavorful! Look for bananas that are heavily speckled or even mostly brown.
- All-Purpose Flour: 2 cups (250g). Spooned and leveled, not scooped.
- Baking Soda: 1 teaspoon. This is our primary leavening agent.
- Salt: ½ teaspoon. Enhances all the other flavors.
- Ground Cinnamon: 1 teaspoon (optional, but highly recommended for warmth).
- Ground Nutmeg: ¼ teaspoon (optional, adds a lovely nuance).
- Large Eggs: 2, at room temperature. Room temperature eggs incorporate better into the batter.
- Granulated Sugar: ¾ cup (150g).
- Light Brown Sugar: ¼ cup (50g), packed. Adds moisture and a hint of molasses flavor.
- Vegetable Oil: ½ cup (120ml) (or melted unsalted butter, cooled slightly). Oil generally yields a moister crumb in quick breads.
- Sour Cream or Plain Full-Fat Yogurt: ¼ cup (60g), at room temperature. This is a key ingredient for incredible moisture!
- Pure Vanilla Extract: 1 ½ teaspoons. Use good quality vanilla for the best flavor.
- Chopped Nuts: 1 cup (walnuts or pecans are classic choices), toasted for enhanced flavor (optional, but recommended).
- For the Optional Topping (Streusel-like crunch):
- Chopped Nuts: ¼ cup extra
- Brown Sugar: 1 tablespoon
- Cinnamon: ¼ teaspoon (optional)
Crafting Your Loaf: Step-by-Step Instructions
Follow these instructions carefully, and you’ll be rewarded with a loaf of banana nut bread that’s moist, flavorful, and utterly irresistible.
- Preheat and Prepare:
- Preheat your oven to 350°F (175°C).
- Grease and flour a standard 9×5 inch loaf pan. Alternatively, line it with parchment paper, leaving an overhang on two sides to easily lift the bread out later. This is my preferred method as it guarantees no sticking.
- Toast the Nuts (Optional but Recommended):
- If using, spread your 1 cup of chopped nuts on a baking sheet.
- Toast in the preheated oven for 5-7 minutes, or until fragrant and lightly golden. Keep a close eye on them as nuts can burn quickly.
- Remove from oven, let cool slightly, and then roughly chop if they are large pieces. Set aside.
- Combine Dry Ingredients:
- In a medium mixing bowl, whisk together the all-purpose flour, baking soda, salt, ground cinnamon, and ground nutmeg (if using). Whisking helps to aerate the flour and distribute the leavening agent evenly. Set aside.
- Mash the Bananas:
- In a separate large mixing bowl, peel the ripe bananas and mash them thoroughly with a fork or a potato masher. You want them well-mashed but a few small lumps are perfectly fine – they add to the texture. You should have about 1 ½ to 2 cups of mashed banana.
- Combine Wet Ingredients:
- To the bowl with the mashed bananas, add the granulated sugar and packed light brown sugar. Stir well to combine.
- Add the room temperature large eggs, one at a time, beating lightly with a whisk or fork after each addition until just combined.
- Pour in the vegetable oil (or cooled melted butter), room temperature sour cream (or yogurt), and pure vanilla extract. Stir gently until everything is just incorporated. Do not overmix at this stage.
- Combine Wet and Dry Ingredients:
- Gradually add the dry ingredient mixture to the wet ingredient mixture.
- Using a spatula, fold the ingredients together until just combined. It’s crucial not to overmix. A few streaks of flour remaining are okay. Overmixing develops gluten, which can lead to a tough and dense bread.
- Fold in the Nuts:
- Gently fold in the toasted and chopped nuts, reserving a small amount (about ¼ cup if you’re making the topping) if you wish to sprinkle them on top.
- Prepare the Optional Topping (If Using):
- In a small bowl, mix the reserved ¼ cup chopped nuts, 1 tablespoon brown sugar, and ¼ teaspoon cinnamon (if using).
- Pour Batter and Bake:
- Pour the batter evenly into your prepared loaf pan.
- If using the optional topping, sprinkle it evenly over the top of the batter.
- Place the loaf pan in the center rack of your preheated oven.
- Bake for 55-70 minutes. Baking time can vary depending on your oven and the moisture content of your bananas.
- The bread is done when a wooden skewer or toothpick inserted into the center comes out clean, or with a few moist crumbs attached (but no wet batter). The top should be golden brown and feel set.
- If the top of the bread starts to brown too quickly before the inside is cooked, you can loosely tent it with aluminum foil for the remaining baking time.
- Cool the Bread:
- Once baked, remove the loaf pan from the oven and place it on a wire cooling rack.
- Let the banana nut bread cool in the pan for at least 10-15 minutes. This allows it to set further and makes it easier to remove.
- After 10-15 minutes, carefully invert the loaf onto the wire rack (if not using parchment) or use the parchment overhang to lift it out.
- Let the bread cool completely on the wire rack before slicing and serving. This is the hardest part – resisting the urge to cut into it while warm! Cooling completely helps the crumb set and makes for cleaner slices.
Nutritional Snapshot: What’s in a Slice?
Understanding the nutritional content can be helpful. Please note these are estimates and can vary based on specific ingredients used, ripeness of bananas, and actual serving size.
- Servings: This recipe typically yields 10-12 slices from a 9×5 inch loaf.
- Calories per Serving (approximate, based on 12 slices): Around 280-350 calories per slice.
- This estimation includes nuts and uses oil. Using butter might slightly alter the fat content. The exact calorie count will depend on the size of your bananas and specific brands of ingredients.
Time Investment: From Batter to Bliss
Good things take time, but this banana nut bread is well worth the (mostly hands-off) wait!
- Preparation Time: 20-25 minutes (includes mashing bananas, mixing batter, toasting nuts if using).
- Baking Time: 55-70 minutes.
- Cooling Time: At least 1-2 hours for complete cooling (essential for best texture and slicing).
- Total Time (approximate, excluding full cooling): 1 hour 15 minutes to 1 hour 35 minutes.
Serving Your Super Moist Banana Nut Bread: Ideas & Inspiration
This banana nut bread is delightful on its own, but here are some ways to elevate your serving experience:
- Classic Simplicity:
- Serve a warm slice as is – the aroma and taste are pure perfection.
- A thick slice with a generous smear of salted butter. The contrast of salty butter with sweet bread is divine.
- Creamy Companions:
- Top with a dollop of cream cheese, perhaps lightly sweetened or cinnamon-spiced.
- A spoonful of mascarpone cheese for a touch of luxury.
- A scoop of vanilla bean ice cream alongside a warm slice for an indulgent dessert.
- Breakfast Boost:
- Enjoy with your morning coffee or tea.
- Lightly toast a slice and drizzle with a bit of honey or maple syrup.
- Believe it or not, thick slices of day-old banana bread make incredible French toast!
- Decadent Drizzles & Dustings:
- A light dusting of powdered sugar for an elegant presentation.
- A drizzle of caramel sauce or chocolate ganache for a more dessert-like treat.
- Fruity Pairings:
- Serve with a side of fresh berries or sliced banana.
- A spoonful of fruit compote or jam.
Pro Tips for the Ultimate Banana Nut Bread Experience
Unlock the full potential of your banana nut bread with these five expert tips:
- The Riper, The Better (Bananas are Key!): This cannot be stressed enough. Use bananas that are heavily speckled with brown spots, or even mostly black. Overripe bananas are significantly sweeter and have a more intense banana flavor, which translates directly to a more delicious and moist bread. If your bananas aren’t ripe enough, you can speed up the process by placing them in a paper bag (with an apple or tomato if you have one) for a day or two.
- Don’t Overmix the Batter: This is the golden rule for most quick breads. Once you combine the wet and dry ingredients, mix only until they are just incorporated. A few lumps or streaks of flour are perfectly fine. Overmixing develops the gluten in the flour, resulting in a tough, dense, and chewy bread rather than a tender and moist one. Use a spatula and gentle folding motions.
- Toast Your Nuts for Deeper Flavor: If you’re including nuts, taking a few extra minutes to toast them makes a world of difference. Toasting brings out their natural oils, enhances their nutty flavor, and gives them a crunchier texture. Simply spread them on a baking sheet and bake at 350°F (175°C) for 5-8 minutes until fragrant. Let them cool before chopping and adding to the batter.
- Room Temperature Ingredients for Harmony: Using room temperature eggs and sour cream (or yogurt) helps them incorporate more easily and evenly into the batter. This creates a smoother batter and contributes to a more uniform texture in the final bake. Cold ingredients can cause the batter to curdle or become lumpy. Take them out of the fridge about 30-60 minutes before you start baking.
- The Toothpick Test & Proper Cooling: Ovens vary, so rely on the toothpick test for doneness rather than just the clock. Insert a toothpick into the center of the loaf; it should come out clean or with a few moist (not wet) crumbs. Once baked, allow the bread to cool in the pan for 10-15 minutes before transferring it to a wire rack to cool completely. Slicing into hot bread can cause it to be gummy and fall apart. Patience during cooling ensures a perfectly set crumb.
Your Banana Nut Bread Questions Answered: FAQ
Here are answers to some frequently asked questions about making Super Moist Banana Nut Bread:
- Q: Why did my banana bread turn out dry or dense?
- A: Several factors can contribute to this. The most common culprits are:
- Overmixing the batter: This develops too much gluten, making the bread tough. Mix only until combined.
- Too much flour: Ensure you’re measuring flour correctly by spooning it into your measuring cup and leveling it off, rather than scooping directly from the bag (which compacts it).
- Overbaking: Baking for too long will dry out the bread. Start checking for doneness a bit earlier than the recipe states, as ovens vary.
- Not enough fat or moisture: This recipe uses oil and sour cream/yogurt specifically to combat dryness. Ensure your bananas are very ripe, as they also contribute significant moisture.
- A: Several factors can contribute to this. The most common culprits are:
- Q: Can I use frozen bananas?
- A: Absolutely! Frozen ripe bananas are excellent for banana bread. Thaw them completely at room temperature or in the microwave. They will release a lot of liquid when thawed – be sure to include this liquid along with the mashed banana in your batter, as it’s full of banana flavor and moisture.
- Q: How should I store my banana nut bread to keep it moist?
- A: Once completely cooled, store the banana nut bread in an airtight container at room temperature for up to 3-4 days. You can also wrap it tightly in plastic wrap or aluminum foil. For longer storage, wrap it well and freeze for up to 3 months. Thaw at room temperature. Some people find that storing it in the refrigerator can dry it out faster, but if your kitchen is very warm, it might be a safer option for a couple of days.
- Q: Can I make this recipe gluten-free or vegan?
- A:
- Gluten-Free: You can try substituting the all-purpose flour with a good quality gluten-free all-purpose baking blend that contains xanthan gum. Results may vary depending on the blend.
- Vegan: To make it vegan, you’ll need to replace the eggs and sour cream/yogurt.
- Eggs: Use a flax egg (1 tablespoon ground flaxseed + 3 tablespoons water per egg, let sit for 5-10 minutes to thicken) or a commercial egg replacer. Mashed banana itself is a good binder, so sometimes you can get away with less egg replacer.
- Sour Cream/Yogurt: Use a plant-based yogurt (like coconut or soy) or unsweetened applesauce.
- Ensure your sugars are vegan-certified if that’s a concern (some white sugar is processed with bone char).
- Remember that these substitutions might alter the texture and baking time slightly.
- A:
- Q: Can I add other mix-ins, like chocolate chips or different spices?
- A: Yes, definitely! This recipe is very adaptable.
- Chocolate Chips: Fold in ¾ to 1 cup of semi-sweet, milk, or dark chocolate chips along with the nuts.
- Spices: Feel free to adjust the cinnamon and nutmeg, or add other warming spices like allspice, cardamom, or a pinch of cloves.
- Dried Fruit: Raisins, cranberries, or chopped dates can be a delicious addition (about ½ cup).
- Extracts: A dash of almond extract or rum extract can add another layer of flavor.
- Just be mindful not to overload the batter with too many mix-ins, as it can affect the structure. Aim for a total of 1 to 1 ½ cups of combined nuts, chips, or dried fruit.
- A: Yes, definitely! This recipe is very adaptable.
Super Moist Banana Nut Bread Recipe
Ingredients
- For the Bread:
- Ripe Bananas: 3-4 large, very ripe bananas (about 1 ½ to 2 cups mashed). The riper, the sweeter and more flavorful! Look for bananas that are heavily speckled or even mostly brown.
- All-Purpose Flour: 2 cups (250g). Spooned and leveled, not scooped.
- Baking Soda: 1 teaspoon. This is our primary leavening agent.
- Salt: ½ teaspoon. Enhances all the other flavors.
- Ground Cinnamon: 1 teaspoon (optional, but highly recommended for warmth).
- Ground Nutmeg: ¼ teaspoon (optional, adds a lovely nuance).
- Large Eggs: 2, at room temperature. Room temperature eggs incorporate better into the batter.
- Granulated Sugar: ¾ cup (150g).
- Light Brown Sugar: ¼ cup (50g), packed. Adds moisture and a hint of molasses flavor.
- Vegetable Oil: ½ cup (120ml) (or melted unsalted butter, cooled slightly). Oil generally yields a moister crumb in quick breads.
- Sour Cream or Plain Full-Fat Yogurt: ¼ cup (60g), at room temperature. This is a key ingredient for incredible moisture!
- Pure Vanilla Extract: 1 ½ teaspoons. Use good quality vanilla for the best flavor.
- Chopped Nuts: 1 cup (walnuts or pecans are classic choices), toasted for enhanced flavor (optional, but recommended).
- For the Optional Topping (Streusel-like crunch):
- Chopped Nuts: ¼ cup extra
- Brown Sugar: 1 tablespoon
- Cinnamon: ¼ teaspoon (optional)
Instructions
- Preheat and Prepare:
- Preheat your oven to 350°F (175°C).
- Grease and flour a standard 9×5 inch loaf pan. Alternatively, line it with parchment paper, leaving an overhang on two sides to easily lift the bread out later. This is my preferred method as it guarantees no sticking.
- Toast the Nuts (Optional but Recommended):
- If using, spread your 1 cup of chopped nuts on a baking sheet.
- Toast in the preheated oven for 5-7 minutes, or until fragrant and lightly golden. Keep a close eye on them as nuts can burn quickly.
- Remove from oven, let cool slightly, and then roughly chop if they are large pieces. Set aside.
- Combine Dry Ingredients:
- In a medium mixing bowl, whisk together the all-purpose flour, baking soda, salt, ground cinnamon, and ground nutmeg (if using). Whisking helps to aerate the flour and distribute the leavening agent evenly. Set aside.
- Mash the Bananas:
- In a separate large mixing bowl, peel the ripe bananas and mash them thoroughly with a fork or a potato masher. You want them well-mashed but a few small lumps are perfectly fine – they add to the texture. You should have about 1 ½ to 2 cups of mashed banana.
- Combine Wet Ingredients:
- To the bowl with the mashed bananas, add the granulated sugar and packed light brown sugar. Stir well to combine.
- Add the room temperature large eggs, one at a time, beating lightly with a whisk or fork after each addition until just combined.
- Pour in the vegetable oil (or cooled melted butter), room temperature sour cream (or yogurt), and pure vanilla extract. Stir gently until everything is just incorporated. Do not overmix at this stage.
- Combine Wet and Dry Ingredients:
- Gradually add the dry ingredient mixture to the wet ingredient mixture.
- Using a spatula, fold the ingredients together until just combined. It’s crucial not to overmix. A few streaks of flour remaining are okay. Overmixing develops gluten, which can lead to a tough and dense bread.
- Fold in the Nuts:
- Gently fold in the toasted and chopped nuts, reserving a small amount (about ¼ cup if you’re making the topping) if you wish to sprinkle them on top.
- Prepare the Optional Topping (If Using):
- In a small bowl, mix the reserved ¼ cup chopped nuts, 1 tablespoon brown sugar, and ¼ teaspoon cinnamon (if using).
- Pour Batter and Bake:
- Pour the batter evenly into your prepared loaf pan.
- If using the optional topping, sprinkle it evenly over the top of the batter.
- Place the loaf pan in the center rack of your preheated oven.
- Bake for 55-70 minutes. Baking time can vary depending on your oven and the moisture content of your bananas.
- The bread is done when a wooden skewer or toothpick inserted into the center comes out clean, or with a few moist crumbs attached (but no wet batter). The top should be golden brown and feel set.
- If the top of the bread starts to brown too quickly before the inside is cooked, you can loosely tent it with aluminum foil for the remaining baking time.
- Cool the Bread:
- Once baked, remove the loaf pan from the oven and place it on a wire cooling rack.
- Let the banana nut bread cool in the pan for at least 10-15 minutes. This allows it to set further and makes it easier to remove.
- After 10-15 minutes, carefully invert the loaf onto the wire rack (if not using parchment) or use the parchment overhang to lift it out.
- Let the bread cool completely on the wire rack before slicing and serving. This is the hardest part – resisting the urge to cut into it while warm! Cooling completely helps the crumb set and makes for cleaner slices.
Nutrition
- Serving Size: One Normal Portion
- Calories: 280-350


