


There are breakfasts, and then there are breakfasts. You know the ones – the lazy weekend mornings, the special occasion brunches, the times you want something truly spectacular to start the day. That’s exactly where these Strawberry Shortcake Pancakes enter the picture. The first time I made these for my family, the reaction was pure, unadulterated joy. My kids’ eyes widened at the sight of fluffy pancakes piled high, adorned with glistening, sweet strawberries and a cloud of whipped cream. It wasn’t just breakfast; it was an event. The combination of warm, tender pancakes, slightly tangy and sweet macerated strawberries, and cool, luscious whipped cream is pure magic. It genuinely tastes like a dessert, but somehow perfectly acceptable (and encouraged!) for the morning. They’ve since become a requested favorite for birthdays, holidays, or simply when we need a little extra sunshine on our plates. Forget standard pancakes; this recipe elevates the humble flapjack into something truly memorable, a guaranteed crowd-pleaser that feels indulgent yet surprisingly straightforward to whip up. Prepare for rave reviews and requests for seconds (and thirds!).
The Ultimate Strawberry Shortcake Pancakes: Ingredients
Creating this masterpiece requires combining elements of classic fluffy pancakes with the signature components of strawberry shortcake. Here’s what you’ll need to gather:
For the Fluffy Pancakes:
- All-Purpose Flour: 2 cups (Provides structure)
- Granulated Sugar: ¼ cup (Adds sweetness and aids browning)
- Baking Powder: 4 teaspoons (Primary leavening agent for fluffiness)
- Baking Soda: ½ teaspoon (Reacts with buttermilk for extra lift)
- Salt: ½ teaspoon (Balances sweetness and enhances flavor)
- Buttermilk: 1 ¾ cups (Adds tang and tenderness; activate baking soda)
- Large Eggs: 2 (Bind ingredients and add richness)
- Unsalted Butter: ¼ cup (4 tablespoons), melted (Adds flavor and moisture)
- Vanilla Extract: 1 teaspoon (Enhances overall flavor)
For the Macerated Strawberries:
- Fresh Strawberries: 2 pints (about 4 cups), hulled and sliced or quartered
- Granulated Sugar: ¼ cup (or more, to taste, depending on strawberry sweetness)
- Lemon Juice: 1 teaspoon (Optional, brightens the strawberry flavor)
For the Whipped Cream Topping:
- Heavy Whipping Cream: 1 ½ cups, very cold
- Powdered Sugar: ¼ cup (or to taste)
- Vanilla Extract: ½ teaspoon
Optional Garnish:
- Extra sliced strawberries
- Mint sprigs
- A dusting of powdered sugar
Step-by-Step Instructions: Crafting Pancake Perfection
Follow these instructions carefully to achieve pancake nirvana. Organization is key, so prepare your components before you start cooking the pancakes.
Phase 1: Prepare the Toppings (Do this first!)
- Macerate the Strawberries: In a medium bowl, gently combine the hulled and sliced (or quartered) strawberries with ¼ cup of granulated sugar and the optional teaspoon of lemon juice. Stir carefully to coat the berries. Let this mixture sit at room temperature for at least 20-30 minutes (or up to an hour). The sugar will draw out the natural juices from the strawberries, creating a delicious syrupy sauce. Stir occasionally.
- Whip the Cream: Ensure your heavy cream is very cold. Pour it into a large, chilled bowl (chilling the bowl and beaters helps!). Using an electric mixer (stand or hand-held), beat the cream on medium speed until soft peaks begin to form. Gradually add the powdered sugar and vanilla extract. Continue beating on medium-high speed until stiff peaks form – be careful not to overbeat, or it will turn buttery. Cover the whipped cream and refrigerate until ready to serve.
Phase 2: Make the Pancake Batter
- Combine Dry Ingredients: In a large mixing bowl, whisk together the all-purpose flour, ¼ cup granulated sugar, baking powder, baking soda, and salt. Whisking well ensures the leavening agents are evenly distributed, which is crucial for uniformly fluffy pancakes.
- Combine Wet Ingredients: In a separate medium bowl, whisk together the buttermilk, large eggs, melted (and slightly cooled) butter, and 1 teaspoon of vanilla extract until well combined.
- Combine Wet and Dry: Pour the wet ingredients into the bowl with the dry ingredients. Whisk just until combined. It’s crucial not to overmix! A few lumps remaining in the batter are perfectly fine – even desirable. Overmixing develops the gluten in the flour, leading to tough, rubbery pancakes instead of light and fluffy ones.
- Rest the Batter (Optional but Recommended): Let the pancake batter rest for 5-10 minutes. This allows the flour to hydrate fully and gives the baking powder time to start working, resulting in even tenderer and fluffier pancakes.
Phase 3: Cook the Pancakes
- Preheat the Griddle/Pan: Heat a large non-stick skillet or griddle over medium heat. Getting the temperature right is key. Too hot, and the outside will burn before the inside cooks. Too cool, and they won’t get golden brown or cook through properly. Add a small amount of butter or non-stick cooking spray if your pan isn’t perfectly non-stick, though a good non-stick surface often needs nothing.
- Test the Heat: You can test if the pan is ready by flicking a tiny drop of water onto it. If it sizzles and evaporates immediately, it’s too hot. If it just sits there, it’s too cool. If it dances around for a second or two before evaporating, the temperature is likely just right.
- Portion the Batter: Once the griddle is properly heated, use a ¼ cup measuring cup or a small ladle to pour batter onto the hot surface for each pancake. Leave some space between pancakes so they don’t run together and are easier to flip.
- Cook Until Bubbly: Cook for about 2-3 minutes per side. You’ll know it’s time to flip when bubbles start appearing and popping on the surface of the pancake, and the edges look set and slightly dry.
- Flip and Cook: Carefully slide a thin spatula under the pancake and flip it confidently. Cook the second side for another 1-2 minutes, or until golden brown and cooked through.
- Keep Warm (Optional): As pancakes are cooked, you can transfer them to a baking sheet placed in a warm oven (around 200°F or 90°C) to keep them warm while you cook the remaining batter. Cover loosely with foil.
- Repeat: Continue cooking pancakes with the remaining batter, adding a tiny bit more butter or oil to the pan between batches if needed. Adjust the heat as necessary if pancakes are cooking too quickly or too slowly.
Phase 4: Assemble Your Strawberry Shortcake Pancakes
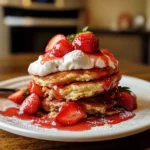
- Stack ’em High: For each serving, create a stack of 2 or 3 warm pancakes on a plate.
- Add Strawberries: Spoon a generous amount of the macerated strawberries and their delicious syrup over the pancake stack. Let some cascade down the sides.
- Top with Cream: Add a dollop (or two!) of the fresh whipped cream on top of the strawberries.
- Garnish (Optional): For an extra touch, add a few fresh strawberry slices, a sprig of mint, or a light dusting of powdered sugar over the whipped cream.
- Serve Immediately: These pancakes are best enjoyed fresh and warm, while the contrast between the warm pancakes, cool strawberries, and cold whipped cream is at its peak.
Nutrition Facts (Estimated)
- Servings: This recipe yields approximately 12-16 standard (4-5 inch) pancakes, serving roughly 4-6 people (assuming 2-3 pancakes per person, plus toppings).
- Calories per Serving (Estimated): Approximately 550-750 calories per serving (based on 3 pancakes with strawberries and whipped cream).
Disclaimer: Nutritional information is an estimate only, calculated using standard ingredient databases. Actual values may vary based on specific ingredients used (e.g., fat content of buttermilk, sweetness of strawberries), portion sizes, and optional additions.
Preparation Time
- Prep Time: 25-35 minutes (Includes macerating strawberries, whipping cream, mixing batter)
- Cook Time: 15-25 minutes (Depending on griddle size and batch cooking)
- Total Time: Approximately 40-60 minutes
How to Serve Your Strawberry Shortcake Pancakes
Serving these pancakes is all about celebrating the layers and textures. Here are a few ways to present them:
- Classic Stack:
- Stack 2-3 pancakes per plate.
- Generously spoon macerated strawberries and syrup over the top.
- Top with a large dollop of whipped cream.
- Optional: Garnish with a fresh strawberry slice and a mint leaf.
- Individual Shortcake Style:
- Place one pancake on a plate.
- Top with a layer of strawberries and a layer of whipped cream.
- Place another pancake on top.
- Repeat with more strawberries and whipped cream.
- Finish with a final dollop of cream and a sprinkle of powdered sugar.
- Pancake Board (for Brunch):
- Arrange cooked pancakes on a large platter or board.
- Place bowls of macerated strawberries, whipped cream, and perhaps some extra toppings (like chocolate chips, toasted nuts, or lemon curd) alongside.
- Allow guests to build their own Strawberry Shortcake Pancake creations.
- Deconstructed Style:
- Serve pancakes plain on plates.
- Provide bowls of the strawberry mixture and whipped cream on the side for guests to add as they please. This keeps pancakes from getting soggy if serving a crowd over time.
- Mini Pancake Skewers:
- Make smaller, silver-dollar sized pancakes.
- Thread onto small skewers, alternating mini pancakes with whole or halved strawberries.
- Serve with a bowl of whipped cream for dipping. Perfect for parties!
Why You’ll Fall in Love with This Recipe
Beyond the incredible taste, there are many reasons why these Strawberry Shortcake Pancakes will become a staple:
- Crowd-Pleasing Flavor: The combination is universally loved – sweet, slightly tangy, creamy, and comforting.
- Surprisingly Easy: While it looks impressive, each component (pancakes, strawberries, cream) is relatively simple to make.
- Perfect for Special Occasions: Instantly elevates any breakfast or brunch, making it feel festive (think Mother’s Day, birthdays, Easter).
- Uses Fresh Seasonal Fruit: A wonderful way to showcase beautiful, ripe strawberries when they are in season.
- Feels Indulgent: It’s like having dessert for breakfast, but totally justifiable!
- Customizable: Easily adjust sweetness levels or add your own twists (see variations below).
Ingredient Spotlight & Tips for Success
Understanding your ingredients can take your pancakes from good to great.
- The Magic of Buttermilk: Buttermilk is acidic. This acid reacts with the baking soda to create carbon dioxide bubbles, giving the pancakes a significant lift and fluffy texture. It also tenderizes the gluten, resulting in a softer crumb, and adds a subtle tangy flavor that balances the sweetness.
- DIY Buttermilk: No buttermilk? No problem! Place 1 ¾ tablespoons of white vinegar or lemon juice in a measuring cup. Add regular milk to reach the 1 ¾ cup mark. Let it sit for 5-10 minutes until it looks slightly curdled. Use as directed.
- Achieving Peak Fluffiness: The combination of baking powder (double-acting, works twice) and baking soda (reacts with buttermilk) provides maximum lift. Crucially, do not overmix the batter. Lumps are okay! Resting the batter also helps.
- Choosing the Best Strawberries: Use fresh, ripe, and fragrant strawberries for the best flavor. Look for berries that are bright red all over, with fresh green caps. Avoid mushy, bruised, or dull-looking berries. Taste one – if it’s sweet, your topping will be amazing. If they’re a bit tart, you might want to add slightly more sugar when macerating.
- Perfect Whipped Cream: Use very cold heavy whipping cream (at least 35% fat content). Chilling the bowl and beaters also helps immensely. Start on low speed and gradually increase. Stop when stiff peaks form (when you lift the beater, the peak holds its shape and maybe curls slightly at the tip). Overbeating turns it grainy and eventually into butter.
Mastering the Perfect Pancake Flip
Flipping pancakes can be intimidating, but practice makes perfect!
- Wait for the Signs: Don’t rush it. Look for bubbles forming across the surface and popping, and the edges appearing set and slightly dry. Lifting an edge gently should reveal a golden-brown underside.
- Use the Right Tool: A wide, thin spatula (metal or silicone) works best. Slide it completely under the center of the pancake.
- Lift and Turn: Lift the pancake straight up a couple of inches. In one smooth, confident motion, turn your wrist to flip the pancake over. Try not to fling it high in the air or slap it down, which can deflate it.
- Don’t Press: Once flipped, resist the urge to press down on the pancake with the spatula! This squeezes out the air bubbles you worked so hard to create, making them dense instead of fluffy.
Additional Tips for Strawberry Shortcake Pancake Perfection
- Don’t Overcrowd the Pan: Cooking too many pancakes at once lowers the pan’s temperature, leading to pale, greasy, and unevenly cooked pancakes. Cook in batches, giving each pancake ample space.
- Control the Heat: Medium heat is usually ideal. Monitor the first couple of pancakes and adjust the heat up or down as needed. Every stove and pan is different. If they brown too quickly, lower the heat. If they take too long, nudge it up slightly.
- Make Components Ahead (Partially): You can make the macerated strawberries and whipped cream a few hours ahead (keep the cream chilled). The pancake batter is best made fresh, but if necessary, you can mix the dry ingredients and wet ingredients (except melted butter) separately the night before, store them covered (wet in the fridge), and combine them just before cooking (adding the melted butter to the wet ingredients first). Fresh batter yields the fluffiest results.
- Keep Pancakes Warm Correctly: Placing cooked pancakes directly on top of each other can make them steam and get soggy. If keeping them warm in the oven, place them in a single layer on a wire rack set over a baking sheet. This allows air circulation. Cover loosely with foil.
- Taste and Adjust: Always taste your components! Are the strawberries sweet enough? Add a touch more sugar if needed. Is the whipped cream sweet enough for your liking? Adjust the powdered sugar accordingly before it’s fully whipped.
Variations and Substitutions
Feel free to get creative or adapt the recipe to your needs:
- Gluten-Free: Substitute the all-purpose flour with a good quality 1-to-1 gluten-free baking blend (one that contains xanthan gum). Results may vary slightly in texture.
- Vegan: This requires more significant substitutions:
- Use a plant-based milk alternative with lemon juice/vinegar for “buttermilk.”
- Use flax eggs (1 tbsp flaxseed meal + 3 tbsp water per egg, let sit 5 mins) or a commercial egg replacer.
- Use melted coconut oil or vegan butter instead of dairy butter.
- Use coconut cream (the thick part from a chilled can of full-fat coconut milk) whipped with powdered sugar and vanilla for the topping.
- Different Berries: While strawberries are classic, feel free to substitute or mix in other berries like raspberries, blueberries, or blackberries. Adjust sugar accordingly.
- Lemon Zest: Add 1-2 teaspoons of lemon zest to the pancake batter or the whipped cream for an extra bright, fresh flavor.
- Chocolate Lover’s Twist: Add mini chocolate chips to the pancake batter or drizzle the finished stack with chocolate sauce. Strawberry and chocolate are a great pairing!
- Shortcake Biscuit Crumble: For extra texture, crumble some store-bought or homemade shortbread cookies or biscuits over the top.
Storing and Reheating Leftovers
While best fresh, leftovers can still be enjoyed:
- Pancakes: Store leftover cooked pancakes in an airtight container or zip-top bag in the refrigerator for 2-3 days. Separate layers with parchment paper to prevent sticking. Reheat in a toaster, toaster oven, microwave (covered with a damp paper towel to prevent drying), or briefly in a skillet until warmed through.
- Macerated Strawberries: Store leftover strawberries in their syrup in an airtight container in the refrigerator for 2-3 days. The berries will soften further over time.
- Whipped Cream: Homemade whipped cream is best fresh but can be stored in an airtight container in the fridge for 1-2 days. It may deflate slightly; you can briefly re-whip it if needed.
Note: It’s best to store components separately and assemble just before serving leftovers.
Pairing Suggestions
These pancakes are a star on their own, but here are some pairing ideas for a full brunch spread:
- Drinks: Freshly brewed coffee, tea, orange juice, milk, or even a celebratory mimosa or bellini.
- Savory Sides: Balance the sweetness with savory items like crispy bacon, sausage links, scrambled eggs, or a simple quiche.
- Fruit Salad: A light, mixed fruit salad can complement the strawberry theme.
Frequently Asked Questions (FAQ)
Q1: Can I use frozen strawberries instead of fresh?
A1: Yes, you can use frozen strawberries, but the texture will be different. Thaw them first, then drain any excess liquid before macerating. They will release more liquid and be softer than fresh berries, but still delicious. You may need slightly less sugar as frozen berries can sometimes be packed in syrup.
Q2: Can I make the pancake batter ahead of time?
A2: It’s best to cook pancake batter relatively soon after mixing for maximum fluffiness, as the leavening agents start working immediately. However, you can mix the dry ingredients and store them in an airtight container at room temp. Mix the wet ingredients (minus melted butter) and store covered in the fridge. Combine wet and dry, add melted butter, just before cooking. Making the full batter the night before is generally not recommended as the pancakes might be denser.
Q3: My pancakes aren’t fluffy! What did I do wrong?
A3: Several factors could be at play:
* Overmixing: The most common culprit. Mix only until combined; lumps are good!
* Old Leavening Agents: Check the expiration dates on your baking powder and baking soda. They lose potency over time.
* Not Resting Batter: Allowing the batter to rest briefly helps ensure fluffiness.
* Pressing Down: Don’t press pancakes with the spatula after flipping.
* Incorrect Heat: Cooking too slowly can sometimes lead to flatter pancakes.
Q4: How do I prevent my pancakes from sticking to the pan?
A4: Use a good quality non-stick skillet or griddle. Ensure it’s properly preheated over medium heat. If needed, use a small amount of butter, oil, or cooking spray. Don’t add too much fat, or the pancakes can get greasy edges. Wipe the pan lightly between batches if residue builds up.
Q5: Can I use store-bought whipped cream?
A5: Absolutely! If you’re short on time or prefer the convenience, a good quality store-bought whipped cream (like Reddi-wip from the can or a tub of whipped topping) is a perfectly acceptable substitute for the homemade version. Homemade does offer a fresher flavor and texture, but use what works best for you!
Strawberry Shortcake Pancakes Recipe
Ingredients
For the Fluffy Pancakes:
- All-Purpose Flour: 2 cups (Provides structure)
- Granulated Sugar: ¼ cup (Adds sweetness and aids browning)
- Baking Powder: 4 teaspoons (Primary leavening agent for fluffiness)
- Baking Soda: ½ teaspoon (Reacts with buttermilk for extra lift)
- Salt: ½ teaspoon (Balances sweetness and enhances flavor)
- Buttermilk: 1 ¾ cups (Adds tang and tenderness; activate baking soda)
- Large Eggs: 2 (Bind ingredients and add richness)
- Unsalted Butter: ¼ cup (4 tablespoons), melted (Adds flavor and moisture)
- Vanilla Extract: 1 teaspoon (Enhances overall flavor)
For the Macerated Strawberries:
- Fresh Strawberries: 2 pints (about 4 cups), hulled and sliced or quartered
- Granulated Sugar: ¼ cup (or more, to taste, depending on strawberry sweetness)
- Lemon Juice: 1 teaspoon (Optional, brightens the strawberry flavor)
For the Whipped Cream Topping:
- Heavy Whipping Cream: 1 ½ cups, very cold
- Powdered Sugar: ¼ cup (or to taste)
- Vanilla Extract: ½ teaspoon
Instructions
Phase 1: Prepare the Toppings (Do this first!)
- Macerate the Strawberries: In a medium bowl, gently combine the hulled and sliced (or quartered) strawberries with ¼ cup of granulated sugar and the optional teaspoon of lemon juice. Stir carefully to coat the berries. Let this mixture sit at room temperature for at least 20-30 minutes (or up to an hour). The sugar will draw out the natural juices from the strawberries, creating a delicious syrupy sauce. Stir occasionally.
- Whip the Cream: Ensure your heavy cream is very cold. Pour it into a large, chilled bowl (chilling the bowl and beaters helps!). Using an electric mixer (stand or hand-held), beat the cream on medium speed until soft peaks begin to form. Gradually add the powdered sugar and vanilla extract. Continue beating on medium-high speed until stiff peaks form – be careful not to overbeat, or it will turn buttery. Cover the whipped cream and refrigerate until ready to serve.
Phase 2: Make the Pancake Batter
- Combine Dry Ingredients: In a large mixing bowl, whisk together the all-purpose flour, ¼ cup granulated sugar, baking powder, baking soda, and salt. Whisking well ensures the leavening agents are evenly distributed, which is crucial for uniformly fluffy pancakes.
- Combine Wet Ingredients: In a separate medium bowl, whisk together the buttermilk, large eggs, melted (and slightly cooled) butter, and 1 teaspoon of vanilla extract until well combined.
- Combine Wet and Dry: Pour the wet ingredients into the bowl with the dry ingredients. Whisk just until combined. It’s crucial not to overmix! A few lumps remaining in the batter are perfectly fine – even desirable. Overmixing develops the gluten in the flour, leading to tough, rubbery pancakes instead of light and fluffy ones.
- Rest the Batter (Optional but Recommended): Let the pancake batter rest for 5-10 minutes. This allows the flour to hydrate fully and gives the baking powder time to start working, resulting in even tenderer and fluffier pancakes.
Phase 3: Cook the Pancakes
- Preheat the Griddle/Pan: Heat a large non-stick skillet or griddle over medium heat. Getting the temperature right is key. Too hot, and the outside will burn before the inside cooks. Too cool, and they won’t get golden brown or cook through properly. Add a small amount of butter or non-stick cooking spray if your pan isn’t perfectly non-stick, though a good non-stick surface often needs nothing.
- Test the Heat: You can test if the pan is ready by flicking a tiny drop of water onto it. If it sizzles and evaporates immediately, it’s too hot. If it just sits there, it’s too cool. If it dances around for a second or two before evaporating, the temperature is likely just right.
- Portion the Batter: Once the griddle is properly heated, use a ¼ cup measuring cup or a small ladle to pour batter onto the hot surface for each pancake. Leave some space between pancakes so they don’t run together and are easier to flip.
- Cook Until Bubbly: Cook for about 2-3 minutes per side. You’ll know it’s time to flip when bubbles start appearing and popping on the surface of the pancake, and the edges look set and slightly dry.
- Flip and Cook: Carefully slide a thin spatula under the pancake and flip it confidently. Cook the second side for another 1-2 minutes, or until golden brown and cooked through.
- Keep Warm (Optional): As pancakes are cooked, you can transfer them to a baking sheet placed in a warm oven (around 200°F or 90°C) to keep them warm while you cook the remaining batter. Cover loosely with foil.
- Repeat: Continue cooking pancakes with the remaining batter, adding a tiny bit more butter or oil to the pan between batches if needed. Adjust the heat as necessary if pancakes are cooking too quickly or too slowly.
Phase 4: Assemble Your Strawberry Shortcake Pancakes
- Stack ’em High: For each serving, create a stack of 2 or 3 warm pancakes on a plate.
- Add Strawberries: Spoon a generous amount of the macerated strawberries and their delicious syrup over the pancake stack. Let some cascade down the sides.
- Top with Cream: Add a dollop (or two!) of the fresh whipped cream on top of the strawberries.
- Garnish (Optional): For an extra touch, add a few fresh strawberry slices, a sprig of mint, or a light dusting of powdered sugar over the whipped cream.
- Serve Immediately: These pancakes are best enjoyed fresh and warm, while the contrast between the warm pancakes, cool strawberries, and cold whipped cream is at its peak.
Nutrition
- Serving Size: One Normal Portion
- Calories: 550-750


