


Of all the takeout dishes my family craves, Pad Thai sits comfortably at the top of the list. There’s something magical about the symphony of sweet, sour, salty, and spicy flavors, all tangled up with satisfying noodles and crunchy peanuts. For years, it was our go-to Friday night treat. But as we started focusing more on healthier, whole-food eating, the traditional rice noodle and sugar-laden dish began to feel more like a heavy indulgence than a regular meal. I was on a mission: to recreate the Pad Thai experience we loved, but in a way that left us feeling energized and nourished. My first attempt with zucchini noodles was good, but a bit watery. Then, I turned to the humble spaghetti squash. The moment I scraped out those golden, noodle-like strands and tossed them in a homemade, refined-sugar-free Pad Thai sauce, I knew I had a winner. The family was skeptical at first, eyeing the vibrant orange squash with suspicion. But after the first bite—the familiar tangy sauce, the tender-crisp squash “noodles,” the fresh cilantro, and the all-important crunch of peanuts—they were completely sold. Now, this Spaghetti Squash Pad Thai isn’t just a “healthy alternative”; it’s a dish we genuinely crave and request, a vibrant, guilt-free masterpiece that has earned its permanent spot in our dinner rotation.
The Ultimate Spaghetti Squash Pad Thai Recipe
This recipe transforms the classic Thai street food into a nutrient-dense, gluten-free, and low-carb powerhouse without sacrificing the authentic flavors you love. We’ll break down how to perfectly cook the spaghetti squash, whip up a dynamic and balanced sauce, and bring it all together for a truly unforgettable meal.
Ingredients
This list is broken down into components to make your preparation seamless.
For the Spaghetti Squash:
- 1 medium spaghetti squash (about 3-4 lbs): This will be the base of our “noodles.”
- 1 tablespoon avocado oil or olive oil: For roasting the squash.
- ½ teaspoon sea salt: To season the squash from the inside out.
- ¼ teaspoon black pepper: For a touch of warmth.
For the Dynamic Pad Thai Sauce:
- ½ cup creamy almond butter or peanut butter: Use almond butter for a Paleo-friendly version.
- ¼ cup tamari or coconut aminos: Tamari is a gluten-free soy sauce. Coconut aminos are a soy-free, Paleo-friendly alternative.
- ¼ cup fresh lime juice (from about 2 limes): This is non-negotiable for that classic sour punch.
- 3 tablespoons pure maple syrup or honey: A natural sweetener to balance the sauce. Adjust to your desired sweetness level.
- 2 tablespoons rice vinegar: Adds another layer of acidity and brightness.
- 1 tablespoon toasted sesame oil: For a deep, nutty, aromatic flavor.
- 1-2 cloves garlic, minced: Or 1 teaspoon garlic powder.
- 1 teaspoon fresh ginger, grated: Or ½ teaspoon ground ginger.
- 1-2 teaspoons sriracha or chili garlic sauce (optional): Adjust according to your spice preference.
For Assembling the Pad Thai:
- 1 tablespoon avocado oil or coconut oil: For sautéing.
- 1 lb protein of choice (optional):
- Boneless, skinless chicken breast or thighs, thinly sliced
- Large shrimp, peeled and deveined
- Extra-firm tofu, pressed and cubed
- 1 small red onion or 2 shallots, thinly sliced: Adds a sweet and savory bite.
- 2 cups fresh bean sprouts: For that classic Pad Thai crunch and freshness.
- 2 large eggs, lightly beaten: Creates savory ribbons throughout the dish.
- 4 green onions, chopped, white and green parts separated: The white parts are for cooking, the green for garnish.
- ½ cup fresh cilantro, chopped: An essential fresh herb.
For Garnish (Don’t Skip These!):
- ½ cup roasted peanuts or cashews, roughly chopped: For the signature crunch.
- Lime wedges: For squeezing over the finished dish.
- Reserved chopped green onions and cilantro.
- Red pepper flakes: For extra heat.
Step-by-Step Instructions
Follow these detailed steps for a flawless result. The key is preparing all your components before you start cooking the final dish, a practice known as mise en place.
Part 1: Cooking the Spaghetti Squash
You have a few options here. The oven method yields the best texture, but the microwave is a great time-saver.
Oven Method (Recommended):
- Preheat Oven: Set your oven to 400°F (200°C). Line a baking sheet with parchment paper.
- Prepare Squash: Carefully slice the spaghetti squash in half lengthwise from stem to end. This can be tricky, so use a large, sharp knife and a stable cutting board.
- Scoop Seeds: Use a spoon to scoop out the seeds and stringy pulp from the center of each half, just like you would with a pumpkin.
- Season: Drizzle the cut-side of the squash with avocado oil and rub it all over the flesh. Sprinkle generously with salt and pepper.
- Roast: Place the squash halves cut-side down on the prepared baking sheet. This allows the squash to steam and cook evenly.
- Bake: Roast for 30-45 minutes, depending on the size of your squash. You can tell it’s done when the outside is easily pierced with a fork and the flesh is tender.
- Cool and Shred: Let the squash cool for about 10-15 minutes, or until it’s safe to handle. Use a fork to scrape the flesh from the skin. The strands will separate and look just like spaghetti. Set your “noodles” aside.
Microwave Method (Quickest):
- Prepare Squash: Slice and scoop the squash as described above.
- Microwave: Place the squash halves cut-side down in a microwave-safe dish. Add about an inch of water to the bottom of the dish.
- Cook: Microwave on high for 10-15 minutes. The cook time will vary greatly based on your microwave’s wattage and the squash size. Check for tenderness after 10 minutes.
- Shred: Carefully remove the hot dish from the microwave. Let it cool slightly before shredding with a fork. Note that microwaved squash can be a bit wetter, so you may want to gently pat the strands with a paper towel.
Part 2: Making the Pad Thai Sauce
- Combine Ingredients: In a medium bowl or a jar with a lid, combine all the sauce ingredients: almond/peanut butter, tamari/coconut aminos, lime juice, maple syrup/honey, rice vinegar, sesame oil, minced garlic, grated ginger, and sriracha (if using).
- Whisk or Shake: Whisk vigorously until the sauce is completely smooth and emulsified. If your nut butter is very thick, you can add a tablespoon or two of hot water to help it thin out.
- Taste and Adjust: This is the most important step! Taste your sauce. Does it need more sweetness? Add a touch more maple syrup. More tang? A squeeze of lime. More saltiness? A splash of tamari. More heat? A dash of sriracha. The perfect Pad Thai sauce is a balance of all these flavors. Set it aside.
Part 3: Assembling the Masterpiece
- Cook Protein (if using): Heat 1 tablespoon of avocado oil in a large wok or skillet over medium-high heat. Add your chosen protein (chicken, shrimp, or tofu). Season with a pinch of salt and pepper. Cook until the chicken is no longer pink, the shrimp is opaque, or the tofu is golden brown. Remove the protein from the skillet and set it aside.
- Sauté Aromatics: In the same skillet, add the thinly sliced red onion (or shallots) and the white parts of the green onions. Sauté for 2-3 minutes until they begin to soften and become fragrant.
- Scramble the Eggs: Push the onions to one side of the skillet. Pour the beaten eggs into the empty side. Let them set for a moment before scrambling them with your spatula until cooked through.
- Combine Everything: Add the cooked spaghetti squash “noodles,” the cooked protein, and the fresh bean sprouts to the skillet.
- Pour the Sauce: Pour your perfectly balanced Pad Thai sauce all over the ingredients in the skillet.
- Toss Gently: Use tongs to gently toss everything together, ensuring the noodles and protein are thoroughly coated in the sauce. Be careful not to break up the squash strands too much. Cook for another 2-3 minutes, just until everything is heated through and the bean sprouts are tender-crisp.
- Finish with Herbs: Turn off the heat. Stir in the chopped cilantro and the green parts of the green onions.
Nutrition Facts
- Servings: 4-6 servings
- Calories per serving (approximate): 450-550 calories
Disclaimer: The nutritional information is an estimate and will vary depending on the exact ingredients used, such as the type of protein, nut butter, and sweetener.
Preparation Time
- Prep Time: 20 minutes (includes making the sauce and chopping vegetables)
- Cook Time: 35-50 minutes (includes roasting the squash and assembling the dish)
- Total Time: 55-70 minutes
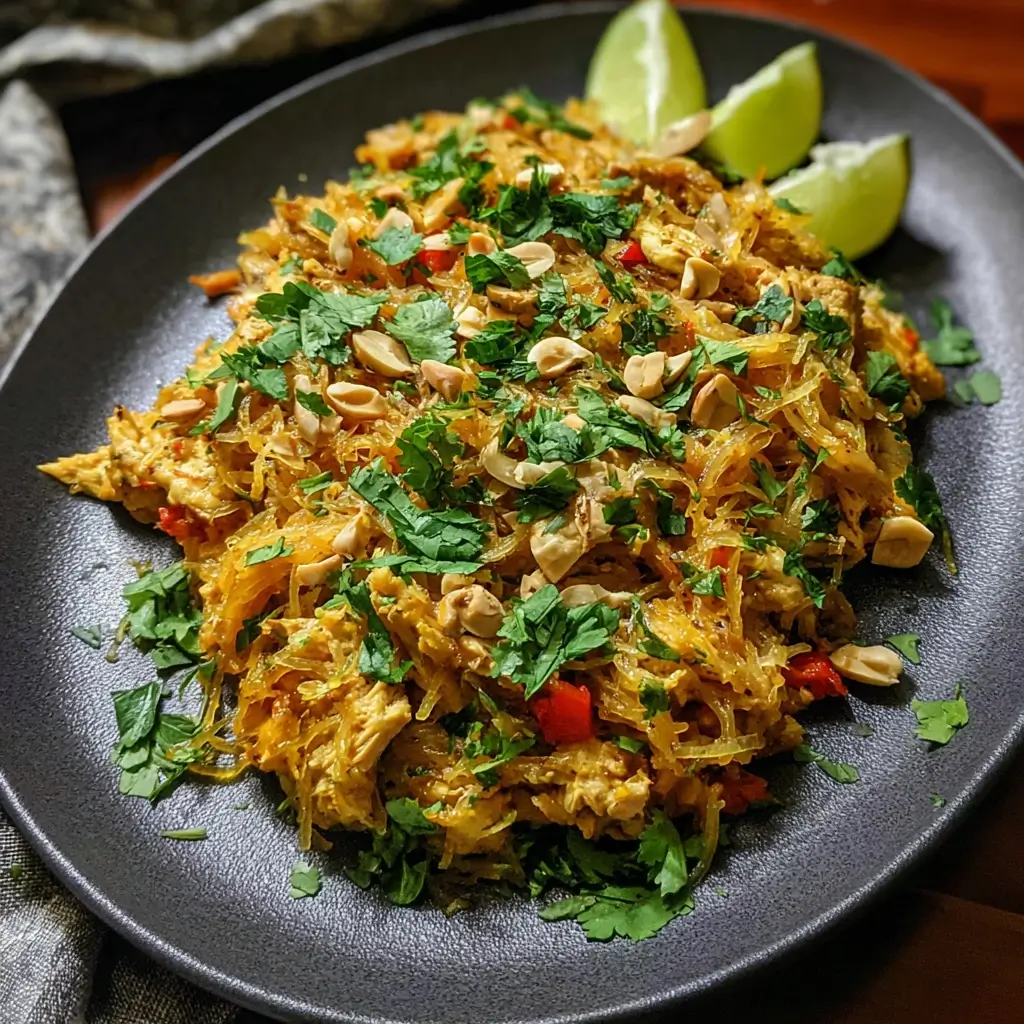
How to Serve This Vibrant Dish
Presentation is part of the fun and enhances the dining experience. Here’s how to serve your Spaghetti Squash Pad Thai like a pro.
- Family-Style Platter:
- Arrange the finished Pad Thai on a large, beautiful platter.
- Create small piles of each garnish (chopped peanuts, fresh cilantro, lime wedges, red pepper flakes) around the edge of the platter.
- This allows everyone to customize their own serving with their favorite toppings.
- Individual Bowls:
- Portion the Pad Thai into individual shallow bowls.
- Sprinkle each bowl generously with the chopped peanuts, cilantro, and green onions.
- Place a lime wedge on the rim of each bowl for a restaurant-quality touch.
- Perfect Pairings:
- Serve alongside a light and brothy soup like a Tom Yum or a simple miso soup to start the meal.
- Pair with fresh, crunchy Vietnamese-style summer rolls for a complete and healthy feast.
- A crisp, cold lager, a glass of off-dry Riesling, or a refreshing Thai iced tea (the traditional or a dairy-free version) complements the flavors wonderfully.
Additional Tips for Pad Thai Perfection
Master this recipe with five expert tips that make all the difference.
- Don’t Overcook the Squash: This is the most crucial tip. The goal is al dente squash strands, not mush. Overcooked squash will be watery and soft, losing its noodle-like texture. Start checking for doneness on the earlier side of the recommended cooking time. The strands should be tender but still have a slight bite.
- The “Mise en Place” Rule is Law: This dish comes together very quickly at the end. You won’t have time to chop an onion or juice a lime once you start sautéing. Have your squash cooked, sauce mixed, protein cooked, and all veggies and garnishes chopped and ready to go before you even turn on the stove for the final assembly.
- Taste and Adjust the Sauce Religiously: Your taste buds are the final judge. The balance of sweet, sour, salty, and spicy is personal. Before you add the sauce to the pan, taste it. After you’ve tossed everything together, taste it again. It might need one last squeeze of lime to brighten it up or a tiny pinch of salt to make the flavors pop.
- Don’t Overcrowd the Pan: Use the largest wok or skillet you own. If you try to cram too much into a small pan, the ingredients will steam instead of sauté, and you’ll miss out on the delicious, lightly caramelized flavors. If your skillet is on the smaller side, it’s better to cook in two separate batches.
- Embrace the Bean Sprouts: While some recipes skip them, fresh bean sprouts are essential for the authentic texture of Pad Thai. They add a cool, crisp, and slightly watery crunch that perfectly contrasts the tender squash and rich sauce. Add them in the last couple of minutes of cooking so they stay crisp.
Frequently Asked Questions (FAQ)
Here are answers to some common questions about making Spaghetti Squash Pad Thai.
1. My spaghetti squash turned out mushy. What did I do wrong?
This is the most common pitfall! It’s almost always due to overcooking. Every squash and every oven is different, so start checking it earlier than the recipe states. The other culprit can be excess water. If you microwave your squash, be sure to drain it well and even pat the strands with a paper towel to remove moisture before adding them to the skillet. Roasting cut-side down helps a lot of the water evaporate, leading to a better texture.
2. Can I make the Pad Thai sauce ahead of time?
Absolutely! The sauce can be made up to 5 days in advance and stored in an airtight container (like a mason jar) in the refrigerator. The flavors will actually meld and deepen over time. The nut butter may solidify when chilled, so let the sauce sit at room temperature for about 20-30 minutes and give it a good shake or whisk before using.
3. Is this recipe spicy? How can I adjust the heat level?
As written with 1 teaspoon of sriracha, this recipe has a very mild kick. The spice level is completely customizable. For a totally non-spicy version, simply omit the sriracha or chili garlic sauce. For a medium heat, use 1-2 teaspoons. For a spicy version, use a tablespoon or more. You can also serve it with red pepper flakes and sriracha on the side so everyone can adjust their own plate.
4. I don’t have a wok. Can I still make this?
Yes, you can. While a wok is ideal because its high, sloped sides make tossing ingredients easy and distribute heat effectively, any large, deep skillet will work just fine. The key is to use your largest pan to ensure the ingredients have enough space to sauté properly without steaming.
5. How do I make this recipe vegan or paleo?
It’s very easy to adapt!
- For a Vegan Version: Simply omit the eggs or use a vegan egg substitute (like a JUST Egg scramble). Ensure your sweetener is maple syrup, not honey. Use tofu as your protein.
- For a Paleo Version: Use coconut aminos instead of tamari. Use almond butter instead of peanut butter. Ensure your sweetener is honey or a Paleo-approved option. Omit the bean sprouts (as legumes are not strictly Paleo) and replace them with extra shredded cabbage or carrots for crunch. Use cashews instead of peanuts for the garnish.

Spaghetti Squash Pad Thai Recipe
Ingredients
For the Spaghetti Squash:
- 1 medium spaghetti squash (about 3–4 lbs): This will be the base of our “noodles.”
- 1 tablespoon avocado oil or olive oil: For roasting the squash.
- ½ teaspoon sea salt: To season the squash from the inside out.
- ¼ teaspoon black pepper: For a touch of warmth.
For the Dynamic Pad Thai Sauce:
- ½ cup creamy almond butter or peanut butter: Use almond butter for a Paleo-friendly version.
- ¼ cup tamari or coconut aminos: Tamari is a gluten-free soy sauce. Coconut aminos are a soy-free, Paleo-friendly alternative.
- ¼ cup fresh lime juice (from about 2 limes): This is non-negotiable for that classic sour punch.
- 3 tablespoons pure maple syrup or honey: A natural sweetener to balance the sauce. Adjust to your desired sweetness level.
- 2 tablespoons rice vinegar: Adds another layer of acidity and brightness.
- 1 tablespoon toasted sesame oil: For a deep, nutty, aromatic flavor.
- 1–2 cloves garlic, minced: Or 1 teaspoon garlic powder.
- 1 teaspoon fresh ginger, grated: Or ½ teaspoon ground ginger.
- 1–2 teaspoons sriracha or chili garlic sauce (optional): Adjust according to your spice preference.
For Assembling the Pad Thai:
- 1 tablespoon avocado oil or coconut oil: For sautéing.
- 1 lb protein of choice (optional):
- Boneless, skinless chicken breast or thighs, thinly sliced
- Large shrimp, peeled and deveined
- Extra-firm tofu, pressed and cubed
- 1 small red onion or 2 shallots, thinly sliced: Adds a sweet and savory bite.
- 2 cups fresh bean sprouts: For that classic Pad Thai crunch and freshness.
- 2 large eggs, lightly beaten: Creates savory ribbons throughout the dish.
- 4 green onions, chopped, white and green parts separated: The white parts are for cooking, the green for garnish.
- ½ cup fresh cilantro, chopped: An essential fresh herb.
For Garnish (Don’t Skip These!):
- ½ cup roasted peanuts or cashews, roughly chopped: For the signature crunch.
- Lime wedges: For squeezing over the finished dish.
- Reserved chopped green onions and cilantro.
- Red pepper flakes: For extra heat.
Instructions
Part 1: Cooking the Spaghetti Squash
You have a few options here. The oven method yields the best texture, but the microwave is a great time-saver.
Oven Method (Recommended):
- Preheat Oven: Set your oven to 400°F (200°C). Line a baking sheet with parchment paper.
- Prepare Squash: Carefully slice the spaghetti squash in half lengthwise from stem to end. This can be tricky, so use a large, sharp knife and a stable cutting board.
- Scoop Seeds: Use a spoon to scoop out the seeds and stringy pulp from the center of each half, just like you would with a pumpkin.
- Season: Drizzle the cut-side of the squash with avocado oil and rub it all over the flesh. Sprinkle generously with salt and pepper.
- Roast: Place the squash halves cut-side down on the prepared baking sheet. This allows the squash to steam and cook evenly.
- Bake: Roast for 30-45 minutes, depending on the size of your squash. You can tell it’s done when the outside is easily pierced with a fork and the flesh is tender.
- Cool and Shred: Let the squash cool for about 10-15 minutes, or until it’s safe to handle. Use a fork to scrape the flesh from the skin. The strands will separate and look just like spaghetti. Set your “noodles” aside.
Microwave Method (Quickest):
- Prepare Squash: Slice and scoop the squash as described above.
- Microwave: Place the squash halves cut-side down in a microwave-safe dish. Add about an inch of water to the bottom of the dish.
- Cook: Microwave on high for 10-15 minutes. The cook time will vary greatly based on your microwave’s wattage and the squash size. Check for tenderness after 10 minutes.
- Shred: Carefully remove the hot dish from the microwave. Let it cool slightly before shredding with a fork. Note that microwaved squash can be a bit wetter, so you may want to gently pat the strands with a paper towel.
Part 2: Making the Pad Thai Sauce
- Combine Ingredients: In a medium bowl or a jar with a lid, combine all the sauce ingredients: almond/peanut butter, tamari/coconut aminos, lime juice, maple syrup/honey, rice vinegar, sesame oil, minced garlic, grated ginger, and sriracha (if using).
- Whisk or Shake: Whisk vigorously until the sauce is completely smooth and emulsified. If your nut butter is very thick, you can add a tablespoon or two of hot water to help it thin out.
- Taste and Adjust: This is the most important step! Taste your sauce. Does it need more sweetness? Add a touch more maple syrup. More tang? A squeeze of lime. More saltiness? A splash of tamari. More heat? A dash of sriracha. The perfect Pad Thai sauce is a balance of all these flavors. Set it aside.
Part 3: Assembling the Masterpiece
- Cook Protein (if using): Heat 1 tablespoon of avocado oil in a large wok or skillet over medium-high heat. Add your chosen protein (chicken, shrimp, or tofu). Season with a pinch of salt and pepper. Cook until the chicken is no longer pink, the shrimp is opaque, or the tofu is golden brown. Remove the protein from the skillet and set it aside.
- Sauté Aromatics: In the same skillet, add the thinly sliced red onion (or shallots) and the white parts of the green onions. Sauté for 2-3 minutes until they begin to soften and become fragrant.
- Scramble the Eggs: Push the onions to one side of the skillet. Pour the beaten eggs into the empty side. Let them set for a moment before scrambling them with your spatula until cooked through.
- Combine Everything: Add the cooked spaghetti squash “noodles,” the cooked protein, and the fresh bean sprouts to the skillet.
- Pour the Sauce: Pour your perfectly balanced Pad Thai sauce all over the ingredients in the skillet.
- Toss Gently: Use tongs to gently toss everything together, ensuring the noodles and protein are thoroughly coated in the sauce. Be careful not to break up the squash strands too much. Cook for another 2-3 minutes, just until everything is heated through and the bean sprouts are tender-crisp.
- Finish with Herbs: Turn off the heat. Stir in the chopped cilantro and the green parts of the green onions.
Nutrition
- Serving Size: One Normal Portion
- Calories: 450-550


