


There are certain aromas that instantly signal comfort, and for my family, the scent of a simmering coconut curry is at the top of that list. For years, I chased that perfect balance of creamy, spicy, savory, and sweet that I’d enjoyed in our favorite Thai restaurants. My attempts were often too thin, too spicy, or just… lacking. That all changed the day I decided to let my slow cooker do the heavy lifting. I came home from a hectic day of work and errands to a house filled with the most intoxicating fragrance of ginger, garlic, and coconut. The chicken was so tender it practically melted, and the sauce had a depth of flavor that tasted like it had been simmering for days, not just a few hands-off hours. My kids, who can be notoriously picky, devoured their bowls and asked for more. That’s when I knew this Slow Cooker Basil Chicken Coconut Curry wasn’t just a good recipe; it was a game-changer for our busy weeknights. It delivers that five-star restaurant experience with minimal morning prep, making you feel like a culinary hero with a secret weapon humming away on the counter.
The Ultimate Slow Cooker Basil Chicken Coconut Curry
This recipe is designed for maximum flavor with minimum effort. We’ll build a rich, aromatic base and let the low-and-slow cooking process tenderize the chicken to perfection. The final additions of creamy coconut milk and fresh basil ensure a vibrant, fresh finish.
Yields: 6-8 servings
Prep time: 20 minutes
Cook time: 4-6 hours on LOW, or 2-3 hours on HIGH
Ingredients
This recipe relies on a harmony of key ingredients. Below is the complete list, followed by a deeper dive into why each component is so important for achieving the perfect curry.
- For the Curry Base:
- 2 lbs (about 900g) boneless, skinless chicken thighs, cut into 1-inch cubes
- 1 large yellow onion, finely chopped
- 4-6 cloves garlic, minced
- 1 tablespoon fresh ginger, grated
- 2 large bell peppers (one red, one yellow recommended for color), deseeded and sliced
- 4-6 tablespoons Thai red curry paste (adjust to your spice preference)
- 1 tablespoon vegetable or coconut oil
- 1/2 cup low-sodium chicken broth or water
- 2 tablespoons fish sauce
- 1 tablespoon soy sauce (or tamari for a gluten-free option)
- 1 tablespoon brown sugar or coconut sugar
- For Finishing the Curry:
- 1 (13.5 oz / 400ml) can full-fat, unsweetened coconut milk
- 1 cup fresh Thai basil leaves, packed (or regular Italian basil if unavailable)
- Juice of 1 large lime
A Closer Look at the Key Ingredients
Understanding your ingredients is the first step to becoming a master of this dish.
- Chicken Thighs: While chicken breasts will work, thighs are the superior choice for slow cooking. Their higher fat content ensures they remain incredibly moist and tender, even after hours of cooking. They absorb the flavors of the curry sauce beautifully and won’t become dry or stringy.
- Thai Red Curry Paste: This is the heart and soul of the dish. It’s not just about heat; it’s a complex, aromatic paste made from red chili peppers, galangal (a relative of ginger), lemongrass, makrut lime leaves, coriander, and more. Brands like Mae Ploy are spicier and more authentic, while brands like Thai Kitchen are milder and widely available. Start with 4 tablespoons for a medium heat and adjust upwards if you love spice.
- Full-Fat Coconut Milk: Do not substitute with light coconut milk! The fat is what creates the luxurious, creamy texture and balances the spice of the curry paste. Adding it at the end of the cooking process prevents it from splitting or curdling, ensuring a silky-smooth sauce.
- Fish Sauce: Don’t be afraid of it! This fermented anchovy sauce adds a crucial layer of salty, savory “umami” depth that you simply cannot get from salt alone. A good quality fish sauce (like Red Boat or Three Crabs) will smell potent from the bottle but will transform into a complex, savory note in the finished dish.
- Thai Basil vs. Italian Basil: If you can find it, use Thai basil. It has a distinct, slightly spicy flavor with notes of anise or licorice that is characteristic of Thai cuisine. Standard Italian basil is a perfectly acceptable substitute, but it will lend a sweeter, more peppery flavor to the final dish. Both are delicious; they just create slightly different experiences.
Step-by-Step Instructions
Follow these detailed steps to build your curry from a simple base to a complex, flavorful masterpiece.
Step 1: Create the Flavor Base (Optional but Recommended)
While this is a “dump and go” friendly recipe, taking 5-10 minutes to bloom your aromatics will elevate the final flavor immensely.
- Place a large skillet over medium-high heat and add the oil.
- Once the oil is shimmering, add the chopped yellow onion and cook, stirring occasionally, until softened and translucent, about 3-4 minutes.
- Add the minced garlic and grated ginger to the skillet. Sauté for another minute until fragrant. Be careful not to burn the garlic.
- Add the Thai red curry paste to the skillet. Cook, stirring constantly, for 1-2 minutes. This step, known as “blooming,” toasts the spices in the paste, deepening their flavor and unlocking their full aromatic potential. The paste will darken slightly and become very fragrant.
Time-Saver Tip: If you are short on time, you can skip this step. Simply add the oil, onion, garlic, ginger, and curry paste directly to the slow cooker. The flavor will still be good, just slightly less complex.
Step 2: Load the Slow Cooker
- Transfer the bloomed aromatics from the skillet into the basin of your 6-quart or larger slow cooker. If you skipped the sautéing step, add them now.
- Add the cubed chicken thighs, sliced bell peppers, chicken broth (or water), fish sauce, soy sauce (or tamari), and brown sugar to the slow cooker.
- Stir everything together thoroughly, ensuring the chicken and vegetables are evenly coated in the curry paste mixture.
Step 3: The Slow Cook
- Secure the lid on your slow cooker.
- Set the cooker to LOW for 4-6 hours or HIGH for 2-3 hours. We strongly recommend the LOW setting. A longer, slower cook time results in more tender chicken and allows the flavors to meld more deeply.
Step 4: The Finishing Touches
This is the most critical step for achieving that fresh, creamy, restaurant-quality result.
- About 15-20 minutes before serving, turn off the slow cooker.
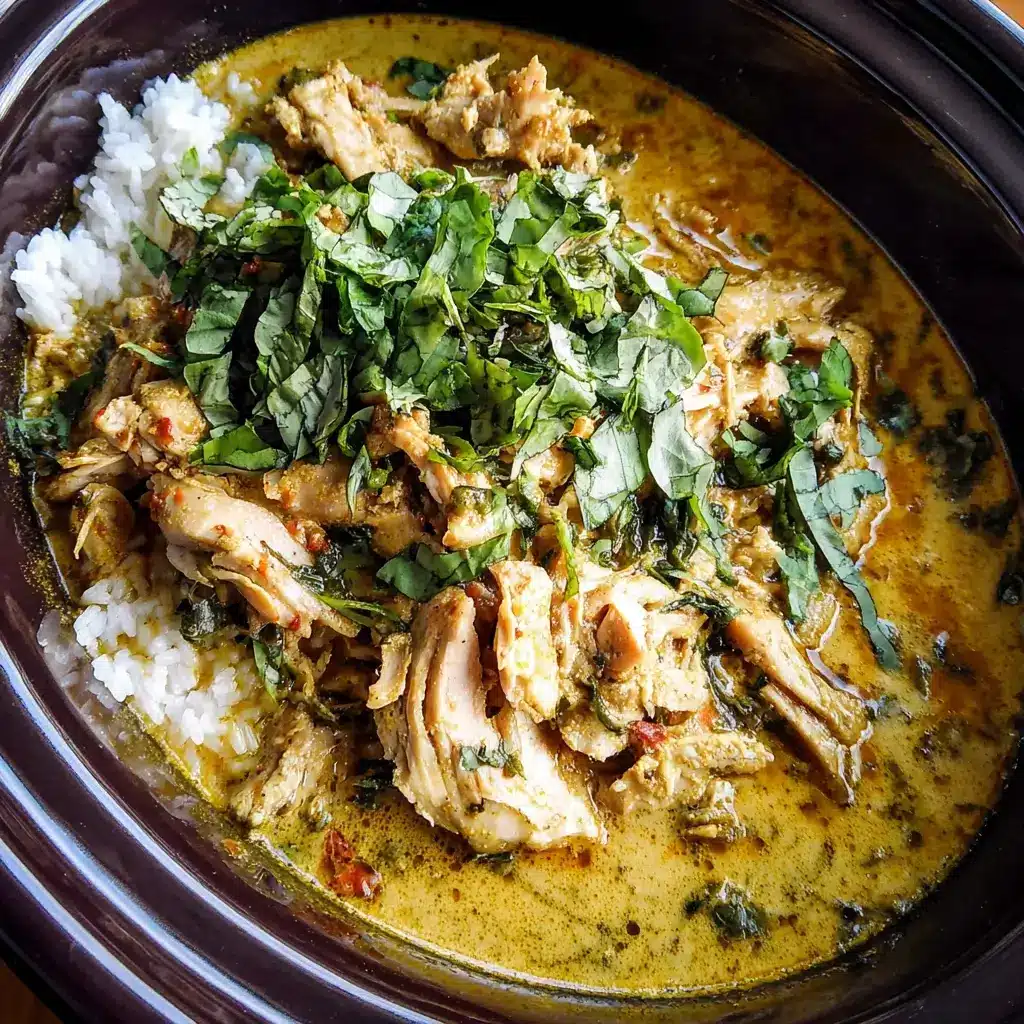
- Pour the entire can of full-fat coconut milk into the slow cooker. Stir gently to combine. The sauce will instantly become creamy and change to a beautiful, lighter orange-red color.
- Add the fresh lime juice and the packed cup of fresh basil leaves. Stir gently again until the basil begins to wilt into the hot curry.
- Place the lid back on the slow cooker for 10-15 minutes to allow the basil to infuse its flavor throughout the sauce and for the coconut milk to heat through without boiling.
- Taste the sauce and adjust the seasoning if necessary. Does it need more saltiness? Add a splash more fish sauce. More brightness? A squeeze more lime. More sweetness? A pinch more sugar.
Nutrition Facts
- Servings: 6-8
- Calories per serving: Approximately 450-550 kcal
Disclaimer: The nutritional information provided is an estimate and can vary based on the specific ingredients used (e.g., brand of coconut milk, fat content of chicken) and serving size. This estimate does not include accompaniments like rice or naan.
Preparation Time Breakdown
- Active Prep Time: 20 Minutes (chopping vegetables, cubing chicken, sautéing aromatics)
- Cook Time: 4 to 6 hours
- Total Time: 4 hours 20 minutes to 6 hours 20 minutes
How to Serve Your Basil Chicken Coconut Curry
The presentation and accompaniments are half the fun! Serving this curry is about creating a complete, satisfying meal. Here are some classic and creative ways to serve it up.
- The Foundation (Choose a Grain):
- Jasmine Rice: This is the quintessential choice. The fragrant, slightly sticky Thai rice is the perfect vehicle for soaking up every last drop of the delicious coconut sauce.
- Basmati Rice: A great alternative with a slightly different aroma and a fluffier, more separate grain structure.
- Brown Rice or Quinoa: For a healthier, higher-fiber option, these work well and add a nutty flavor.
- For Scooping and Dipping:
- Warm Naan Bread: Buttery, soft naan bread is perfect for scooping up chunks of chicken and sopping up the sauce. Garlic naan is an especially decadent choice.
- Roti: This unleavened flatbread is another excellent option for dipping.
- The Essential Toppings Bar: Set out small bowls of garnishes so everyone can customize their own bowl. This is a fantastic way to add texture, freshness, and extra layers of flavor.
- Fresh Herbs: Extra fresh Thai basil leaves or chopped cilantro.
- A Touch of Heat: Thinly sliced red chilies or a sprinkle of red pepper flakes.
- Crunch Factor: Chopped roasted peanuts or cashews.
- A Squeeze of Acidity: Extra lime wedges on the side for a bright, zesty finish.
- Crispy Goodness: Crispy fried shallots or onions (available in the international aisle of most supermarkets).
- Cooling Element: A small dollop of plain Greek yogurt or coconut cream can be a nice contrast to the spice.
Additional Tips for Curry Perfection
- How to Thicken Your Curry Sauce: If you prefer a thicker, richer sauce, it’s easy to achieve. After stirring in the coconut milk, create a slurry by whisking 2 tablespoons of cornstarch with 3 tablespoons of cold water in a small bowl until smooth. Pour this slurry into the slow cooker and stir. Turn the slow cooker setting to HIGH, cover, and let it cook for another 15-20 minutes, or until the sauce has thickened to your liking.
- Meal Prep and Storage Excellence: This curry is a fantastic meal prep recipe. The flavors actually get even better the next day! Store leftovers in an airtight container in the refrigerator for up to 4 days. Reheat gently on the stovetop over medium-low heat or in the microwave.
- Freezing for a Future Meal: Let the curry cool completely. For best results, portion it into freezer-safe containers or zip-top bags, leaving a little room for expansion. You can freeze it for up to 3 months. Pro-tip: Freeze the curry before adding the fresh basil and lime juice. When you’re ready to eat, thaw it overnight in the fridge, reheat gently on the stovetop, and then stir in the fresh basil and lime juice just before serving for the freshest flavor.
- Vegetable Variations: This recipe is a great template for clearing out your vegetable drawer. Add heartier vegetables like diced potatoes, sweet potatoes, or carrots at the beginning of the cooking time along with the bell peppers. For more tender vegetables, add them in the last 30-45 minutes of cooking. Great options include:
- Broccoli or cauliflower florets
- Snap peas or snow peas
- Sliced zucchini or yellow squash
- A few large handfuls of fresh spinach (stir in at the very end with the basil)
- Mastering the Spice Level: The heat in this dish comes primarily from the red curry paste. To make it milder, use only 3-4 tablespoons of paste and consider using a milder brand like Thai Kitchen. You could also add an extra splash of coconut milk at the end. To make it spicier, use 6+ tablespoons of a potent paste like Mae Ploy, or add a finely diced serrano or Thai chili along with the garlic and ginger. A sprinkle of red pepper flakes can also be added for a quick heat boost.
Frequently Asked Questions (FAQ)
Q1: Can I use chicken breasts instead of chicken thighs?
A: Yes, you can, but you need to adjust the cooking method slightly to prevent them from drying out. Chicken breasts have very little fat and can become tough and stringy with long cooking times. For best results, add the cubed chicken breast during the last 1.5-2 hours of cooking on LOW, or the last hour of cooking on HIGH. This is just enough time for the breast meat to cook through while remaining tender.
Q2: My coconut milk separated or looks curdled! What went wrong?
A: This is a common issue! Coconut milk can “split” or curdle when it’s boiled or cooked for too long, especially in the presence of acidic ingredients like lime juice. The fat solids separate from the liquid, creating a grainy texture. This is precisely why the recipe instructs you to turn off the heat and stir in the coconut milk and lime juice at the very end. This method gently heats the milk without boiling it, preserving its creamy, smooth consistency.
Q3: Can I make this recipe on the stovetop or in an Instant Pot?
A: Absolutely! This recipe is very adaptable.
- For the Stovetop: Sauté the aromatics and curry paste in a large Dutch oven or heavy-bottomed pot. Add the chicken and cook until lightly browned. Add the peppers, broth, fish sauce, soy sauce, and sugar. Bring to a simmer, then reduce the heat to low, cover, and cook for 25-30 minutes, or until the chicken is cooked through and tender. Turn off the heat and stir in the coconut milk, lime juice, and basil as directed.
- For the Instant Pot: Use the “Sauté” function to perform Step 1. Add the chicken, peppers, broth, fish sauce, soy sauce, and sugar. Secure the lid, set the valve to “Sealing,” and cook on High Pressure for 8 minutes. Let the pressure naturally release for 10 minutes before performing a quick release. Turn off the heat, stir in the coconut milk, lime juice, and basil, and let it sit for a few minutes before serving.
Q4: Is this recipe gluten-free and dairy-free?
A: This recipe is naturally dairy-free. To ensure it is gluten-free, you must use a gluten-free soy sauce substitute, such as tamari or coconut aminos. Additionally, while most Thai curry pastes are gluten-free, it’s always wise to double-check the label on your specific brand to ensure it doesn’t contain any hidden gluten additives.
Q5: What if I can’t find Thai basil anywhere?
A: While Thai basil provides the most authentic flavor, don’t let its absence stop you from making this curry! Regular Italian basil, which is much more common, makes a fantastic substitute. It will lend a different but equally delicious aromatic quality to the dish. Use the same amount called for in the recipe. In a pinch, you could even use a combination of fresh mint and cilantro to mimic some of the fresh, herbaceous notes. Avoid using dried basil, as it lacks the vibrant, fresh flavor needed to finish this dish properly.
Print
Slow Cooker Basil Chicken Coconut Curry Recipe
Ingredients
- For the Curry Base:
- 2 lbs (about 900g) boneless, skinless chicken thighs, cut into 1-inch cubes
- 1 large yellow onion, finely chopped
- 4–6 cloves garlic, minced
- 1 tablespoon fresh ginger, grated
- 2 large bell peppers (one red, one yellow recommended for color), deseeded and sliced
- 4–6 tablespoons Thai red curry paste (adjust to your spice preference)
- 1 tablespoon vegetable or coconut oil
- 1/2 cup low-sodium chicken broth or water
- 2 tablespoons fish sauce
- 1 tablespoon soy sauce (or tamari for a gluten-free option)
- 1 tablespoon brown sugar or coconut sugar
- For Finishing the Curry:
- 1 (13.5 oz / 400ml) can full-fat, unsweetened coconut milk
- 1 cup fresh Thai basil leaves, packed (or regular Italian basil if unavailable)
- Juice of 1 large lime
Instructions
Step 1: Create the Flavor Base (Optional but Recommended)
While this is a “dump and go” friendly recipe, taking 5-10 minutes to bloom your aromatics will elevate the final flavor immensely.
- Place a large skillet over medium-high heat and add the oil.
- Once the oil is shimmering, add the chopped yellow onion and cook, stirring occasionally, until softened and translucent, about 3-4 minutes.
- Add the minced garlic and grated ginger to the skillet. Sauté for another minute until fragrant. Be careful not to burn the garlic.
- Add the Thai red curry paste to the skillet. Cook, stirring constantly, for 1-2 minutes. This step, known as “blooming,” toasts the spices in the paste, deepening their flavor and unlocking their full aromatic potential. The paste will darken slightly and become very fragrant.
Time-Saver Tip: If you are short on time, you can skip this step. Simply add the oil, onion, garlic, ginger, and curry paste directly to the slow cooker. The flavor will still be good, just slightly less complex.
Step 2: Load the Slow Cooker
- Transfer the bloomed aromatics from the skillet into the basin of your 6-quart or larger slow cooker. If you skipped the sautéing step, add them now.
- Add the cubed chicken thighs, sliced bell peppers, chicken broth (or water), fish sauce, soy sauce (or tamari), and brown sugar to the slow cooker.
- Stir everything together thoroughly, ensuring the chicken and vegetables are evenly coated in the curry paste mixture.
Step 3: The Slow Cook
- Secure the lid on your slow cooker.
- Set the cooker to LOW for 4-6 hours or HIGH for 2-3 hours. We strongly recommend the LOW setting. A longer, slower cook time results in more tender chicken and allows the flavors to meld more deeply.
Step 4: The Finishing Touches
This is the most critical step for achieving that fresh, creamy, restaurant-quality result.
- About 15-20 minutes before serving, turn off the slow cooker.
- Pour the entire can of full-fat coconut milk into the slow cooker. Stir gently to combine. The sauce will instantly become creamy and change to a beautiful, lighter orange-red color.
- Add the fresh lime juice and the packed cup of fresh basil leaves. Stir gently again until the basil begins to wilt into the hot curry.
- Place the lid back on the slow cooker for 10-15 minutes to allow the basil to infuse its flavor throughout the sauce and for the coconut milk to heat through without boiling.
- Taste the sauce and adjust the seasoning if necessary. Does it need more saltiness? Add a splash more fish sauce. More brightness? A squeeze more lime. More sweetness? A pinch more sugar.
Nutrition
- Serving Size: One Normal Portion
- Calories: 450-550 kcal


