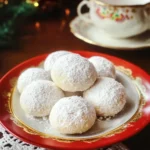
There’s a certain magic to Russian Tea Cakes, those delicate, buttery, nut-filled orbs dusted generously with powdered sugar, reminiscent of freshly fallen snow. For my family, these cookies, also affectionately known as Snowball Cookies or Mexican Wedding Cookies, are an indispensable part of any festive gathering, especially during the holidays. The moment the aroma of toasting nuts and warm butter begins to fill the kitchen, a sense of cozy anticipation settles in. I recall my grandmother meticulously shaping each little ball, her hands dusted with flour and sugar, a tradition I now cherish and carry on. The first bite is always a delightful experience – a tender, crumbly texture that practically melts in your mouth, followed by the satisfying crunch of finely chopped pecans and a wave of sweet, buttery goodness. They are deceptively simple to make, yet their elegance and irresistible flavor make them a perennial favorite. This recipe, honed over years of happy baking, delivers consistently perfect results, yielding cookies that are not too sweet in the dough itself, allowing the double coating of powdered sugar to provide the perfect finishing touch. They’re a guaranteed crowd-pleaser, disappearing quickly from cookie platters and always eliciting requests for the recipe.
The Enduring Charm of Russian Tea Cakes: A Recipe for Perfection
Russian Tea Cakes, despite their name, have a somewhat nebulous origin story, with similar cookies appearing in various cultures under different monikers. What’s undeniable is their universal appeal. These cookies are celebrated for their tender, shortbread-like texture, rich nutty flavor, and the iconic powdered sugar coating that gives them their “snowball” appearance. This recipe focuses on achieving that perfect balance of crumbly, buttery, and nutty, ensuring each bite is a moment of pure bliss.
Ingredients for Classic Russian Tea Cakes
This recipe yields approximately 3 to 4 dozen cookies, depending on size.
- Butter: 1 cup (227g) unsalted butter, softened to room temperature
- Powdered Sugar (for dough): 1/2 cup (60g) confectioners’ sugar, sifted
- Vanilla Extract: 2 teaspoons pure vanilla extract
- Almond Extract (optional but recommended): 1/4 teaspoon pure almond extract (enhances nutty flavor)
- All-Purpose Flour: 2 cups (240g) all-purpose flour, spooned and leveled
- Salt: 1/4 teaspoon fine sea salt
- Nuts: 1 cup (110-120g) finely chopped pecans or walnuts (toasted for enhanced flavor, if desired)
- Powdered Sugar (for coating): Approximately 1 to 1 1/2 cups (120-180g) confectioners’ sugar, sifted
Step-by-Step Instructions for Perfect Russian Tea Cakes
Follow these instructions carefully for the best results, ensuring your cookies are tender, flavorful, and beautifully coated.
- Prepare the Nuts (Optional Toasting):
- If using, preheat your oven to 350°F (175°C). Spread the pecans or walnuts in a single layer on a baking sheet.
- Toast for 5-8 minutes, or until fragrant and lightly golden. Keep a close eye on them as nuts can burn quickly.
- Let the nuts cool completely, then chop them finely. Using a food processor to pulse them into small, even pieces works well, but be careful not to turn them into nut butter. Set aside.
- Cream Butter and Sugar:
- In a large mixing bowl, using a hand mixer or a stand mixer fitted with the paddle attachment, beat the softened unsalted butter on medium speed until smooth and creamy, about 1-2 minutes.
- Add the 1/2 cup of sifted powdered sugar (for the dough) to the butter. Beat on medium speed until the mixture is light and fluffy, scraping down the sides of the bowl as needed. This step typically takes about 2-3 minutes.
- Add Flavorings:
- Beat in the pure vanilla extract and the optional almond extract until well combined.
- Combine Dry Ingredients:
- In a separate medium bowl, whisk together the all-purpose flour and the fine sea salt. This ensures the salt is evenly distributed.
- Combine Wet and Dry Ingredients:
- Gradually add the flour mixture to the wet butter mixture, mixing on low speed. Start with about one-third of the flour, mix until just combined, then add another third, and finally the last third. Mix only until the flour is mostly incorporated. Be very careful not to overmix at this stage, as overmixing develops gluten and can lead to tough cookies. The dough will be somewhat crumbly.
- Incorporate Nuts:
- Add the finely chopped nuts to the dough. Mix on low speed or stir by hand with a spatula until the nuts are evenly distributed throughout the dough. Again, avoid overmixing.
- Chill the Dough (Crucial Step):
- Gather the dough into a ball, flatten it into a disc, and wrap it tightly in plastic wrap.
- Refrigerate the dough for at least 1 hour, or up to 2 days. Chilling the dough is essential for several reasons: it prevents the cookies from spreading too much during baking, makes the dough easier to handle, and allows the flavors to meld. For longer chilling, the dough might become quite firm; let it sit at room temperature for 10-15 minutes to soften slightly before shaping.
- Preheat Oven and Prepare Baking Sheets:
- When ready to bake, preheat your oven to 350°F (175°C).
- Line two large baking sheets with parchment paper or silicone baking mats. This prevents sticking and helps with even baking.
- Shape the Cookies:
- Remove the chilled dough from the refrigerator.
- Scoop dough using a small cookie scoop (about 1 tablespoon per cookie) or roll it between your palms to form small, uniform balls, about 1 inch in diameter. Uniformity in size ensures even baking.
- Place the dough balls about 1-2 inches apart on the prepared baking sheets. They don’t spread much, but some space is needed for air circulation.
- Bake the Cookies:
- Bake for 10-14 minutes. The exact time will depend on your oven and the size of your cookies.
- The cookies should be set and the bottoms should be very lightly golden. The tops will remain pale; do not overbake, as this will make them dry and hard rather than tender and crumbly.
- First Powdered Sugar Coating (Warm):
- While the cookies are baking, sift about 1/2 to 3/4 cup of the powdered sugar (for coating) into a shallow bowl or pie dish.
- Once the cookies are baked, let them cool on the baking sheets for just 3-5 minutes. They should be warm but not so hot that they fall apart when handled.
- Carefully roll each warm cookie in the sifted powdered sugar, ensuring it’s lightly coated on all sides. The warmth of the cookie will help this first layer of sugar melt slightly and adhere.
- Place the sugar-coated cookies on a wire rack to cool completely.
- Second Powdered Sugar Coating (Cool):
- Once the cookies have cooled completely to room temperature (this is important!), sift the remaining powdered sugar into a clean shallow bowl.
- Roll each cooled cookie in the powdered sugar again, this time for a thicker, more beautiful “snowball” coating. This second coating will stick better and provide that classic powdery finish.
- Gently tap off any excess sugar if desired.
- Storage:
- Store the finished Russian Tea Cakes in an airtight container at room temperature for up to one week. They can also be frozen for longer storage (see FAQ).
Nutrition Facts
- Servings: Approximately 36-48 cookies (assuming 1 tablespoon-sized balls)
- Calories per serving (1 cookie): Approximately 70-90 calories
Disclaimer: Nutritional information is an estimate and can vary depending on the exact ingredients used, nut type, and cookie size.
Preparation Time
- Active Preparation Time: 25-30 minutes (includes toasting nuts, mixing dough, shaping)
- Chilling Time: Minimum 1 hour (can be up to 48 hours)
- Baking Time: 10-14 minutes per batch
- Cooling Time: Approximately 30-45 minutes (for both cooling stages)
- Total Time (excluding extended chilling beyond 1 hour): Approximately 2 hours 15 minutes
How to Serve Russian Tea Cakes
These delightful cookies are versatile and can be enjoyed in many ways. Here are some serving suggestions:
- Holiday Cookie Platters: They are a star attraction on any Christmas, Easter, or festive cookie assortment. Their white, snowy appearance adds a touch of elegance.
- With Tea or Coffee: As their name suggests, they are a perfect accompaniment to a hot cup of tea (black, green, or herbal) or coffee. The buttery richness pairs wonderfully with a warm beverage.
- Afternoon Treat: A couple of these cookies make for a delightful pick-me-up in the afternoon.
- Edible Gifts: Pack them in decorative tins or cellophane bags tied with a ribbon for a thoughtful homemade gift, especially during the holiday season.
- Dessert Tables: Arrange them artfully on a dessert table for parties, weddings, or showers. Their bite-sized nature makes them easy for guests to enjoy.
- Alongside Fresh Fruit: Serve with a bowl of fresh berries to provide a contrasting tartness and freshness.
- Crumbled Over Ice Cream: For an indulgent twist, crumble a cookie or two over a scoop of vanilla or butter pecan ice cream.
Additional Tips for Success
- Use Room Temperature Butter (Properly Softened): Your butter should be soft enough that your finger leaves an indent, but not greasy or melted. If it’s too cold, it won’t cream properly. If it’s too soft/melted, the cookies may spread excessively. To quickly soften butter, cut it into small cubes and let it sit at room temperature for about 30-60 minutes.
- Measure Flour Correctly: Spoon the flour into your measuring cup and then level it off with a straight edge. Scooping directly from the bag can pack the flour, resulting in too much flour and dry, dense cookies.
- Don’t Skip the Chilling: Chilling the dough is non-negotiable for Russian Tea Cakes. It solidifies the fat (butter), preventing the cookies from spreading into flat discs during baking. It also makes the dough much easier to roll into uniform balls.
- Fine, Evenly Chopped Nuts: The nuts should be chopped finely so they distribute evenly throughout the dough and don’t cause the cookies to crumble excessively when bitten into. A food processor can make quick work of this, but pulse carefully to avoid making nut paste. Toasting the nuts beforehand deepens their flavor significantly.
- The Double Sugar-Coating Technique: The first coating while the cookies are still warm allows some sugar to melt and adhere, creating a base. The second coating, once the cookies are completely cool, gives them that signature thick, powdery, snowball look that stays put. Ensure cookies are completely cool before the second roll, or the sugar will absorb moisture and become pasty.
FAQ: Your Russian Tea Cake Questions Answered
Q1: Why are my Russian Tea Cakes flat and spread out?
A: There are a few common culprits:
* Butter too soft/melted: If your butter was overly soft or partially melted when you creamed it, the cookies will spread more.
* Dough not chilled sufficiently: Chilling solidifies the fat, which is key to preventing spread. Ensure at least 1 hour of chilling, or even longer.
* Too little flour: Incorrect flour measurement (not enough) can lead to a softer dough that spreads.
* Oven temperature too low: If your oven isn’t hot enough, the cookies spread before they have a chance to set. Use an oven thermometer to verify temperature.
Q2: Can I make Russian Tea Cakes without nuts?
A: Yes, you can make them nut-free. However, nuts contribute significantly to both the flavor and texture. If omitting nuts, you might want to:
* Add a little more flour (perhaps 2-3 tablespoons) to compensate for the lost bulk.
* Increase the vanilla extract slightly or add other flavorings like citrus zest (lemon or orange) or mini chocolate chips (though this changes the traditional profile).
The texture will be slightly different, more akin to a plain shortbread.
Q3: How do I store Russian Tea Cakes, and how long do they last?
A: Store completely cooled Russian Tea Cakes in an airtight container at room temperature. They will stay fresh for up to one week. For longer storage, you can freeze them:
* Freezing Baked Cookies: Arrange cooled, un-sugared (or single-sugared) cookies in a single layer on a baking sheet and freeze until solid. Then transfer to a freezer-safe bag or container for up to 3 months. Thaw at room temperature, then give them their final powdered sugar coating before serving.
* Freezing Dough: The cookie dough can also be frozen. Shape into balls, freeze on a baking sheet until solid, then transfer to a freezer bag for up to 3 months. Bake from frozen, adding a few extra minutes to the baking time.
Q4: Can I use granulated sugar instead of powdered sugar in the cookie dough?
A: While technically possible, it’s not recommended for classic Russian Tea Cakes. Powdered sugar (confectioners’ sugar) contains a small amount of cornstarch, which contributes to the tender, melt-in-your-mouth texture that these cookies are known for. Granulated sugar would result in a slightly different, potentially crispier texture. For the coating, powdered sugar is essential.
Q5: What’s the difference between Russian Tea Cakes, Mexican Wedding Cookies, and Snowball Cookies?
A: Essentially, they are very similar, if not identical, cookies. The core ingredients (butter, flour, powdered sugar, nuts) and the characteristic snowball appearance are common to all. The different names often reflect regional popularity or cultural associations rather than significant recipe variations. Other names include Italian Butter Nut, Pecan Butterballs, or Swedish Tea Cakes. The delightful cookie itself transcends geographical naming conventions!
Russian Tea Cakes Recipe
Ingredients
- Butter: 1 cup (227g) unsalted butter, softened to room temperature
- Powdered Sugar (for dough): 1/2 cup (60g) confectioners’ sugar, sifted
- Vanilla Extract: 2 teaspoons pure vanilla extract
- Almond Extract (optional but recommended): 1/4 teaspoon pure almond extract (enhances nutty flavor)
- All-Purpose Flour: 2 cups (240g) all-purpose flour, spooned and leveled
- Salt: 1/4 teaspoon fine sea salt
- Nuts: 1 cup (110-120g) finely chopped pecans or walnuts (toasted for enhanced flavor, if desired)
- Powdered Sugar (for coating): Approximately 1 to 1 1/2 cups (120-180g) confectioners’ sugar, sifted
Instructions
- Prepare the Nuts (Optional Toasting):
- If using, preheat your oven to 350°F (175°C). Spread the pecans or walnuts in a single layer on a baking sheet.
- Toast for 5-8 minutes, or until fragrant and lightly golden. Keep a close eye on them as nuts can burn quickly.
- Let the nuts cool completely, then chop them finely. Using a food processor to pulse them into small, even pieces works well, but be careful not to turn them into nut butter. Set aside.
- Cream Butter and Sugar:
- In a large mixing bowl, using a hand mixer or a stand mixer fitted with the paddle attachment, beat the softened unsalted butter on medium speed until smooth and creamy, about 1-2 minutes.
- Add the 1/2 cup of sifted powdered sugar (for the dough) to the butter. Beat on medium speed until the mixture is light and fluffy, scraping down the sides of the bowl as needed. This step typically takes about 2-3 minutes.
- Add Flavorings:
- Beat in the pure vanilla extract and the optional almond extract until well combined.
- Combine Dry Ingredients:
- In a separate medium bowl, whisk together the all-purpose flour and the fine sea salt. This ensures the salt is evenly distributed.
- Combine Wet and Dry Ingredients:
- Gradually add the flour mixture to the wet butter mixture, mixing on low speed. Start with about one-third of the flour, mix until just combined, then add another third, and finally the last third. Mix only until the flour is mostly incorporated. Be very careful not to overmix at this stage, as overmixing develops gluten and can lead to tough cookies. The dough will be somewhat crumbly.
- Incorporate Nuts:
- Add the finely chopped nuts to the dough. Mix on low speed or stir by hand with a spatula until the nuts are evenly distributed throughout the dough. Again, avoid overmixing.
- Chill the Dough (Crucial Step):
- Gather the dough into a ball, flatten it into a disc, and wrap it tightly in plastic wrap.
- Refrigerate the dough for at least 1 hour, or up to 2 days. Chilling the dough is essential for several reasons: it prevents the cookies from spreading too much during baking, makes the dough easier to handle, and allows the flavors to meld. For longer chilling, the dough might become quite firm; let it sit at room temperature for 10-15 minutes to soften slightly before shaping.
- Preheat Oven and Prepare Baking Sheets:
- When ready to bake, preheat your oven to 350°F (175°C).
- Line two large baking sheets with parchment paper or silicone baking mats. This prevents sticking and helps with even baking.
- Shape the Cookies:
- Remove the chilled dough from the refrigerator.
- Scoop dough using a small cookie scoop (about 1 tablespoon per cookie) or roll it between your palms to form small, uniform balls, about 1 inch in diameter. Uniformity in size ensures even baking.
- Place the dough balls about 1-2 inches apart on the prepared baking sheets. They don’t spread much, but some space is needed for air circulation.
- Bake the Cookies:
- Bake for 10-14 minutes. The exact time will depend on your oven and the size of your cookies.
- The cookies should be set and the bottoms should be very lightly golden. The tops will remain pale; do not overbake, as this will make them dry and hard rather than tender and crumbly.
- First Powdered Sugar Coating (Warm):
- While the cookies are baking, sift about 1/2 to 3/4 cup of the powdered sugar (for coating) into a shallow bowl or pie dish.
- Once the cookies are baked, let them cool on the baking sheets for just 3-5 minutes. They should be warm but not so hot that they fall apart when handled.
- Carefully roll each warm cookie in the sifted powdered sugar, ensuring it’s lightly coated on all sides. The warmth of the cookie will help this first layer of sugar melt slightly and adhere.
- Place the sugar-coated cookies on a wire rack to cool completely.
- Second Powdered Sugar Coating (Cool):
- Once the cookies have cooled completely to room temperature (this is important!), sift the remaining powdered sugar into a clean shallow bowl.
- Roll each cooled cookie in the powdered sugar again, this time for a thicker, more beautiful “snowball” coating. This second coating will stick better and provide that classic powdery finish.
- Gently tap off any excess sugar if desired.
- Storage:
- Store the finished Russian Tea Cakes in an airtight container at room temperature for up to one week. They can also be frozen for longer storage (see FAQ).
Nutrition
- Serving Size: One Normal Portion
- Calories: 70-90