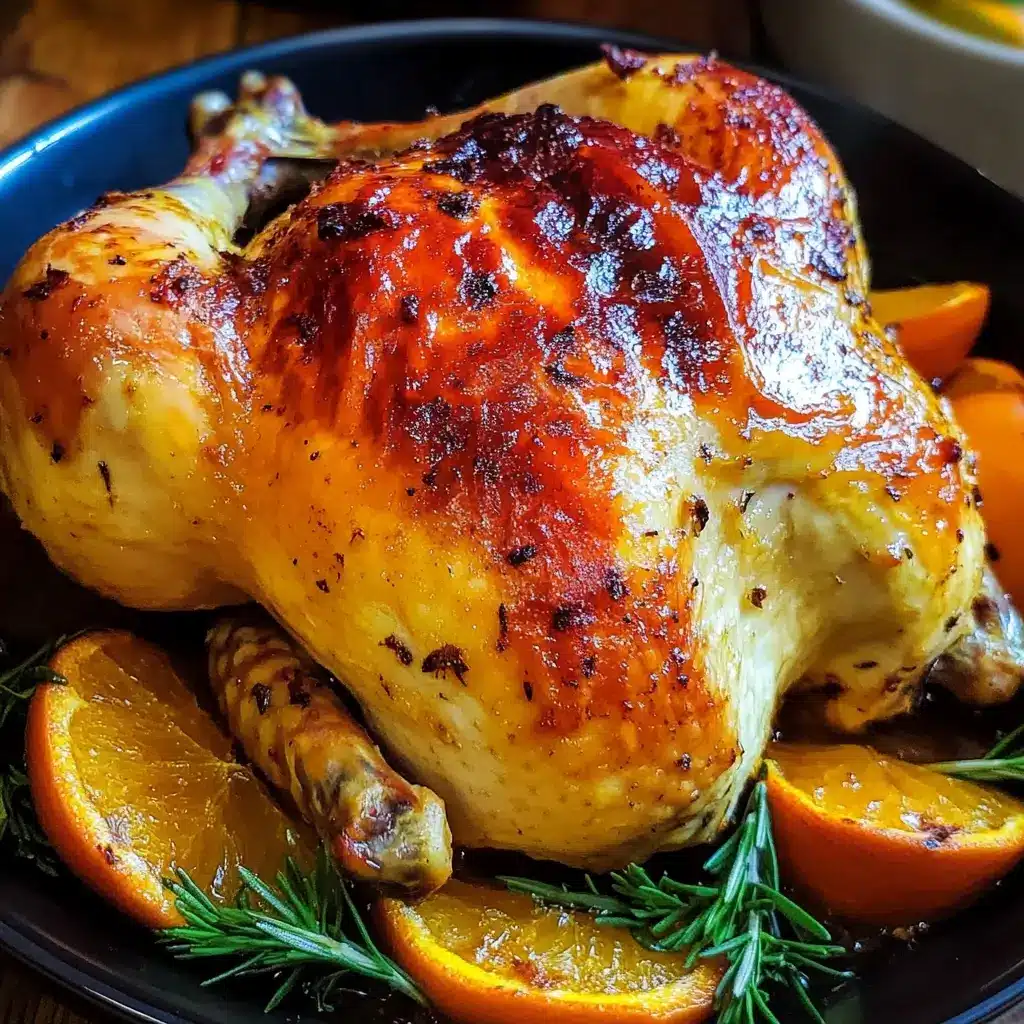
From our cozy family dinners to festive holiday gatherings, there’s one dish that consistently steals the show and earns rave reviews: Roast Orange Brined Chicken. Let me tell you, this isn’t just your average roast chicken recipe; it’s a flavor explosion that will transform your perception of poultry forever. The first time I prepared this for my family, the aroma alone was enough to draw everyone into the kitchen, their faces alight with anticipation. And the taste? Oh, the taste! The chicken, imbued with the bright, zesty notes of orange and fragrant herbs, was unbelievably juicy and tender, with a perfectly crisp, golden-brown skin. Even my picky eaters, who usually approach chicken with a degree of skepticism, devoured every last morsel. Since then, Roast Orange Brined Chicken has become a staple in our home, requested time and time again. It’s the perfect balance of simplicity and sophistication, easy enough for a weeknight meal yet impressive enough for special occasions. If you’re looking for a roast chicken recipe that will wow your family and friends, look no further. This Orange Brined Chicken is guaranteed to become your new go-to for tender, flavorful, and utterly irresistible poultry.
Ingredients
To create this culinary masterpiece, you’ll need a selection of fresh, aromatic ingredients that work in harmony to infuse the chicken with its signature flavor and ensure unparalleled juiciness. Let’s break down exactly what you’ll need for both the brine and the chicken itself.
For the Orange Brine:
- 1 Gallon Water: The foundation of our brine, water acts as the solvent, allowing the salt, sugar, and flavorings to penetrate the chicken. Use cold water to ensure the brine cools down quickly and maintains a safe temperature for the chicken.
- 1 Cup Kosher Salt: Salt is the star of the brine, responsible for denaturing the chicken’s proteins, allowing it to retain moisture during cooking. Kosher salt is preferred for brining due to its larger crystals and pure salt flavor, free of additives like iodine that can sometimes impart a metallic taste. Avoid using table salt, as its finer granules can lead to an overly salty brine if measured cup for cup.
- 1/2 Cup Granulated Sugar: Sugar balances the saltiness of the brine and adds a subtle sweetness that complements the orange and herbs. Granulated sugar dissolves easily in water, making it ideal for brines. You can also use brown sugar for a slightly richer, molasses-like note, if preferred.
- 2 Large Oranges: The heart of our flavor profile! We need both the zest and the juice of fresh oranges.
- Zest of 2 Oranges: The zest, the brightly colored outer layer of the orange peel, is packed with intensely fragrant oils. Use a microplane or fine grater to zest the oranges, being careful to avoid the bitter white pith underneath. Orange zest provides a concentrated burst of citrus aroma and flavor to the brine.
- Juice of 2 Oranges: Freshly squeezed orange juice adds a tangy sweetness and acidity to the brine, further tenderizing the chicken and enhancing its flavor. Avoid using bottled orange juice, which can sometimes contain added sugars and lack the vibrant freshness of freshly squeezed juice.
- 4 Sprigs Fresh Rosemary: Rosemary, with its piney, woodsy aroma, is a classic pairing with citrus and chicken. Fresh rosemary sprigs infuse the brine with their aromatic oils, imparting a savory, herbaceous depth to the chicken. If fresh rosemary isn’t available, you can substitute 1 tablespoon of dried rosemary, but fresh is always preferred for its brighter flavor.
- 4 Sprigs Fresh Thyme: Thyme, with its earthy, slightly lemony flavor, complements the rosemary and orange beautifully, adding another layer of herbaceous complexity to the brine. Fresh thyme sprigs contribute a delicate, fragrant aroma. Similar to rosemary, you can substitute 1 tablespoon of dried thyme if fresh isn’t available, but fresh is recommended.
- 1 Tablespoon Black Peppercorns: Whole black peppercorns add a subtle warmth and peppery bite to the brine, enhancing the overall flavor profile. The peppercorns release their aromatic oils as they steep in the brine. You can use coarsely cracked black pepper if whole peppercorns are not readily available.
- 4 Bay Leaves: Bay leaves, with their subtle, tea-like aroma, add a depth of savory flavor to the brine. They contribute a subtle complexity that rounds out the citrus and herbs. Dried bay leaves are typically used in brines and stews for their long-lasting flavor infusion.
- 6 Cloves Garlic, smashed: Garlic, with its pungent, aromatic flavor, adds a savory base note to the brine. Smashed garlic cloves release their flavor more readily than whole cloves. Smashing the garlic helps to break down the cell walls, allowing the aromatic compounds to infuse into the brine.
For the Roast Chicken:
- 1 Whole Chicken (4-5 pounds): Choose a high-quality whole chicken, preferably air-chilled for crispier skin. A 4-5 pound chicken is ideal for roasting and will provide ample servings for a family meal. Ensure the chicken is fully thawed if frozen before brining.
- 2 Tablespoons Olive Oil or Melted Butter: Olive oil or melted butter is used to rub the chicken before roasting, promoting crispy skin and adding richness. Olive oil imparts a subtle fruity flavor, while melted butter adds a richer, more decadent flavor and helps with browning.
- Salt and Freshly Ground Black Pepper: While the brine seasons the chicken from within, a light seasoning of salt and pepper on the skin before roasting enhances the flavor and helps create a flavorful crust. Use kosher salt and freshly ground black pepper for the best flavor.
- Optional Aromatics for the Cavity (Orange slices, Onion wedges, Garlic cloves, Herb sprigs): Stuffing the chicken cavity with aromatics is optional but highly recommended. It further enhances the flavor of the chicken from the inside out and adds aromatic steam during roasting. Orange slices, onion wedges, garlic cloves, and herb sprigs like rosemary and thyme are excellent choices.
Instructions
Now that we have all our ingredients ready, let’s embark on the journey of creating this incredibly flavorful and juicy Roast Orange Brined Chicken. Follow these step-by-step instructions carefully to ensure perfect results every time.
Step 1: Prepare the Orange Brine
- Combine Brine Ingredients: In a large stockpot or container (make sure it’s food-safe and large enough to hold the chicken and brine), combine the 1 gallon of cold water, 1 cup of kosher salt, 1/2 cup of granulated sugar, zest of 2 oranges, juice of 2 oranges, 4 sprigs of fresh rosemary, 4 sprigs of fresh thyme, 1 tablespoon of black peppercorns, 4 bay leaves, and 6 smashed garlic cloves.
- Heat to Dissolve: Place the pot over medium-high heat and stir continuously until the salt and sugar are completely dissolved. You don’t need to boil the brine, just heat it enough to ensure the salt and sugar are fully incorporated. This usually takes just a few minutes.
- Cool Completely: Remove the brine from the heat and allow it to cool completely to room temperature. This is crucial for food safety. Adding the chicken to a warm brine can raise its temperature into the danger zone for bacterial growth. You can speed up the cooling process by placing the pot in an ice bath or refrigerating it after it has cooled down slightly at room temperature. The brine must be cold before adding the chicken.
Step 2: Brine the Chicken
- Prepare the Chicken: Rinse the whole chicken inside and out with cold water. Pat it thoroughly dry with paper towels. Removing excess moisture will help the brine penetrate effectively and result in crispier skin during roasting.
- Submerge Chicken in Brine: Place the chicken in the cooled brine, ensuring it is completely submerged. If necessary, weigh it down with a plate or a clean, sealed bag filled with ice to keep it fully immersed in the liquid. The entire chicken must be covered by the brine for even flavor and moisture infusion.
- Refrigerate and Brine: Cover the container tightly and refrigerate for at least 4 hours, and ideally for 8-12 hours, or up to 24 hours for maximum flavor and juiciness. Do not brine for longer than 24 hours, as the chicken can become overly salty and the texture can become slightly mushy. Brining for the recommended time allows the salt to effectively denature the proteins, resulting in a tender and moist bird.
Step 3: Prepare the Chicken for Roasting
- Preheat Oven: Preheat your oven to 425°F (220°C). Preheating the oven to a high temperature initially helps to crisp the skin quickly.
- Remove Chicken from Brine: Remove the chicken from the brine and discard the brine. Do not rinse the chicken after brining. Rinsing can wash away the salt and flavor that has been absorbed during the brining process.
- Pat Chicken Dry Thoroughly: Pat the chicken very dry, inside and out, with paper towels. This step is absolutely essential for achieving crispy skin. The drier the skin, the better it will brown and crisp up in the oven.
- Optional: Stuff the Cavity: If desired, stuff the cavity of the chicken with orange slices, onion wedges, garlic cloves, and fresh herb sprigs. These aromatics will infuse the chicken with extra flavor and fragrance as it roasts.
- Rub with Oil or Butter: Rub the entire surface of the chicken with 2 tablespoons of olive oil or melted butter. Ensure you coat the skin evenly for uniform browning and crispiness.
- Season with Salt and Pepper (Lightly): Season the chicken lightly with salt and freshly ground black pepper. Remember that the brine has already seasoned the chicken from within, so you only need a light seasoning on the skin.
- Position Chicken for Roasting: Place the chicken on a roasting rack set inside a roasting pan. The roasting rack allows air to circulate around the chicken, promoting even cooking and crispier skin on all sides. If you don’t have a roasting rack, you can use a bed of roughly chopped vegetables like carrots, onions, and celery to elevate the chicken.
Step 4: Roast the Chicken
- Initial High Heat Roast: Roast the chicken in the preheated oven at 425°F (220°C) for 20 minutes. This initial high heat helps to brown the skin and render out some of the fat.
- Reduce Oven Temperature: Reduce the oven temperature to 375°F (190°C) and continue roasting for another 1 hour to 1 hour and 20 minutes, or until the chicken is cooked through. The total roasting time will depend on the size of your chicken.
- Check for Doneness: The chicken is done when a meat thermometer inserted into the thickest part of the thigh, without touching the bone, registers 165°F (74°C). The juices should also run clear when you pierce the thigh with a fork or knife. Do not rely solely on time; always use a meat thermometer to ensure the chicken is cooked to a safe internal temperature.
- Rest the Chicken: Once the chicken is cooked through, remove it from the oven and let it rest for 15-20 minutes before carving. Tent it loosely with foil during resting to keep it warm. Resting allows the juices to redistribute throughout the chicken, resulting in a more tender and flavorful bird. Do not skip this crucial step!
Step 5: Carve and Serve
- Carve the Chicken: Carve the roast orange brined chicken and serve immediately.
- Optional: Make Pan Sauce/Gravy: While the chicken rests, you can make a simple pan sauce or gravy using the pan drippings. Skim off excess fat from the pan drippings. Place the roasting pan over medium heat on the stovetop. Add 1/2 cup of chicken broth or white wine to deglaze the pan, scraping up any browned bits from the bottom. Simmer for a few minutes, then thicken with a cornstarch slurry (1 tablespoon cornstarch mixed with 2 tablespoons cold water) if desired. Season with salt and pepper to taste.
Nutrition Facts
(Note: Nutritional information is an estimate and can vary based on specific ingredients, portion sizes, and cooking methods.)
Servings: Approximately 6-8 servings
Calories Per Serving (estimated): 450-550 calories
Approximate Nutritional Breakdown per Serving:
- Protein: 50-60 grams
- Fat: 25-35 grams (varies depending on skin consumption and fat content of chicken)
- Carbohydrates: 5-10 grams (primarily from orange juice and sugar in brine, negligible in the cooked chicken meat)
Important Considerations:
- These are rough estimates. Actual calorie and macronutrient content will depend on the specific chicken size, amount of skin consumed, and any added fats during cooking.
- Brining adds sodium to the chicken. Individuals on sodium-restricted diets should be mindful of this.
- Chicken is a good source of lean protein, B vitamins (especially niacin and B6), selenium, and phosphorus.
For more precise nutritional information, use a nutrition calculator app or website and input the specific ingredients and serving sizes.
Preparation Time
The beauty of this Roast Orange Brined Chicken recipe is that while it delivers exceptional flavor, it’s quite straightforward to prepare, with most of the time being hands-off brining and roasting.
- Brine Preparation Time: 15-20 minutes (to assemble ingredients and heat the brine)
- Brining Time: Minimum 4 hours, ideally 8-12 hours, up to 24 hours (hands-off time in the refrigerator)
- Chicken Preparation for Roasting: 15-20 minutes (removing from brine, patting dry, seasoning, preparing for roasting)
- Roasting Time: 1 hour 20 minutes to 1 hour 40 minutes (depending on chicken size and oven temperature consistency)
- Resting Time: 15-20 minutes (essential for juicy chicken)
Total Time (approximate):
- Minimum (including minimum brining time): 6 hours
- Ideal (including 8-hour brining time): 9-10 hours
- Maximum (including overnight brining): 25-26 hours
Active Time (hands-on time): Approximately 45-60 minutes (mostly spread across brine preparation and chicken prep/carving)
This recipe is perfect for planning ahead. You can prepare the brine and start brining the chicken the day before you plan to roast it. On the day of cooking, the active preparation time is minimal, allowing you to focus on other aspects of your meal or simply relax while the oven does its magic.
How to Serve
Roast Orange Brined Chicken is incredibly versatile and pairs wonderfully with a wide array of side dishes, making it suitable for both casual family meals and more formal gatherings. Here are some serving suggestions to create a complete and delicious meal:
Classic Side Dish Pairings:
- Roasted Vegetables:
- Roasted Root Vegetables: Carrots, potatoes, parsnips, sweet potatoes tossed with olive oil, herbs, and a sprinkle of salt and pepper. The sweetness of root vegetables complements the citrus notes of the chicken beautifully.
- Roasted Broccoli or Brussels Sprouts: Crispy roasted broccoli or Brussels sprouts with a drizzle of balsamic glaze or lemon juice add a touch of bitterness and freshness to balance the richness of the chicken.
- Roasted Asparagus: Simple roasted asparagus with olive oil, salt, and pepper is a light and elegant side dish.
- Potatoes:
- Mashed Potatoes: Creamy mashed potatoes are a classic comfort food side that pairs perfectly with roast chicken and pan gravy.
- Roasted Garlic Potatoes: Roasted potatoes with garlic and herbs offer a flavorful and rustic side dish.
- Scalloped Potatoes: Rich and cheesy scalloped potatoes are a more indulgent option for special occasions.
- Grains and Starches:
- Rice Pilaf: Fluffy rice pilaf with herbs and vegetables provides a light and flavorful base.
- Quinoa Salad: A vibrant quinoa salad with vegetables, herbs, and a citrus vinaigrette adds a healthy and refreshing element.
- Couscous: Light and fluffy couscous, perhaps flavored with lemon zest and herbs, is a quick and easy side dish.
- Salads:
- Green Salad with Citrus Vinaigrette: A simple green salad with a bright citrus vinaigrette echoes the orange flavor of the chicken and adds freshness.
- Caesar Salad: A classic Caesar salad provides a creamy and savory contrast to the chicken.
- Citrus Salad: A salad featuring segments of oranges, grapefruit, or other citrus fruits, perhaps with avocado and red onion, would be a refreshing and complementary side.
- Bread:
- Crusty Bread: Serve with a warm, crusty loaf of bread for soaking up the delicious pan juices.
- Dinner Rolls: Soft dinner rolls are always a welcome addition to a roast chicken meal.
Sauces and Accompaniments:
- Pan Gravy: As mentioned in the instructions, a simple pan gravy made from the drippings is a classic accompaniment.
- Orange Sauce: For an extra burst of orange flavor, consider making a simple orange sauce using orange juice, zest, and a touch of honey or maple syrup.
- Cranberry Sauce (for holidays): Cranberry sauce, especially homemade, is a traditional and delicious pairing for roast chicken, particularly during holiday meals.
- Herb Butter: Serve with a pat of herb butter (made with softened butter, chopped herbs like rosemary and thyme, and a pinch of salt) to melt over the chicken.
Presentation Tips:
- Garnish: Garnish the platter of carved chicken with fresh orange slices, sprigs of rosemary and thyme, and perhaps some fresh parsley for visual appeal.
- Serve Family Style: Place the carved chicken on a large platter surrounded by side dishes for a family-style serving.
- Individual Plates: For a more formal setting, plate individual servings of chicken with a selection of side dishes.
Ultimately, the best way to serve Roast Orange Brined Chicken is with sides that you and your family enjoy most. The versatility of this chicken recipe allows it to be the star of a wide variety of delicious and satisfying meals.
Additional Tips for Roast Orange Brined Chicken Perfection
To ensure your Roast Orange Brined Chicken is a resounding success every time, consider these helpful tips and tricks:
- Tip 1: Don’t Skip the Brining! Brining is the key to the incredible juiciness and flavor of this recipe. It’s not just about adding salt; the brine alters the chicken’s muscle proteins, allowing them to retain more moisture during cooking. The orange, herbs, and spices in the brine penetrate the chicken, infusing it with flavor from the inside out. While it requires planning ahead, the difference brining makes is truly transformative, resulting in chicken that is consistently moist and flavorful, even if slightly overcooked.
- Tip 2: Pat the Chicken Extremely Dry Before Roasting. This cannot be emphasized enough! Moisture is the enemy of crispy skin. After brining, pat the chicken dry inside and out with paper towels until it is completely dry. The drier the skin, the better it will brown and crisp up in the oven. You can even leave the patted-dry chicken uncovered in the refrigerator for an hour or two before roasting to further dry out the skin (this is optional but helpful for extra crispy skin).
- Tip 3: Use a Meat Thermometer – It’s Your Best Friend. Guesswork has no place in perfectly cooked chicken. A meat thermometer is essential for ensuring your chicken is cooked to a safe internal temperature of 165°F (74°C) and is not overcooked and dry. Insert the thermometer into the thickest part of the thigh, avoiding the bone, to get an accurate reading. Don’t rely solely on cooking time; oven temperatures can vary, and chicken sizes can differ. A meat thermometer guarantees perfectly cooked, juicy chicken every time.
- Tip 4: Rest the Chicken After Roasting – Patience Pays Off. Resist the urge to carve the chicken immediately after it comes out of the oven! Resting is crucial for allowing the juices to redistribute throughout the meat. During roasting, the juices are pushed towards the center of the chicken. Resting for 15-20 minutes allows these juices to redistribute evenly throughout the bird, resulting in more tender and flavorful meat. Tent the chicken loosely with foil while it rests to keep it warm.
- Tip 5: Get Creative with the Brine – Explore Flavor Variations. While this orange brine is delicious as is, don’t be afraid to experiment and customize it to your taste. You can try:
- Different Citrus: Substitute some or all of the oranges with lemons, grapefruits, or limes for a different citrus profile.
- Spice Variations: Add other spices to the brine, such as star anise, cloves, cinnamon sticks, coriander seeds, or fennel seeds for a warmer, more exotic flavor.
- Herbs and Aromatics: Experiment with different herbs like sage, oregano, or marjoram, or add other aromatics like ginger, shallots, or chili flakes to the brine.
- Sweetness Level: Adjust the amount of sugar in the brine to your preference, or use honey or maple syrup instead of granulated sugar.
By following these tips, you’ll be well on your way to consistently creating incredibly delicious and impressive Roast Orange Brined Chicken that will delight your family and guests.
FAQ – Frequently Asked Questions
Let’s address some common questions you might have about making Roast Orange Brined Chicken:
Q1: Can I brine the chicken for longer than 24 hours?
A: While brining for 24 hours is generally considered the maximum recommended time, brining for slightly longer, up to 30 hours, might be acceptable, but it’s generally not advisable and can lead to undesirable results. Extended brining can make the chicken’s texture mushy and overly salty. The salt in the brine continues to penetrate the chicken over time. After 24 hours, the benefits of brining diminish, and the risks of altering the texture and making it too salty increase. Stick to the recommended brining time of 4-24 hours for optimal results.
Q2: Can I use frozen chicken for this recipe?
A: Yes, you can use frozen chicken, but it must be completely thawed before brining. Brining frozen chicken is not effective because the brine cannot penetrate the frozen meat properly. Thaw the chicken thoroughly in the refrigerator for 24-48 hours, depending on its size, before starting the brining process. Ensure the chicken is fully thawed all the way to the bone before brining to ensure even flavor penetration and food safety. Never thaw chicken at room temperature, as this can promote bacterial growth.
Q3: How do I know when the chicken is done roasting without a meat thermometer?
A: While a meat thermometer is the most accurate way to determine doneness, you can use visual cues as a secondary method if you don’t have one. Pierce the thickest part of the thigh with a fork or knife. If the juices run clear, not pink or reddish, the chicken is likely cooked through. Additionally, the leg joint should move easily, and the drumstick should wiggle freely in its socket. However, visual cues are less reliable than a meat thermometer, and it’s always best to err on the side of caution and ensure the internal temperature reaches 165°F (74°C) for food safety. Investing in an inexpensive meat thermometer is highly recommended for consistently perfect roast chicken.
Q4: Can I brine and roast the chicken ahead of time and reheat it later?
A: While freshly roasted chicken is always best, you can prepare components ahead of time to streamline the cooking process. You can brine the chicken up to 24 hours in advance. However, it’s not recommended to roast the chicken completely ahead of time and then reheat it. Reheating roast chicken can dry it out significantly and diminish the quality of the crispy skin. If you need to prepare ahead, you can roast the chicken partially, stopping about 20-30 minutes before it’s fully cooked. Then, cool it quickly and refrigerate. Reheat it in a preheated oven at 350°F (175°C) until heated through and the internal temperature reaches 165°F (74°C), finishing the roasting process and crisping the skin. Even with this method, freshly roasted chicken is always superior in terms of juiciness and texture.
Q5: What if I don’t have oranges? Can I substitute another citrus fruit in the brine?
A: Yes, you can substitute other citrus fruits if you don’t have oranges, although the flavor profile will be slightly different. Lemons and grapefruits are good substitutes and will impart a similar citrusy tang. Use the same amount of lemon or grapefruit zest and juice as you would orange in the recipe. Lemon will provide a brighter, more tart flavor, while grapefruit will offer a slightly more bitter and complex citrus note. While orange is the star of this particular recipe, experimenting with other citrus fruits can create delicious variations and allow you to adapt based on what you have available.
Print
Roast Orange Brined Chicken Recipe
Ingredients
For the Orange Brine:
- 1 Gallon Water: The foundation of our brine, water acts as the solvent, allowing the salt, sugar, and flavorings to penetrate the chicken. Use cold water to ensure the brine cools down quickly and maintains a safe temperature for the chicken.
- 1 Cup Kosher Salt: Salt is the star of the brine, responsible for denaturing the chicken’s proteins, allowing it to retain moisture during cooking. Kosher salt is preferred for brining due to its larger crystals and pure salt flavor, free of additives like iodine that can sometimes impart a metallic taste. Avoid using table salt, as its finer granules can lead to an overly salty brine if measured cup for cup.
- 1/2 Cup Granulated Sugar: Sugar balances the saltiness of the brine and adds a subtle sweetness that complements the orange and herbs. Granulated sugar dissolves easily in water, making it ideal for brines. You can also use brown sugar for a slightly richer, molasses-like note, if preferred.
- 2 Large Oranges: The heart of our flavor profile! We need both the zest and the juice of fresh oranges.
- Zest of 2 Oranges: The zest, the brightly colored outer layer of the orange peel, is packed with intensely fragrant oils. Use a microplane or fine grater to zest the oranges, being careful to avoid the bitter white pith underneath. Orange zest provides a concentrated burst of citrus aroma and flavor to the brine.
- Juice of 2 Oranges: Freshly squeezed orange juice adds a tangy sweetness and acidity to the brine, further tenderizing the chicken and enhancing its flavor. Avoid using bottled orange juice, which can sometimes contain added sugars and lack the vibrant freshness of freshly squeezed juice.
- 4 Sprigs Fresh Rosemary: Rosemary, with its piney, woodsy aroma, is a classic pairing with citrus and chicken. Fresh rosemary sprigs infuse the brine with their aromatic oils, imparting a savory, herbaceous depth to the chicken. If fresh rosemary isn’t available, you can substitute 1 tablespoon of dried rosemary, but fresh is always preferred for its brighter flavor.
- 4 Sprigs Fresh Thyme: Thyme, with its earthy, slightly lemony flavor, complements the rosemary and orange beautifully, adding another layer of herbaceous complexity to the brine. Fresh thyme sprigs contribute a delicate, fragrant aroma. Similar to rosemary, you can substitute 1 tablespoon of dried thyme if fresh isn’t available, but fresh is recommended.
- 1 Tablespoon Black Peppercorns: Whole black peppercorns add a subtle warmth and peppery bite to the brine, enhancing the overall flavor profile. The peppercorns release their aromatic oils as they steep in the brine. You can use coarsely cracked black pepper if whole peppercorns are not readily available.
- 4 Bay Leaves: Bay leaves, with their subtle, tea-like aroma, add a depth of savory flavor to the brine. They contribute a subtle complexity that rounds out the citrus and herbs. Dried bay leaves are typically used in brines and stews for their long-lasting flavor infusion.
- 6 Cloves Garlic, smashed: Garlic, with its pungent, aromatic flavor, adds a savory base note to the brine. Smashed garlic cloves release their flavor more readily than whole cloves. Smashing the garlic helps to break down the cell walls, allowing the aromatic compounds to infuse into the brine.
For the Roast Chicken:
- 1 Whole Chicken (4–5 pounds): Choose a high-quality whole chicken, preferably air-chilled for crispier skin. A 4-5 pound chicken is ideal for roasting and will provide ample servings for a family meal. Ensure the chicken is fully thawed if frozen before brining.
- 2 Tablespoons Olive Oil or Melted Butter: Olive oil or melted butter is used to rub the chicken before roasting, promoting crispy skin and adding richness. Olive oil imparts a subtle fruity flavor, while melted butter adds a richer, more decadent flavor and helps with browning.
- Salt and Freshly Ground Black Pepper: While the brine seasons the chicken from within, a light seasoning of salt and pepper on the skin before roasting enhances the flavor and helps create a flavorful crust. Use kosher salt and freshly ground black pepper for the best flavor.
- Optional Aromatics for the Cavity (Orange slices, Onion wedges, Garlic cloves, Herb sprigs): Stuffing the chicken cavity with aromatics is optional but highly recommended. It further enhances the flavor of the chicken from the inside out and adds aromatic steam during roasting. Orange slices, onion wedges, garlic cloves, and herb sprigs like rosemary and thyme are excellent choices.
Instructions
Step 1: Prepare the Orange Brine
- Combine Brine Ingredients: In a large stockpot or container (make sure it’s food-safe and large enough to hold the chicken and brine), combine the 1 gallon of cold water, 1 cup of kosher salt, 1/2 cup of granulated sugar, zest of 2 oranges, juice of 2 oranges, 4 sprigs of fresh rosemary, 4 sprigs of fresh thyme, 1 tablespoon of black peppercorns, 4 bay leaves, and 6 smashed garlic cloves.
- Heat to Dissolve: Place the pot over medium-high heat and stir continuously until the salt and sugar are completely dissolved. You don’t need to boil the brine, just heat it enough to ensure the salt and sugar are fully incorporated. This usually takes just a few minutes.
- Cool Completely: Remove the brine from the heat and allow it to cool completely to room temperature. This is crucial for food safety. Adding the chicken to a warm brine can raise its temperature into the danger zone for bacterial growth. You can speed up the cooling process by placing the pot in an ice bath or refrigerating it after it has cooled down slightly at room temperature. The brine must be cold before adding the chicken.
Step 2: Brine the Chicken
- Prepare the Chicken: Rinse the whole chicken inside and out with cold water. Pat it thoroughly dry with paper towels. Removing excess moisture will help the brine penetrate effectively and result in crispier skin during roasting.
- Submerge Chicken in Brine: Place the chicken in the cooled brine, ensuring it is completely submerged. If necessary, weigh it down with a plate or a clean, sealed bag filled with ice to keep it fully immersed in the liquid. The entire chicken must be covered by the brine for even flavor and moisture infusion.
- Refrigerate and Brine: Cover the container tightly and refrigerate for at least 4 hours, and ideally for 8-12 hours, or up to 24 hours for maximum flavor and juiciness. Do not brine for longer than 24 hours, as the chicken can become overly salty and the texture can become slightly mushy. Brining for the recommended time allows the salt to effectively denature the proteins, resulting in a tender and moist bird.
Step 3: Prepare the Chicken for Roasting
- Preheat Oven: Preheat your oven to 425°F (220°C). Preheating the oven to a high temperature initially helps to crisp the skin quickly.
- Remove Chicken from Brine: Remove the chicken from the brine and discard the brine. Do not rinse the chicken after brining. Rinsing can wash away the salt and flavor that has been absorbed during the brining process.
- Pat Chicken Dry Thoroughly: Pat the chicken very dry, inside and out, with paper towels. This step is absolutely essential for achieving crispy skin. The drier the skin, the better it will brown and crisp up in the oven.
- Optional: Stuff the Cavity: If desired, stuff the cavity of the chicken with orange slices, onion wedges, garlic cloves, and fresh herb sprigs. These aromatics will infuse the chicken with extra flavor and fragrance as it roasts.
- Rub with Oil or Butter: Rub the entire surface of the chicken with 2 tablespoons of olive oil or melted butter. Ensure you coat the skin evenly for uniform browning and crispiness.
- Season with Salt and Pepper (Lightly): Season the chicken lightly with salt and freshly ground black pepper. Remember that the brine has already seasoned the chicken from within, so you only need a light seasoning on the skin.
- Position Chicken for Roasting: Place the chicken on a roasting rack set inside a roasting pan. The roasting rack allows air to circulate around the chicken, promoting even cooking and crispier skin on all sides. If you don’t have a roasting rack, you can use a bed of roughly chopped vegetables like carrots, onions, and celery to elevate the chicken.
Step 4: Roast the Chicken
- Initial High Heat Roast: Roast the chicken in the preheated oven at 425°F (220°C) for 20 minutes. This initial high heat helps to brown the skin and render out some of the fat.
- Reduce Oven Temperature: Reduce the oven temperature to 375°F (190°C) and continue roasting for another 1 hour to 1 hour and 20 minutes, or until the chicken is cooked through. The total roasting time will depend on the size of your chicken.
- Check for Doneness: The chicken is done when a meat thermometer inserted into the thickest part of the thigh, without touching the bone, registers 165°F (74°C). The juices should also run clear when you pierce the thigh with a fork or knife. Do not rely solely on time; always use a meat thermometer to ensure the chicken is cooked to a safe internal temperature.
- Rest the Chicken: Once the chicken is cooked through, remove it from the oven and let it rest for 15-20 minutes before carving. Tent it loosely with foil during resting to keep it warm. Resting allows the juices to redistribute throughout the chicken, resulting in a more tender and flavorful bird. Do not skip this crucial step!
Step 5: Carve and Serve
- Carve the Chicken: Carve the roast orange brined chicken and serve immediately.
- Optional: Make Pan Sauce/Gravy: While the chicken rests, you can make a simple pan sauce or gravy using the pan drippings. Skim off excess fat from the pan drippings. Place the roasting pan over medium heat on the stovetop. Add 1/2 cup of chicken broth or white wine to deglaze the pan, scraping up any browned bits from the bottom. Simmer for a few minutes, then thicken with a cornstarch slurry (1 tablespoon cornstarch mixed with 2 tablespoons cold water) if desired. Season with salt and pepper to taste.
Nutrition
- Serving Size: One Normal Portion
- Calories: 450-550
- Fat: 25-35 grams
- Carbohydrates: 5-10 grams
- Protein: 50-60 grams