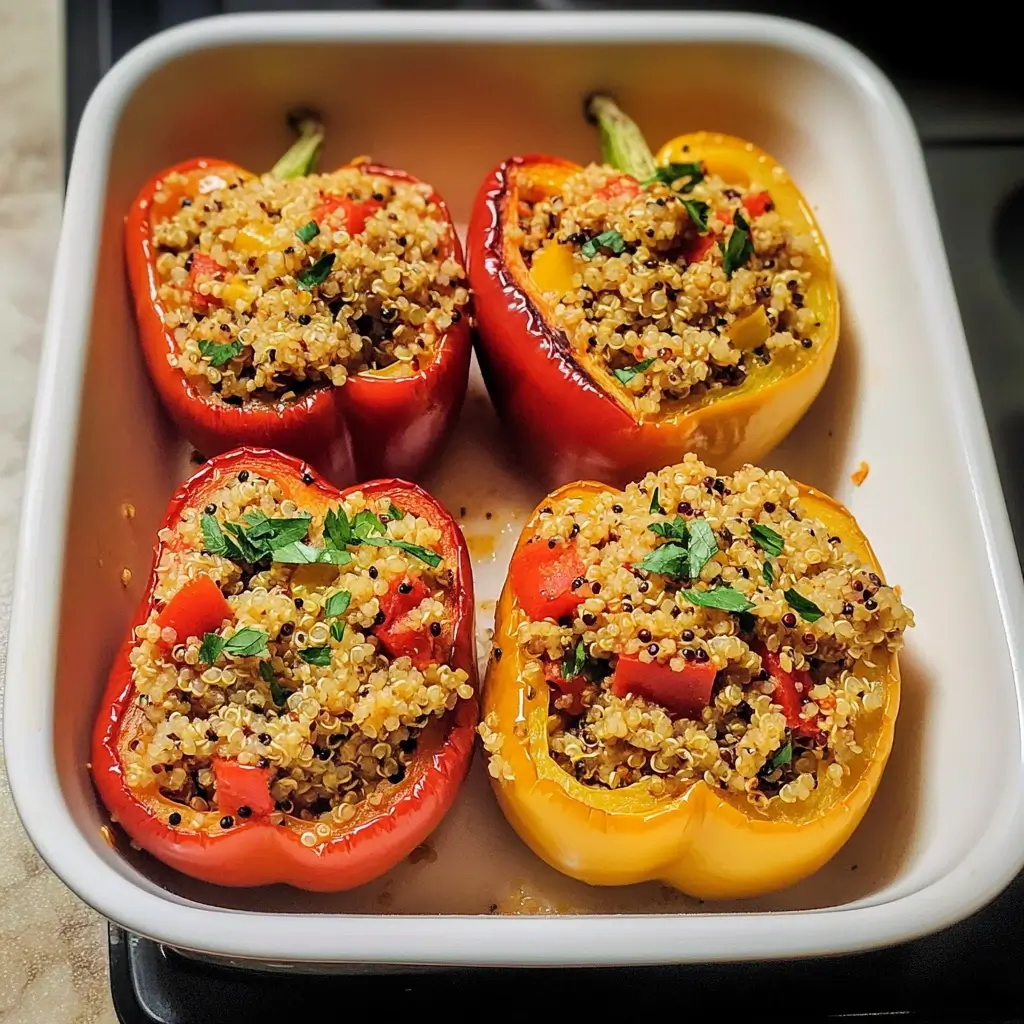
It was one of those weekday evenings where inspiration felt miles away, yet the craving for something wholesome, flavorful, and satisfying was palpable. My family, a delightful mix of adventurous eaters and a couple of (lovable) picky ones, needed a meal that could bridge that gap. I remembered a bag of vibrant bell peppers in the fridge and a pantry staple, quinoa. The idea sparked: Quinoa-Stuffed Bell Peppers! I’d made them before, but this time, I was determined to perfect the filling, to create a symphony of textures and tastes that would win everyone over. The aroma that filled the kitchen as they baked – a warm, savory blend of spices, sweet peppers, and nutty quinoa – was the first sign of success. When I pulled them from the oven, glistening and vibrant, and set them on the table, the initial “oohs” and “aahs” were promising. The true test, however, was the silence that followed the first few bites, punctuated only by appreciative murmurs. Even my usually reserved youngest went back for seconds on the “rainbow boats,” as they affectionately named them. This recipe hasn’t just become a family favorite; it’s a testament to how simple, healthy ingredients can transform into an extraordinary meal that nourishes both body and soul. It’s colorful, endlessly customizable, and surprisingly easy to whip up, making it a star player in our weekly meal rotation.
A Symphony of Flavors: The Ultimate Quinoa-Stuffed Bell Peppers Recipe
Quinoa-Stuffed Bell Peppers are more than just a meal; they’re a vibrant celebration of fresh ingredients, wholesome grains, and aromatic spices, all beautifully encased in tender, sweet bell peppers. This dish is a powerhouse of nutrition, offering plant-based protein, fiber, and a host of vitamins and minerals. It’s naturally vegetarian (and easily made vegan), gluten-free, and incredibly versatile. Whether you’re looking for a hearty weeknight dinner, an impressive dish for guests, or a healthy option for meal prepping, these stuffed peppers deliver on all fronts. The beauty of this recipe lies in its adaptability – feel free to tweak the spices, add different vegetables, or incorporate your favorite plant-based protein boosters. Get ready to create a dish that’s as delightful to look at as it is to eat!
Ingredients You’ll Need for Perfection
Crafting these delightful Quinoa-Stuffed Bell Peppers requires a medley of fresh and pantry-staple ingredients. Each component plays a crucial role in building layers of flavor and texture. Here’s what you’ll need:
- Bell Peppers: 4 large, vibrant bell peppers (a mix of colors like red, yellow, and orange not only looks stunning but offers slightly different sweetness levels. Red peppers are generally the sweetest, while green are more piquant.)
- Quinoa: 1 cup uncooked quinoa (white, red, black, or tri-color all work wonderfully. Rinse it thoroughly under cold water before cooking to remove any bitter saponins.)
- Vegetable Broth or Water: 2 cups (for cooking the quinoa; broth adds more flavor than water.)
- Olive Oil: 2 tablespoons, extra virgin (for sautéing the aromatics and a little for drizzling.)
- Yellow Onion: 1 medium, finely chopped (provides a foundational savory sweetness.)
- Garlic: 3-4 cloves, minced (fresh garlic is key for that aromatic punch.)
- Black Beans: 1 can (15 ounces), rinsed and drained (adds plant-based protein and a hearty texture.)
- Corn: 1 cup, frozen or canned (drained if canned) (provides pops of sweetness and texture. Fire-roasted corn is a great option for added smoky flavor.)
- Diced Tomatoes: 1 can (14.5 ounces), undrained (petite diced work well for better distribution. Fire-roasted diced tomatoes can also enhance the flavor profile.)
- Chili Powder: 1 tablespoon (adjust to your spice preference. Ancho chili powder offers a mild, smoky heat.)
- Ground Cumin: 1 ½ teaspoons (lends a warm, earthy, and slightly citrusy note.)
- Smoked Paprika: 1 teaspoon (adds a lovely smoky depth; sweet paprika can be used as an alternative.)
- Dried Oregano: 1 teaspoon (or 1 tablespoon fresh, chopped.)
- Salt: ¾ teaspoon, or to taste (sea salt or kosher salt recommended.)
- Black Pepper: ½ teaspoon freshly ground, or to taste.
- Fresh Cilantro or Parsley: ¼ cup, chopped (for mixing into the filling and for garnish. Choose based on your preference.)
- Optional Cheese Topping: ½ – ¾ cup shredded cheese (Cheddar, Monterey Jack, Pepper Jack, or a vegan mozzarella/cheddar alternative work well.)
- Optional Toppings for Serving: Sour cream or plain Greek yogurt (or vegan alternatives), salsa, sliced avocado, lime wedges.
A note on ingredient quality: Using fresh, high-quality vegetables and spices will significantly impact the final flavor of your dish. Organic options are great if available. The vibrancy of the peppers themselves contributes not just to aesthetics but also to the overall taste experience.
Step-by-Step Guide: Crafting Your Quinoa-Stuffed Bell Peppers
Follow these detailed instructions to create perfectly cooked, flavor-packed Quinoa-Stuffed Bell Peppers every time. The process is straightforward, involving preparing the peppers, cooking the quinoa, creating the savory filling, stuffing, and finally baking to perfection.
1. Prepare the Bell Peppers:
* Preheat your oven to 375°F (190°C). Lightly grease a 9×13 inch baking dish or line it with parchment paper.
* Wash the bell peppers thoroughly. Slice them in half lengthwise, from stem to bottom.
* Carefully remove the seeds and white membranes from each pepper half. You want a clean cavity for the filling. If the pepper halves don’t sit flat, you can shave a tiny sliver off the rounded bottom to create a stable base, being careful not to cut through.
* Optional Par-Baking: For softer peppers, you can par-bake them. Place the pepper halves cut-side down in the prepared baking dish, add about ¼ inch of water to the bottom of the dish, and bake for 15-20 minutes. This pre-softens them and reduces overall baking time later. Remove from oven, discard water, and set aside. If you prefer firmer peppers, you can skip this step.
2. Cook the Quinoa:
* Rinse the 1 cup of uncooked quinoa thoroughly in a fine-mesh sieve under cold running water. This step is crucial to remove saponins, a natural coating that can make quinoa taste bitter.
* In a medium saucepan, combine the rinsed quinoa and 2 cups of vegetable broth (or water). Bring to a boil over medium-high heat.
* Once boiling, reduce the heat to low, cover the saucepan, and let it simmer for about 15 minutes, or until all the liquid has been absorbed and the quinoa is fluffy. You’ll see tiny spirals (the germ) separating from the seeds.
* Remove from heat and let it stand, covered, for 5 minutes. Then, fluff the quinoa with a fork. Set aside. You should have about 3 cups of cooked quinoa.
3. Prepare the Aromatic Base for the Filling:
* While the quinoa is cooking (or after), heat 2 tablespoons of olive oil in a large skillet or Dutch oven over medium heat.
* Add the finely chopped yellow onion and sauté for 5-7 minutes, until softened and translucent, stirring occasionally.
* Add the minced garlic and cook for another 1-2 minutes until fragrant. Be careful not to burn the garlic, as it can become bitter.
4. Build the Flavorful Filling:
* To the skillet with the onions and garlic, add the rinsed and drained black beans and the corn (if frozen, no need to thaw). Stir to combine.
* Stir in the can of undrained diced tomatoes. The liquid from the tomatoes helps create a saucy consistency for the filling.
* Add the spices: chili powder, ground cumin, smoked paprika, dried oregano, salt, and black pepper. Stir well to ensure everything is evenly coated and the spices become fragrant, cooking for about 2-3 minutes.
* Taste the filling at this point and adjust seasonings if necessary. You might want more salt, a bit more chili powder for heat, or a pinch of sugar if your tomatoes are particularly acidic.
5. Combine Quinoa and Filling:
* Add the cooked, fluffed quinoa to the skillet with the vegetable and spice mixture.
* Stir gently but thoroughly to combine everything. Ensure the quinoa is well-integrated with the other ingredients, creating a cohesive and flavorful stuffing.
* Stir in about half of the chopped fresh cilantro or parsley, reserving the rest for garnish.
6. Stuff the Bell Peppers:
* Carefully spoon the quinoa filling mixture generously into each bell pepper half. Pack it in gently but don’t compress it too much. You want the filling to be substantial.
* Arrange the stuffed pepper halves, cut-side up, in the prepared baking dish. They should fit snugly but not be overcrowded. If they wobble, you can use scrunched-up foil to prop them up.
7. Bake the Stuffed Peppers:
* If you didn’t par-bake the peppers, you might want to add about ¼ cup of water or vegetable broth to the bottom of the baking dish. This creates steam and helps the peppers cook through without drying out.
* Cover the baking dish loosely with aluminum foil. This prevents the tops of the filling from drying out or burning before the peppers are tender.
* Bake in the preheated 375°F (190°C) oven for 25-30 minutes if you par-baked the peppers, or 40-50 minutes if you started with raw peppers. The peppers should be tender when pierced with a fork, and the filling should be heated through.
8. Add Cheese (Optional) and Final Bake:
* If using cheese, remove the foil from the baking dish. Sprinkle the shredded cheese evenly over the top of each stuffed pepper.
* Return the dish to the oven, uncovered, and bake for another 5-10 minutes, or until the cheese is melted, bubbly, and slightly golden.
* If you prefer a crispier top without cheese, you can skip the cheese and broil for the last 1-2 minutes, watching carefully to prevent burning.
9. Rest and Garnish:
* Once baked to perfection, carefully remove the baking dish from the oven. Let the stuffed peppers rest for 5-10 minutes before serving. This allows the flavors to meld further and makes them easier to handle.
* Garnish generously with the remaining fresh cilantro or parsley.
These steps, while detailed, ensure a perfectly executed dish. The aromas filling your kitchen during the baking process will be a delightful preview of the delicious meal to come!
Nutritional Snapshot: What’s Inside?
Understanding the nutritional value of your meals is empowering. These Quinoa-Stuffed Bell Peppers are not only delicious but also packed with goodness.
- Servings: This recipe makes 8 stuffed pepper halves, which typically serves 4 people (2 halves per person).
- Calories per serving (approximate): Around 380-450 calories per serving (2 pepper halves), without optional cheese. Adding about 2 tablespoons of shredded cheese per serving (¼ cup per 2 halves) can add approximately 80-110 calories.
General Nutritional Highlights:
- High in Fiber: Thanks to the quinoa, black beans, and vegetables, this dish is an excellent source of dietary fiber, promoting digestive health and satiety.
- Good Source of Plant-Based Protein: Quinoa is a complete protein, and combined with black beans, it provides a substantial amount of plant-based protein.
- Rich in Vitamins and Minerals: Bell peppers are packed with Vitamin C and A. The filling contributes iron, potassium, folate, and various B vitamins.
- Healthy Fats: Olive oil provides monounsaturated fats, beneficial for heart health.
- Naturally Gluten-Free: Perfect for those with gluten sensitivities or celiac disease.
- Vegetarian/Vegan-Friendly: Easily adaptable for a fully vegan meal by omitting cheese or using a dairy-free alternative.
Disclaimer: The nutritional information provided is an estimate and can vary based on specific ingredients used, portion sizes, and any modifications made to the recipe. For precise nutritional data, using a dedicated nutritional calculator with your exact ingredients is recommended.
Time Commitment: From Prep to Plate
Knowing the time investment helps in planning your meal preparation. Here’s a breakdown:
- Preparation Time: Approximately 30-40 minutes. This includes:
- Chopping vegetables (onion, garlic).
- Rinsing quinoa.
- Preparing bell peppers (slicing, deseeding).
- Sautéing aromatics and building the filling.
- Stuffing the peppers.
- (If par-baking peppers, add 15-20 minutes to this, but it can be done concurrently with other prep).
- Cooking Time (Baking):
- If par-baking peppers first: 15-20 minutes.
- Main baking time for stuffed peppers: 30-40 minutes (if peppers were par-baked) OR 40-50 minutes (if peppers were raw), plus an additional 5-10 minutes if adding cheese.
- Let’s estimate an average baking time of 40-50 minutes total for the stuffed peppers themselves.
- Total Time: Approximately 1 hour 15 minutes to 1 hour 30 minutes. This can vary slightly based on your speed in the kitchen and whether you choose to par-bake the peppers.
While it might seem like a bit of a time commitment, much of it is passive baking time, allowing you to focus on other things or simply relax. The delicious and wholesome result is well worth the effort!
Serving Suggestions: Elevate Your Meal
These Quinoa-Stuffed Bell Peppers are wonderfully satisfying on their own, but pairing them with the right accompaniments can elevate the entire dining experience. Here are some delightful ways to serve them:
- With a Simple Green Salad:
- A crisp side salad dressed with a light vinaigrette (lemon-tahini, balsamic, or a simple olive oil and lime juice dressing) provides a refreshing contrast to the warm, savory peppers. Think mixed greens, cherry tomatoes, and cucumber.
- Drizzled with a Creamy Sauce:
- A dollop of plain Greek yogurt or sour cream (or dairy-free alternatives like cashew cream or vegan sour cream) adds a cool, tangy counterpoint.
- A cilantro-lime crema or an avocado crema would be exceptionally delicious.
- Accompanied by Grains or Bread (if desired for extra heartiness):
- While already containing quinoa, a small side of crusty bread for soaking up any delicious juices or a light couscous salad could complement the meal if you’re feeding a very hungry crowd.
- Topped with Freshness:
- Sliced or Diced Avocado: Adds creamy texture and healthy fats.
- Extra Fresh Cilantro or Parsley: Enhances the fresh, herby notes.
- A Squeeze of Lime Juice: Brightens all the flavors beautifully. Offer lime wedges on the side.
- Crumbled Cotija Cheese or Feta (if not strictly vegan): Adds a salty, tangy kick.
- With a Side of Salsa:
- Your favorite store-bought or homemade salsa (pico de gallo, corn salsa, or a smoky chipotle salsa) can add another layer of flavor and zest.
- As Part of a Larger Spread:
- For gatherings, these peppers can be a stunning centerpiece alongside other dishes like a light soup, grilled corn on the cob, or a black bean and corn salad.
- Garnished Creatively:
- A sprinkle of toasted pumpkin seeds (pepitas) or sunflower seeds for added crunch.
- A few thin slices of jalapeño for those who like extra heat.
When plating, consider arranging the colorful pepper halves on a large platter for a visually appealing presentation, especially if serving guests. The goal is to complement the rich flavors of the stuffed peppers without overpowering them.
Pro Tips for Stuffed Pepper Supremacy
Take your Quinoa-Stuffed Bell Peppers from great to absolutely exceptional with these five professional tips:
- Par-Bake Your Peppers for Tenderness: While optional, briefly baking the pepper halves (cut-side down with a little water in the pan) for 15-20 minutes before stuffing makes a significant difference. It ensures the peppers are perfectly tender and cooked through at the same time the filling is hot and bubbly, preventing undercooked, crunchy peppers or an overcooked filling.
- Toast Your Quinoa for Nutty Depth: Before cooking the quinoa in broth or water, try toasting it. Heat a dry saucepan over medium heat, add the rinsed and drained quinoa, and stir constantly for 2-4 minutes until it becomes aromatic and slightly golden. This simple step intensifies its natural nutty flavor, adding another layer of complexity to your filling.
- Don’t Skimp on Seasoning the Filling: The quinoa filling is the heart of this dish. Taste and adjust the seasoning before stuffing the peppers. Quinoa can absorb a lot of flavor, so be generous with your spices, salt, and pepper. Consider adding a pinch of red pepper flakes for a little heat or a dash of hot sauce to the filling mixture if you like things spicy.
- Achieve the Perfect Stuffing Consistency: Aim for a filling that is moist but not watery. The undrained diced tomatoes help with this, but if your mixture seems too dry, add a tablespoon or two of vegetable broth or tomato sauce. If it seems too wet, let it simmer for a few extra minutes to reduce. This ensures the peppers aren’t soggy and the filling holds together well.
- Make-Ahead Magic for Easy Weeknights: These stuffed peppers are fantastic for meal prep.
- Option 1 (Partial Prep): Prepare the quinoa filling entirely and store it in an airtight container in the refrigerator for up to 3 days. Prepare the pepper halves and store them separately. When ready to eat, simply stuff and bake.
- Option 2 (Full Prep): Assemble the stuffed peppers completely (without baking), cover, and refrigerate for up to 24 hours. You may need to add 10-15 minutes to the baking time if baking straight from the fridge.
- Freezing: Cooked stuffed peppers can be frozen. Let them cool completely, then wrap individually in plastic wrap and then foil, or place in a freezer-safe container for up to 3 months. Thaw overnight in the refrigerator and reheat in the oven until warmed through.
By implementing these tips, you’ll ensure your Quinoa-Stuffed Bell Peppers are consistently delicious, perfectly textured, and bursting with flavor every single time.
Frequently Asked Questions (FAQ) About Quinoa-Stuffed Bell Peppers
Here are answers to some common questions you might have about making these delightful Quinoa-Stuffed Bell Peppers:
- Q: Can I make these Quinoa-Stuffed Bell Peppers vegan?
- A: Absolutely! This recipe is very easily made vegan. The primary modification is to omit the optional cheese topping or replace it with your favorite shredded vegan cheese (many good mozzarella or cheddar-style alternatives are available). Ensure your vegetable broth is also certified vegan. The rest of the ingredients are naturally plant-based.
- Q: Can I use a different grain instead of quinoa?
- A: Yes, you can. While quinoa offers a complete protein and a lovely texture, other grains work well too. Good alternatives include:
- Brown Rice or White Rice: Classic choices for stuffed peppers. Adjust cooking time for the rice accordingly.
- Couscous (especially pearl/Israeli couscous): Cooks quickly and has a pleasant texture.
- Farro or Barley: Offer a chewier, heartier texture. Note that these are not gluten-free.
- Millet: A gluten-free option with a slightly corn-like flavor.
Remember to cook the alternative grain according to its package directions before incorporating it into the filling.
- A: Yes, you can. While quinoa offers a complete protein and a lovely texture, other grains work well too. Good alternatives include:
- Q: How do I store and reheat leftover stuffed peppers?
- A: Leftover Quinoa-Stuffed Bell Peppers store wonderfully. Allow them to cool completely, then place them in an airtight container in the refrigerator. They will keep well for 3-4 days.
- To reheat: The best way is in the oven. Preheat your oven to 350°F (175°C). Place the peppers in an oven-safe dish (you can add a tablespoon of water to the bottom of the dish to prevent drying), cover loosely with foil, and bake for 15-25 minutes, or until heated through. You can also microwave them, but the texture of the pepper might become softer.
- Q: Can I freeze Quinoa-Stuffed Bell Peppers?
- A: Yes, they freeze quite well!
- Freezing Cooked Peppers: Let them cool completely. Wrap each stuffed pepper half individually in plastic wrap, then in aluminum foil, or place them in a freezer-safe airtight container or bag. They can be frozen for up to 3 months. To reheat, thaw overnight in the refrigerator, then bake as directed above (you might need a slightly longer baking time).
- Freezing Uncooked Peppers: You can also assemble the peppers and freeze them before baking. This is great for meal prep. Freeze them on a baking sheet until solid, then transfer to a freezer bag or container. Bake from frozen, adding about 20-30 minutes to the original baking time, ensuring they are cooked through.
- A: Yes, they freeze quite well!
- Q: What kind of bell peppers are best for stuffing? Any color difference?
- A: You can use any color of bell pepper! The choice often comes down to personal preference and visual appeal:
- Red Bell Peppers: Are the sweetest as they are the most mature. They have a lovely flavor and high vitamin C content.
- Yellow and Orange Bell Peppers: Also sweet, though slightly less so than red peppers. They add beautiful color.
- Green Bell Peppers: Are unripe peppers and have a more grassy, slightly bitter flavor. Some people prefer this contrast with the savory filling.
- A mix of colors makes for the most visually stunning presentation. Look for peppers that are large, firm, and relatively uniform in shape so they sit well in the baking dish and hold a good amount of filling.
- A: You can use any color of bell pepper! The choice often comes down to personal preference and visual appeal:
These FAQs should help address any lingering queries, setting you up for success in making this versatile and delicious dish!
Print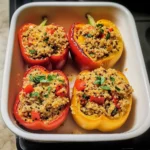
Quinoa-Stuffed Bell Peppers Recipe
Ingredients
- Bell Peppers: 4 large, vibrant bell peppers (a mix of colors like red, yellow, and orange not only looks stunning but offers slightly different sweetness levels. Red peppers are generally the sweetest, while green are more piquant.)
- Quinoa: 1 cup uncooked quinoa (white, red, black, or tri-color all work wonderfully. Rinse it thoroughly under cold water before cooking to remove any bitter saponins.)
- Vegetable Broth or Water: 2 cups (for cooking the quinoa; broth adds more flavor than water.)
- Olive Oil: 2 tablespoons, extra virgin (for sautéing the aromatics and a little for drizzling.)
- Yellow Onion: 1 medium, finely chopped (provides a foundational savory sweetness.)
- Garlic: 3-4 cloves, minced (fresh garlic is key for that aromatic punch.)
- Black Beans: 1 can (15 ounces), rinsed and drained (adds plant-based protein and a hearty texture.)
- Corn: 1 cup, frozen or canned (drained if canned) (provides pops of sweetness and texture. Fire-roasted corn is a great option for added smoky flavor.)
- Diced Tomatoes: 1 can (14.5 ounces), undrained (petite diced work well for better distribution. Fire-roasted diced tomatoes can also enhance the flavor profile.)
- Chili Powder: 1 tablespoon (adjust to your spice preference. Ancho chili powder offers a mild, smoky heat.)
- Ground Cumin: 1 ½ teaspoons (lends a warm, earthy, and slightly citrusy note.)
- Smoked Paprika: 1 teaspoon (adds a lovely smoky depth; sweet paprika can be used as an alternative.)
- Dried Oregano: 1 teaspoon (or 1 tablespoon fresh, chopped.)
- Salt: ¾ teaspoon, or to taste (sea salt or kosher salt recommended.)
- Black Pepper: ½ teaspoon freshly ground, or to taste.
- Fresh Cilantro or Parsley: ¼ cup, chopped (for mixing into the filling and for garnish. Choose based on your preference.)
- Optional Cheese Topping: ½ – ¾ cup shredded cheese (Cheddar, Monterey Jack, Pepper Jack, or a vegan mozzarella/cheddar alternative work well.)
- Optional Toppings for Serving: Sour cream or plain Greek yogurt (or vegan alternatives), salsa, sliced avocado, lime wedges.
Instructions
1. Prepare the Bell Peppers:
* Preheat your oven to 375°F (190°C). Lightly grease a 9×13 inch baking dish or line it with parchment paper.
* Wash the bell peppers thoroughly. Slice them in half lengthwise, from stem to bottom.
* Carefully remove the seeds and white membranes from each pepper half. You want a clean cavity for the filling. If the pepper halves don’t sit flat, you can shave a tiny sliver off the rounded bottom to create a stable base, being careful not to cut through.
* Optional Par-Baking: For softer peppers, you can par-bake them. Place the pepper halves cut-side down in the prepared baking dish, add about ¼ inch of water to the bottom of the dish, and bake for 15-20 minutes. This pre-softens them and reduces overall baking time later. Remove from oven, discard water, and set aside. If you prefer firmer peppers, you can skip this step.
2. Cook the Quinoa:
* Rinse the 1 cup of uncooked quinoa thoroughly in a fine-mesh sieve under cold running water. This step is crucial to remove saponins, a natural coating that can make quinoa taste bitter.
* In a medium saucepan, combine the rinsed quinoa and 2 cups of vegetable broth (or water). Bring to a boil over medium-high heat.
* Once boiling, reduce the heat to low, cover the saucepan, and let it simmer for about 15 minutes, or until all the liquid has been absorbed and the quinoa is fluffy. You’ll see tiny spirals (the germ) separating from the seeds.
* Remove from heat and let it stand, covered, for 5 minutes. Then, fluff the quinoa with a fork. Set aside. You should have about 3 cups of cooked quinoa.
3. Prepare the Aromatic Base for the Filling:
* While the quinoa is cooking (or after), heat 2 tablespoons of olive oil in a large skillet or Dutch oven over medium heat.
* Add the finely chopped yellow onion and sauté for 5-7 minutes, until softened and translucent, stirring occasionally.
* Add the minced garlic and cook for another 1-2 minutes until fragrant. Be careful not to burn the garlic, as it can become bitter.
4. Build the Flavorful Filling:
* To the skillet with the onions and garlic, add the rinsed and drained black beans and the corn (if frozen, no need to thaw). Stir to combine.
* Stir in the can of undrained diced tomatoes. The liquid from the tomatoes helps create a saucy consistency for the filling.
* Add the spices: chili powder, ground cumin, smoked paprika, dried oregano, salt, and black pepper. Stir well to ensure everything is evenly coated and the spices become fragrant, cooking for about 2-3 minutes.
* Taste the filling at this point and adjust seasonings if necessary. You might want more salt, a bit more chili powder for heat, or a pinch of sugar if your tomatoes are particularly acidic.
5. Combine Quinoa and Filling:
* Add the cooked, fluffed quinoa to the skillet with the vegetable and spice mixture.
* Stir gently but thoroughly to combine everything. Ensure the quinoa is well-integrated with the other ingredients, creating a cohesive and flavorful stuffing.
* Stir in about half of the chopped fresh cilantro or parsley, reserving the rest for garnish.
6. Stuff the Bell Peppers:
* Carefully spoon the quinoa filling mixture generously into each bell pepper half. Pack it in gently but don’t compress it too much. You want the filling to be substantial.
* Arrange the stuffed pepper halves, cut-side up, in the prepared baking dish. They should fit snugly but not be overcrowded. If they wobble, you can use scrunched-up foil to prop them up.
7. Bake the Stuffed Peppers:
* If you didn’t par-bake the peppers, you might want to add about ¼ cup of water or vegetable broth to the bottom of the baking dish. This creates steam and helps the peppers cook through without drying out.
* Cover the baking dish loosely with aluminum foil. This prevents the tops of the filling from drying out or burning before the peppers are tender.
* Bake in the preheated 375°F (190°C) oven for 25-30 minutes if you par-baked the peppers, or 40-50 minutes if you started with raw peppers. The peppers should be tender when pierced with a fork, and the filling should be heated through.
8. Add Cheese (Optional) and Final Bake:
* If using cheese, remove the foil from the baking dish. Sprinkle the shredded cheese evenly over the top of each stuffed pepper.
* Return the dish to the oven, uncovered, and bake for another 5-10 minutes, or until the cheese is melted, bubbly, and slightly golden.
* If you prefer a crispier top without cheese, you can skip the cheese and broil for the last 1-2 minutes, watching carefully to prevent burning.
9. Rest and Garnish:
* Once baked to perfection, carefully remove the baking dish from the oven. Let the stuffed peppers rest for 5-10 minutes before serving. This allows the flavors to meld further and makes them easier to handle.
* Garnish generously with the remaining fresh cilantro or parsley.
Nutrition
- Serving Size: One Normal Portion
- Calories: 380-450