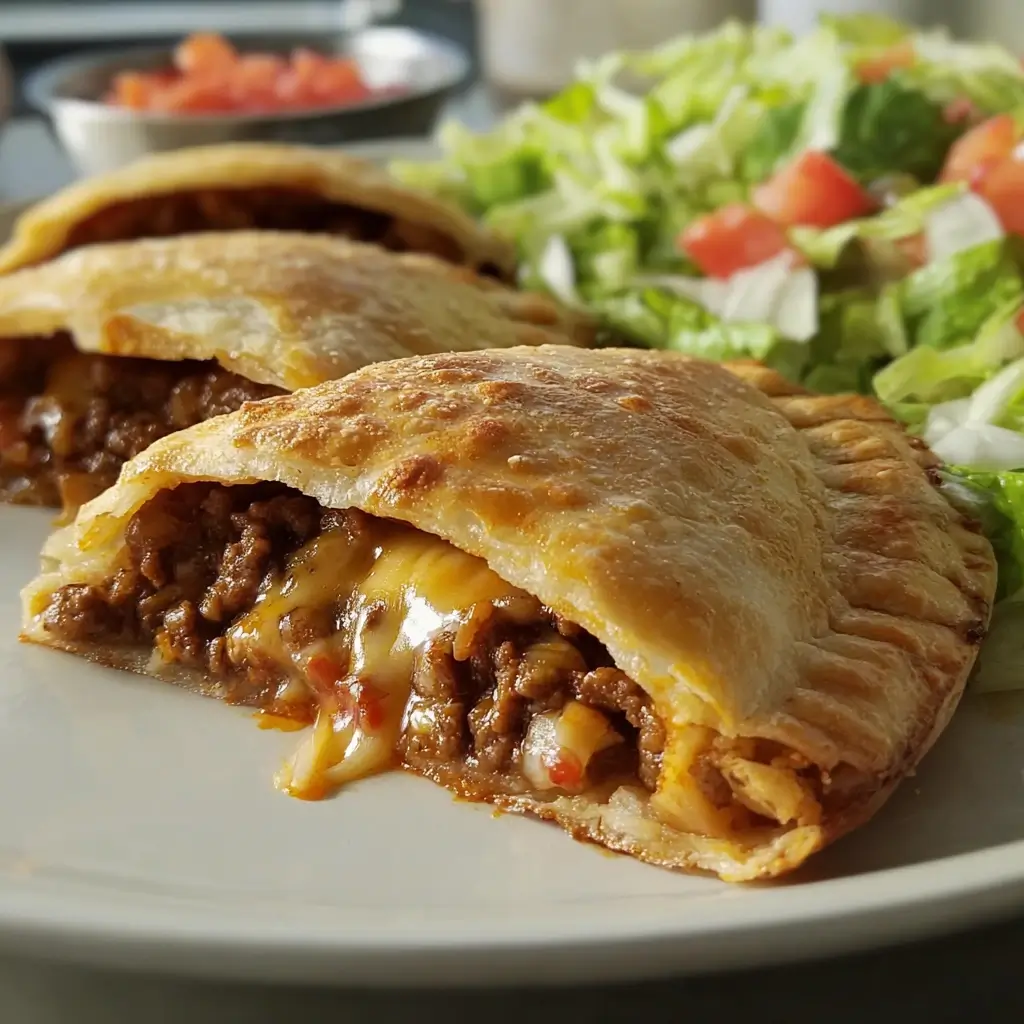
Of all the weeknight dinner battles I’ve fought, the struggle for a meal that is simultaneously easy for me, exciting for the adults, and not-scary for the kids is the fiercest. For a long time, Taco Tuesday was our ceasefire, a reliable crowd-pleaser. But even the most beloved tradition can grow stale. That’s when the idea for these Queso Taco Pockets struck me, and I can honestly say it has revolutionized our dinner rotation. The first time I made them, the aroma of seasoned beef and baking pastry filled the house, drawing my family to the kitchen like a magnet. My husband, a taco purist, was skeptical at first, but his eyes widened at the first bite. The kids, who usually pick apart their tacos, devoured these handheld marvels without a single complaint. It was a home run. The magic is in the contrast: a perfectly golden, flaky, and buttery crescent roll crust gives way to a molten, savory, and ridiculously cheesy river of taco-seasoned beef and creamy queso. It’s the love child of a cheesy beef empanada and your favorite taco, and it’s one of the most satisfyingly delicious things to ever come out of my oven. This recipe isn’t just a meal; it’s an event, a solution, and a guaranteed new family favorite.
The Ultimate Queso Taco Pockets Recipe
This recipe is designed for maximum flavor and ease. We’re creating a rich, meaty filling and a separate, creamy queso sauce that get combined for the ultimate cheesy experience. The crescent dough makes it accessible for any night of the week.
Ingredients for the Queso Taco Pockets:
For the Taco Meat Filling:
- 1 lb Ground Beef (80/20): The 20% fat content ensures a juicy, flavorful filling. Don’t go much leaner, or it can become dry.
- 1 small Yellow Onion, finely diced: Adds a foundational layer of sweet, aromatic flavor.
- 2 cloves Garlic, minced: Essential for that savory depth.
- 1 packet (1 oz) Taco Seasoning: Use your favorite store-bought brand or our homemade recipe below for more control over sodium and spice.
- 1/4 cup Water: Helps the seasoning coat the meat evenly and create a slight sauce.
For the Creamy Queso Sauce:
- 4 oz Velveeta Cheese (or other processed cheese), cubed: This is the secret to a perfectly smooth, non-greasy, and ultra-melty queso that won’t break when baked.
- 4 oz Sharp Cheddar Cheese, freshly shredded: Provides that classic, tangy cheese flavor. Shredding your own from a block is crucial for a smooth melt.
- 1/4 cup Evaporated Milk: More stable than regular milk, it helps create a creamy consistency without thinning the sauce too much.
- 1 (4 oz) can Diced Green Chiles, undrained: Adds a mild, tangy heat and authentic Southwestern flavor.
For Assembling the Pockets:
- 2 (8 oz) cans Refrigerated Crescent Roll Dough: This is the quick and easy ticket to a flaky, buttery crust.
- 1 large Egg, beaten with 1 tbsp water: This is our egg wash, the key to a beautiful, golden-brown, and shiny finish.
- Optional for Garnish: Sesame seeds, coarse sea salt, or dried parsley.
Step-by-Step Instructions to Perfection
Follow these detailed steps carefully to ensure your taco pockets are sealed, stuffed, and spectacular.
Part 1: Prepare the Taco Meat Filling
- Brown the Beef: Place a large skillet over medium-high heat. Add the ground beef and the finely diced yellow onion. Use a wooden spoon or spatula to break the beef into small crumbles as it cooks.
- Cook Until Browned: Continue cooking for about 8-10 minutes, or until the beef is no longer pink and the onions have softened and become translucent.
- Drain the Grease: This is a critical step! Tilt the skillet and carefully spoon out the excess grease. You can also drain the meat in a colander over a bowl. Removing the grease prevents the pocket bottoms from becoming soggy.
- Add Flavor: Return the skillet to the heat. Add the minced garlic and cook for another minute until fragrant. Be careful not to burn the garlic.
- Season the Meat: Sprinkle the taco seasoning over the beef, then pour in the 1/4 cup of water. Stir everything together until the meat is evenly coated. Let it simmer for 2-3 minutes, allowing the sauce to thicken slightly.
- Cool Down: Remove the skillet from the heat and set the taco meat aside to cool slightly while you prepare the queso. A hot filling can melt the crescent dough prematurely.
Part 2: Create the Creamy Queso Sauce
- Combine Ingredients: In a small saucepan, combine the cubed Velveeta, shredded cheddar cheese, evaporated milk, and the entire can of undrained diced green chiles.
- Melt Gently: Place the saucepan over low heat. Stir frequently with a whisk or rubber spatula until the cheeses are completely melted and the sauce is smooth and creamy. Low and slow is the key here to prevent the cheese from scorching or becoming grainy.
- Combine Fillings: Pour the finished queso sauce directly into the skillet with the cooled taco meat. Stir until every crumble of beef is generously coated in the cheesy sauce. Your ultimate pocket filling is now ready!
Part 3: Assemble and Bake the Queso Taco Pockets
- Preheat and Prepare: Preheat your oven to 375°F (190°C). Line a large baking sheet with parchment paper for easy cleanup and to prevent sticking.
- Unroll the Dough: Open one can of crescent roll dough and unroll it onto a lightly floured surface. The dough will be perforated into 8 triangles. Press down on the perforations to seal two triangles together, forming 4 rectangles. Repeat with the second can of dough so you have a total of 8 rectangles.
- Portion the Filling: Spoon a generous amount of the queso-beef mixture onto one half of each rectangle. Be careful not to overfill! Leave about a 1/2-inch border around the edges. Overstuffing is the number one cause of leaky pockets.
- Fold and Seal: Gently fold the empty half of the dough over the filling to create a pocket. Use your fingers to press the edges together firmly.
- Crimp for Security: For a decorative and secure seal, use the tines of a fork to press down and crimp all three sealed edges of the pocket. This helps prevent the delicious filling from escaping during baking.
- Arrange on Baking Sheet: Carefully transfer the sealed pockets to your prepared baking sheet, leaving an inch or two of space between each one for even baking.
- Apply Egg Wash: In a small bowl, whisk the egg and the tablespoon of water together. Brush this egg wash lightly over the top of each taco pocket. This step is optional but highly recommended for achieving that professional, bakery-quality golden sheen. If you wish, sprinkle with sesame seeds or coarse salt now.
- Vent the Pockets: Use a sharp knife to cut a small slit or two in the top of each pocket. This allows steam to escape, which helps the pastry cook through and stay crisp.
- Bake to Golden Perfection: Place the baking sheet in the preheated oven and bake for 12-15 minutes, or until the tops are a deep golden brown and the filling is bubbly.
- Rest Before Serving: Remove the pockets from the oven and let them cool on the baking sheet for at least 5-10 minutes. The filling will be extremely hot, and this resting period allows it to set up slightly, making for a much more pleasant eating experience.
Nutrition Facts
- Servings: 8 Pockets
- Calories Per Serving (1 Pocket): Approximately 450-500 kcal
(Disclaimer: Nutritional information is an estimate and can vary based on the specific brands of ingredients used, the exact fat content of the beef, and any substitutions made.)
Preparation Time
- Prep Time: 25 minutes
- Cook Time: 15 minutes
- Total Time: 40 minutes
How to Serve Your Queso Taco Pockets
These pockets are a fantastic meal on their own, but they truly shine when paired with the right accompaniments. Think of it as building your own deconstructed taco experience. Here are some incredible ways to serve them:
- As a Main Course:
- With a Dipping Bar: Set out small bowls of classic taco toppings for dipping and dunking. This is incredibly fun for kids and adults alike.
- Sour Cream or Plain Greek Yogurt
- Your favorite Salsa (pico de gallo, salsa verde, or a chunky red salsa)
- Guacamole or simple mashed avocado with lime
- Chipotle Aioli (mayonnaise mixed with a little adobo sauce from a can of chipotles)
- Extra Queso Sauce
- Alongside Classic Side Dishes:
- Cilantro-Lime Rice: The fresh, zesty flavor cuts through the richness of the pockets.
- Mexican Street Corn Salad (Esquites): A creamy, tangy corn salad that complements the flavors perfectly.
- Seasoned Black Beans: A simple side of black beans adds extra fiber and protein.
- A Crisp, Simple Salad: A light green salad with a citrusy vinaigrette provides a refreshing contrast.
- With a Dipping Bar: Set out small bowls of classic taco toppings for dipping and dunking. This is incredibly fun for kids and adults alike.
- As an Appetizer or Party Food:
- Cut in Half: For game days, potlucks, or parties, slice the pockets in half diagonally after they’ve cooled slightly.
- Arrange on a Platter: Place the halved pockets on a large platter surrounded by your dipping sauces for an impressive and easy-to-eat party snack.
- Garnish Generously: Top the platter with chopped fresh cilantro, diced jalapeños, and a sprinkle of cotija cheese to make it look even more appealing.
5 Additional Tips for Flawless Taco Pockets
- Shred Your Own Cheese: Pre-shredded cheeses are coated in anti-caking agents like potato starch, which can make your queso sauce grainy. For the smoothest, meltiest queso, always buy a block of cheddar and shred it yourself. It only takes a minute and makes a world of difference.
- Don’t Skip the Cooling Step: It’s tempting to mix your hot beef filling and immediately assemble the pockets, but this is a mistake. Hot filling will start to melt and soften the delicate crescent dough, making it difficult to seal and prone to tearing. Let the meat mixture cool for at least 10 minutes.
- Customize Your Seasoning: The packet of taco seasoning is for convenience, but making your own is easy and allows you to control the salt and heat levels. A great basic blend is: 2 tbsp chili powder, 1 tbsp cumin, 2 tsp paprika, 1 tsp onion powder, 1 tsp garlic powder, 1/2 tsp oregano, and a pinch of cayenne pepper.
- Get Creative with the Dough: While crescent dough is fantastic for its flaky texture, you can experiment with other types of refrigerated dough. Biscuit dough will create a sturdier, more bread-like pocket, while pizza dough will result in a chewier, calzone-style pocket. You may need to adjust baking times accordingly.
- Make-Ahead for an Even Quicker Meal: You can prepare the entire beef and queso filling up to 2 days in advance. Store it in an airtight container in the refrigerator. When you’re ready to eat, simply assemble the pockets with the cold filling and bake as directed. This turns a 40-minute meal into a 20-minute one!
Frequently Asked Questions (FAQ)
Q1: My Queso Taco Pockets leaked in the oven! What went wrong?
A: This is the most common issue and it usually comes down to one of three things. First, overfilling. It’s tempting to pack them full, but too much filling will force its way out as it heats up and expands. Stick to a reasonable amount, leaving a clear border. Second, an insecure seal. After folding, you must press the edges together firmly and then go over them with a fork to crimp them shut. Third, you may have forgotten to cut steam vents. The slits on top are crucial for letting steam escape; otherwise, it builds pressure inside and can burst the seams.
Q2: Can I make these Queso Taco Pockets vegetarian?
A: Absolutely! This recipe is very adaptable. For a fantastic vegetarian version, substitute the 1 lb of ground beef with 1 (15-oz) can of black beans (rinsed and drained) and 1 cup of frozen corn. Sauté the onion and garlic first, then add the beans, corn, taco seasoning, and a little water. Mash about half of the beans to create a creamier texture. From there, proceed with making the queso sauce and assembling as directed. You could also use a plant-based ground “meat” substitute.
Q3: Can I cook these in an air fryer?
A: Yes, an air fryer works wonderfully for making these pockets extra crispy! Preheat your air fryer to 350°F (175°C). Place the assembled and egg-washed pockets in the air fryer basket in a single layer, making sure not to overcrowd them (you’ll likely need to work in batches). Air fry for 8-10 minutes, or until the crust is deeply golden and cooked through. The exact time will depend on your specific air fryer model.
Q4: My taco filling seems too wet. Will that make my pockets soggy?
A: Yes, a filling that is too wet is the enemy of a crisp crust. There are two key steps to prevent this. First and foremost, you must thoroughly drain the grease from the ground beef after browning. Second, after you add the water and taco seasoning, let the mixture simmer for a few minutes. This allows the excess liquid to evaporate and the sauce to thicken, coating the meat rather than pooling at the bottom of the pan. The final queso-meat mixture should be thick and creamy, not watery.
Q5: Can I freeze Queso Taco Pockets for later?
A: Yes, they freeze beautifully! You have two options. Option 1 (Freeze Unbaked): Assemble the pockets completely but do not apply the egg wash. Place them on a parchment-lined baking sheet and “flash freeze” them for 1-2 hours until solid. Then, transfer them to a freezer-safe zip-top bag. They can be stored for up to 3 months. To bake, you can bake them directly from frozen, adding about 10-15 minutes to the baking time. Brush with egg wash before they go in the oven. Option 2 (Freeze Baked): Let the baked pockets cool completely. Wrap each one individually in plastic wrap or foil, then place them in a freezer bag. To reheat, unwrap them and bake at 350°F (175°C) for 15-20 minutes, or until heated through. The air fryer is also excellent for reheating frozen baked pockets.
Print
Queso Taco Pockets Recipe
Ingredients
For the Taco Meat Filling:
- 1 lb Ground Beef (80/20): The 20% fat content ensures a juicy, flavorful filling. Don’t go much leaner, or it can become dry.
- 1 small Yellow Onion, finely diced: Adds a foundational layer of sweet, aromatic flavor.
- 2 cloves Garlic, minced: Essential for that savory depth.
- 1 packet (1 oz) Taco Seasoning: Use your favorite store-bought brand or our homemade recipe below for more control over sodium and spice.
- 1/4 cup Water: Helps the seasoning coat the meat evenly and create a slight sauce.
For the Creamy Queso Sauce:
- 4 oz Velveeta Cheese (or other processed cheese), cubed: This is the secret to a perfectly smooth, non-greasy, and ultra-melty queso that won’t break when baked.
- 4 oz Sharp Cheddar Cheese, freshly shredded: Provides that classic, tangy cheese flavor. Shredding your own from a block is crucial for a smooth melt.
- 1/4 cup Evaporated Milk: More stable than regular milk, it helps create a creamy consistency without thinning the sauce too much.
- 1 (4 oz) can Diced Green Chiles, undrained: Adds a mild, tangy heat and authentic Southwestern flavor.
For Assembling the Pockets:
- 2 (8 oz) cans Refrigerated Crescent Roll Dough: This is the quick and easy ticket to a flaky, buttery crust.
- 1 large Egg, beaten with 1 tbsp water: This is our egg wash, the key to a beautiful, golden-brown, and shiny finish.
- Optional for Garnish: Sesame seeds, coarse sea salt, or dried parsley.
Instructions
Part 1: Prepare the Taco Meat Filling
- Brown the Beef: Place a large skillet over medium-high heat. Add the ground beef and the finely diced yellow onion. Use a wooden spoon or spatula to break the beef into small crumbles as it cooks.
- Cook Until Browned: Continue cooking for about 8-10 minutes, or until the beef is no longer pink and the onions have softened and become translucent.
- Drain the Grease: This is a critical step! Tilt the skillet and carefully spoon out the excess grease. You can also drain the meat in a colander over a bowl. Removing the grease prevents the pocket bottoms from becoming soggy.
- Add Flavor: Return the skillet to the heat. Add the minced garlic and cook for another minute until fragrant. Be careful not to burn the garlic.
- Season the Meat: Sprinkle the taco seasoning over the beef, then pour in the 1/4 cup of water. Stir everything together until the meat is evenly coated. Let it simmer for 2-3 minutes, allowing the sauce to thicken slightly.
- Cool Down: Remove the skillet from the heat and set the taco meat aside to cool slightly while you prepare the queso. A hot filling can melt the crescent dough prematurely.
Part 2: Create the Creamy Queso Sauce
- Combine Ingredients: In a small saucepan, combine the cubed Velveeta, shredded cheddar cheese, evaporated milk, and the entire can of undrained diced green chiles.
- Melt Gently: Place the saucepan over low heat. Stir frequently with a whisk or rubber spatula until the cheeses are completely melted and the sauce is smooth and creamy. Low and slow is the key here to prevent the cheese from scorching or becoming grainy.
- Combine Fillings: Pour the finished queso sauce directly into the skillet with the cooled taco meat. Stir until every crumble of beef is generously coated in the cheesy sauce. Your ultimate pocket filling is now ready!
Part 3: Assemble and Bake the Queso Taco Pockets
- Preheat and Prepare: Preheat your oven to 375°F (190°C). Line a large baking sheet with parchment paper for easy cleanup and to prevent sticking.
- Unroll the Dough: Open one can of crescent roll dough and unroll it onto a lightly floured surface. The dough will be perforated into 8 triangles. Press down on the perforations to seal two triangles together, forming 4 rectangles. Repeat with the second can of dough so you have a total of 8 rectangles.
- Portion the Filling: Spoon a generous amount of the queso-beef mixture onto one half of each rectangle. Be careful not to overfill! Leave about a 1/2-inch border around the edges. Overstuffing is the number one cause of leaky pockets.
- Fold and Seal: Gently fold the empty half of the dough over the filling to create a pocket. Use your fingers to press the edges together firmly.
- Crimp for Security: For a decorative and secure seal, use the tines of a fork to press down and crimp all three sealed edges of the pocket. This helps prevent the delicious filling from escaping during baking.
- Arrange on Baking Sheet: Carefully transfer the sealed pockets to your prepared baking sheet, leaving an inch or two of space between each one for even baking.
- Apply Egg Wash: In a small bowl, whisk the egg and the tablespoon of water together. Brush this egg wash lightly over the top of each taco pocket. This step is optional but highly recommended for achieving that professional, bakery-quality golden sheen. If you wish, sprinkle with sesame seeds or coarse salt now.
- Vent the Pockets: Use a sharp knife to cut a small slit or two in the top of each pocket. This allows steam to escape, which helps the pastry cook through and stay crisp.
- Bake to Golden Perfection: Place the baking sheet in the preheated oven and bake for 12-15 minutes, or until the tops are a deep golden brown and the filling is bubbly.
- Rest Before Serving: Remove the pockets from the oven and let them cool on the baking sheet for at least 5-10 minutes. The filling will be extremely hot, and this resting period allows it to set up slightly, making for a much more pleasant eating experience.
Nutrition
- Serving Size: One Normal Portion
- Calories: 450-500


