


Of all the weeknight dinner battles I’ve fought in my kitchen, the quest for a meal that is simultaneously easy, delicious, and a certified crowd-pleaser for the whole family is the most common. There are nights when juggling multiple pots and pans feels like a circus act I was never trained for. That’s where this One-Pot Honey Garlic Chicken and Rice recipe came into my life and completely changed the game. The first time I made it, the entire house filled with the most intoxicating aroma of sweet honey, savory garlic, and rich chicken broth. My kids, usually picky, were drawn to the kitchen asking what smelled so good. When I brought the single, glorious pot to the table, their eyes lit up. The chicken was impossibly tender with a sticky, caramelized glaze, and the rice underneath had soaked up all the incredible flavors, becoming fluffy and savory. It wasn’t just a meal; it was an experience. It’s the kind of dish that earns you a “chef’s kiss” from your partner and clean plates from the little ones. It has since become our go-to comfort meal, the perfect solution for a busy Tuesday or a cozy Sunday supper. It’s a recipe that proves you don’t need a mountain of dishes to create a mountain of flavor.
One-Pot Honey Garlic Chicken and Rice: The Ultimate Recipe
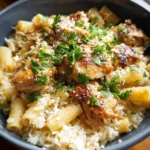
This recipe is designed for maximum flavor with minimal cleanup. By searing the chicken, building a sauce, and cooking the rice all in the same pot, every layer of flavor is captured and infused into the final dish. The result is succulent chicken with a perfect sweet and savory glaze, resting on a bed of fluffy, garlic-infused rice.
Ingredients You’ll Need
To create this masterpiece, we’ll break the ingredients down into three main components: the chicken and its seasoning, the signature honey garlic sauce, and the rice base. Using high-quality ingredients will elevate the final result, but this recipe is also wonderfully forgiving.
For the Chicken:
- Chicken: 2 lbs (about 900g) bone-in, skin-on chicken thighs (about 4-6 thighs). The bone and skin are crucial for flavor and moisture, preventing the chicken from drying out as the rice cooks. If you must use boneless, skinless thighs, you may need to reduce the final simmering time slightly.
- Salt: 1 teaspoon kosher salt, for seasoning the chicken.
- Black Pepper: ½ teaspoon freshly ground black pepper, for seasoning the chicken.
- Olive Oil: 2 tablespoons, for searing the chicken and creating a flavorful base.
For the Honey Garlic Sauce:
- Garlic: 6 cloves, freshly minced. This is the heart of the recipe, so don’t be shy. Freshly minced garlic provides a pungent, aromatic flavor that jarred garlic can’t replicate.
- Honey: ⅓ cup. A standard clover or wildflower honey works perfectly. It provides the sweetness and helps create that sticky, caramelized glaze.
- Low-Sodium Soy Sauce: ⅓ cup. Using low-sodium soy sauce is essential to control the saltiness of the final dish, as the chicken broth also contains sodium. For a gluten-free option, use tamari or coconut aminos.
- Apple Cider Vinegar: 1 tablespoon. This small amount of acid is a secret weapon. It cuts through the richness of the sauce and balances the sweetness of the honey. Rice vinegar also works well.
- Sesame Oil: 1 teaspoon (optional, but highly recommended). A drizzle of toasted sesame oil at the end adds a wonderful nutty depth and aroma.
- Red Pepper Flakes: ¼ teaspoon (optional). For those who like a little kick of heat to contrast the sweetness. Adjust the amount to your preference.
For the Rice and Liquid:
- Long-Grain White Rice: 1 ½ cups. Varieties like Jasmine or Basmati are ideal. It’s crucial to rinse the rice thoroughly in a fine-mesh sieve until the water runs clear. This removes excess starch and is the key to preventing gummy, mushy rice.
- Low-Sodium Chicken Broth: 2 ½ cups. Using broth instead of water infuses the rice with a deep, savory chicken flavor from the inside out. Again, low-sodium is best to control the final seasoning.
- Yellow Onion: 1 medium, finely diced. This builds an essential aromatic base for the rice.
- Butter: 1 tablespoon, unsalted. Sautéing the onion in butter adds a layer of richness.
For Garnish (Optional):
- Green Onions: 2, thinly sliced.
- Toasted Sesame Seeds: 1 tablespoon.
Step-by-Step Instructions
Follow these instructions carefully, particularly the notes about searing and simmering, to ensure your one-pot meal is a resounding success. The key is patience, especially not peeking while the rice cooks!
1. Prepare and Sear the Chicken:
First, prepare your chicken. Pat the chicken thighs completely dry with paper towels. This step is non-negotiable for achieving crispy skin. Season both sides generously with the kosher salt and freshly ground black pepper. Heat the 2 tablespoons of olive oil in a large, heavy-bottomed pot or Dutch oven over medium-high heat. The pot should be wide enough to hold the chicken in a single layer without overcrowding. Once the oil is shimmering, carefully place the chicken thighs skin-side down. Sear for 5-7 minutes without moving them, until the skin is deeply golden brown and crispy. Flip the chicken and sear for another 3-4 minutes on the other side. The chicken will not be cooked through at this point. Remove the chicken from the pot and set it aside on a plate.
2. Build the Flavor Base:
Reduce the heat to medium. There should be a good amount of rendered chicken fat and browned bits (fond) in the pot—this is pure flavor! If there is an excessive amount of fat (more than 2-3 tablespoons), carefully pour some off. Add the 1 tablespoon of butter to the pot. Once it’s melted, add the diced yellow onion and sauté for 3-4 minutes, stirring occasionally, until softened and translucent. Add the 6 cloves of minced garlic and the ¼ teaspoon of red pepper flakes (if using) and cook for another minute until fragrant. Be careful not to burn the garlic, as it will become bitter.
3. Create the Sauce and Deglaze:
Pour in the ⅓ cup of soy sauce and 1 tablespoon of apple cider vinegar to deglaze the pot. Use a wooden spoon or spatula to scrape up all the browned bits from the bottom of the pot. Let the mixture simmer for about 30 seconds. Whisk in the ⅓ cup of honey until it is fully dissolved into the sauce. This mixture should be bubbly and aromatic.
4. Combine Rice and Liquid:
Add the 1 ½ cups of rinsed long-grain white rice to the pot. Stir constantly for about one minute to toast the rice grains slightly and coat them in the sauce and aromatics. This toasting step adds a nutty flavor and helps the grains remain separate. Pour in the 2 ½ cups of low-sodium chicken broth and stir everything together to combine.
5. The Simmer and Steam (The “No-Peek” Phase):
Bring the mixture to a gentle simmer. Once it’s bubbling, nestle the seared chicken thighs back into the pot, on top of the rice mixture, skin-side up. Make sure the skin stays above the liquid level as much as possible to keep it from getting soggy. Once the liquid returns to a simmer, reduce the heat to the lowest possible setting. Cover the pot with a tight-fitting lid and let it cook for 20-25 minutes. Do not lift the lid during this time. The steam trapped inside is what cooks the rice to perfection. Lifting the lid releases the steam and can result in unevenly cooked or hard rice.
6. Rest and Fluff:
After 20-25 minutes, turn off the heat completely. Let the pot stand, still covered, for another 10 minutes. This resting period is just as important as the cooking time. It allows the rice to absorb any remaining moisture and finish steaming, ensuring a fluffy texture.
7. Final Touches and Serving:
Remove the lid. The rice should be tender and have absorbed all the liquid. Drizzle the optional 1 teaspoon of sesame oil over the chicken. Fluff the rice around the chicken gently with a fork. Garnish generously with sliced green onions and toasted sesame seeds. Serve immediately, straight from the pot.
Nutrition Facts
- Servings: 4-6
- Calories per serving: Approximately 650-750 kcal (This is an estimate and can vary based on the size of chicken thighs and exact ingredients used).
This is a hearty, all-in-one meal. The chicken provides a significant source of protein, while the rice offers carbohydrates for energy. The sauce, while delicious, does contain sugar from the honey and sodium from the soy sauce, making this a balanced but indulgent comfort food.
Preparation Time
- Prep Time: 15 minutes (dicing onion, mincing garlic, rinsing rice, seasoning chicken)
- Cook Time: 45 minutes (searing, sautéing, simmering, resting)
- Total Time: 1 hour
How to Serve This Delicious Dish
While this One-Pot Honey Garlic Chicken and Rice is a complete meal on its own, you can elevate the dining experience with some simple additions and presentation tweaks.
- Family-Style Centerpiece: The most impressive way to serve this dish is to bring the entire pot or Dutch oven directly to the table. It creates a rustic, communal feel and keeps the food warm. Provide a large spoon for scooping the rice and tongs for serving the chicken.
- Plated Presentation: For a more refined look, plate each serving individually. Start with a generous scoop of the fluffy honey garlic rice. Place a piece of the glistening chicken on top or slightly to the side. Spoon some of the extra sauce from the bottom of the pot over the chicken and rice.
- Pair with Green Vegetables: The richness of the honey garlic sauce pairs beautifully with fresh, crisp green vegetables that cut through the sweetness.
- Steamed or Roasted Broccoli: Simple steamed broccoli florets or broccoli roasted with a bit of olive oil and salt is a perfect companion.
- Garlic Green Beans: Quickly blanch or sauté some fresh green beans with a touch of garlic.
- Simple Cucumber Salad: A refreshing salad of thinly sliced cucumber, a splash of rice vinegar, and a pinch of salt can provide a cool, crisp contrast.
- Don’t Forget the Garnishes: The final touches make a big difference.
- Fresh Cilantro: If you’re a fan, chopped fresh cilantro can add a bright, herbaceous note that complements the honey and garlic.
- Lime Wedges: A squeeze of fresh lime juice over the chicken just before eating can awaken all the flavors and add a zesty kick.
- Chili Oil: For a more intense heat, a drizzle of chili oil or crispy chili garlic on top is a fantastic addition for spice lovers.
Additional Tips for a Perfect Pot Every Time
- The Secret to Crispy Skin (Even in a One-Pot Meal): The initial sear is crucial, but if you want that “straight from the oven” crispiness, here’s a pro tip. Once the dish is fully cooked and rested, carefully remove the chicken thighs and place them on a foil-lined baking sheet, skin-side up. Place them under your oven’s broiler for 2-4 minutes, watching them like a hawk. They will crisp up beautifully. Then, just return them to the pot for serving.
- Rice is Everything—Treat it Right: The biggest pitfall in one-pot rice dishes is gummy or undercooked rice. Rinsing your long-grain white rice until the water runs clear is the most important step to prevent a starchy, sticky mess. Also, strictly adhere to the “no-peek” rule. Every time you lift the lid, you release steam and heat, disrupting the delicate cooking process and extending the cooking time. Trust the process!
- Customize Your Sauce: This sauce recipe is a fantastic baseline, but feel free to make it your own.
- For more tang: Increase the apple cider vinegar to 1.5 tablespoons or add a squeeze of lime juice.
- For more spice: Double the red pepper flakes or whisk in a teaspoon or two of sriracha or gochujang with the honey.
- For more depth: A tablespoon of oyster sauce or a teaspoon of ginger paste, added with the garlic, can introduce new dimensions of flavor.
- Meal Prep and Reheating Like a Pro: This dish is excellent for meal prep. Store individual portions in airtight containers in the refrigerator for up to 4 days. To reheat, sprinkle a tablespoon of water over the rice to help it re-steam. Microwave in 60-second intervals, stirring in between, until heated through. The added water prevents the rice from drying out and the chicken from becoming tough.
- Incorporate More Veggies: You can easily turn this into an even more complete meal by adding vegetables. The key is knowing when to add them.
- Hard Vegetables: For hearty veggies like diced carrots or celery, add them with the onions to give them time to soften.
- Softer Vegetables: For quick-cooking veggies like broccoli florets, frozen peas, or chopped bell peppers, stir them into the rice right before you add the chicken back into the pot for the final simmer. They will steam perfectly along with the rice.
Frequently Asked Questions (FAQ)
1. Can I use chicken breasts instead of thighs?
Yes, you can, but you’ll need to make a few adjustments. Chicken breasts, especially boneless and skinless ones, are much leaner and can dry out easily. Sear them for a shorter time (3-4 minutes per side) until golden but not cooked through. When you add them back to the pot to simmer with the rice, they may only need 15-20 minutes of cooking time. To be sure, you can use a meat thermometer; they are done when the internal temperature reaches 165°F (74°C). Another option is to cut the chicken breasts into 1-inch chunks and sear them, which will cook faster and distribute more evenly.
2. My rice came out mushy or undercooked. What went wrong?
This is the most common issue with one-pot rice dishes and usually comes down to one of three things.
- Incorrect Liquid Ratio: Ensure you are using exactly 1 ½ cups of rice to 2 ½ cups of broth. Using a different type of rice (like short-grain or brown rice) will require a different liquid ratio and cooking time.
- Heat Management: If your heat is too high during the simmering phase, the liquid can evaporate too quickly before the rice has a chance to cook, leaving it hard. If the heat is too low, it may not create enough steam, leading to uneven cooking. A low, gentle simmer is key.
- Peeking: Lifting the lid releases the steam required to cook the rice evenly. You must keep the lid on for the entire cooking and resting time.
3. Can I make this dish with brown rice for a healthier option?
Yes, you can, but it requires significant adjustments. Brown rice takes much longer to cook and requires more liquid. You would likely need to increase the chicken broth to at least 3 cups and increase the simmering time to 40-45 minutes. Because of the extended cooking time, the chicken may become overcooked. A better method would be to cook the brown rice separately according to package directions and make the honey garlic chicken and sauce in a skillet, then serve the chicken and sauce over the cooked rice.
4. How can I make this recipe gluten-free?
This recipe can easily be made gluten-free with one simple swap. Traditional soy sauce contains wheat. To make it gluten-free, substitute the soy sauce with an equal amount of tamari, which is a Japanese soy sauce brewed without wheat, or coconut aminos, which is a soy-free and gluten-free alternative with a slightly sweeter taste. Always double-check that your chicken broth is certified gluten-free as well.
5. Can I double this recipe?
You can, but you must use a very large pot. A 7-quart or larger Dutch oven would be ideal. When you double the recipe, you may not need to double the cooking time, but it will take longer for the liquid to come to a simmer. Keep the simmering time around 25-30 minutes, but check one small area of rice for doneness before beginning the 10-minute rest period. The most important factor is ensuring the rice is in a relatively even layer and not piled too deep, which would cause the bottom to get mushy and the top to be undercooked.
One-Pot Honey Garlic Chicken and Rice Recipe
Ingredients
For the Chicken:
- Chicken: 2 lbs (about 900g) bone-in, skin-on chicken thighs (about 4-6 thighs). The bone and skin are crucial for flavor and moisture, preventing the chicken from drying out as the rice cooks. If you must use boneless, skinless thighs, you may need to reduce the final simmering time slightly.
- Salt: 1 teaspoon kosher salt, for seasoning the chicken.
- Black Pepper: ½ teaspoon freshly ground black pepper, for seasoning the chicken.
- Olive Oil: 2 tablespoons, for searing the chicken and creating a flavorful base.
For the Honey Garlic Sauce:
- Garlic: 6 cloves, freshly minced. This is the heart of the recipe, so don’t be shy. Freshly minced garlic provides a pungent, aromatic flavor that jarred garlic can’t replicate.
- Honey: ⅓ cup. A standard clover or wildflower honey works perfectly. It provides the sweetness and helps create that sticky, caramelized glaze.
- Low-Sodium Soy Sauce: ⅓ cup. Using low-sodium soy sauce is essential to control the saltiness of the final dish, as the chicken broth also contains sodium. For a gluten-free option, use tamari or coconut aminos.
- Apple Cider Vinegar: 1 tablespoon. This small amount of acid is a secret weapon. It cuts through the richness of the sauce and balances the sweetness of the honey. Rice vinegar also works well.
- Sesame Oil: 1 teaspoon (optional, but highly recommended). A drizzle of toasted sesame oil at the end adds a wonderful nutty depth and aroma.
- Red Pepper Flakes: ¼ teaspoon (optional). For those who like a little kick of heat to contrast the sweetness. Adjust the amount to your preference.
For the Rice and Liquid:
- Long-Grain White Rice: 1 ½ cups. Varieties like Jasmine or Basmati are ideal. It’s crucial to rinse the rice thoroughly in a fine-mesh sieve until the water runs clear. This removes excess starch and is the key to preventing gummy, mushy rice.
- Low-Sodium Chicken Broth: 2 ½ cups. Using broth instead of water infuses the rice with a deep, savory chicken flavor from the inside out. Again, low-sodium is best to control the final seasoning.
- Yellow Onion: 1 medium, finely diced. This builds an essential aromatic base for the rice.
- Butter: 1 tablespoon, unsalted. Sautéing the onion in butter adds a layer of richness.
Instructions
1. Prepare and Sear the Chicken:
First, prepare your chicken. Pat the chicken thighs completely dry with paper towels. This step is non-negotiable for achieving crispy skin. Season both sides generously with the kosher salt and freshly ground black pepper. Heat the 2 tablespoons of olive oil in a large, heavy-bottomed pot or Dutch oven over medium-high heat. The pot should be wide enough to hold the chicken in a single layer without overcrowding. Once the oil is shimmering, carefully place the chicken thighs skin-side down. Sear for 5-7 minutes without moving them, until the skin is deeply golden brown and crispy. Flip the chicken and sear for another 3-4 minutes on the other side. The chicken will not be cooked through at this point. Remove the chicken from the pot and set it aside on a plate.
2. Build the Flavor Base:
Reduce the heat to medium. There should be a good amount of rendered chicken fat and browned bits (fond) in the pot—this is pure flavor! If there is an excessive amount of fat (more than 2-3 tablespoons), carefully pour some off. Add the 1 tablespoon of butter to the pot. Once it’s melted, add the diced yellow onion and sauté for 3-4 minutes, stirring occasionally, until softened and translucent. Add the 6 cloves of minced garlic and the ¼ teaspoon of red pepper flakes (if using) and cook for another minute until fragrant. Be careful not to burn the garlic, as it will become bitter.
3. Create the Sauce and Deglaze:
Pour in the ⅓ cup of soy sauce and 1 tablespoon of apple cider vinegar to deglaze the pot. Use a wooden spoon or spatula to scrape up all the browned bits from the bottom of the pot. Let the mixture simmer for about 30 seconds. Whisk in the ⅓ cup of honey until it is fully dissolved into the sauce. This mixture should be bubbly and aromatic.
4. Combine Rice and Liquid:
Add the 1 ½ cups of rinsed long-grain white rice to the pot. Stir constantly for about one minute to toast the rice grains slightly and coat them in the sauce and aromatics. This toasting step adds a nutty flavor and helps the grains remain separate. Pour in the 2 ½ cups of low-sodium chicken broth and stir everything together to combine.
5. The Simmer and Steam (The “No-Peek” Phase):
Bring the mixture to a gentle simmer. Once it’s bubbling, nestle the seared chicken thighs back into the pot, on top of the rice mixture, skin-side up. Make sure the skin stays above the liquid level as much as possible to keep it from getting soggy. Once the liquid returns to a simmer, reduce the heat to the lowest possible setting. Cover the pot with a tight-fitting lid and let it cook for 20-25 minutes. Do not lift the lid during this time. The steam trapped inside is what cooks the rice to perfection. Lifting the lid releases the steam and can result in unevenly cooked or hard rice.
6. Rest and Fluff:
After 20-25 minutes, turn off the heat completely. Let the pot stand, still covered, for another 10 minutes. This resting period is just as important as the cooking time. It allows the rice to absorb any remaining moisture and finish steaming, ensuring a fluffy texture.
7. Final Touches and Serving:
Remove the lid. The rice should be tender and have absorbed all the liquid. Drizzle the optional 1 teaspoon of sesame oil over the chicken. Fluff the rice around the chicken gently with a fork. Garnish generously with sliced green onions and toasted sesame seeds. Serve immediately, straight from the pot.
Nutrition
- Serving Size: One Normal Portion
- Calories: 650-750


