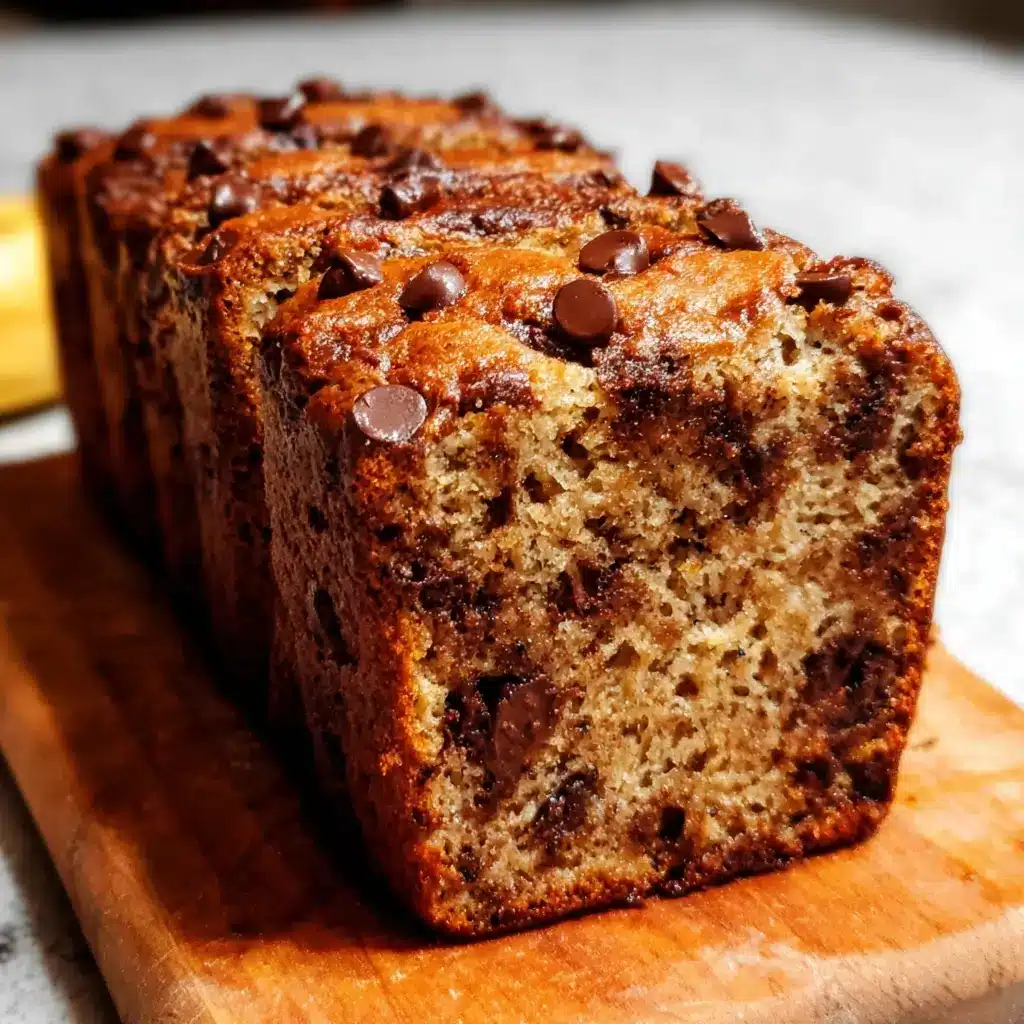

Of all the comforting aromas that can fill a home, the scent of freshly baked banana bread is arguably at the top of the list. For me, it’s the smell of lazy Sunday mornings, of after-school snacks, and of a simple, heartfelt solution to the perennial problem of overripe bananas browning on the counter. This One-Bowl Chocolate Chip Banana Bread recipe isn’t just another recipe; it’s a treasured part of our family’s culinary rhythm. I’ve lost count of how many times my kids have run into the kitchen, their noses twitching, asking, “Are you making the banana bread?” The beauty of this particular version lies in its glorious simplicity. The “one-bowl” method isn’t a gimmick; it’s a promise of minimal fuss and maximum reward. It means fewer dishes to wash, a process so straightforward that even the most novice baker (or an enthusiastic child) can achieve a perfectly moist, tender, and chocolate-studded loaf every single time. It’s dense but not heavy, sweet but not cloying, and the pockets of melted chocolate transform it from a humble quick bread into a truly decadent treat. This is the recipe that never fails, the one that earns rave reviews from guests, and the one that makes our house feel most like a home.
The Ultimate One-Bowl Chocolate Chip Banana Bread
This recipe has been tweaked and perfected over years to achieve the ideal balance of banana flavor, sweetness, and a moist, tender crumb. The combination of melted butter for flavor and a touch of oil for extra moisture is our secret to a loaf that stays fresh for days.
A Closer Look at the Key Ingredients
Before we dive in, let’s talk about why these specific ingredients make this recipe a guaranteed success. Understanding the “why” behind the “what” is the first step to becoming a more intuitive baker.
- Overripe Bananas: This is non-negotiable. The bananas should be heavily speckled with brown or even mostly black. The starches in the banana convert to sugar as it ripens, which means you get a bread that is naturally sweeter, more intensely flavored, and incredibly moist.
- All-Purpose Flour: The workhorse of the baking world. It provides the structure for our bread. For the best results, always measure your flour using the spoon-and-level method: use a spoon to scoop flour into your measuring cup, then level it off with the back of a knife. This prevents a compacted, dry loaf.
- Melted Unsalted Butter & Neutral Oil: We use a combination for the best of both worlds. Melted butter provides a rich, classic flavor that is essential to good banana bread. The small amount of neutral oil (like canola or vegetable) adds a level of moisture that butter alone can’t achieve, ensuring a tender crumb that doesn’t dry out.
- Brown and Granulated Sugar: Again, a combination is key. Granulated sugar provides a clean sweetness and helps the crust caramelize beautifully. Light brown sugar, with its molasses content, adds a deeper, more complex flavor and contributes significantly to the bread’s moist texture.
- Eggs: These are our binders, holding everything together. They also add richness and help the bread rise. Using room-temperature eggs allows them to incorporate more smoothly into the batter, creating a more uniform texture.
- Baking Soda: This is our leavening agent. Baking soda is a base that reacts with the acidic components in our batter (the bananas and brown sugar) to create carbon dioxide bubbles. These bubbles are what make the bread rise and give it a light, tender texture instead of being a dense brick.
- Semi-Sweet Chocolate Chips: We find that semi-sweet chocolate provides the perfect contrast to the sweet banana base. They’re not as cloying as milk chocolate and have a more robust flavor than dark chocolate in this application. Of course, you can use your favorite!
Ingredients List
- 1 ¾ cups (210g) all-purpose flour
- 1 teaspoon baking soda
- ½ teaspoon fine sea salt
- ½ teaspoon ground cinnamon (optional, but recommended)
- 3 large, very ripe bananas (about 1 ½ cups mashed)
- ½ cup (113g) unsalted butter, melted
- 2 tablespoons neutral oil (canola, vegetable, or light olive oil)
- ⅔ cup (134g) packed light brown sugar
- ⅓ cup (67g) granulated sugar
- 2 large eggs, at room temperature
- 1 teaspoon pure vanilla extract
- 1 ¼ cups (225g) semi-sweet chocolate chips, divided
Instructions
Follow these steps carefully, especially the notes on mixing, to ensure a perfect loaf. The goal is a tender crumb, which comes from a gentle hand.
Detailed Step-by-Step Breakdown
Step 1: Preparation is Key
Preheat your oven to 350°F (175°C). Position a rack in the center of the oven. Generously grease a 9×5-inch loaf pan with butter or nonstick spray. For guaranteed easy removal, create a parchment paper “sling”: cut a piece of parchment paper to fit the bottom and long sides of the pan, with a few inches of overhang on the long sides. This will act as handles to lift the bread out later. Grease the parchment and the uncovered short sides of the pan. This preparation ensures your beautiful loaf won’t stick.
Step 2: Combine the Dry Ingredients
In a medium bowl (this will be temporarily used, but the main mixing happens in one large bowl), whisk together the all-purpose flour, baking soda, fine sea salt, and optional ground cinnamon. Whisking aerates the flour and evenly distributes the leavening and salt, which is crucial for a uniform rise and flavor. Set this bowl aside.
Step 3: Mash the Bananas and Mix the Wet Ingredients
In a large mixing bowl—your one main bowl for the rest of the recipe—add the peeled, overripe bananas. Using a fork or a potato masher, mash them well. Some small lumps are perfectly fine and add to the texture, but you want a mostly smooth, wet puree. To the mashed bananas, add the melted butter, neutral oil, light brown sugar, and granulated sugar. Whisk everything together until it is well combined and the sugar has started to dissolve into the mixture.
Step 4: Incorporate the Eggs and Vanilla
Add the two room-temperature eggs and the pure vanilla extract to the banana mixture. Whisk until just combined. You don’t want to over-whisk here; just ensure the egg yolks and whites are fully incorporated into the batter. Over-beating the eggs can incorporate too much air and change the final texture.
Step 5: The “Just Combine” Method
Pour the dry ingredient mixture from the medium bowl into the large bowl with the wet ingredients. Using a rubber spatula, gently fold the dry ingredients into the wet. Scrape the bottom and sides of the bowl as you go. Stop mixing when there are still a few streaks of flour visible. This is the most critical step to prevent a tough, dense bread. Overmixing develops the gluten in the flour, leading to a chewy, gummy texture instead of a tender one.
Step 6: Fold in the Chocolate
Reserve about ¼ cup of the chocolate chips to sprinkle on top. Add the remaining 1 cup of chocolate chips to the batter. Gently fold them in until they are just distributed and the last of the flour streaks have disappeared. Again, do not overmix. A few final folds are all you need.
Step 7: Pan and Bake
Pour the batter into your prepared loaf pan and use the spatula to smooth the top. Sprinkle the reserved ¼ cup of chocolate chips evenly over the surface. This not only looks beautiful but adds an extra chocolatey bite to every slice.
Place the pan in the preheated oven on the center rack. Bake for 55 to 70 minutes. Baking times can vary significantly depending on your oven and the moisture content of your bananas.
Step 8: The Doneness Test and Cooling
Start checking for doneness around the 55-minute mark. The bread is done when a wooden skewer or toothpick inserted into the center comes out clean or with a few moist crumbs attached (but no wet batter). If you hit a pocket of melted chocolate, try a different spot. The top should be a deep golden brown, and the edges should be pulling away slightly from the sides of the pan.
Pro-Tip: If you notice the top is browning too quickly before the center is cooked, loosely tent a piece of aluminum foil over the top of the pan for the remaining baking time.
Once baked, remove the pan from the oven and place it on a wire cooling rack. Let the banana bread cool in the pan for 15-20 minutes. This allows it to set up, making it easier to remove. After 20 minutes, use the parchment paper handles to lift the loaf out of the pan and place it directly on the wire rack to cool completely. It’s tempting to slice into it while it’s hot, but allowing it to cool completely ensures clean slices and a perfect final texture.
Nutrition Facts
- Servings: 12 slices
- Calories per serving: Approximately 350-380 kcal
Disclaimer: The nutritional information is an estimate and can vary based on the specific ingredients and brands used.
Preparation Time
- Active Prep Time: 15 minutes
- Baking Time: 55-70 minutes
- Cooling Time: At least 1 hour
- Total Time: Approximately 2 hours 30 minutes
How to Serve Your Chocolate Chip Banana Bread
This bread is incredibly versatile. Here are some of our favorite ways to enjoy it, from a simple snack to a show-stopping dessert.
- The Pure and Simple:
- Serve a thick slice warm, just as it is.
- Spread a pat of high-quality salted butter on a warm slice and let it melt in.
- Enjoy a room-temperature slice with a hot cup of coffee or a cold glass of milk.
- Breakfast Transformations:
- Toasted: Toast a slice until the edges are crispy and the chocolate chips are re-melted.
- Cream Cheese: Spread a generous layer of plain or honey-nut cream cheese on a toasted or plain slice.
- Nut Butter: A smear of peanut butter, almond butter, or cashew butter adds protein and healthy fats for a more substantial breakfast.
- Yogurt & Berries: Serve a slice alongside a bowl of Greek yogurt and fresh berries for a balanced start to your day.
- Decadent Dessert Ideas:
- A la Mode: Gently warm a slice in the microwave or oven and top it with a scoop of vanilla bean or coffee ice cream.
- Sauce Drizzle: Elevate the dessert by drizzling warm caramel sauce, hot fudge, or even a fruit coulis over the top.
- Whipped Cream: A dollop of freshly whipped cream (or a spray from the can, we don’t judge!) makes it feel extra special.
- Banana Bread French Toast: For a truly indulgent brunch, use thick slices of day-old banana bread to make French toast. Dip in an egg-cinnamon mixture and pan-fry in butter until golden.
Additional Tips for a Perfect Loaf Every Time
- The Ripeness Riddle: How to Quickly Ripen Bananas: Don’t have any overripe bananas? No problem. Place your yellow bananas (with peels on) on a baking sheet and bake them at 300°F (150°C) for 15-20 minutes, or until the peels are completely blackened and shiny. Let them cool completely before you peel and mash them. The heat kickstarts the sugar-conversion process, mimicking natural ripening.
- The No-Sink Chocolate Chip Trick: To prevent your chocolate chips from congregating at the bottom of the loaf, toss them in a tablespoon of the dry flour mixture before folding them into the batter. This light coating of flour helps the chips grip the batter and remain suspended throughout the bread as it bakes.
- Mastering the Mix: We can’t stress this enough: do not overmix the batter. When you combine the wet and dry ingredients, you’re hydrating the flour and activating the gluten. A little gluten development gives the bread structure, but too much makes it tough and chewy. Fold gently with a spatula only until you no longer see big streaks of dry flour. A lumpy batter is a happy batter when it comes to quick breads.
- The Art of Storing for Lasting Freshness: How you store your banana bread makes all the difference.
- Room Temperature (Up to 4 days): Once completely cool, wrap the loaf tightly in plastic wrap or place it in an airtight container. Storing it at room temperature preserves its soft, moist texture best.
- Freezer (Up to 3 months): For long-term storage, wrap the completely cooled loaf (or individual slices) in a layer of plastic wrap, followed by a layer of aluminum foil. Place it in a zip-top freezer bag. To enjoy, let it thaw at room temperature or gently reheat a slice in the microwave or toaster oven. Avoid the refrigerator, as it can dry out the bread’s texture.
- Don’t Be Afraid to Customize: This recipe is a fantastic base for your creativity. Think of it as a canvas.
- Add Nuts: Toast ½ cup of chopped walnuts or pecans and fold them in with the chocolate chips for a delightful crunch.
- Spice it Up: Add ¼ teaspoon of nutmeg or allspice along with the cinnamon for a warmer, spicier flavor profile.
- Create a Streusel Topping: Before baking, top the batter with a simple streusel made from flour, brown sugar, cinnamon, and cold butter. It adds a wonderful crunchy texture to the top.
Frequently Asked Questions (FAQ)
1. Can I use frozen bananas for this recipe?
Absolutely! Frozen bananas are fantastic for banana bread. Simply let them thaw completely at room temperature or in the microwave. They will release a lot of liquid as they thaw—do not discard this liquid! It’s full of banana flavor and sugar. Mash the thawed bananas along with all their juices and proceed with the recipe as written. You may have a slightly more moist loaf, which is never a bad thing.
2. Why did my banana bread turn out dense and gummy?
This is the most common banana bread problem and it almost always comes down to one of two things. First, and most likely, the batter was overmixed after the flour was added. This overdevelops the gluten, resulting in a tough, chewy texture. Remember to fold gently and stop as soon as the flour is incorporated. Second, your leavening agent (baking soda) might be old or expired. To test your baking soda, place a small spoonful in a bowl and add a splash of vinegar or lemon juice. If it fizzes vigorously, it’s still good to use.
3. Can I make this recipe into muffins?
Yes, this recipe adapts beautifully to muffins. Prepare the batter as directed and line a standard 12-cup muffin tin with paper liners. Fill each liner about ¾ full with batter and sprinkle with the reserved chocolate chips. Bake at 350°F (175°C) for 20-25 minutes, or until a toothpick inserted into the center of a muffin comes out clean. This will yield approximately 12-14 standard-sized muffins.
4. What are some other variations or add-ins I can try?
The possibilities are endless!
- Dried Fruit: Swap out some of the chocolate chips for ½ cup of raisins, dried cranberries, or chopped dates.
- Different Chips: Try peanut butter chips, butterscotch chips, or white chocolate chips.
- Coconut: Fold in ½ cup of sweetened or unsweetened shredded coconut for a tropical twist.
- Citrus Zest: Add the zest of one orange to the wet ingredients for a bright, fresh flavor that pairs wonderfully with chocolate and banana.
- Espresso Powder: A teaspoon of instant espresso powder dissolved in the vanilla extract will deepen the chocolate flavor without making the bread taste like coffee.
5. How can I make this banana bread a little healthier?
While this is a treat, you can make a few simple swaps to boost its nutritional profile.
- Flour: Replace up to half of the all-purpose flour with white whole wheat flour or whole wheat pastry flour for added fiber.
- Sugar: You can reduce the total sugar by about ¼ cup without drastically affecting the texture, though it will be less sweet. You could also experiment with substitutes like coconut sugar or maple syrup, though this may alter the moisture content.
- Fat: For a lower saturated fat version, you can replace all the butter with an equal amount of neutral oil, or even use unsweetened applesauce for half of the total fat (though the texture will be a bit denser and more cake-like).
- Add-ins: Boost the fiber and nutrients by adding a tablespoon of chia seeds or ground flaxseed to the batter.

One-Bowl Chocolate Chip Banana Bread Recipe
Ingredients
- 1 ¾ cups (210g) all-purpose flour
- 1 teaspoon baking soda
- ½ teaspoon fine sea salt
- ½ teaspoon ground cinnamon (optional, but recommended)
- 3 large, very ripe bananas (about 1 ½ cups mashed)
- ½ cup (113g) unsalted butter, melted
- 2 tablespoons neutral oil (canola, vegetable, or light olive oil)
- ⅔ cup (134g) packed light brown sugar
- ⅓ cup (67g) granulated sugar
- 2 large eggs, at room temperature
- 1 teaspoon pure vanilla extract
- 1 ¼ cups (225g) semi-sweet chocolate chips, divided
Instructions
Step 1: Preparation is Key
Preheat your oven to 350°F (175°C). Position a rack in the center of the oven. Generously grease a 9×5-inch loaf pan with butter or nonstick spray. For guaranteed easy removal, create a parchment paper “sling”: cut a piece of parchment paper to fit the bottom and long sides of the pan, with a few inches of overhang on the long sides. This will act as handles to lift the bread out later. Grease the parchment and the uncovered short sides of the pan. This preparation ensures your beautiful loaf won’t stick.
Step 2: Combine the Dry Ingredients
In a medium bowl (this will be temporarily used, but the main mixing happens in one large bowl), whisk together the all-purpose flour, baking soda, fine sea salt, and optional ground cinnamon. Whisking aerates the flour and evenly distributes the leavening and salt, which is crucial for a uniform rise and flavor. Set this bowl aside.
Step 3: Mash the Bananas and Mix the Wet Ingredients
In a large mixing bowl—your one main bowl for the rest of the recipe—add the peeled, overripe bananas. Using a fork or a potato masher, mash them well. Some small lumps are perfectly fine and add to the texture, but you want a mostly smooth, wet puree. To the mashed bananas, add the melted butter, neutral oil, light brown sugar, and granulated sugar. Whisk everything together until it is well combined and the sugar has started to dissolve into the mixture.
Step 4: Incorporate the Eggs and Vanilla
Add the two room-temperature eggs and the pure vanilla extract to the banana mixture. Whisk until just combined. You don’t want to over-whisk here; just ensure the egg yolks and whites are fully incorporated into the batter. Over-beating the eggs can incorporate too much air and change the final texture.
Step 5: The “Just Combine” Method
Pour the dry ingredient mixture from the medium bowl into the large bowl with the wet ingredients. Using a rubber spatula, gently fold the dry ingredients into the wet. Scrape the bottom and sides of the bowl as you go. Stop mixing when there are still a few streaks of flour visible. This is the most critical step to prevent a tough, dense bread. Overmixing develops the gluten in the flour, leading to a chewy, gummy texture instead of a tender one.
Step 6: Fold in the Chocolate
Reserve about ¼ cup of the chocolate chips to sprinkle on top. Add the remaining 1 cup of chocolate chips to the batter. Gently fold them in until they are just distributed and the last of the flour streaks have disappeared. Again, do not overmix. A few final folds are all you need.
Step 7: Pan and Bake
Pour the batter into your prepared loaf pan and use the spatula to smooth the top. Sprinkle the reserved ¼ cup of chocolate chips evenly over the surface. This not only looks beautiful but adds an extra chocolatey bite to every slice.
Place the pan in the preheated oven on the center rack. Bake for 55 to 70 minutes. Baking times can vary significantly depending on your oven and the moisture content of your bananas.
Step 8: The Doneness Test and Cooling
Start checking for doneness around the 55-minute mark. The bread is done when a wooden skewer or toothpick inserted into the center comes out clean or with a few moist crumbs attached (but no wet batter). If you hit a pocket of melted chocolate, try a different spot. The top should be a deep golden brown, and the edges should be pulling away slightly from the sides of the pan.
Pro-Tip: If you notice the top is browning too quickly before the center is cooked, loosely tent a piece of aluminum foil over the top of the pan for the remaining baking time.
Once baked, remove the pan from the oven and place it on a wire cooling rack. Let the banana bread cool in the pan for 15-20 minutes. This allows it to set up, making it easier to remove. After 20 minutes, use the parchment paper handles to lift the loaf out of the pan and place it directly on the wire rack to cool completely. It’s tempting to slice into it while it’s hot, but allowing it to cool completely ensures clean slices and a perfect final texture.
Nutrition
- Serving Size: One Normal Portion
- Calories: 350-380