


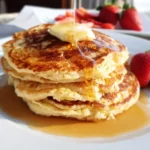
Of all the weekend breakfast rituals, nothing quite captures the feeling of a slow, cozy morning like a stack of freshly made pancakes. For years, my family’s go-to was the classic buttermilk recipe, but I was on a quest for something more. I wanted a pancake that wasn’t just a vehicle for maple syrup, but a genuinely satisfying and nourishing meal. I wanted something that would keep my kids full and energized for their Saturday adventures without the inevitable sugar crash. That’s when I discovered the magic of oatmeal pancakes. The first time I made them, the reaction was instantaneous. The aroma alone—a warm, toasty scent of oats and cinnamon—filled the kitchen and brought everyone running. The verdict? An overwhelming success. These aren’t your average light-as-air, disappear-in-two-bites pancakes. They are substantial, with a wonderfully complex texture that is both fluffy and satisfyingly hearty. The ground oats give them a tender, moist crumb and a subtle nutty flavor that beautifully complements any topping you can dream of. They’ve become our undisputed family favorite, the one recipe requested time and time again. This isn’t just a recipe; it’s the centerpiece of our perfect weekend morning, and I’m so excited to share it with you.
The Ultimate Oatmeal Pancakes: A Wholesome Start to Your Day
This recipe has been tested and tweaked to achieve the perfect balance of health and indulgence. We use a combination of whole rolled oats and all-purpose flour to create a pancake that is structurally sound, incredibly fluffy, and packed with the goodness of whole grains. The oats are soaked briefly in milk, a crucial step that softens them and ensures every bite is tender and moist. Forget dry, gritty oat pancakes; these are the real deal. They are simple enough for a weekday treat but special enough for a celebratory brunch. Prepare to redefine what you think a pancake can be.
Ingredients for Perfect Oatmeal Pancakes
A great recipe starts with quality ingredients. Each component in this list plays a vital role in creating the perfect texture and flavor. Here’s exactly what you’ll need:
- Rolled Oats: 1 ½ cups. Also known as old-fashioned oats, these are the star of the show. They provide fiber, a wonderful nutty flavor, and a hearty texture. Do not use steel-cut oats, as they won’t soften enough. Quick oats can work in a pinch, but the texture will be slightly mushier.
- All-Purpose Flour: 1 cup. Flour provides the gluten structure necessary to hold the pancakes together and give them their classic fluffy rise. The combination of flour and oats creates a perfect textural harmony.
- Baking Powder: 2 teaspoons. This is our primary leavening agent. It reacts with the liquid and heat to create carbon dioxide bubbles, which make the pancakes light and airy. Make sure your baking powder is fresh for the best lift!
- Granulated Sugar: 2 tablespoons. This adds just a touch of sweetness to balance the flavors. You can substitute with brown sugar, coconut sugar, or maple syrup (if using maple syrup, reduce the milk by a tablespoon).
- Ground Cinnamon: 1 teaspoon. This is optional but highly recommended. Cinnamon adds a beautiful warmth that pairs perfectly with the nutty oats. A pinch of nutmeg also works wonderfully.
- Salt: ½ teaspoon. Salt is a flavor enhancer. It doesn’t make the pancakes salty but rather intensifies the sweetness and the nutty oat flavor, making everything taste more vibrant.
- Milk: 1 ¾ cups. You can use any milk you prefer. Whole milk will result in a richer pancake, while low-fat or skim milk also works well. For a dairy-free version, almond, soy, or oat milk are excellent substitutes.
- Large Eggs: 2. Eggs are essential for binding the ingredients together, adding richness and protein, and contributing to the fluffy texture.
- Unsalted Butter: 4 tablespoons (½ stick), melted and slightly cooled. Melted butter adds incredible flavor and moisture, resulting in a tender crumb. You can substitute with an equal amount of neutral oil like canola or melted coconut oil.
- Vanilla Extract: 1 teaspoon. A splash of pure vanilla extract enhances all the other flavors in the batter, adding a delicious aromatic quality.
- Butter or Oil for the Griddle: For cooking.
Step-by-Step Instructions for Fluffy Oatmeal Pancakes
Follow these detailed steps carefully for foolproof, delicious oatmeal pancakes every time. The key is in the technique, especially the soaking of the oats and the gentle mixing of the batter.
Step 1: Prepare the Oats (The Secret to Tenderness)
In a medium-sized mixing bowl, combine the 1 ½ cups of rolled oats and 1 ¾ cups of milk. Stir them together and let the mixture sit for at least 10-15 minutes. This step is non-negotiable for the best texture! It allows the oats to absorb the liquid and soften significantly. This prevents the final pancakes from being tough or overly chewy and is the key to a moist, tender crumb. While the oats are soaking, you can proceed with the next steps.
Step 2: Combine the Dry Ingredients
In a separate, larger mixing bowl, add the 1 cup of all-purpose flour, 2 teaspoons of baking powder, 2 tablespoons of sugar, 1 teaspoon of ground cinnamon, and ½ teaspoon of salt. Use a whisk to combine these ingredients thoroughly. Whisking not only mixes but also aerates the flour, which contributes to a lighter pancake. Ensure the baking powder is evenly distributed so that all your pancakes rise uniformly.
Step 3: Combine the Wet Ingredients
Go back to your bowl of soaked oats and milk. The oats should look plump and the mixture will have thickened slightly. To this bowl, add the 2 large eggs, 4 tablespoons of cooled melted butter, and 1 teaspoon of vanilla extract. Whisk these wet ingredients together until the eggs are well-beaten and everything is uniformly combined. It’s important that your melted butter has cooled slightly so it doesn’t scramble the eggs upon contact.
Step 4: Mix Wet and Dry Ingredients (Gently!)
Pour the entire wet mixture into the bowl of dry ingredients. Using a spatula or wooden spoon, gently fold the ingredients together until they are just combined. It is crucial that you do not overmix the batter. A few small lumps are perfectly fine and are actually desirable. Overmixing develops the gluten in the flour, which will result in tough, rubbery, and dense pancakes instead of light and fluffy ones. Mix only until you no longer see large streaks of dry flour.
Step 5: Rest the Batter
Once mixed, let the final batter rest for 5-10 minutes. This allows the gluten strands that did form to relax, leading to a more tender pancake. It also gives the baking powder more time to activate, creating even more bubbles for a superior rise. The batter will thicken slightly during this rest period, which is completely normal.
Step 6: Cook the Pancakes to Golden Perfection
Heat a non-stick skillet, griddle, or cast-iron pan over medium heat. To test if the pan is ready, flick a few drops of water onto the surface; they should sizzle and dance before evaporating. If they evaporate instantly, the pan is too hot. If they just sit there, it’s not hot enough.
Once the pan is at the right temperature, lightly grease it with butter or a neutral oil. Using a ¼-cup measuring cup or a ladle, pour the batter onto the hot griddle to form pancakes of your desired size. Leave some space between them for easy flipping.
Cook for about 2-3 minutes on the first side. You’ll know it’s time to flip when the edges look set and dry, and you see bubbles forming on the surface and popping. Use a thin, wide spatula to peek underneath. It should be a beautiful golden-brown.
Carefully flip the pancake and cook for another 1-2 minutes on the other side, until it is also golden-brown and cooked through. Transfer the cooked pancakes to a plate and keep them warm in a low-temperature oven (around 200°F or 90°C) while you cook the remaining batter. Repeat the process, adding a little more butter or oil to the pan as needed between batches.
Nutrition Facts (Estimated)
This information is an estimate and can vary based on the specific ingredients used (e.g., type of milk, sugar substitutes).
- Servings: This recipe makes approximately 12-14 medium-sized pancakes, serving 4-5 people.
- Calories Per Serving (3 pancakes): Approximately 420-480 kcal.
A rough breakdown per serving:
- Carbohydrates: 55g
- Protein: 15g
- Fat: 18g
- Fiber: 6g
- Sugar: 12g
These pancakes are a great source of dietary fiber from the oats, which aids in digestion and promotes a feeling of fullness, helping to prevent overeating. They also provide a good amount of protein from the eggs and milk.
Preparation and Cooking Time
- Preparation Time: 20 minutes (includes the 10-15 minute oat soaking and 5-minute batter rest time)
- Cooking Time: 15-20 minutes (depending on the size of your griddle and how many you cook at once)
- Total Time: Approximately 35-40 minutes
How to Serve Your Oatmeal Pancakes: Topping and Pairing Ideas
One of the best things about these oatmeal pancakes is their versatility. Their hearty, nutty flavor is a fantastic canvas for a wide array of toppings, from simple and classic to decadent and creative. Here are some ideas to get you started:
- The Timeless Classic:
- A pat of salted butter melting over the warm stack.
- A generous drizzle of pure maple syrup.
- Fresh and Fruity:
- A handful of fresh berries (blueberries, raspberries, sliced strawberries).
- Sliced bananas and a sprinkle of cinnamon.
- A warm fruit compote or a dollop of apple sauce.
- Sautéed apples with a dash of cinnamon and nutmeg.
- Healthy and Hearty Boost:
- A large dollop of Greek yogurt or skyr for a protein boost and tangy contrast.
- A spoonful of your favorite nut butter (almond, peanut, or cashew).
- A sprinkle of crunchy seeds like chia seeds, flax seeds, or hemp hearts for extra fiber and omega-3s.
- A handful of toasted pecans, walnuts, or sliced almonds for added texture and healthy fats.
- Decadent and Indulgent:
- A sprinkle of mini chocolate chips (you can add these directly to the batter, too!).
- A drizzle of melted chocolate or hazelnut spread.
- A dollop of freshly whipped cream and chocolate shavings.
- A spoonful of lemon curd for a bright, tangy-sweet flavor.
5 Additional Tips for Pancake Perfection
- Try the Blender Method for a Smoother Texture. If you prefer a pancake with a completely uniform, less rustic texture, you can use a blender! Simply add the rolled oats to a high-powered blender and pulse until they form a coarse flour. Then, proceed with the recipe as written, combining your homemade oat flour with the all-purpose flour and other dry ingredients. You can skip the initial oat-soaking step if you use this method.
- Don’t Press Down on the Pancakes! A common mistake is to press down on the pancake with the spatula after flipping it. Resist this urge! Pressing down deflates the pancake, squeezing out all the air bubbles that your baking powder worked so hard to create. This leads to dense, flat pancakes. Let them cook undisturbed after the flip.
- Achieve the Perfect Pan Temperature. The heat of your pan is critical. If it’s too hot, the outside will burn before the inside is cooked. If it’s not hot enough, the pancakes won’t get a good rise and will absorb too much oil, becoming greasy. Medium heat is your friend. Do the water-drop test before the first batch and adjust the heat as you go. You may need to turn it down slightly after the first couple of batches as the pan retains heat.
- Make Ahead for Easy Mornings. These pancakes are fantastic for meal prep. Cook a full batch over the weekend, let them cool completely, and then store them.
- Refrigerating: Stack them with a small piece of parchment paper between each one to prevent sticking. Store in an airtight container or zip-top bag in the refrigerator for up to 3-4 days.
- Freezing: For longer storage, flash-freeze them. Place the cooled pancakes in a single layer on a baking sheet and freeze for about an hour. Once solid, transfer them to a freezer-safe bag. They will last for up to 2 months. Reheat them directly from frozen in a toaster, toaster oven, or microwave until warm.
- Customize Your Batter with Mix-ins. Feel free to get creative by adding mix-ins directly to the batter after it’s been combined. Gently fold in about ½ to ¾ cup of your chosen ingredient. Great options include:
- Fresh or frozen blueberries (don’t thaw if frozen).
- Chocolate chips.
- Finely chopped nuts like walnuts or pecans.
- Shredded coconut.
- Mashed banana (if adding, you may want to reduce the milk by a couple of tablespoons as it adds moisture).
Frequently Asked Questions (FAQ)
Q1: Can I make these oatmeal pancakes gluten-free?
A: Absolutely! To make this recipe gluten-free, make two simple swaps. First, ensure you are using certified gluten-free rolled oats. Oats are naturally gluten-free but are often processed in facilities that also handle wheat, leading to cross-contamination. Second, substitute the all-purpose flour with a good quality 1-to-1 gluten-free baking flour blend (one that contains xanthan gum). Follow the recipe as written, and you’ll have delicious GF oatmeal pancakes.
Q2: How can I make this recipe vegan?
A: This recipe is easily adapted for a vegan diet. Use a plant-based milk like almond, soy, or oat milk (oat milk works particularly well). For the eggs, create two “flax eggs” by mixing 2 tablespoons of ground flaxseed with 6 tablespoons of water. Let the mixture sit for 5-10 minutes to thicken into a gel-like consistency, then add it to the wet ingredients as you would the regular eggs. Finally, use melted coconut oil or another vegan butter substitute instead of dairy butter.
Q3: Why are my oatmeal pancakes dense instead of fluffy?
A: The most common culprit for dense pancakes is overmixing the batter. When you mix flour with liquid, you develop gluten. A little gluten provides structure, but too much makes the final product tough and dense. Mix only until the wet and dry ingredients are just combined—a few lumps are your friend! Another reason could be skipping the batter’s rest time, which helps relax the gluten and activate the baking powder for maximum fluffiness. Lastly, check the freshness of your baking powder. If it’s old, it won’t provide the necessary lift.
Q4: Can I use steel-cut oats or quick-cooking oats?
A: It’s best to stick with rolled (old-fashioned) oats for this recipe’s intended texture.
- Quick-cooking oats can be used as a substitute. Since they are thinner and more processed, they will absorb the liquid faster and create a slightly softer, mushier texture. You can reduce the soaking time to just 5 minutes.
- Steel-cut oats are not recommended for this recipe. They are much harder and will not soften sufficiently with a simple soak, resulting in hard, uncooked bits in your pancakes. They would need to be fully cooked into porridge before being incorporated into a batter.
Q5: How do I know for sure when to flip my pancake?
A: The visual cues are the most reliable indicators. Don’t just rely on a timer, as stove and pan temperatures vary. Look for these three signs:
- Bubbles: Small bubbles will appear on the surface of the pancake. Wait until they start to pop and leave little holes that don’t immediately fill back in with batter.
- Edges: The edges of the pancake will begin to look dry and set, losing their wet sheen.
- The Peek: Use your spatula to gently lift a corner. The underside should be an even, golden-brown color. If you see all three of these signs, you are ready for a perfect flip.
Oatmeal Pancakes Recipe
Ingredients
- Rolled Oats: 1 ½ cups. Also known as old-fashioned oats, these are the star of the show. They provide fiber, a wonderful nutty flavor, and a hearty texture. Do not use steel-cut oats, as they won’t soften enough. Quick oats can work in a pinch, but the texture will be slightly mushier.
- All-Purpose Flour: 1 cup. Flour provides the gluten structure necessary to hold the pancakes together and give them their classic fluffy rise. The combination of flour and oats creates a perfect textural harmony.
- Baking Powder: 2 teaspoons. This is our primary leavening agent. It reacts with the liquid and heat to create carbon dioxide bubbles, which make the pancakes light and airy. Make sure your baking powder is fresh for the best lift!
- Granulated Sugar: 2 tablespoons. This adds just a touch of sweetness to balance the flavors. You can substitute with brown sugar, coconut sugar, or maple syrup (if using maple syrup, reduce the milk by a tablespoon).
- Ground Cinnamon: 1 teaspoon. This is optional but highly recommended. Cinnamon adds a beautiful warmth that pairs perfectly with the nutty oats. A pinch of nutmeg also works wonderfully.
- Salt: ½ teaspoon. Salt is a flavor enhancer. It doesn’t make the pancakes salty but rather intensifies the sweetness and the nutty oat flavor, making everything taste more vibrant.
- Milk: 1 ¾ cups. You can use any milk you prefer. Whole milk will result in a richer pancake, while low-fat or skim milk also works well. For a dairy-free version, almond, soy, or oat milk are excellent substitutes.
- Large Eggs: 2. Eggs are essential for binding the ingredients together, adding richness and protein, and contributing to the fluffy texture.
- Unsalted Butter: 4 tablespoons (½ stick), melted and slightly cooled. Melted butter adds incredible flavor and moisture, resulting in a tender crumb. You can substitute with an equal amount of neutral oil like canola or melted coconut oil.
- Vanilla Extract: 1 teaspoon. A splash of pure vanilla extract enhances all the other flavors in the batter, adding a delicious aromatic quality.
- Butter or Oil for the Griddle: For cooking.
Instructions
Step 1: Prepare the Oats (The Secret to Tenderness)
In a medium-sized mixing bowl, combine the 1 ½ cups of rolled oats and 1 ¾ cups of milk. Stir them together and let the mixture sit for at least 10-15 minutes. This step is non-negotiable for the best texture! It allows the oats to absorb the liquid and soften significantly. This prevents the final pancakes from being tough or overly chewy and is the key to a moist, tender crumb. While the oats are soaking, you can proceed with the next steps.
Step 2: Combine the Dry Ingredients
In a separate, larger mixing bowl, add the 1 cup of all-purpose flour, 2 teaspoons of baking powder, 2 tablespoons of sugar, 1 teaspoon of ground cinnamon, and ½ teaspoon of salt. Use a whisk to combine these ingredients thoroughly. Whisking not only mixes but also aerates the flour, which contributes to a lighter pancake. Ensure the baking powder is evenly distributed so that all your pancakes rise uniformly.
Step 3: Combine the Wet Ingredients
Go back to your bowl of soaked oats and milk. The oats should look plump and the mixture will have thickened slightly. To this bowl, add the 2 large eggs, 4 tablespoons of cooled melted butter, and 1 teaspoon of vanilla extract. Whisk these wet ingredients together until the eggs are well-beaten and everything is uniformly combined. It’s important that your melted butter has cooled slightly so it doesn’t scramble the eggs upon contact.
Step 4: Mix Wet and Dry Ingredients (Gently!)
Pour the entire wet mixture into the bowl of dry ingredients. Using a spatula or wooden spoon, gently fold the ingredients together until they are just combined. It is crucial that you do not overmix the batter. A few small lumps are perfectly fine and are actually desirable. Overmixing develops the gluten in the flour, which will result in tough, rubbery, and dense pancakes instead of light and fluffy ones. Mix only until you no longer see large streaks of dry flour.
Step 5: Rest the Batter
Once mixed, let the final batter rest for 5-10 minutes. This allows the gluten strands that did form to relax, leading to a more tender pancake. It also gives the baking powder more time to activate, creating even more bubbles for a superior rise. The batter will thicken slightly during this rest period, which is completely normal.
Step 6: Cook the Pancakes to Golden Perfection
Heat a non-stick skillet, griddle, or cast-iron pan over medium heat. To test if the pan is ready, flick a few drops of water onto the surface; they should sizzle and dance before evaporating. If they evaporate instantly, the pan is too hot. If they just sit there, it’s not hot enough.
Once the pan is at the right temperature, lightly grease it with butter or a neutral oil. Using a ¼-cup measuring cup or a ladle, pour the batter onto the hot griddle to form pancakes of your desired size. Leave some space between them for easy flipping.
Cook for about 2-3 minutes on the first side. You’ll know it’s time to flip when the edges look set and dry, and you see bubbles forming on the surface and popping. Use a thin, wide spatula to peek underneath. It should be a beautiful golden-brown.
Carefully flip the pancake and cook for another 1-2 minutes on the other side, until it is also golden-brown and cooked through. Transfer the cooked pancakes to a plate and keep them warm in a low-temperature oven (around 200°F or 90°C) while you cook the remaining batter. Repeat the process, adding a little more butter or oil to the pan as needed between batches.
Nutrition
- Serving Size: One Normal Portion
- Calories: 420-480 kcal
- Sugar: 12g
- Fat: 18g
- Carbohydrates: 55g
- Fiber: 6g
- Protein: 15g


