
In my house, the time between 3:00 PM and dinner is affectionately known as “The Snackpocalypse.” It’s that chaotic period when school bags are dropped, energy levels are at an all-time low, and the chorus of “I’m hungry!” echoes through the kitchen. For years, I struggled to find a snack that was quick, healthy, and satisfying enough to bridge the gap without spoiling dinner. I needed something that didn’t require turning on the oven, could be made in a big batch, and would be genuinely enjoyed by both my kids and my husband (and, let’s be honest, myself). That’s when I perfected my recipe for these incredible No-Bake Granola Balls. They became an instant game-changer. The first time I made them, I watched as my kids’ eyes lit up. They thought they were getting a dessert-like treat, packed with peanut butter and chocolate chips. Little did they know, I had packed them full of wholesome oats, protein-rich flaxseed, and natural sweeteners. They are now our go-to solution for busy mornings, after-school fuel, pre-soccer practice energy boosts, and even a healthy late-night bite. They are infinitely customizable, ridiculously easy to make, and have single-handedly ended the daily snack-time scramble. This recipe isn’t just about food; it’s about providing simple, wholesome, and delicious fuel for my family’s busiest days.
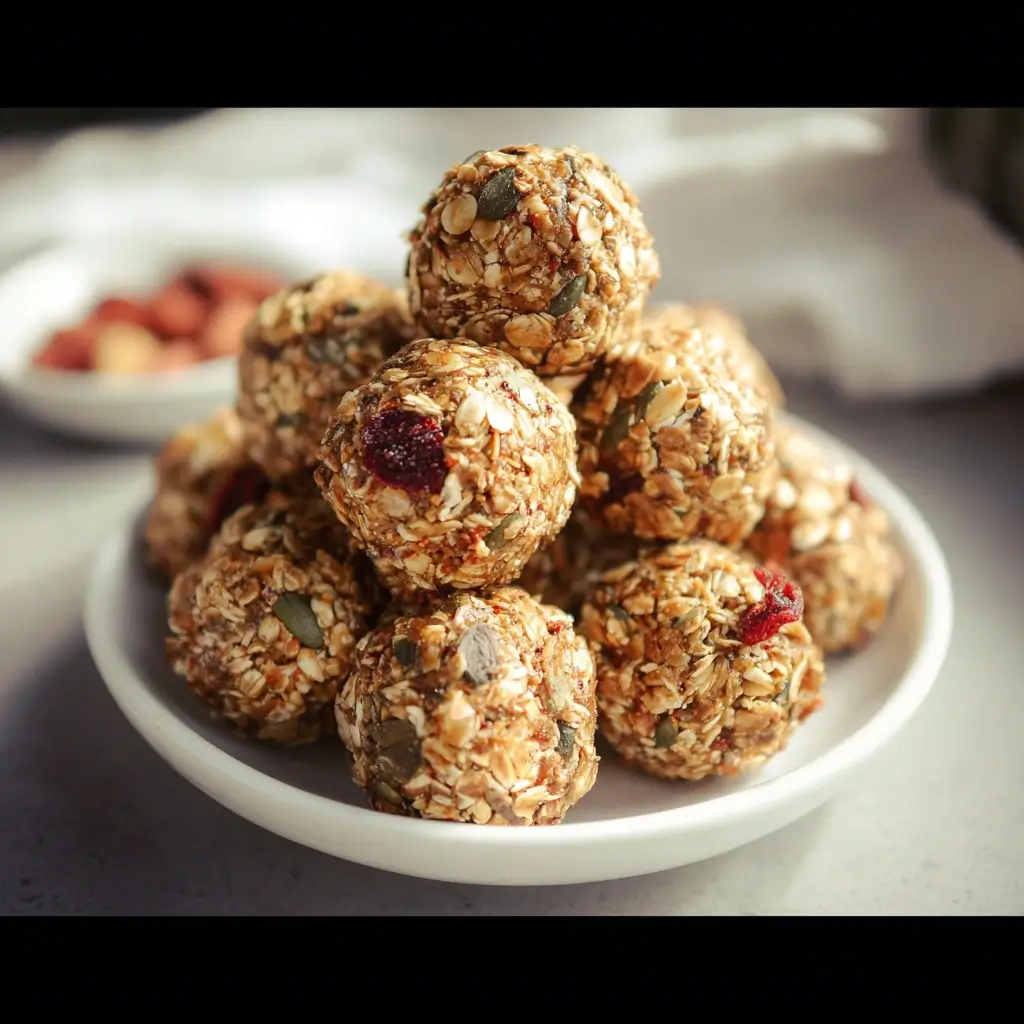
The Ultimate No-Bake Granola Balls Recipe
This recipe is the foundational blueprint for the most delicious and easy-to-make granola balls you’ll ever try. It strikes the perfect balance between sweet, savory, and satisfyingly chewy. We’ll explore countless variations later, but mastering this classic version first will show you just how simple and rewarding homemade snacks can be.
Ingredients
- Rolled Oats: 2 cups (200g) – Use old-fashioned rolled oats for the best chewy texture. Avoid steel-cut oats, as they won’t soften, and instant oats, which can become mushy.
- Creamy Peanut Butter: 1 cup (250g) – Use a standard creamy peanut butter like Jif or Skippy for the best binding consistency. Natural peanut butters that require stirring can sometimes be too oily or dry.
- Honey: 1/2 cup (170g) – Acts as both a sweetener and a crucial binder. For a vegan alternative, you can substitute with an equal amount of maple syrup or agave nectar.
- Ground Flaxseed: 1/2 cup (70g) – This adds a fantastic boost of fiber, omega-3 fatty acids, and helps hold the balls together.
- Mini Chocolate Chips: 1/2 cup (90g) – Mini chips distribute more evenly throughout the balls, ensuring you get a little bit of chocolate in every bite. Semi-sweet, milk, or dark chocolate all work well.
- Vanilla Extract: 1 teaspoon – Elevates all the other flavors, adding a warm, dessert-like quality.
- Pinch of Salt: 1/4 teaspoon (optional) – If your peanut butter is unsalted, a small pinch of salt can enhance the sweetness and overall flavor profile.
A Deeper Dive into the Core Ingredients
Understanding why we use these specific ingredients will empower you to become a true granola ball artist, capable of customizing and troubleshooting your creations.
The Foundation: Why Rolled Oats are King
The star of any granola ball is, of course, the oats. For this no-bake recipe, old-fashioned rolled oats are non-negotiable. During processing, whole oat groats are steamed and then rolled flat. This pre-cooking process means they are soft enough to eat raw without being tough, and they absorb the wet ingredients perfectly to create that signature chewy, satisfying texture. Quick oats are rolled even thinner and cut into smaller pieces, which causes them to break down too much, resulting in a pasty or mushy texture. Steel-cut oats are simply chopped groats that haven’t been rolled; they are far too hard and gritty for a no-bake recipe and require cooking. By sticking with rolled oats, you guarantee the perfect structural integrity and chew for your no-bake granola balls.
The Binder: Choosing Your Nut Butter
Peanut butter is the glue that holds these delicious bites together. Its high fat and protein content create a thick, malleable “dough” when mixed with the other ingredients. For the most reliable results, a conventional, stabilized creamy peanut butter is your best friend. These types have emulsifiers that prevent the oil from separating, ensuring a consistent texture every time.
What if you use natural peanut butter? You absolutely can! Just be sure to stir it extremely well to fully reincorporate the separated oil. If the mixture seems too oily, you may need to add a few more tablespoons of oats. If it seems too dry and crumbly, you may need a little extra honey or another tablespoon of the natural peanut butter. Don’t be afraid to experiment with other nut butters! Almond butter provides a slightly less sweet, more earthy flavor, while cashew butter is incredibly creamy and mild. For a nut-free version, sunflower seed butter is a fantastic, allergy-friendly alternative.
The Sweetener: Honey, Maple Syrup, and Beyond
Sweetness is key, but in this recipe, the sweetener also plays a vital role as a sticky binder. Honey is a classic choice. Its thick viscosity is perfect for holding the oats and mix-ins together. Its floral notes pair beautifully with peanut butter and oats. For a vegan-friendly option, maple syrup is an excellent substitute. It provides a slightly different, warmer flavor and is a bit thinner than honey, so you may find you need to let the mixture chill for a few extra minutes to firm up before rolling. Agave nectar also works well and has a neutral flavor profile.
Step-by-Step Instructions for Perfect Granola Balls
Making these no-bake energy bites is a wonderfully simple, almost therapeutic process. It’s a great recipe to get kids involved in the kitchen, as there’s no heat and plenty of mixing and rolling to be done.
- Prepare Your Workstation: Grab a large mixing bowl. There’s nothing worse than starting a recipe and realizing your bowl is too small and ingredients are flying everywhere. Ensure all your ingredients are measured out and ready to go. This French culinary concept, mise en place (everything in its place), makes the process smooth and enjoyable.
- Combine the Wet Ingredients: In your large bowl, combine the peanut butter, honey (or maple syrup), and vanilla extract. Use a sturdy spatula or wooden spoon to stir them together until the mixture is smooth, creamy, and uniform in color. This step is crucial because it creates the base that will evenly coat all the dry ingredients.
- Incorporate the Dry Ingredients: Add the rolled oats, ground flaxseed, and the optional pinch of salt to the wet mixture. Begin to fold the dry ingredients into the wet. The mixture will become very thick and stiff. This is normal! Keep stirring until every oat is coated and there are no dry pockets left. It requires a bit of arm strength, but it’s worth it.
- Fold in the Fun: Gently fold in the mini chocolate chips. You want to distribute them evenly throughout the mixture without overmixing at this stage.
- The Crucial Chill: This is the most important secret to frustration-free rolling! Cover the bowl with plastic wrap or a lid and place it in the refrigerator for at least 30 minutes. Chilling the mixture does two things: it allows the oats to absorb some of the moisture, and it solidifies the peanut butter and honey slightly. This makes the “dough” much less sticky and far easier to handle and roll into perfect spheres.
- Roll ‘Em Up: Once chilled, remove the bowl from the fridge. Use a small cookie scoop (about 1 tablespoon in size) to portion out the mixture. This ensures all your granola balls are uniform in size, which is great for consistent nutrition and appearance. Roll each portion firmly between the palms of your hands to form a tight, compact ball. If the mixture starts to stick to your hands, you can lightly dampen your palms with a little water.
- Store for Later: Place the finished granola balls in a single layer in an airtight container. You can separate layers with a sheet of parchment paper to prevent them from sticking together. Store them in the refrigerator for optimal freshness and texture.
No-Bake Granola Balls: Nutrition Facts
While these taste like a treat, they are packed with beneficial nutrients that make them a smart snack choice.
- Servings: This recipe makes approximately 24-28 one-inch balls.
- Calories Per Serving: Approximately 120-140 calories per ball.
Disclaimer: The nutritional information provided is an estimate and will vary based on the specific brands of ingredients used, the size of your granola balls, and any substitutions you make.
These bites offer a balanced macronutrient profile. The carbohydrates from the oats and honey provide a quick and sustained source of energy, making them perfect for a pre-workout snack or a midday pick-me-up. The protein and healthy fats from the peanut butter and flaxseed promote satiety, helping to keep you feeling full and satisfied for longer. Finally, the fiber from the oats and flaxseed is excellent for digestive health and helps to regulate blood sugar levels, preventing the dreaded sugar crash associated with many other sweet snacks.
Quick and Easy: Preparation & Chill Time
One of the best features of this recipe is how incredibly fast it is to throw together.
- Preparation Time: 10-15 minutes
- Chill Time: 30 minutes
- Total Time: 40-45 minutes
The hands-on time is minimal, with the majority of the time being the passive chilling period. This makes it a perfect recipe for meal prep Sundays. You can whip up a double batch in under 30 minutes and have healthy snacks ready for the entire week.
Creative Ways to Serve and Enjoy Your Granola Balls
These versatile little spheres can be enjoyed in so many different ways. Here are a few of our family’s favorite methods:
- The On-the-Go Breakfast: For those mornings when there’s no time for a sit-down meal, grabbing two or three of these granola balls alongside a piece of fruit is a lifesaver. It’s a balanced, portable breakfast that gets you out the door quickly.
- The Perfect Pre-Workout Fuel: Consume one or two balls about 30-45 minutes before a workout. The simple carbs from the honey provide immediate energy, while the complex carbs from the oats offer sustained fuel to power you through your entire session.
- The After-School Hero: Keep a container ready in the fridge for when the kids get home from school. It’s a wholesome, parent-approved snack that feels like a treat to them. It provides the energy they need for homework or afternoon play.
- The Lunchbox Addition: Tuck a couple of granola balls into your kids’ (or your own) lunchbox. They are a much healthier alternative to pre-packaged, processed snacks and provide that perfect little sweet bite to end a meal.
- A Healthy Dessert Transformation: Crumble a granola ball over a bowl of Greek yogurt with some fresh berries for a delicious and nutritious dessert parfait. You can also crumble them over a small scoop of vanilla frozen yogurt or ice cream for a healthier take on a sundae topping.
- The Snack Platter Star: Arrange them on a platter with cheese cubes, apple slices, and grapes for a sophisticated yet simple snack board when you have guests over. They are always a crowd-pleaser!
5 Pro Tips for No-Bake Granola Ball Perfection
After making hundreds of these balls, I’ve learned a few tricks that guarantee a perfect result every single time.
- Master Your Texture Control: The consistency of your mixture is everything. If it feels too dry and crumbly after mixing, it’s likely your nut butter was on the drier side. Add another tablespoon of peanut butter or honey and mix again. If the mixture feels too wet or oily, add another ¼ cup of rolled oats or a tablespoon of ground flaxseed to help absorb the excess moisture. The ideal texture is thick and holds together easily when pressed, but isn’t overly sticky.
- Don’t Skip the Chill!: I cannot stress this enough. Chilling the mixture before rolling is the secret to a clean, non-sticky experience. It allows the fats in the peanut butter to solidify and the oats to soften just enough. If you’re in a real hurry, you can pop the bowl in the freezer for 10-15 minutes, but the 30-minute fridge chill yields the best results.
- Customization is Key: The Art of the Add-In: This base recipe is your canvas. Get creative! Here are some amazing variations to try:
- Nut-Free: Swap the peanut butter for sunflower seed butter or tahini. Ensure your chocolate chips are nut-free as well.
- Gluten-Free: Simply use certified gluten-free rolled oats. All other ingredients are naturally gluten-free.
- Cranberry White Chocolate: Replace the mini chocolate chips with ½ cup of dried cranberries and ½ cup of white chocolate chips.
- Coconut Cream: Add ¼ cup of unsweetened shredded coconut and use coconut oil-based peanut butter for a tropical twist.
- Spiced Up: Add ½ teaspoon of ground cinnamon and a pinch of nutmeg to the dry ingredients for a warm, cozy flavor profile that’s perfect for autumn.
- Protein Power: Add a scoop of your favorite vanilla or chocolate protein powder. You may need to add an extra tablespoon or two of honey or peanut butter to compensate for the added dry ingredient.
- Smart Storage for Lasting Freshness: Your no-bake granola balls should always be stored in an airtight container in the refrigerator. They will stay fresh and hold their shape perfectly for up to two weeks. For longer storage, they freeze beautifully. Place them in a single layer on a baking sheet and freeze until solid, then transfer them to a freezer-safe bag or container. They will last for up to 3 months in the freezer. You can eat them straight from the freezer for a firmer, chewier treat, or let them thaw for a few minutes at room temperature.
- The Magic of the Cookie Scoop: For perfectly uniform, professional-looking granola balls, a small cookie scoop is your best tool. It portions the dough quickly and consistently, meaning all your balls will be the same size. This isn’t just for aesthetics; it helps with portion control and ensures that the nutritional information per ball is accurate. It also makes the rolling process much faster and less messy.
Frequently Asked Questions About Homemade Granola Balls
Here are answers to some of the most common questions people have when making no-bake granola balls for the first time.
1. My mixture is too dry and crumbly. What went wrong and how can I fix it?
This is the most common issue and it’s usually an easy fix! It typically happens for one of two reasons: either your measurements of the dry ingredients were slightly off (e.g., you packed the oats too tightly in the measuring cup), or your brand of peanut butter is naturally thicker and less oily.
The Fix: Don’t panic! Simply add more of your “wet” binders. Start by adding one more tablespoon of peanut butter and one tablespoon of honey. Mix thoroughly. The mixture should start coming together. If it’s still too crumbly, add another tablespoon of one or the other until it reaches a consistency that sticks together when you squeeze it in your hand.
2. Can I make these granola balls gluten-free?
Absolutely! Making this recipe gluten-free is incredibly simple. Oats are naturally gluten-free, but they are often processed in facilities that also handle wheat, barley, and rye, leading to cross-contamination. To ensure your granola balls are 100% gluten-free, all you need to do is purchase certified gluten-free rolled oats. These are widely available in most supermarkets, usually in the health food aisle. All the other standard ingredients in this recipe are naturally free of gluten.
3. How can I make a nut-free version for school lunches?
Creating a delicious and safe nut-free version is easy. The key is to swap out the peanut butter for a seed-based butter. Sunflower seed butter (SunButter) is the most popular and accessible choice. It has a similar consistency and a pleasant, roasted flavor that works wonderfully in this recipe. Another great option is tahini (ground sesame seed paste), which will give the balls a more savory, nutty-but-not-a-nut flavor. Just be sure to also check that your chocolate chips were produced in a nut-free facility if the allergy is severe.
4. I want to add protein powder. How much should I use?
Adding protein powder is a fantastic way to boost the nutritional profile of these snacks, especially for post-workout recovery. A good starting point is to add one scoop (typically 25-30g) of your favorite protein powder along with the other dry ingredients. Because you’re adding a significant amount of dry powder, you will almost certainly need to increase the wet ingredients to compensate. Plan on adding 1-2 extra tablespoons of both peanut butter and honey to ensure the mixture binds properly. Vanilla or chocolate flavored powders work best to complement the existing flavors.
5. How long do these no-bake granola balls last and do they have to be refrigerated?
For optimal taste, texture, and food safety, yes, they should be refrigerated. Stored in an airtight container in the fridge, your no-bake granola balls will stay fresh and delicious for up to 2 weeks. Keeping them chilled helps them maintain their firm, round shape. If left at room temperature for an extended period, they will become soft and may start to fall apart. For long-term storage, the freezer is your best bet. They will last for up to 3 months in a freezer-safe container.
Print
No-Bake Granola Balls Recipe
Ingredients
- Rolled Oats: 2 cups (200g) – Use old-fashioned rolled oats for the best chewy texture. Avoid steel-cut oats, as they won’t soften, and instant oats, which can become mushy.
- Creamy Peanut Butter: 1 cup (250g) – Use a standard creamy peanut butter like Jif or Skippy for the best binding consistency. Natural peanut butters that require stirring can sometimes be too oily or dry.
- Honey: 1/2 cup (170g) – Acts as both a sweetener and a crucial binder. For a vegan alternative, you can substitute with an equal amount of maple syrup or agave nectar.
- Ground Flaxseed: 1/2 cup (70g) – This adds a fantastic boost of fiber, omega-3 fatty acids, and helps hold the balls together.
- Mini Chocolate Chips: 1/2 cup (90g) – Mini chips distribute more evenly throughout the balls, ensuring you get a little bit of chocolate in every bite. Semi-sweet, milk, or dark chocolate all work well.
- Vanilla Extract: 1 teaspoon – Elevates all the other flavors, adding a warm, dessert-like quality.
- Pinch of Salt: 1/4 teaspoon (optional) – If your peanut butter is unsalted, a small pinch of salt can enhance the sweetness and overall flavor profile.
Instructions
- Prepare Your Workstation: Grab a large mixing bowl. There’s nothing worse than starting a recipe and realizing your bowl is too small and ingredients are flying everywhere. Ensure all your ingredients are measured out and ready to go. This French culinary concept, mise en place (everything in its place), makes the process smooth and enjoyable.
- Combine the Wet Ingredients: In your large bowl, combine the peanut butter, honey (or maple syrup), and vanilla extract. Use a sturdy spatula or wooden spoon to stir them together until the mixture is smooth, creamy, and uniform in color. This step is crucial because it creates the base that will evenly coat all the dry ingredients.
- Incorporate the Dry Ingredients: Add the rolled oats, ground flaxseed, and the optional pinch of salt to the wet mixture. Begin to fold the dry ingredients into the wet. The mixture will become very thick and stiff. This is normal! Keep stirring until every oat is coated and there are no dry pockets left. It requires a bit of arm strength, but it’s worth it.
- Fold in the Fun: Gently fold in the mini chocolate chips. You want to distribute them evenly throughout the mixture without overmixing at this stage.
- The Crucial Chill: This is the most important secret to frustration-free rolling! Cover the bowl with plastic wrap or a lid and place it in the refrigerator for at least 30 minutes. Chilling the mixture does two things: it allows the oats to absorb some of the moisture, and it solidifies the peanut butter and honey slightly. This makes the “dough” much less sticky and far easier to handle and roll into perfect spheres.
- Roll ‘Em Up: Once chilled, remove the bowl from the fridge. Use a small cookie scoop (about 1 tablespoon in size) to portion out the mixture. This ensures all your granola balls are uniform in size, which is great for consistent nutrition and appearance. Roll each portion firmly between the palms of your hands to form a tight, compact ball. If the mixture starts to stick to your hands, you can lightly dampen your palms with a little water.
- Store for Later: Place the finished granola balls in a single layer in an airtight container. You can separate layers with a sheet of parchment paper to prevent them from sticking together. Store them in the refrigerator for optimal freshness and texture.
Nutrition
- Serving Size: One Normal Portion
- Calories: 120-140